Announcement Bar Plugin
Installing the Plugin
To install the plugin, you can use the standard plugin upload function provided by WordPress by following these steps:
- First, you will need to download the plugin files from the member area on the Themify site.
- Note: Some browsers (e.g. Safari) may auto-extract ZIP files. Right-clicking on the download link and selecting "Save Linked File As" will allow you to download the ZIP version.
- Once you have the ZIP file correctly saved, login to your site's admin dashboard and go to Plugins.
- On this screen, you will want to select the "Add New" button, which will then take you to the plugin installation page.
- On this page, you will need to select the "Upload" tab.
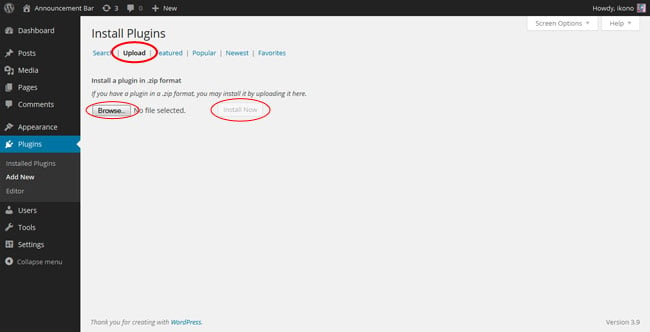
- Now, select the "Browse" button and use the file window to navigate to where you saved the plugin ZIP file and select it.
- Following this, select the "Install Now" button.
Activating the Plugin
Once the plugin is installed, you will then need to activate it before you have access to the features of the plugin.
To do this, please follow these steps:
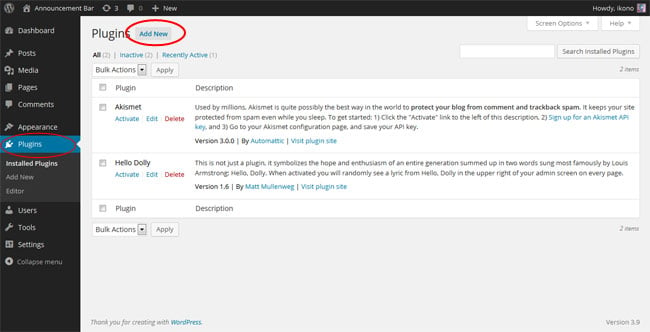
- First, go back to the main Plugins page.
- Here you should see the Announcement Bar plugin in the list of installed plugins.
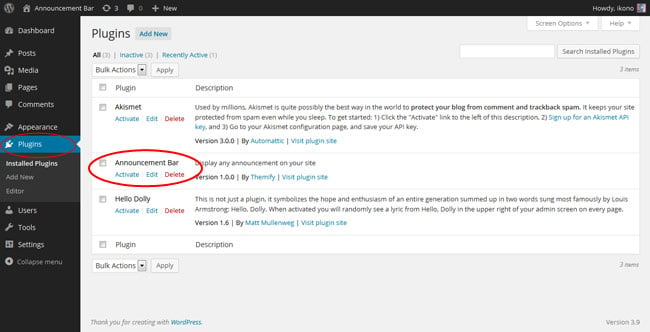
- Select "Activate" underneath the plugin's name.
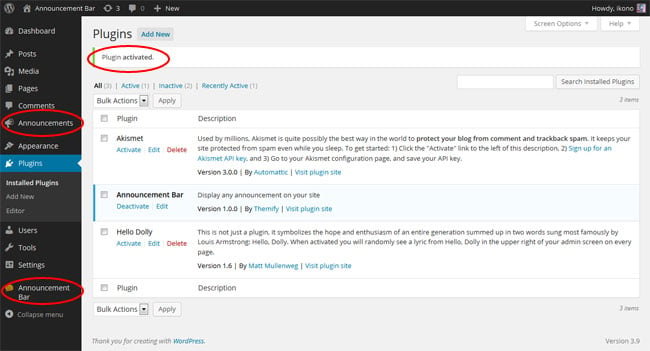
- The plugin will now activate and you should see a message stating the successful activation, along with the new menu options for the Announcement Bar plugin in your dashboard.
Announcement Posts
The heart of the Announcement Bar plugin's backend functionality is built around a new custom post type named "Announcement Posts," and these posts are used by the plugin to create the output that will be seen by your users in the announcement bar itself.
Announcement posts can be given a title, content, and categorized, as with any other post type within WordPress, and the plugin also offers a wide range of options to customize the appearance of each individual announcement post.
Creating an Announcement Post
To create an announcement post, please follow these steps:
- First, navigate to the Announcements section of your WordPress dashboard and then select "Add New"
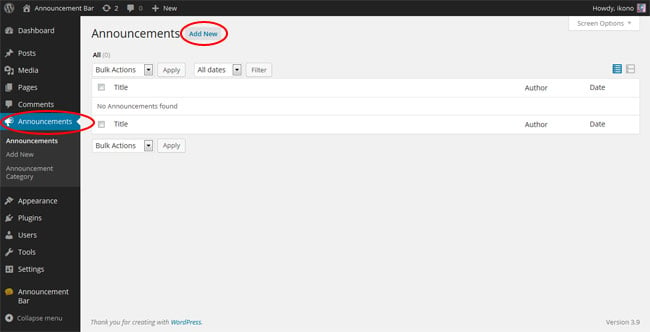
- Once this is done, you will be presented with the new post page, and here you can give the announcement post a title and content as required.
- When you are done creating the content of the post, you can hit "Publish" and the announcement post will be published on the site, and depending on your settings the announcement bar will then be shown on the page.
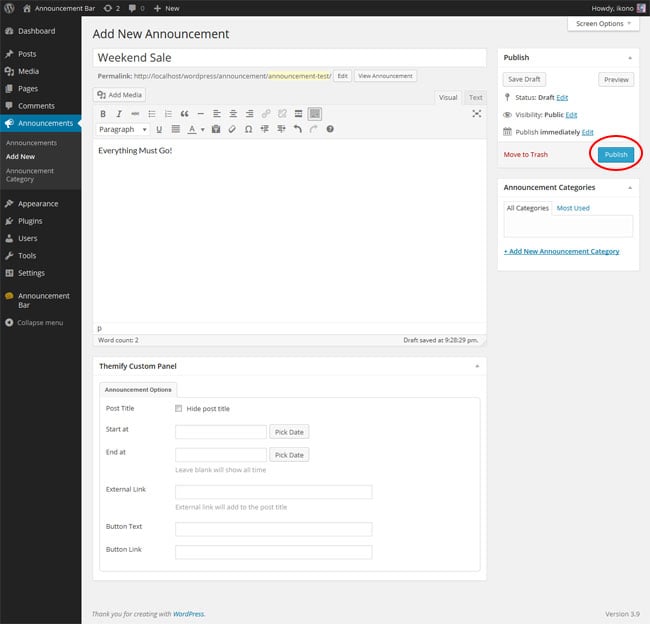
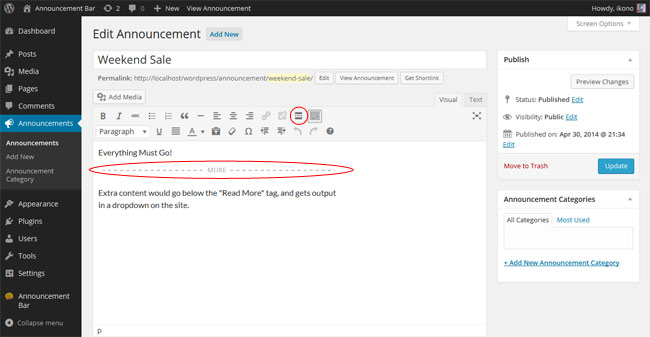
You can also make use of the "Read More" tag in your announcement posts to create a "read more" link within the announcement bar, this will then allow you to add extra content which will be shown in a dropdown when this link is clicked, and allows support for content created with the Themify Builder.

Customizing an Announcement Post
The Announcement Bar plugin offers a number of options for announcement posts which allow you to customise how those posts will be displayed in the announcement bar.
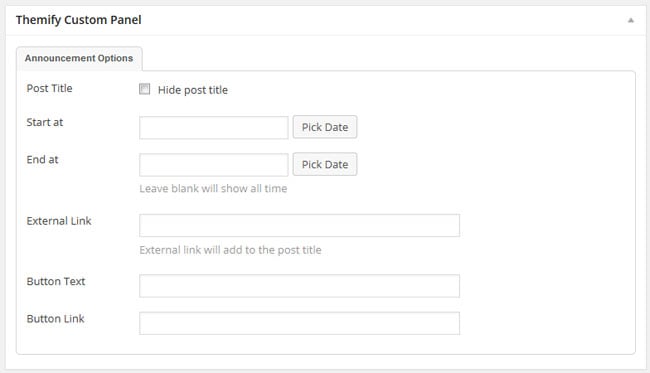
Options are as follows:
- Post Title = This options allows you to set whether the post title will be displayed in the announcement bar or not.
- Start at = This option sets a date/time when the announcement post will begin being displayed in the announcement bar on the site.
- End at = This option sets a date/time for the announcement post to stop being displayed in the announcement bar.
- External Link = This option can be used to set a link for the title of the announcement post to point to.
- Button Text = This option sets the text for a call to action button which will be displayed along with the announcement post in the announcement bar.
- Button Link = This options sets the link to be used for the call to action button.
Announcement Bar Settings
The announcement bar forms the core of what the user will see on the frontend when using the Announcement Bar plugin, it is set up to allow you to display any of the announcement posts you have created and customize how they are displayed, which posts are displayed, etc.
The announcement bar itself can also then be customized to cater its appearance and behaviour to your needs.
Displaying the Announcement Bar
The announcement bar is automatically displayed on the site whenever there are active announcement posts published, unless it is disabled from the Announcement Bar options panel.
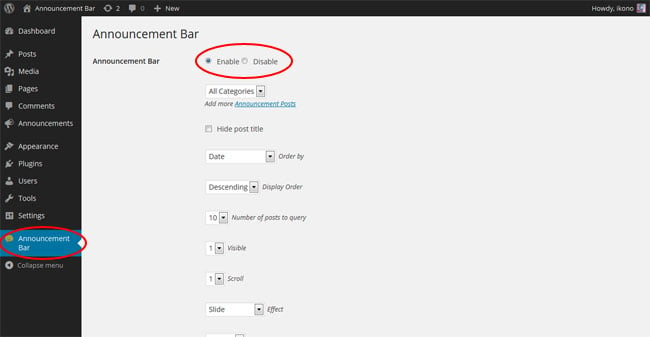
To switch the announcement bar between being enabled or disabled, please follow these steps:
- Firstly, navigate to the Announcement Bar section in the WordPress admin dashboard.
- The Announcement Bar Enable/Disable toggle option here will determine whether or not the announcement bar is displayed on your site.
Customizing the Announcement Bar
To customize the display of the announcement bar please follow these steps:
- Navigate to the Announcement Bar section in the WordPress admin dashboard.
- Here you will find a number of options to customize your announcement bar in terms of both appearance and behaviour.
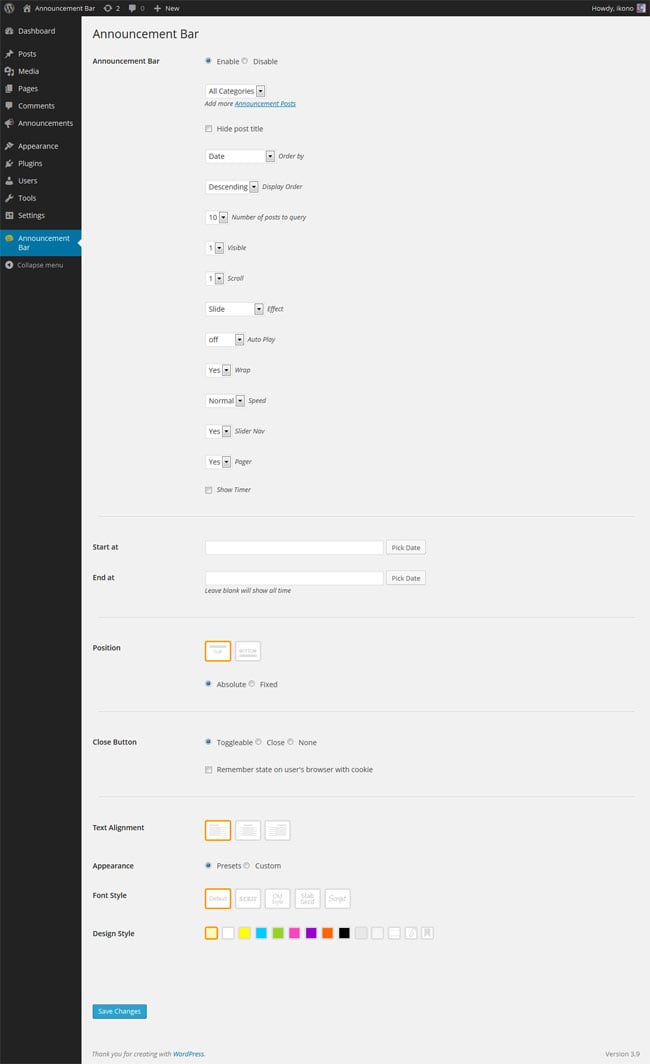
Options are as follows:
- Enable/Disable = Allows you to toggle whether the announcement bar is shown by default on the site when announcement posts are present.
- Category = This sets the category of announcement posts that the announcement will display by default.
- Hide post title = This sets whether the titles for announcement posts are shown by default or not.
- Order by = This option is used to set what data the announcement posts are ordered by (e.g. date, title, random, etc.)
- Display Order = This sets the ordering for the announcement posts between ascending or descending order.
- Number of posts to query = This sets the maximum number of announcement posts to be displayed in the announcement bar by default.
- Visible = This option sets the number of announcement posts that will be displayed at once in the announcement bar.
- Scroll = This sets how many announcement posts will be scrolled through when the announcement bar switches which posts are displayed.
- Effect = This sets the effect used when scrolling to new announcement posts in the announcement bar.
- Speed = This option will set the speed at which the scrolling takes place in the announcement bar.
- Slider Nav = This sets whether navigation arrows will be displayed for the announcement bar.
- Pager = This sets whether dots will be shown for the pages of the announcement bar.
- Show Timer = This option enables the timer display on the announcement bar, which indicates visually when the announcement bar will scroll to new posts.
- Start at = This option sets a date/time when the announcement post will begin being displayed in the announcement bar on the site.
- End at = This option sets a date/time for the announcement post to stop being displayed in the announcement bar.
- Position = Position of the Announcement Bar. Select whether top or bottom.
- Absolute = The bar will scroll along the page.
- Fixed = The bar will be fixed/sticky (always on top of the page).
- Close Button = Close button of the Announcement Bar.
- Toggleable = Bar can toggle (collapse/expand)
- Close = Close the completely.
- None = No close button.
- Text Alignment = Text alignment of the announcement posts (left, center, or right alignment).
- Appearance = Appearance of the Announcement Bar
- Presets = Builtin design presets
- Custom = Allows you to customize the font, color, and background (refer to Custom Styling for more details)
- Font Style = Choose either: Default, Serif, Old Style, Slab Serif, or Script.
- Design Style = Choose either: Default, White, Yellow, Blue, Green, Orange, Pink, Purple, Black, Gray, Paper, Notes, Paper Clip, or Bookmark
Setting Announcement Bars for Specific Pages/Posts
You can also customize the announcement bar based on individual page or post, changing how they appear and behave, which announcements they show, etc. for each page or post on your site.
To do this, follow these steps:
- Navigate to the edit screen for the post or page you intend to set up a custom announcement bar for in the WordPress dashboard, for example under Posts or Pages
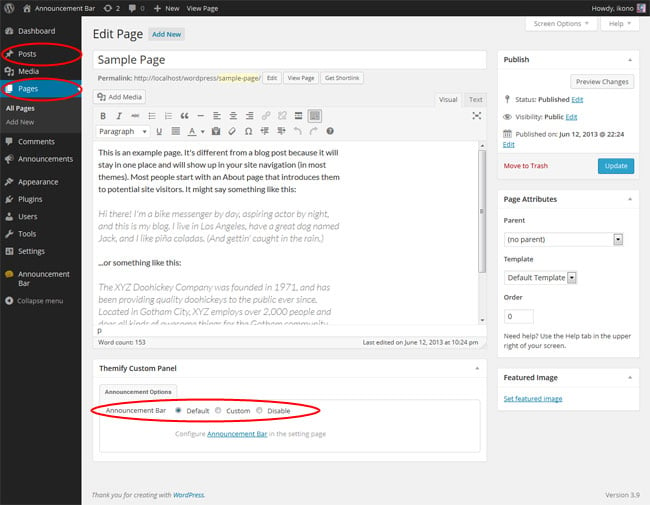
- Here you can find the Themify Custom Panel which will include an "Announcement Options" tab that allows you to switch between using the default announcement bar, which will use the global options set under the Announcement Bar section, a custom announcement bar with options set specifically for this post/page, or disable it on this post/page entirely.
- If you opt to use a custom announcement bar on a post/page, it will allow you to modify the same settings as available in the Announcement Bar section of the WordPress admin dashboard.
Announcement Widget
The Announcement Bar plugin also comes with a widget, which you can use to display announcement posts in other areas, such as your sidebar, or other widgitized areas.
To add the Announcement Bar widget:
- Go to wp-admin > Appearance > Widgets
- Drop the Announcement Bar widget to any widgetized area as you like
Announcement Shortcode
The Announcement Bar plugin includes a shortcode, which can be used within posts/pages to output announcement posts by simply including the shortcode as needed.
To insert the shortcode, simply type or paste in the shortcode from below to your post/page content. It will show the Announcement Bar with the default settings.
[announcement_bar]
The settings can be changed by adding parameters. The example below will show 3 announcement posts without the title from "promotions" category.
[announcement_bar category="promotions" limit="3" title="no"]
You can more parameters as needed like below:
[announcement_bar category="promotions" limit="6" auto="3" title="no" visible="2" scroll="2" pager="no" speed="fast"]
Add the class parameter to specify the pre-designed styles:
[announcement_bar class="bookmark"]
The following are the pre-designed styles: white, yellow, blue, green, orange, pink, purple, black, gray, paper, notes, paper-clip, and bookmark
Below are the available parameters:
- category = default all categories
- limit = default 5
- title = show post title (no, yes, default = no)
- order = (ASC, DESC, default = DESC)
- orderby = (author, comment_count, date, menu_order, rand, title, default = date)
- start = start date and time (YYYY-MM-DDThh:mm)
- end = end date and time (YYYY-MM-DDThh:mm)
- post_type = (announcement, post, default = announcement)
- class = custom css class added to the main wrapper
- the class parameter is also used for the pre-designed styles (eg. class="bookmark")
- the following are the pre-designed styles: white, yellow, blue, green, orange, pink, purple, black, gray, paper, notes, paper-clip, and bookmark
- text alignment styles: textleft, textright, textcenter
- slider parameters:
- visible = number of post visible at the same time (default = 1)
- scroll = number of item to scroll (default = 1)
- effect = slider transition effect (slide, fade, continuously, default = slide)
- auto = auto play slider in number of seconds (default = 0 means off)
- wrap = wrap the slider posts so it will loop back to the first item (yes, no, default = yes)
- speed = animation speed (normal, slow, fast, default = normal)
- slider_nav = show slider navigation (yes, no, default = yes)
- pager = displays pagination below thumbnails (yes, no, default = yes)
Custom Styling
The Annoucement Bar plugin allows you to customize the styling of the announcement bar display both globally and on a per-page/post basis by offering custom styling options.
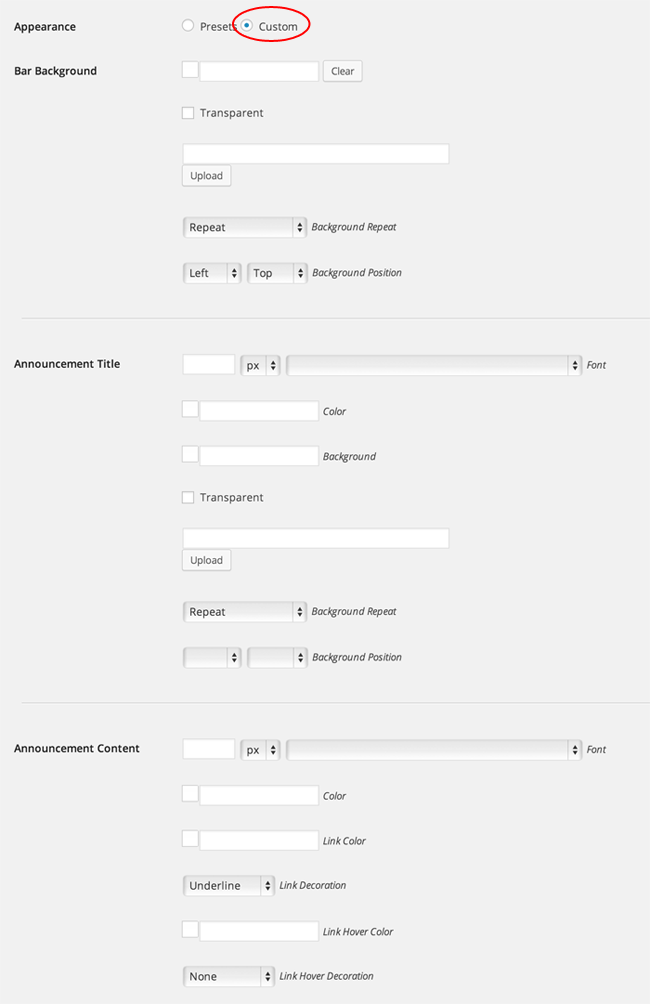
To apply custom styling: click on "Custom" radio button from the Appearance option. Then you will be able the background, font, color, etc. of the Announcement Bar.
- Bar Background = Background of the Announcement Bar.
- Announcement Title = The announcement post title on the bar.
- Announcement Content = Refers to text/content of the announcement posts.
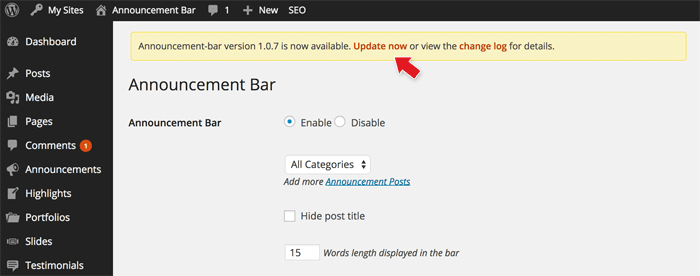
Updating the Plugin
To update the plugin:
- Go to the Announcement Bar settings page
- If there is a newer version, it will display the update notice at the top. To update, click on "Update now" (note that an active membership is required to update the plugin)
Customize the display of announcements
Sometimes you want better control over on which pages of the website the announcements are displayed, more control that the plugin already provides. For example display announcements in posts with specific categories, or to users with specific user roles, perhaps during special hours in the day. For this you can use the hooks provided by the plugin and control where the announcement shows up:
<?php

function custom_announcement_bar_display() {
	if( is_single() && in_category( 'news' ) ) {
		add_filter( 'announcement_bar_cache_enabled', "__return_false" );
		add_filter( 'announcement_bar_display', "__abar_return_enable" );
	}
}
add_action( 'template_redirect', 'custom_announcement_bar_display' );
The above snippet uses Conditional Tags (codex: http://codex.wordpress.org/Conditional_Tags) to check if we're on a single post page where the post is assigned to the "news"category and if so enables the display of the announcements. The condition can be customized for various purposes.