Themify themes come with Gzip version of all CSS and Javascripts to reduce file size. You can enable Gzip scripts at Themify > Settings > Performance. If you are using Nginx server and the Gzip option is greyed out, follow the steps below to enable Gzip on Nginx.
Step 1) IMPORTANT: Before you start, please ask your host provider to check if the ngx_http_gzip_static_module installed. If it is not installed, ask them to install it, else it can cause errors if you enable gzip without that module.
Step 2) Then you need to locate the nginx.conf file.
Normally the nginx.conf file is located at:
/etc/nginx/nginx.conf
If you can't find it there, try the following location:
/usr/local/nginx/conf/nginx.conf
or
/usr/local/etc/nginx/nginx.conf
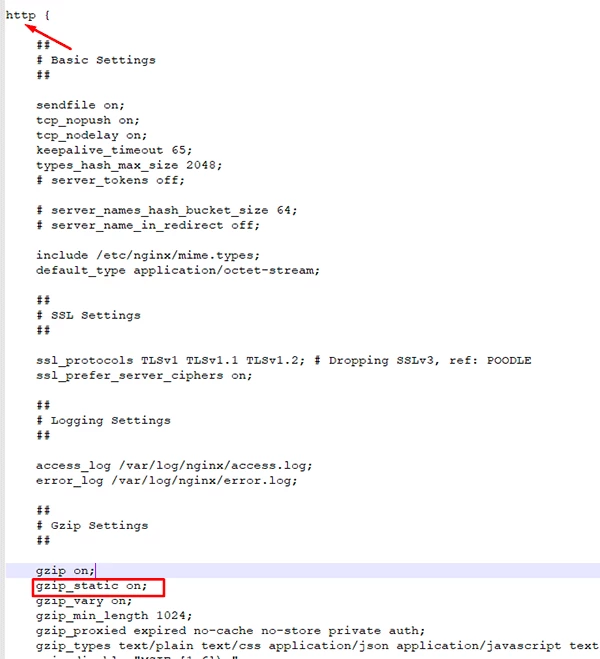
Step 3) Once you locate nginx.conf, edit it, add gzip_static on; on the http block.
Step 4) Once you save the nginx.conf file, restart the server.
WebP is an image format developed by Google that can optimize image file size by 60-80% without losing the image quality. All Themify themes come with the WebP image feature. To enable WebP image, go to Themify > Settings > Performance. If you are using Nginx server, the WebP image option might be greyed out. Follow the steps below to enable WebP on Nginx.
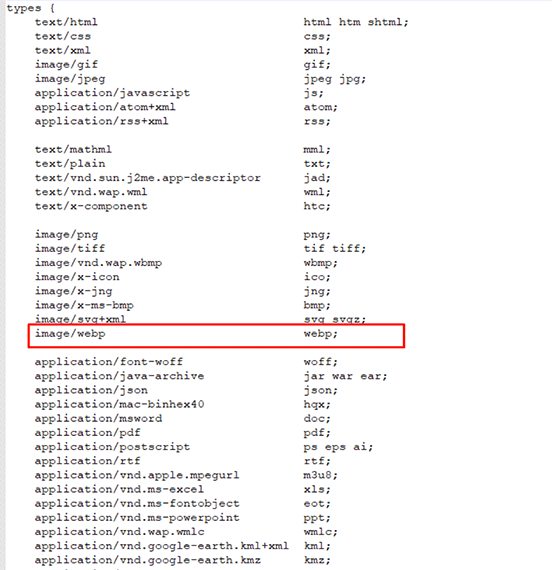
Step 1) Make sure mime.types includes webp support.
The mime.types file is normally located at:
/etc/nginx/mime.types
Open mime.types and check if it includes image/webp webp;
If you don't see it, add it.
Step 2) Download and extract the webp-nginx.zip, you should have 2 folders: 'conf.d' and 'snippets'. Upload 'conf.d' and 'snippets' folders to '/etc/nginx' folder.
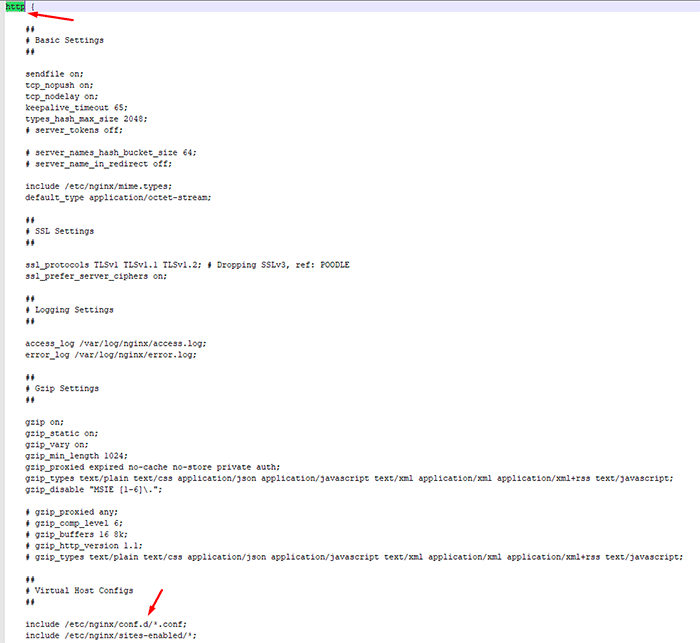
Step 3) Check if nginx.conf file has include /etc/nginx/conf.d/*.conf;
Normally the nginx.conf file is located at:
/etc/nginx/nginx.conf
If you can't find it there, try the following location:
/usr/local/nginx/conf/nginx.conf
or
/usr/local/etc/nginx/nginx.conf
Open nginx.conf file and check if it has this line:
include /etc/nginx/conf.d/*.conf;
If it doesn't have it, add it.
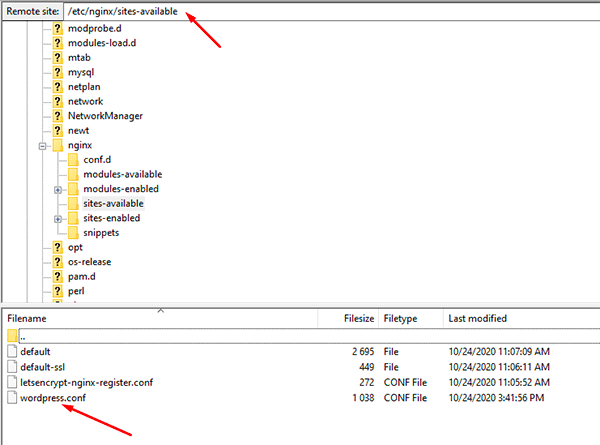
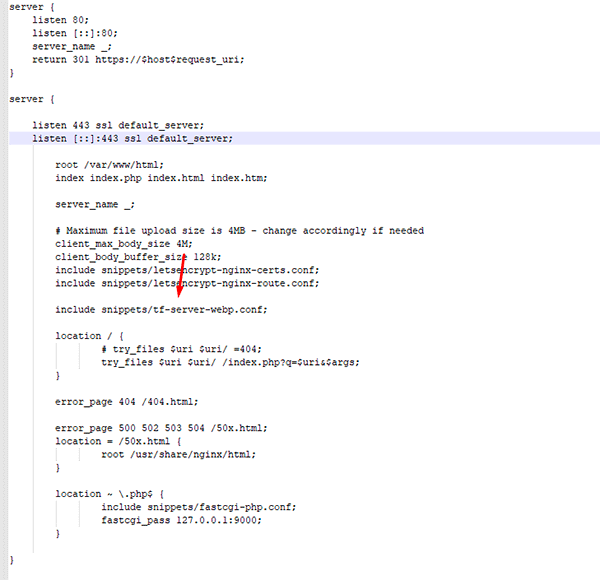
Step 4) Then you need to insert the following in the server context of your configuration file (usually found in /etc/nginx/sites-available/ folder).
/etc/nginx/site-availables/xxx.conf (where xxx is the application name on your server).
Example: if your application name is wordpress, you would see something like the screenshot below. If you are not sure which one is your application name, go to /etc/nginx/sites-enabled/ folder, there should be a .conf file with your application name. If you can't find your site .conf file in the 'sites-available' folder, try to edit the 'default' file.
Edit the conf file in sites-available folder and add this line:
Themify Builder comes with a wide variety of pre-designed layouts that can speed up the process of designing pages on the frontend. However you may wish your clients to not have access to this feature in the Builder, just in case. If so, you can use this snippet of code to eliminate access to the pre-designed layouts:
From that designated URL, Builder will first load "index.json" which contains the list of predesigned layouts, and if the user picks one, Builder will attempt to load "slug.json" where "slug" in the filename is the layout's "slug" that has been defined in "index.json". You can use Builder's default file (https://themify.org/public-api/builder-layouts/index.json) as reference. Note that you need to have both index.json, and a JSON file for each layout you want to include.
Pre-Designed Rows
Themify Builder also offers "Pre-Designed rows", also called "Blocks", which you can mix & match to quickly put together the design you have in mind.
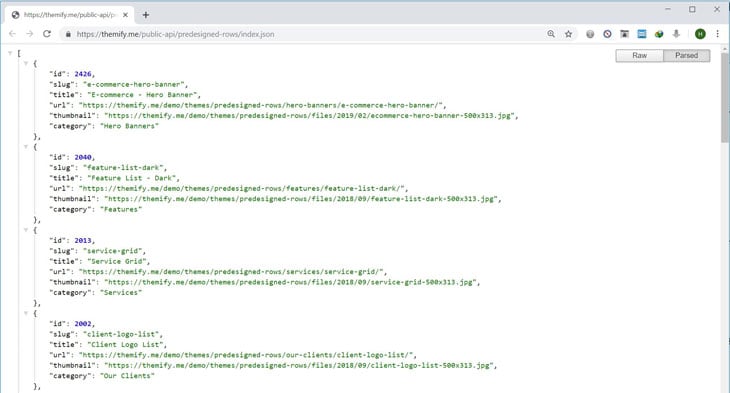
If you wish, you can supply your client with a custom list of pre-designed blocks. For that first download: "https://themify.me/public-api/predesigned-rows/index.json". This is the file Builder loads to display the Blocks list.
This is a JSON file where each member contains the following data:
id Something unique.
slug Must be unique. This is used later on when Builder wants to load this specific Block template.
title A name for this Block.
url URL to where the demo of this Block can be seen.
thumbnail URL to a thumbnail image.
category A comma-separated list of categories. Blocks that share the same categories will be displayed together.
Now to tell the Builder to load a custom version of this file:
Sometimes when the theme has issues such as corrupted or missing files, reinstalling it might resolves the issue. If you didn't edit any core theme file or add any custom files in the theme folder, it is safe to reinstall the theme without losing the theme settings and content. It is recommended to backup your Themify panel settings before re-installing the theme. To backup the Themify panel settings: on the Themify panel, click Transfer tab, then click "Export" button.
Method 1) Re-installing with Themify Panel
Using the Themify panel is the most fastest way to reinstall the theme.
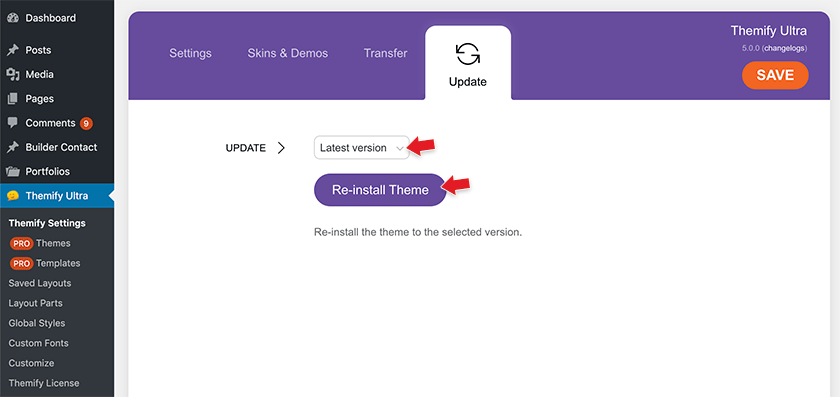
Go to WP-Admin > Themify panel > Update, click "Re-install Theme" button.
NOTE: It requires Themify Updater and a valid membership to reinstall or update the premium Themify themes. If you don't have it installed, install it and enter your Themify username and license key.
You may reinstall to the previous version by selecting the version number from the version dropdown and then click "Re-install Theme" button.
Method 2) Re-installing with Themify Updater
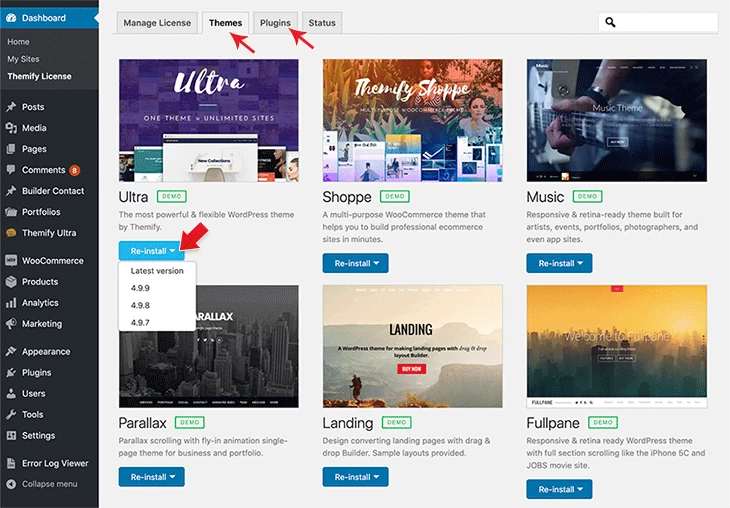
If you have Themify Updater installed with your username and license key entered on Themify License setting page (a valid license key is required to reinstall premium Themify themes), go to "Themify License > Themes", then on the theme that you want to reinstall, click "Re-install" and select the version that you want to reinstall.
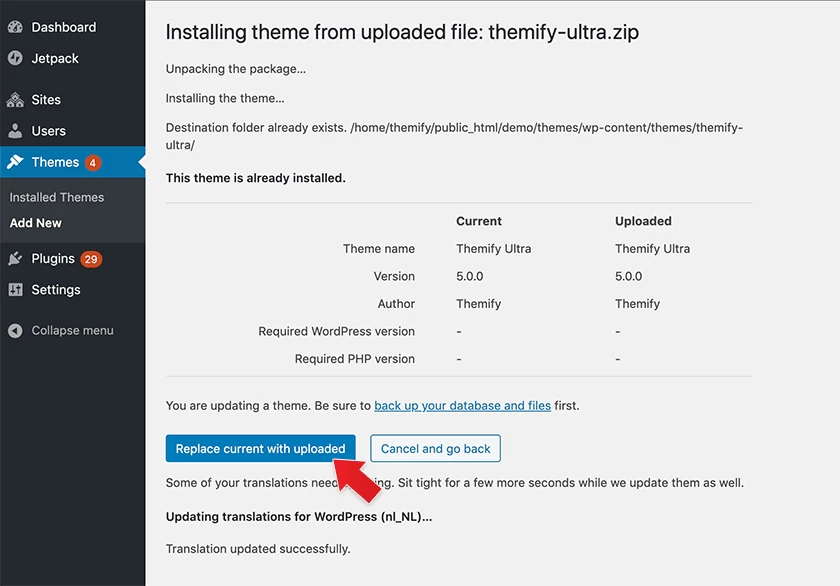
Method 3) Re-installing with WordPress Theme Installer
Click "Upload Theme" link, upload the latest theme zip and activate it (see tutorial on Installing Themes).
Then click on "Replace current with uploaded" button
NOTE: If you using WordPress version below 5.5, you would need to temporarily activate a different theme (theme cannot be deleted if it is active), delete it and then reinstall it.
Method 4) Re-installing a Specific Theme Version
If you want to reinstall to a specific theme version, you may do that with the WordPress theme installer.
First you need to login to Member Dashboard (so you can have access to the old version downloads)
Go to changelogs to find the theme's version history.
Example: Themify Ultra 2.8.3 would be: https://themify.me/files/themify-ultra/themify-ultra-2.8.3.zip
After you download the theme zip, go to WP Admin > Appearance > Themes > Add New, upload the theme zip and click "Repace current with uploaded" (refer to "Re-installing with WordPress Theme Installer" for more details).
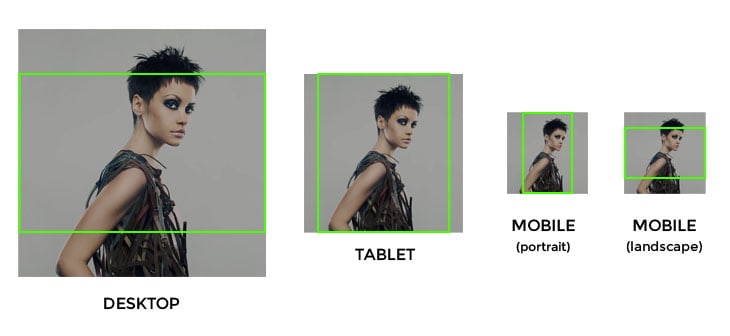
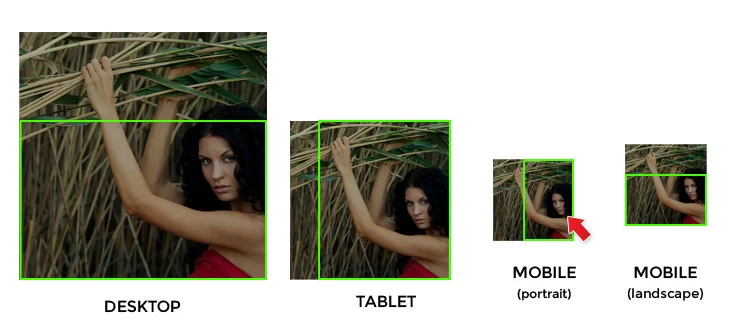
The image below illustrates how background image displays on different devices/resolution. By default, the parallax and fullcover background image is displayed in the center so you can see that the image is fine because the subject (which is the girl model in this example) is in the center of the image. For fullscreen background image, we recommend to have 1400px x 800px which works with most desktop, tablet, and mobile resolutions.
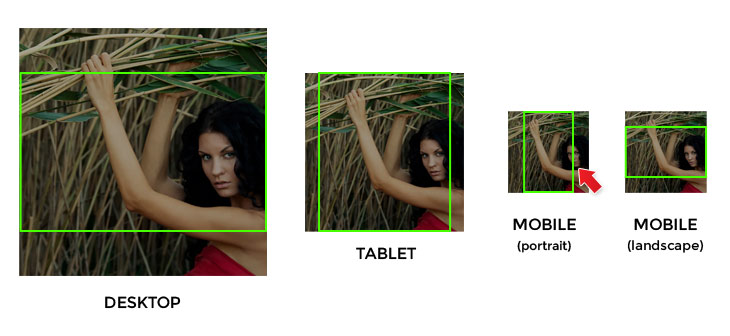
Bad BG Image
However, if the image subject is on the side like the example below. You will see how the face of the model is being covered on certain resolutions because the image is positioned in the center.
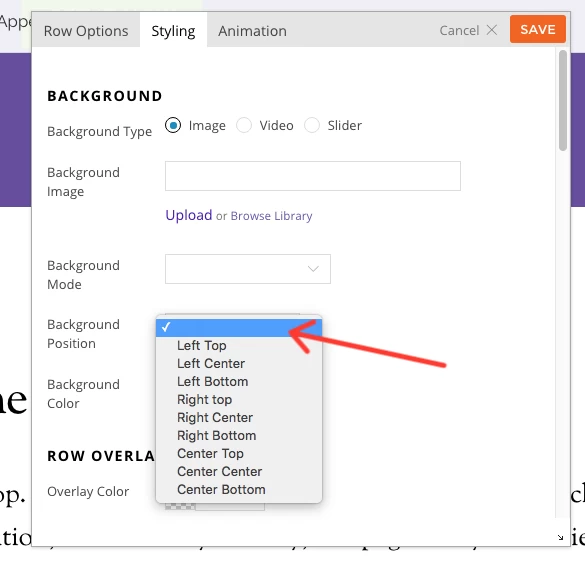
How to Fix Bad BG Image
To resolve this problem, we've added the “Background Position” option in the Builder row background options. To access this, you'll need to turn on the Builder > Click on the Styling (Paintbrush Icon). There you will find the "Background Position" option where you can select where you would like to position or center the image as it's viewed in various devices.
By selecting the background position (for this example, we will select "right bottom"), you can keep the image subject in the visible area.
This tutorial shows you how to create menu links that scrollTo Builder row anchors. It is often used for single page design (e.g. on the page's custom menu, it links to row anchors) so it is sometimes referred to as single page menu.
To achieve scrollTo row anchor:
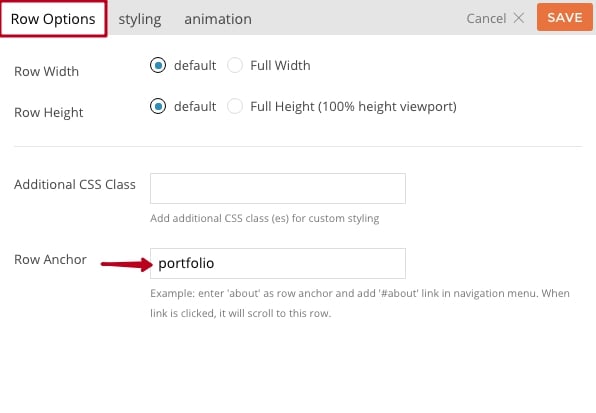
Step 1) First, enter the Row Anchor name in Builder > Row > Options (e.g. "portfolio")
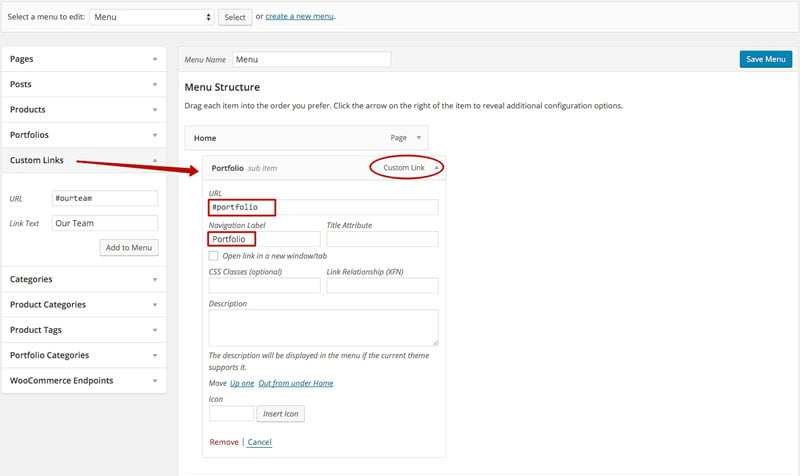
Step 2) Then in the WordPress menu link, insert the anchor name as link URL = "#portfolio" (basically add # in front of the anchor name)
Result: When the #portfolio link is clicked or when users go the URL with the #portfolio anchor (e.g. http://yoursite.com#portfolio), it will scroll to the row where it specified Row Anchor = "portfolio"
NOTE: If you would like to redirect to one particular page with the anchor, you can do so by inserting the entire URL with the anchor on the Custom Links > URL (i.e. www.example.com#portfolio).
Linking From Inner Pages
If you need to have scrollTo menu on inner pages (i.e. linking to the homepage row anchor on inner pages), then you would need to create two separate menus:
Menu #1:
Create a menu (e.g. "Main Menu")
Assign it in the "Main Navigation" menu location
In the link anchor, it should be full URL path plus the anchor name (e.g. http://yousite.com/#anchor_name)
This will allow users to go back to home anchor from all inner pages
Menu #2:
Create another similar menu (e.g. "Custom Page Menu")
Assign it as the "Custom Menu" in the page's Themify Custom Panel > Page Options
In this menu, the link anchor should be just the anchor name with a number sign (#) added in front (e.g. #anchor_name)
Basically, this menu should have identical menu links as the main menu, expect the anchor links are not full URLs
Adjust ScrollTo Row Speed
To adjust the scroll speed, you'll need to create a child theme functions.php in the root of the theme and add the code below.
<?php

add_filter('themify_builder_scroll_highlight_vars','custom_scroll_vars');

function custom_scroll_vars($vars){
$vars['speed'] = 400;
return $vars;
}
NOTE: Don't forget to change the speed as you want. By default it is 900.