To install themes with the WordPress theme uploader:
Download the "theme.zip" file from the Member Area
Note: some browsers (eg. Safari) auto extract zip files automatically. Right-click on the download link and select "Save Linked File As". This will allow you to download the theme as a zip file.
Login to your site's WP Admin.
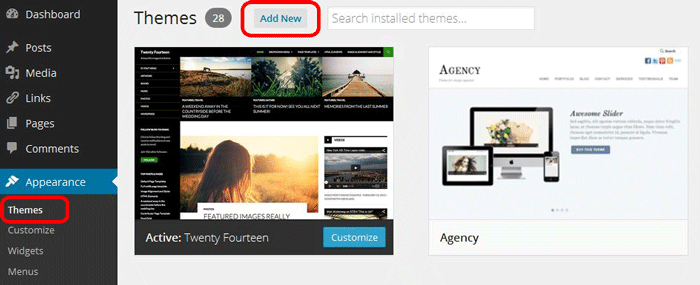
Go to Appearance > Themes.
Click on the "Add New" button, then click on the "Upload Theme" button
Upload the theme.zip file (note: it is the theme.zip, not the theme-psd.zip that you just downloaded from the Member Area).
Activate the theme
FYI: You can also install themes with FTP method. Read the Installing Themes tutorial for more info.
Demo Import
If you are starting a fresh site, importing the demo content will help you understand how the theme demo is built. The Demo Import feature will import the contents (posts, pages, comments, etc.), Themify panel settings, menus, and widgets setup from our demo to your site. You can erase the demo content afterward.
To import the demo setup:
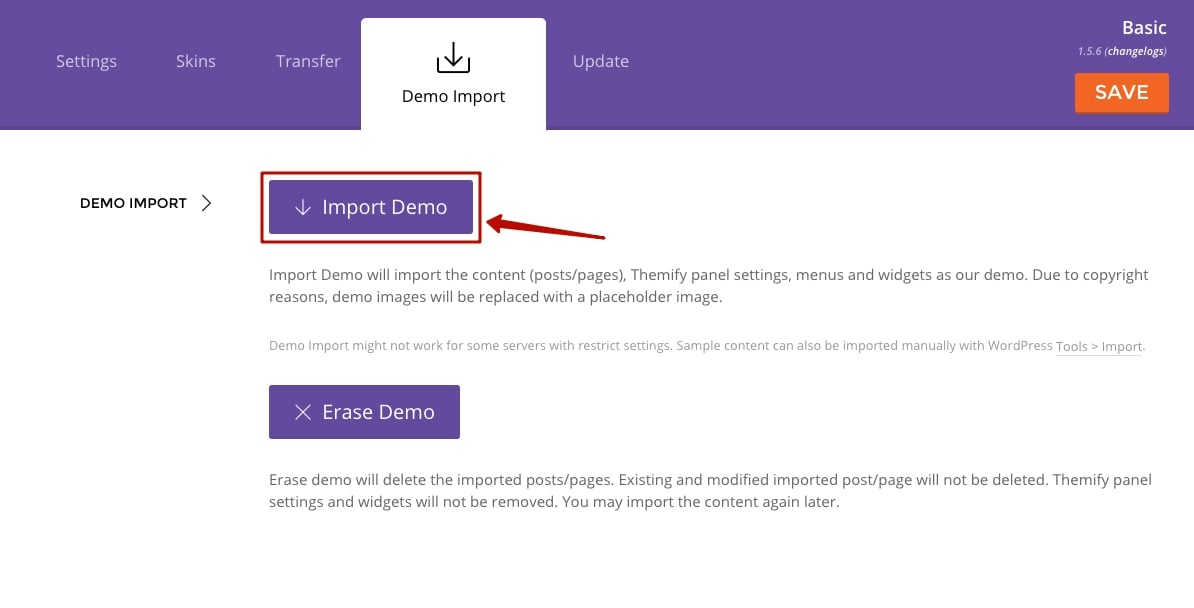
Go to WP Admin > Themify > Settings > Demo Import and click "Import Demo" button.
Note that the featured images will be replaced with an image placeholder for copyright reasons.
To erase the demo setup:
On the Demo Import tab, click on the "Erase Demo" button which will then remove the demo content.
FYI: If the Demo Import does not work on your site, you can use the WP Admin > Tools > Import tool to import the demo content manually.
Site Logo & Tagline
To display a logo image instead of the site name text:
Go to WP Admin > Appearance > Customize > Site Logo and Tagline.
Under "Site Logo", select "Logo Image" radio button.
Upload a logo image.
Specify the logo image width and height.
You can also change website Tagline from here:
Go to WP Admin > Appearance > Customize > Site Logo and Tagline.
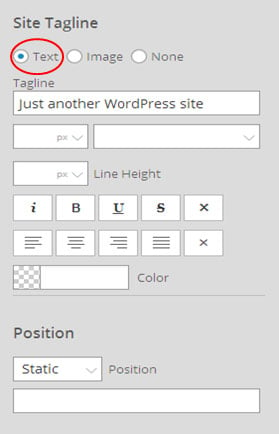
Scroll down and under "Site Tagline" select "Text" radio button.
Enter your site Tagline.
Click "Save & Publish".
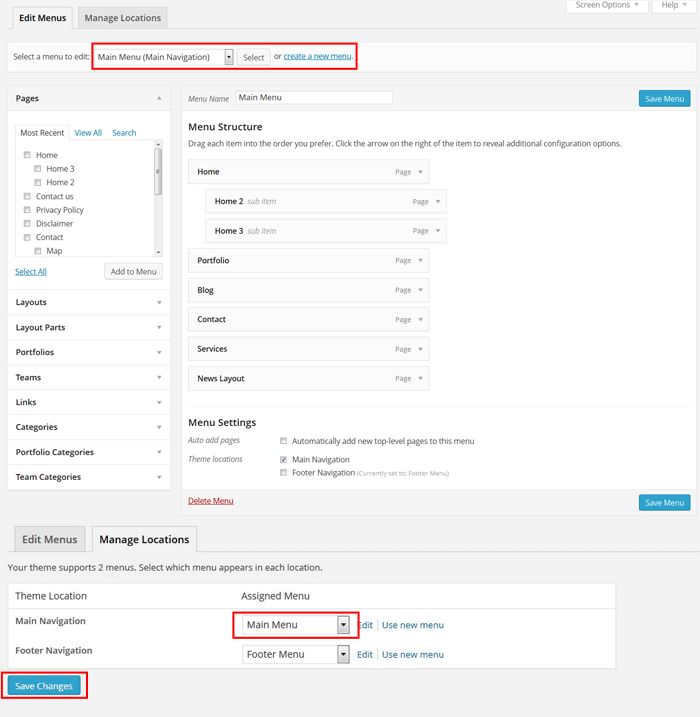
Main Navigation Menu
To create a custom navigation menu:
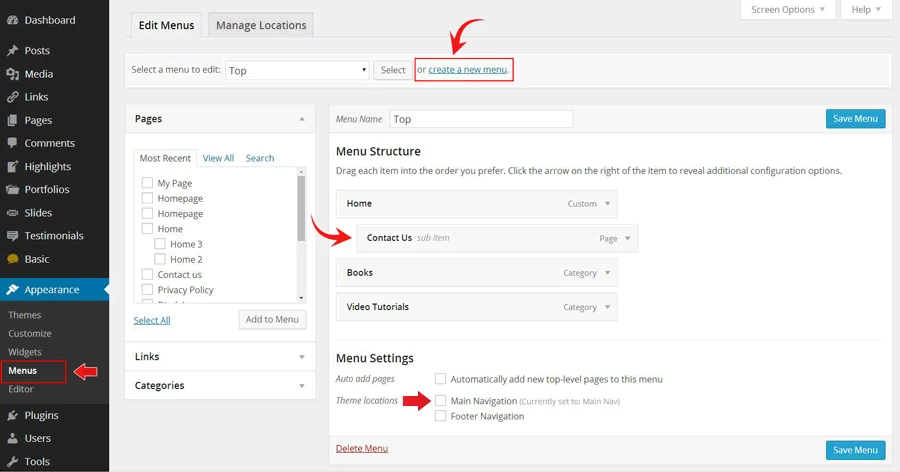
Go to WP Admin > Appearance > Menus.
Click on "create a new menu" to create a new menu (eg. Main Menu).
Add the menu items from the left panels.
To create a dropdown menu: drag the menu item towards the right (the item(s) will be indented).
When you are done adding the menu items, click "Save Menu".
To assign menu locations:
Scroll down to the bottom where it says "Theme locations" and tick the menu location checkbox.
Main Navigation = main menu on the header
Footer Navigation = footer menu on the footer (Note: some themes might not have Footer Navigation).
TIPS: You can display menus on sidebar widgets, remove the main menu, create empty links, and lightbox links. Read Custom Menus for more detailed tutorial.
Setting Up the Social Links
Step 1) To set up the social media links:
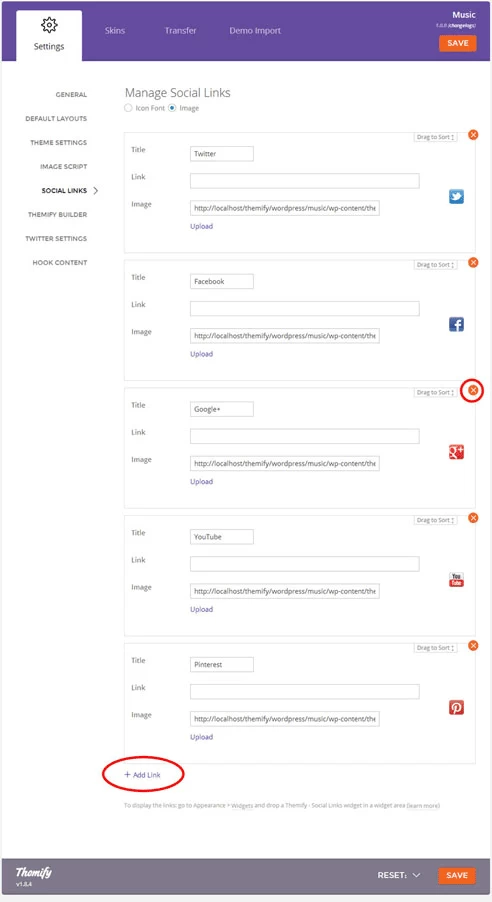
Go to WP Admin > Themify > Settings > Social Links tab.
The theme comes with some pre-filled social links. Simply enter your social profile URL in the Link input field. For example, enter 'https://twitter.com/themify' for the Twitter link.
You can choose to display either "Icon Font" or "Image".
If "Icon Font" is selected, click on "Insert Icon" to select an icon (over 320+ icons available).
If "Image" is selected, you can upload your own graphic icon by clicking on the Upload button.
To add more links, click on the Add Link button at the bottom.
To remove a link, click on the delete icon.
To arrange the display order, drag and drop the link container.
Step 2) Displaying the Social Links:
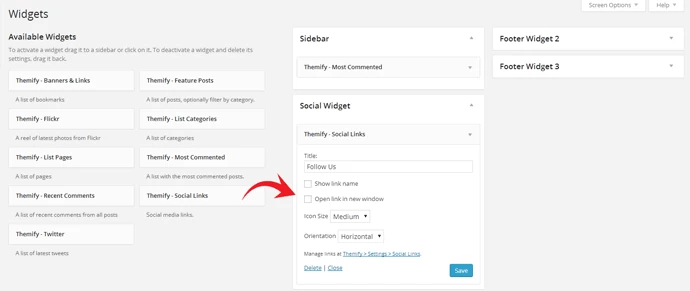
Once you have the Social Links setup, go to WP Admin > Appearance > Widgets. Drag and drop the Themify - Social Links from the Available Widgets panel to the Social Widget panel.
Optional: Customize Widget Title - such as "Follow Us". You can also "Show link name" and adjust icon size.
Hiding the RSS Icon
To hide the default RSS icon in the header:
Go to WP Admin > Themify > Settings > Theme Settings.
Under the "Exclude RSS Link", tick the checkbox that says "Check here to exclude RSS icon/button in the header".
Hiding the Search Form
To hide the default search form in the header:
Go to WP Admin > Themify > Settings > Theme Settings.
Under the "Exclude Search Form", tick the checkbox that says "Check here to exclude search form in the header".
On the top admin bar, select Themify Builder > Turn On Builder (view Builder documentation for more info)
Expand the first row to full width column, then drop in a Builder - Highlight module, select the grid3 layout icon for the Highlight posts
Then drop a Builder - Divider module below the Highlight module, set the divider color as you like
On the next row, create 3-column grid (drag the column dividers left/right to merge or expand columns), then:
In the first column: drop a Builder - Widget module, select Themify - Feature Post widget and the configure the widget options as you like
In the second column: drop a Builder - Widget module, select Themify - Twitter and enter your Twitter ID in the options (note: you need to create a required access token from Twitter API in order to show the tweets)
In the third column: drop a Builder - Text module and enter any text as you like. You can insert Heading tags (H1 - H6) and shortcodes as you like
Set Custom Front Page
After you set the page as front page, the home slider and welcome message will appear. To set the front page:
Go to wp-admin > Settings > Reading
Select a static page under the "Front page displays"
Then select "Custom Homepage" in the dropdown
Homepage Slider
To display the slider on the homepage:
Go to wp-admin, click on the "Add New" link under the Slider menu.
Choose the layout option:
default: display the feature image on left, title and content on the right
image-only: display the feature image only (no title or content)
content-only: display the content only (title and feature image will not be displayed)
gallery: display the feature image, title, and content in gallery style
Upload a feature image.
Image width and height is optional. If the field is empty, default image size will apply.
Image link is optional.
Slider Options can be found at Themify > Theme Settings.
Welcome Message
To display a welcome message on the homepage, go to Themify panel > Settings > Theme Settings, enter the text in the Welcome Text box. The content can be plain text or HTML code.
Highlight Post Type
To display the homepage highlights:
Go to wp-admin, click on the "Add New" link under the Highlights menu.
Icon image is optional.
Image width and height is also optional. If the field is empty, default setting will apply.
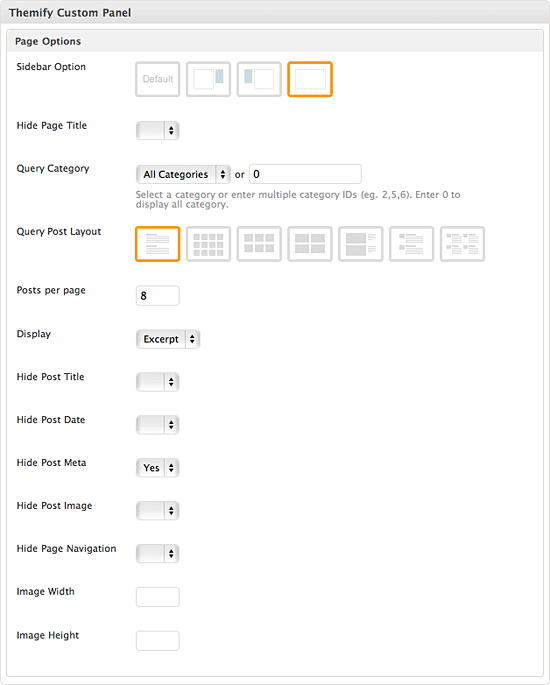
Custom Page Layout
To display posts from specific category(ies) using pre-designed layouts:
Create a new WordPress page.
Select the Sidebar Option
Select the category that you want to display or enter multiple category IDs in the Query Category text field.
Posts per page = the number of posts to be displayed per page.
Select the Layout option.
Image width & height is optional.
Page navigation = pagination menu (page 1, 2, 3, 4...)
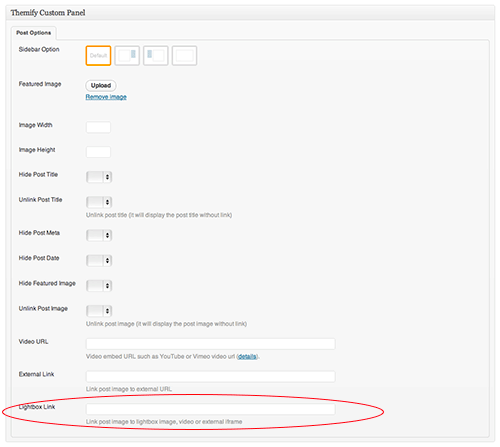
Lightbox Media
To link the featured image with a lightbox popup such as image zoom, video or an iframe window, enter the URL in the Lightbox Link field under the Themify Custom Panel. The Themify Custom Panel can be found in the post edit page.
Sample iframe: https://themify.me?iframe=true&width=100%&height=100% (you need to add ?iframe=true at the end of the URL)
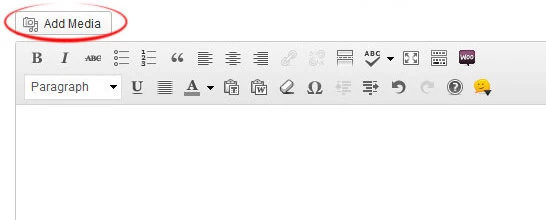
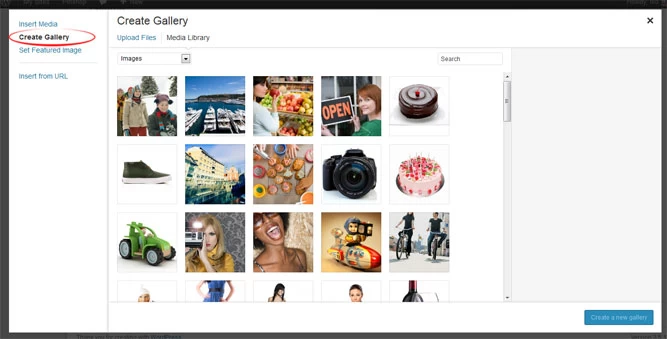
Inserting Gallery to Posts or Pages
The gallery can be inserted in any post or page. To insert a gallery, click on "Add Media" button
It will open a lightbox for you to create and insert gallery. Read this tutorial for more details on how to use WordPress Gallery.
Setting Default Post and Page Layouts
Generally, the theme works out of the box. All the sidebar options and image dimensions are pre-defined in the theme. If you need to change the default sidebar options, featured image dimensions, content/except display, post meta, etc., it can be done in the WP Admin > Themify > Settings > Default Layouts.
There are three default layout options under Themify > Settings > Default Layouts:
Archive Sidebar Option: refers to the default home page, category, search, archive, tag pages, etc.
Default Post Layout: is the post page direct URL (also known as "Single Post").
First, create a new Page (go to WP Admin > Pages > Add New), name it "Blog" or any page title as you want.
View the page on the frontend, click "Turn On Builder".
Drop in a Post module and configure the options as you like.
Setting a Custom Front Page
You can set any page as the front (home) page. This means you can use the Builder to design the page and assign it as the front page. To set the Front Page:
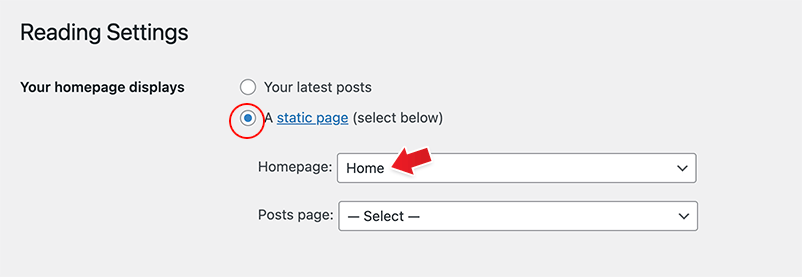
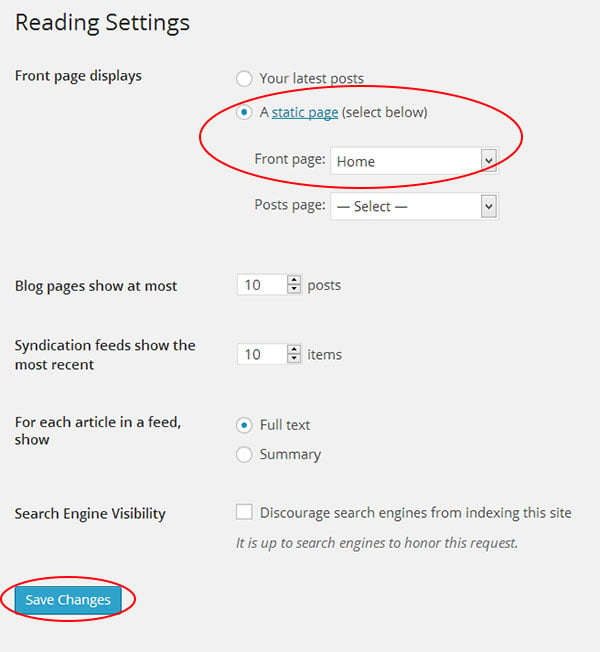
Go to WP Admin > Settings > Reading.
On the Front page displays, select the "A static page (select below)" option and then select a "Front page".
Leave the "Posts page" default. If you want to create a custom Blog page, read this tutorial instead of setting the "Posts page".
Adding Widgets
To add widgets to widgetized areas (eg. sidebar and footer widgets):
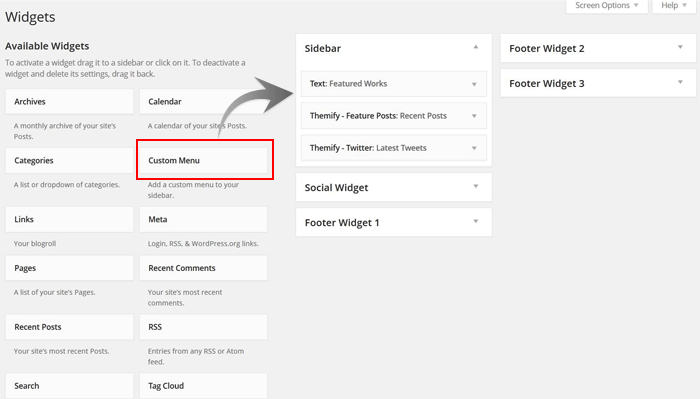
Go to WP Admin > Appearance > Widgets.
The big panel on the left side shows all available widgets. The small panels on the right are the widgetized areas.
To add a widget: drag and drop the widget from the left panel to the right panel.
To remove the widget: drag the widget back to the left panel (Available Widgets panel). If you want to keep the widget setting for future use, drag it to the Inactive Widgets instead of the Available Widgets panel. It will save your widget settings. To retrieve the widget, drag the widget from Inactive Widgets panel instead of the Available Widgets panel.
Go to WP Admin > Themify > Skins, select a skin by clicking on the thumbnail and click Save.
Styling The Theme
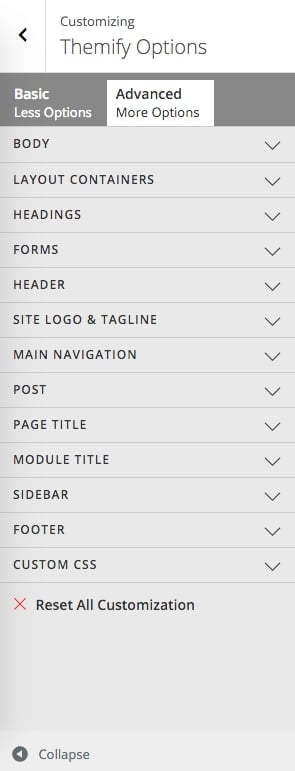
To style the theme frontend appearance:
Go to WP Admin > Appearance > Customize.
It will take you to the Customize panel with live preview where you can style the appearance of the theme design (ie. color, background, font, spacing, border, etc.).
FYI: Refer to Customize documentation for more info.
Footer Widgets
To set the Footer Widget column layout, go to WP Admin > Themify > Settings > Theme Settings.
To drop the widgets in the Footer Widgets, go to WP Admin > Appearance > Widgets.
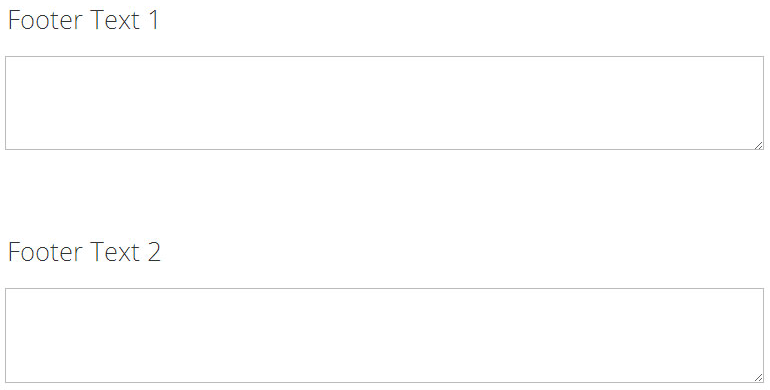
Footer Text
To replace the footer credit links:
Go to WP Admin > Themify > Settings > Theme Settings and enter the footer text.
HTML tags are allowed in the Footer Text.
To have empty footer text, tick the hide footer text checkbox.
We are happy to announce the release of our latest theme—ThemeMin. It is a minimal theme that focuses on typography. There is no images used in entire theme (well, except the RSS icon). Hence, this theme is extremely light weight and fast loading. If you are interested in getting ThemeMin, enter the promo code "GetMin" on checkout to save 30% discount. Note: this coupon code can only be applied to ThemeMin. The discount code expires as of September 8, 2010. (more…)
To install themes with the WordPress theme uploader:
Download the "theme.zip" file from the Member Area
Note: some browsers (eg. Safari) auto extract zip files automatically. Right-click on the download link and select "Save Linked File As". This will allow you to download the theme as a zip file.
Login to your site's WP Admin.
Go to Appearance > Themes.
Click on the "Add New" button, then click on the "Upload Theme" button
Upload the theme.zip file (note: it is the theme.zip, not the theme-psd.zip that you just downloaded from the Member Area).
Activate the theme
FYI: You can also install themes with FTP method. Read the Installing Themes tutorial for more info.
Demo Import
If you are starting a fresh site, importing the demo content will help you understand how the theme demo is built. The Demo Import feature will import the contents (posts, pages, comments, etc.), Themify panel settings, menus, and widgets setup from our demo to your site. You can erase the demo content afterward.
To import the demo setup:
Go to WP Admin > Themify > Settings > Demo Import and click "Import Demo" button.
Note that the featured images will be replaced with an image placeholder for copyright reasons.
To erase the demo setup:
On the Demo Import tab, click on the "Erase Demo" button which will then remove the demo content.
FYI: If the Demo Import does not work on your site, you can use the WP Admin > Tools > Import tool to import the demo content manually.
Site Logo & Tagline
To display a logo image instead of the site name text:
Go to WP Admin > Appearance > Customize > Site Logo and Tagline.
Under "Site Logo", select "Logo Image" radio button.
Upload a logo image.
Specify the logo image width and height.
You can also change website Tagline from here:
Go to WP Admin > Appearance > Customize > Site Logo and Tagline.
Scroll down and under "Site Tagline" select "Text" radio button.
Enter your site Tagline.
Click "Save & Publish".
Main Navigation Menu
To create a custom navigation menu:
Go to WP Admin > Appearance > Menus.
Click on "create a new menu" to create a new menu (eg. Main Menu).
Add the menu items from the left panels.
To create a dropdown menu: drag the menu item towards the right (the item(s) will be indented).
When you are done adding the menu items, click "Save Menu".
To assign menu locations:
Scroll down to the bottom where it says "Theme locations" and tick the menu location checkbox.
Main Navigation = main menu on the header
Footer Navigation = footer menu on the footer (Note: some themes might not have Footer Navigation).
TIPS: You can display menus on sidebar widgets, remove the main menu, create empty links, and lightbox links. Read Custom Menus for more detailed tutorial.
Setting Up the Social Links
Step 1) To set up the social media links:
Go to WP Admin > Themify > Settings > Social Links tab.
The theme comes with some pre-filled social links. Simply enter your social profile URL in the Link input field. For example, enter 'https://twitter.com/themify' for the Twitter link.
You can choose to display either "Icon Font" or "Image".
If "Icon Font" is selected, click on "Insert Icon" to select an icon (over 320+ icons available).
If "Image" is selected, you can upload your own graphic icon by clicking on the Upload button.
To add more links, click on the Add Link button at the bottom.
To remove a link, click on the delete icon.
To arrange the display order, drag and drop the link container.
Step 2) Displaying the Social Links:
Once you have the Social Links setup, go to WP Admin > Appearance > Widgets. Drag and drop the Themify - Social Links from the Available Widgets panel to the Social Widget panel.
Optional: Customize Widget Title - such as "Follow Us". You can also "Show link name" and adjust icon size.
Hiding the RSS Icon
To hide the default RSS icon in the header:
Go to WP Admin > Themify > Settings > Theme Settings.
Under the "Exclude RSS Link", tick the checkbox that says "Check here to exclude RSS icon/button in the header".
Hiding the Search Form
To hide the default search form in the header:
Go to WP Admin > Themify > Settings > Theme Settings.
Under the "Exclude Search Form", tick the checkbox that says "Check here to exclude search form in the header".
Custom Page Layout
To display posts from specific category(ies) using pre-designed layouts:
Create a new WordPress page.
Select the Sidebar Option
Select the category that you want to display or enter multiple category IDs in the Query Category text field.
Posts per page = the number of posts to be displayed per page.
Select the Layout option.
Image width & height is optional.
Page navigation = pagination menu (page 1, 2, 3, 4...)
Custom Homepage
To create a custom Page and assign as the homepage:
Create a new Page (eg. Custom Homepage)
Go to wp-admin > Settings > Reading
Select a static page under the "Front page displays"
Then select "Custom Homepage" in the dropdown
Lightbox Media
To link the featured image with a lightbox popup such as image zoom, video or an iframe window, enter the URL in the Lightbox Link field under the Themify Custom Panel. The Themify Custom Panel can be found in the post edit page.
Sample iframe: https://themify.me?iframe=true&width=100%&height=100% (you need to add ?iframe=true at the end of the URL)
Inserting Gallery to Posts or Pages
The gallery can be inserted in any post or page. To insert a gallery, click on "Add Media" button
It will open a lightbox for you to create and insert gallery. Read this tutorial for more details on how to use WordPress Gallery.
Setting Default Post and Page Layouts
Generally, the theme works out of the box. All the sidebar options and image dimensions are pre-defined in the theme. If you need to change the default sidebar options, featured image dimensions, content/except display, post meta, etc., it can be done in the WP Admin > Themify > Settings > Default Layouts.
There are three default layout options under Themify > Settings > Default Layouts:
Archive Sidebar Option: refers to the default home page, category, search, archive, tag pages, etc.
Default Post Layout: is the post page direct URL (also known as "Single Post").
First, create a new Page (go to WP Admin > Pages > Add New), name it "Blog" or any page title as you want.
View the page on the frontend, click "Turn On Builder".
Drop in a Post module and configure the options as you like.
Setting a Custom Front Page
You can set any page as the front (home) page. This means you can use the Builder to design the page and assign it as the front page. To set the Front Page:
Go to WP Admin > Settings > Reading.
On the Front page displays, select the "A static page (select below)" option and then select a "Front page".
Leave the "Posts page" default. If you want to create a custom Blog page, read this tutorial instead of setting the "Posts page".
Adding Widgets
To add widgets to widgetized areas (eg. sidebar and footer widgets):
Go to WP Admin > Appearance > Widgets.
The big panel on the left side shows all available widgets. The small panels on the right are the widgetized areas.
To add a widget: drag and drop the widget from the left panel to the right panel.
To remove the widget: drag the widget back to the left panel (Available Widgets panel). If you want to keep the widget setting for future use, drag it to the Inactive Widgets instead of the Available Widgets panel. It will save your widget settings. To retrieve the widget, drag the widget from Inactive Widgets panel instead of the Available Widgets panel.
Go to WP Admin > Themify > Skins, select a skin by clicking on the thumbnail and click Save.
Styling The Theme
To style the theme frontend appearance:
Go to WP Admin > Appearance > Customize.
It will take you to the Customize panel with live preview where you can style the appearance of the theme design (ie. color, background, font, spacing, border, etc.).
FYI: Refer to Customize documentation for more info.
Footer Widgets
To set the Footer Widget column layout, go to WP Admin > Themify > Settings > Theme Settings.
To drop the widgets in the Footer Widgets, go to WP Admin > Appearance > Widgets.
Footer Text
To replace the footer credit links:
Go to WP Admin > Themify > Settings > Theme Settings and enter the footer text.
HTML tags are allowed in the Footer Text.
To have empty footer text, tick the hide footer text checkbox.
This documentation will guide you through the steps needed to query posts on a WordPress page.
Querying posts is used to display lists of posts in various layouts on a static page in WordPress, such as when creating a blog page, etc.
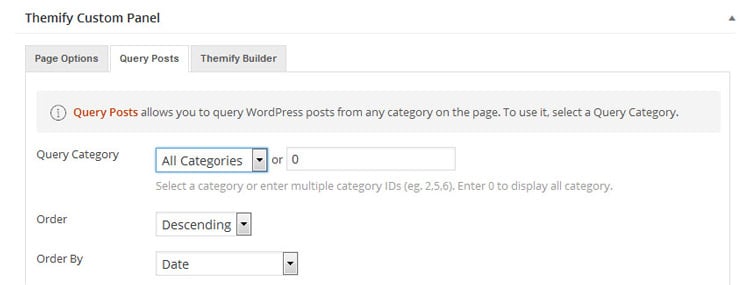
Setting the Query
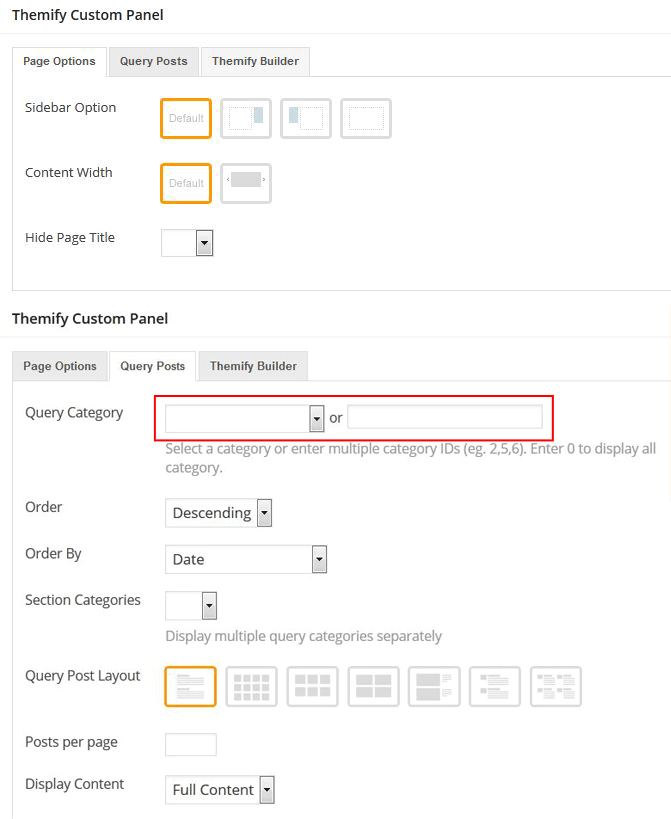
You can find the Query Posts options in the Themify Custom Panel when adding/editing a WordPress page (WP Admin > Pages) and there are a number of options in this tab for determining which posts will be queried and displayed.
You will use the "Query Category" dropdown or text field to select a category of posts to be shown on the page, or to manually enter the IDs or slugs of categories to be included/excluded from the query.
For example, you may enter the following 3, 5, 8 which would show all posts from categories with IDs 3, 5 and 8, or you may put -11 which would exclude any posts from the category with ID 11 from the post list.
Finally, you can also use category slugs such as news, photos to display a category based on its slug.
Once you have set which categories to display, you can then determine how the posts will be ordered using the "Order" and "Order By" options.
The "Order" parameter will determine which sorting order the list will use, e.g. ascending or descending.
The "Order By" parameter will change what information the query will use to sort posts. The default is to use the date, however other options exist such as ordering based on post title, author, number of comments, etc.
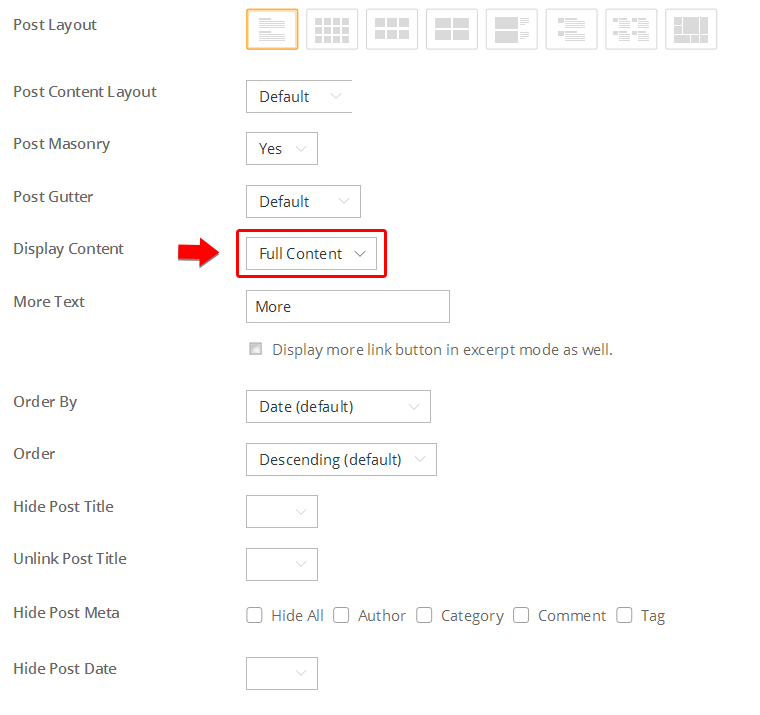
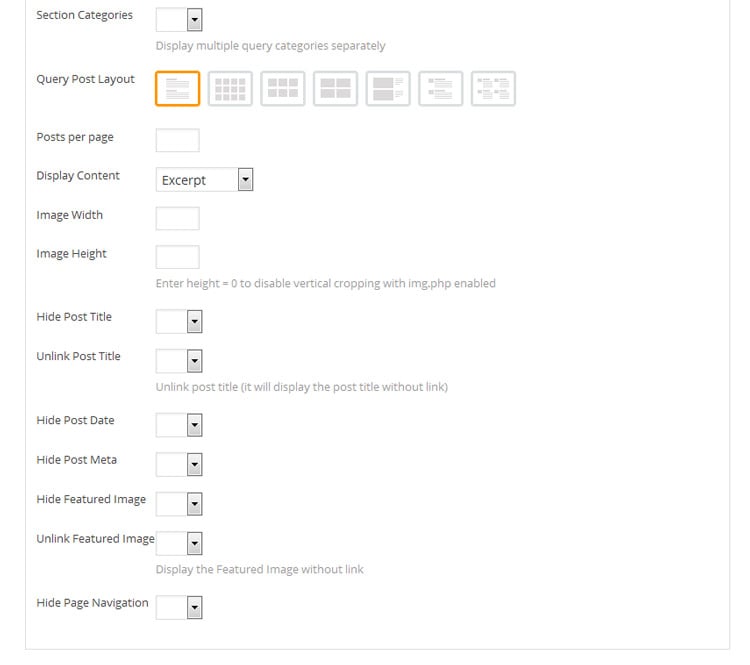
Layout Options
The "Query Posts" tab also offers a range of options for determining how the post list will be laid out beyond just modifying the query.
These options allow you to set the layout of the posts overall, along with determining what content should be shown or not.
Options are as follows:
Query Post Layout - These options are used to set how the blog posts will be shown on the page, such as how many should be displayed per row, placement of featured images, etc.
Posts per page - This is used to set how many posts will be shown per page before navigation links are used.
Display Content - This option allows you to set whether the post list will output post content or not, or if it should instead use the excerpt for the post.
Image Width - This option will set the width of all featured images for the posts.
Image Height - This option will set the height of all featured images for the posts. Use 0 to set this to auto.
Hide Post Title - This option will set the post title for each post to not be output.
Unlink Post Title - This will set the post title to not act as a link.
Hide Post Date - This will set the post date to not be output.
Hide Post Meta - This will set the post meta to not be output with each post.
Hide Featured Image - This option will stop the featured image being displayed with each post.
Unlink Featured Image - This will stop the featured image from acting as a link.
Hide Page Navigation - This will stop the output of links to navigate between the pages of posts.
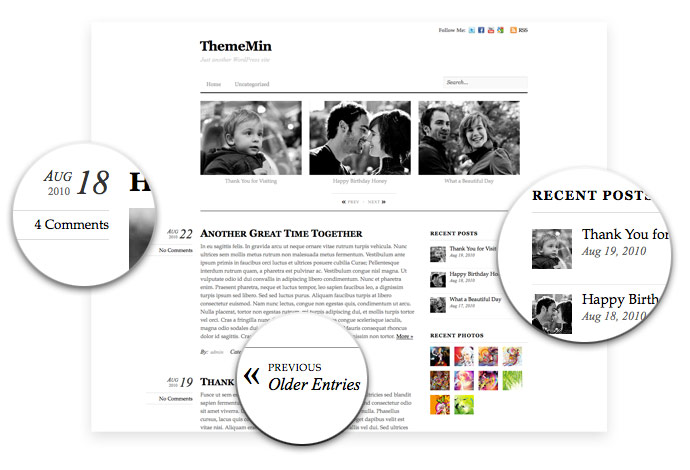
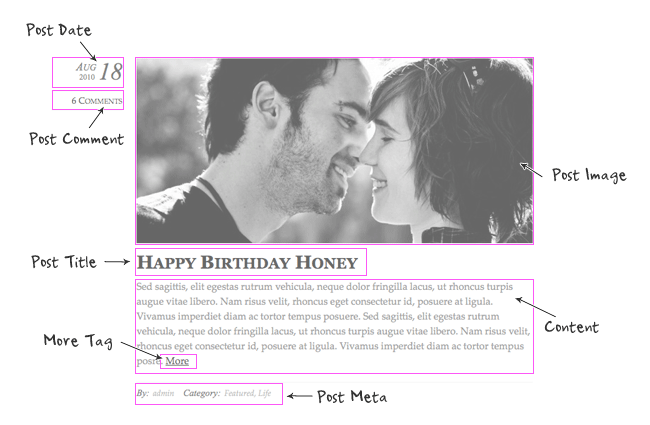
Post Elements
The elements you will generally find on each post are as shown below:
All Themify shortcodes are discontinued in all themes. You need to install Themify Shortcodes plugin if you want to use these shortcodes.
To insert a shortcode, simply paste the sample shortcode listed below in the post or page content editor. If you want to run the shortcodes in sidebar widget, drop in a Text widget and insert the shortcode in the Text box. This documentation lists all the shortcodes packed in the theme. You may configure the shortcode by changing/adding the parameters.
Button
Available parameters:
style= style of the button. You can combine the following options (eg style="large yellow rounded fa-bell"):
first = first column. It is used to clear the floating and margin space. You need to enter the first attribute in the grid parameter of every first column.
If you need to use columns nested inside another column, use the [themify_sub_col] shortcode instead. The parameters are the same than in the general [themify_col] shortcode.
Advanced: CSS classes for columns
Columns also support adding a custom CSS class that you can use to stylize them later in Custom CSS. This must be done with care because it can break the column layout if you have a class that is used for another purpose, so try using unique class names and use them to apply style only to these.
For example, you could use the column shortcodes to create a pricing table and add CSS classes to stylize later depending on the product offer:
In this example, we could use .product-pack to apply a consistent style for columns, .entry-pack, .standard-pack and .advanced-pack to apply a different icon for the package and use .first-pack to add a specific style for the first pricing column. After we have our classes in place, we can use them to target the elements we want to stylize in Styling > Custom CSS.
Horizontal Rule (hr)
Available parameters:
color = color of the horizontal rule (pink, red, light-gray, dark-gray, black, orange, yellow, white)
To display your content in a blockquote, wrap the text with: [themify_quote] content here [/themify_quote]. It will output as <blockquote> content here </blockquote>
Is Logged In
To display a special message or specific content to logged in users of your site, you may use the is_logged_in shortcode:
[themify_is_logged_in] messge here [/themify_is_logged_in]
Is Guest
To display a special message or specific content to guests (someone not logged in) of your site, you can use the is_guest shortcode:
[themify_is_guest] messge here [/themify_is_guest]
width = width of the map container (px or % value)
height = height of the map container (px or % value)
zoom = map zoom level (1 - 16, default = 8)
type = map type (roadmap, satellite, hybrid, terrain, default = roadmap)
scroll_wheel = map scroll (yes, no, default= yes)
draggable = map dragging (yes, no, desktop, default= yes). Setting this parameter to "desktop" will disable it in mobile devices making it draggable only in desktop.
Sample usages:
[themify_map address="Yonge Street and Eglinton Ave. Toronto, Ontario, Canada" width=100% height=400px]

[themify_map address="12 Main St. Toronto, Ontario, Canada" width=300px height=200px zoom=16]
Twitter
To use the Twitter shortcode: you would need to create an access token from the Twitter site and then insert the access token code in Themify > Settings > Integration API > Twitter API Settings (refer to this tutorial for details).
Use the post_slider shortcode to display a slider of posts.
Available parameters:
limit = number of post to query (default = 5)
category = category ID number or category name (default = all categories). Use minus number to exclude category (eg. category=-1 will exclude category 1)
image = show post image or not (yes, no, default = yes)
image_w = post image width (default 240px)
image_h = post image height (default 180px)
title = show post title (yes, no, default = yes)
unlink_image = remove the link on featured image (yes, no, default=no)
unlink_title = remove the link on the post title (yes, no, default=no)
The slider shortcode works just like the <ul> and <li> tag. It requires the opening and closing tag. You would need the opening [themify_slider] and closing [/themify_slider] tag. Then each slide requires the opening [themify_slide] and [/themify_slide]. You may insert any HTML tags in the [themify_slide].
[themify_slider]
	[themify_slide] one [/themify_slide]
	[themify_slide] two [/themify_slide]
	[themify_slide] three [/themify_slide]
[/themify_slider]

[themify_slider auto="1" scroll="1" speed="fast"]
	[themify_slide] one [/themify_slide]
	[themify_slide] two [/themify_slide]
	[themify_slide] three [/themify_slide]
[/themify_slider]
List Posts
Use the list_posts shortcode to query any number of post from any categories.
Available parameters:
limit = number of post to query (default = 5). Enter -1 to query all posts (eg. limit=-1).
category = category ID number or category name (default = all categories). Use minus number to exclude category (eg. category=-1 will exclude category 1)
offset = number of posts to skip over (default = 0)
order = specifies ascendent or descendent order (ASC, DESC, default = DESC)
orderby = criteria used to order posts (author, comment_count, date, menu_order, rand, title, default = date)
post_type = creates the list using only posts with this type (default = post)
taxonomy = the taxonomy to retrieve posts from, affects the "category" parameter (default = category)
image = show post image or not (yes, no, default = yes)
post_meta = display post meta (yes, no, default = no)
post_date = display post date (yes, no, default = no)
more_text = more link text (note more text is only available if display=content and the post has more tag)
style = layout style (list-post, grid4, grid3, grid2, grid2-thumb, list-thumb-image, default = list-post). You may also add custom css class in here (eg. style="grid4 custom-class").
unlink_image = remove the link on featured image (yes, no, default=no)
unlink_title = remove the link on the post title (yes, no, default=no)
This quick tutorial will show you how to install and use Themify's WordPress themes. The videos below summarize this tutorial.
Part 1
The first part of the video covers from theme installation to sample content import and Themify setting panel.
Part 2
The second part covers Themify styling panel, site logo image, custom CSS panel and skins.
1. Installing The Theme
NOTE: you need to have a copy of self-hosted WordPress installed on your own server in order to install the theme. You can not install custom themes or plugins on the accounts hosted at WordPress.com.
To install the theme:
Download the theme zip from the member area. The theme zips in the member area are always the latest version.
Login to your WordPress site's admin
Go to Appearance > Themes
Click on the "Install Themes" tab, then click on the "Upload" link
Upload the theme zip that you've downloaded from our server and click "Install Now"
Click "Activate"
You may also install the theme with FTP, read Installing Themes for details.
2. Importing Sample Content (optional)
If you are starting a new site and would like to import the sample content as seen on the demo site, here are the steps:
Go to "Tools > Import".
Click WordPress (if you are prompted to install the Importer plugin, do so)
Upload the sample-content.xml file included in the theme folder
You will be asked to map a user to the content and import the file attachments. Check "Download and import attachments" to import the gallery images from our demo site.
Now you may edit or delete the content as you like.
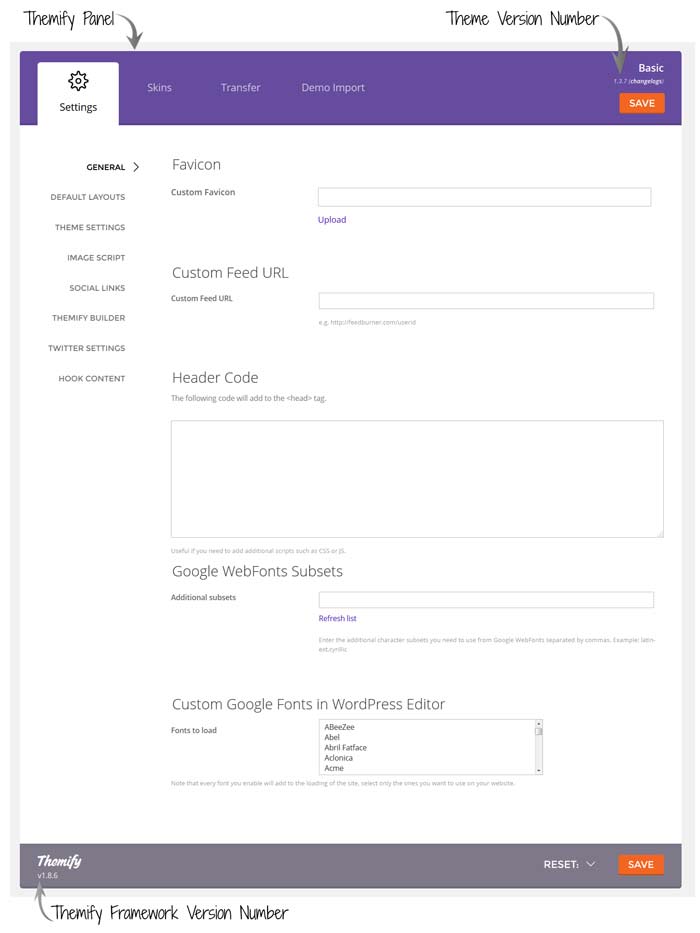
3. Theme Option Panel
After the theme is activated, it should redirects you to the Themify panel (theme option page). Under the theme option panel, there are four main tabs: Settings, Styling, Skins, and Transfer.
Settings
General Settings
Under the General settings tab, you can customize the favicon, feed url, insert header code, footer code, set search categories and RSS feed settings.
Default Layouts
Here you can customize the layout options for: index pages, single post page, and static page.
Theme Settings
Under the Theme Settings tab, you can customize the features specifically built for the theme such as slider, footer widgets, RSS and search bar, etc.
Image Script In the Image Script, you can customize or disable the img.php script that we use to dynamically generate the thumbnails.
Styling
Under the Styling tab, you can customize the appearance of the theme elements such as: body background, font styles, site logo, post title, footer, etc. You may also insert your own CSS code under the Custom CSS sub-tab.
Skins
Under the Skins tab, you may apply one of the pre-built skins. If you want to create your own skins, read Creating Theme Skins.
Transfer
Under the Transfer tab, you may backup or restore the setting data in the option panel. Click on Export to download the setting data for backup. You may restore the data by clicking on the Import button. The data in the option panel is stored in the database. Updating the theme or editing the template files does not affect the setting data.
Reset
At any time, you may clear the Settings or Styling data by clicking on the reset Settings and Styling button located at the bottom of the option panel.
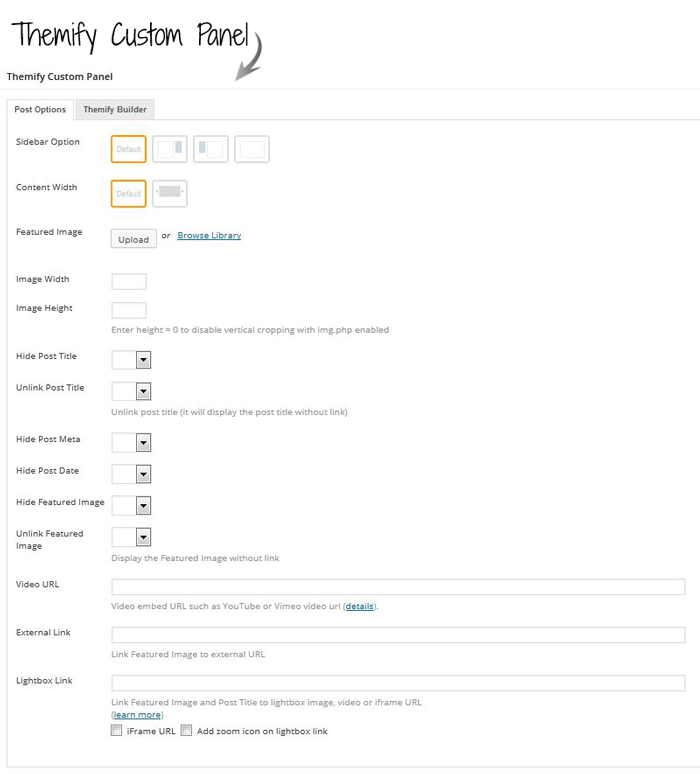
4. Writing Posts
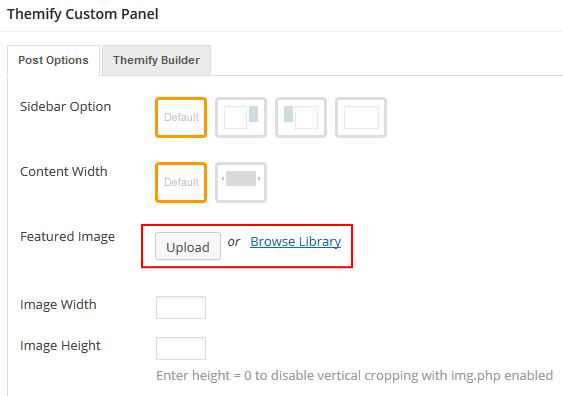
When adding or editing a Post, there is a Themify Custom Panel under the content box which allows you to override the Default Post Layout options that you set in the Themify option panel. You can override the sidebar option, toggle the visibility of the post elements such as post title, date, image, etc.
Featured Image
To attach a featured/post image, simply click on the "Upload" button in the Themify Custom Panel. The image will be automatically assigned as the post's Featured Image. The featured image is required if you want to display an image in the post, slider, and widgets. Read more on Featured Image.
5. Adding Pages
When adding or editing a Page, there is also a Themify Custom Panel under the content box. Under the page custom panel, you can also query posts from specific categor(ies). To display the query posts, select a category from the Query Categories dropdown menu. For example, you can create a Portfolio page to query the posts from the Portfolio category.
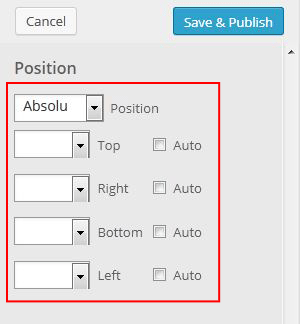
To reposition the logo, select "absolute" from the Position dropdown, enter the "top" and "left" position
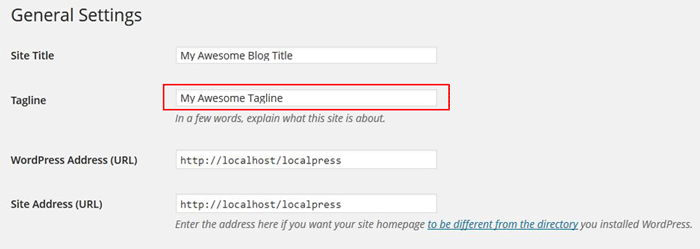
Site Description (Tagline)
To remove or edit the site description:
Go to wp-admin > Settings
Edit or remove the text in the Tagline field
To reposition the site description:
Select "absolute" from the Position dropdown, enter the "top" and "left" position
7. Custom Navigation Menus
To create a custom menu:
Go to Appearance > Menu
Click on the plus (+) sign to create a new menu (eg. Main Menu).
Add the menu items from the left panels (Custom Links, Pages, or Categories)
To create dropdown menu, drag the menu item toward the right (the item(s) will be indented)
When you are done adding the menu items, click "Save Menu"
Then on the top right panel where it says "Theme Locations", select the menu from the dropdown to assign it to the navigation location and click "Save"
NOTE: the custom menu can also be used with the widget (go to Appearance > Widgets and drop in the Custom Menu widget)
8. Widgets
To add/remove widgets:
Go to Appearance > Widgets
Drag the widgets from the Available Widgets panel located on the left side to the widget area panel on the right (eg. Sidebar, Social_Widget, Footer_Widget, etc.)
To remove the widgets, drag the widget from the widget area panel back to the Available Widgets panel. If you want to keep the widget setting for future use, drag it to the Inactive Widgets instead of the Available Widgets panel. It will save your widget settings. To retrieve the widget, drag the widget from Inactive Widgets panel instead of the Available Widgets panel.
9. Shortcodes
The theme also comes with a bunch of shortcodes: button, column, quote, map, etc. Read the shortcodes documentation on how to use them.