Affiliate programs has become one of the most popular strategies for online merchants, as it benefits both users and merchants. First, it creates awareness for merchants by allowing users/influencers to market their brand on their site. Second, it rewards users/influencers by giving them the opportunity to earn revenue through their site. The main concept of this program is to allow site owners to receive commission every time an affiliate link from their site is clicked, and performs a desired action by the merchant. These actions usually involve purchasing a product or filling out a contact form. The rise of merchants adopting this new concept has led to the birth of affiliate sites. Affiliate site owners create sites that are solely focused on marketing various affiliated linked products/services.
This tutorial will show you how you can easily build and customize your affiliate site with the Themify Builder. It will give you a step-by-step guide on how you can (1) upload any image with your affiliate product/services, (2) highlight how you can create custom action buttons that can be linked with your affiliate link, and (2) add an excerpt and (3) an external link to both the featured image and button.
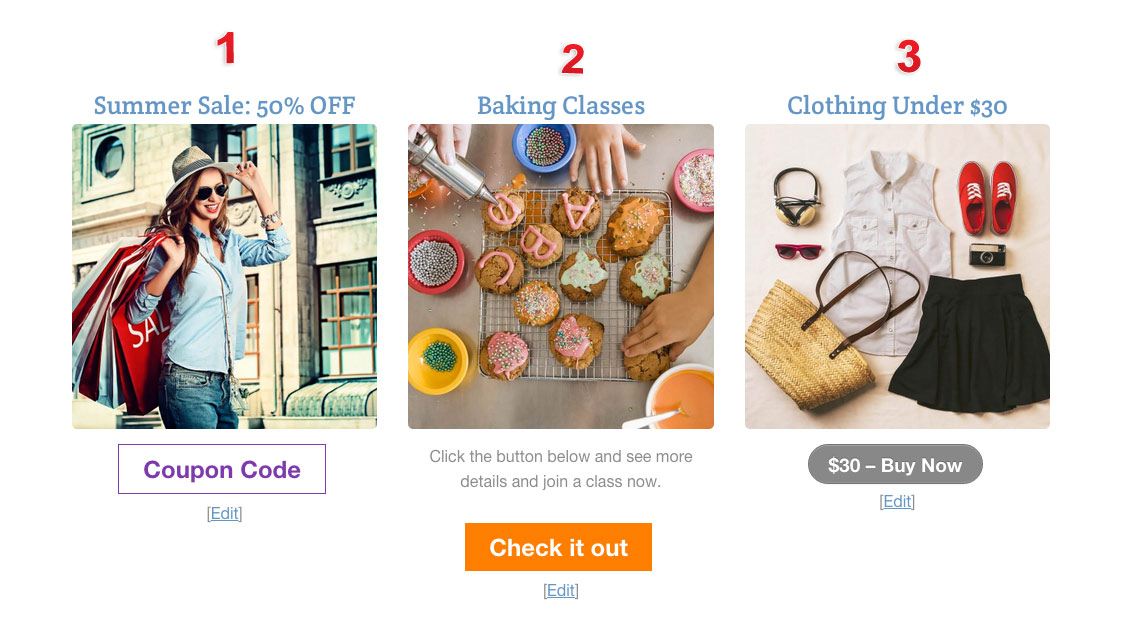
Above is a sample of how your affiliate site can look with the Builder.
Step 1: Create New Post
Let's start by first creating a post to display the product info. To do this, go to your WP Admin > Posts > Add New.
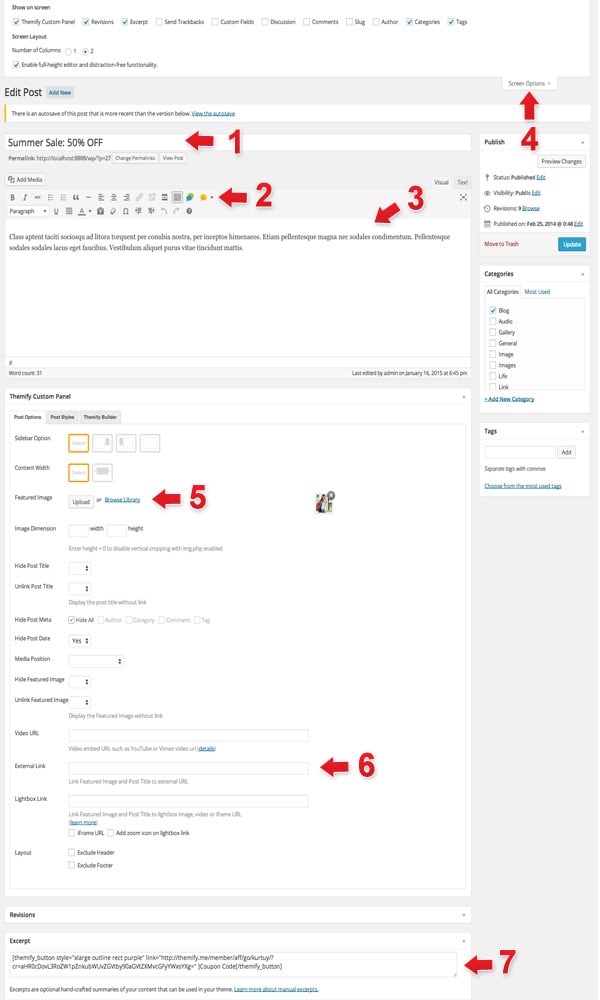
- 1) Post Title = Enter any title you would like to appear when your affiliate is on archive view
- 2) Shortcodes = [Optional] Insert any shortcodes you would like to appear on the description. This could be another button shortcode with the affiliate linked to it.
- 3) Content Editor = [Optional] Enter any description you would like to appear when the user goes to the actual post.
- 4) Screenoptions = Make sure that excerpts are checked. This will be the text that appears on the blog post when in archive view.
- 5) Featured Image = Add any image you would like to appear on the post site.
- 6) External Link =[Optional] Insert affiliate tracking URL on your featured image.
- 7) Excerpt = Any content placed in here will show in your post archive view. Add a Button shortcode. Click here to see all button shortcode guide on how to create on and all the customization features it has.

Step 2: Set-up Default Post Layout
After creating posts for your affiliate products. We now need to choose the layout of our posts when viewed. To do this go to your WP Admin >Themify theme >Themify Settings > Default Layouts > Default Index Layout
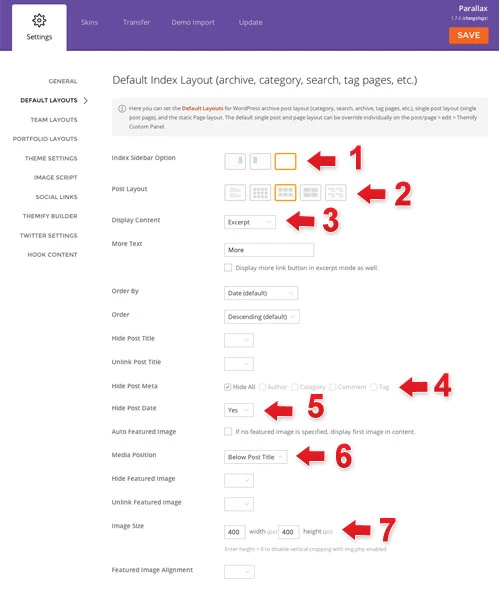
- 1) Index Sidebar Option = Choose if you would like to place a sidebar or not.
- 2) Post Layout = Choose how you want your posts to be viewed.
- 3) Display Content = Choose the excerpt option.
- 4) Hide Post Meta = Check this to remove all meta data when posts are viewed in archive.
- 5) Hide Post Date = Choose Yes to remove the date when the post was published.
- 6) Media Position = Choose whether you would like your image to appear below or on top of your title.
- 7) Image Size = Choose the width and height of the featured image size.

September 6, 2015 @ 1:02 pm
Never thought creating a affiliate theme is pretty easy.
But I have a doubt is your WordPress themes compatible with SSL ?
Jake
September 7, 2015 @ 4:32 am
Hi Jakek,
Thanks! We’re glad you found this post helpful :) Yes, our themes are SSL Compatible. If you need more info about this feel free to email us at info[at]themify.me.
November 12, 2015 @ 5:49 pm
Hello,
Any way to put url affiliates in “albuns”?
Thank you
November 13, 2015 @ 5:26 pm
Yes, this is possible. Do you mind sending us an email here – http://themify.me/contact, so that we’ll be able to provide you with some support.