
3D Tilt is a fun new way for users to experience your website. Instead of having all your images and text static, 3D Tilt allows images and text to float and glide slightly as the user moves their cursor over each item.
Check out our demo to get a taste of 3D Tilt.
Then use the incredibly simple two-step process to apply it to your site.
3D Tilt Effect Tutorial:
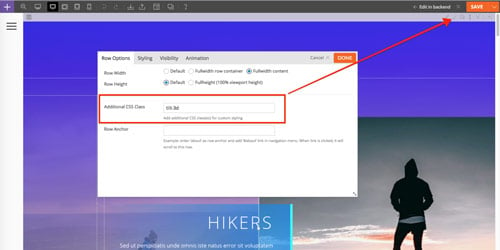
Step 1: Choose the row that you wish to apply the 3D tilt effect on. Add tilt-3d in the "Additional CSS Class" field.
Step 2: Then add the following Javascript code in Themify > General > Header Code:
<script>
jQuery(window).load(function(){
	var $ = jQuery;
	Themify.LoadAsync( 'https://cdnjs.cloudflare.com/ajax/libs/gsap/1.20.2/TweenMax.min.js', function(){
		var $body = $('body');
		$( '.tilt-3d' ).each( function(){
			var $panel = $( this );
			var $pContent = $('.module-text', $panel),
				$img = $('.module-image', $panel);

			function initTilt() {
				TweenMax.set([$pContent, $img], { transformStyle: "preserve-3d" });

				$body.mousemove(function(e) {
					var sxPos = ( e.pageX - $panel.offset().left ) / $panel.width() * 100 - 100;
					var syPos = ( e.pageY - $panel.offset().top ) / $panel.height() * 100 - 100;
					TweenMax.to($pContent, 2, {
						rotationY: 0.03 * sxPos,
						rotationX: -0.03 * syPos,
						transformPerspective: 500,
						transformOrigin: "center center -400",
						ease: Expo.easeOut
					});
					TweenMax.to($img, 2, {
						rotationY: 0.03 * sxPos,
						rotationX: -0.03 * syPos,
						transformPerspective: 500,
						transformOrigin: "center center -200",
						ease: Expo.easeOut
					});
				});
			};

			initTilt();
		} );

	} );
});
</script>
We'd like to give a shoutout to Peter Barr for creating the original 3D Tilt script we used in this tutorial.
If you enjoyed this tutorial, please let us know in the comments below. We'd also love to hear about any future tutorials you'd like to see. Enjoy!
March 15, 2018 @ 12:34 pm
Page builders in high demand and I can see Themify builder is a very good one too. Really amazing to see these effects.
March 15, 2018 @ 1:33 pm
I don’t think it works on Apple iPhone?
March 16, 2018 @ 5:57 am
Unfortunately, mobile does not support this script.
March 15, 2018 @ 1:37 pm
Thanks for sharing the article.
I want to give a try. I was just thinking to switch from Visual composer to themify page buider.
March 16, 2018 @ 6:19 am
Thank you for the nice article. I will be trying this out. Thank you.
March 16, 2018 @ 7:59 am
Hello, Awesome idea but could you please specify where to copy this code? We go to editor and then choose header.php??
Thank you
March 19, 2018 @ 6:31 pm
Hello,
Please allow me to help :) Please go to your WP Admin dashboard > Themify theme > General > Scroll down to the Header input field. Here’s a screenshot for your reference – https://cl.ly/1n0f0l0i2u0G. Thank you for your patience.
March 16, 2018 @ 9:22 am
Nice effect!
Does work on Chrome and Firefox, but not on Safari for me.
March 16, 2018 @ 11:33 am
this is great i was just thinking about this last week. youve read my mind!
@somnath – i switched from visual composer and i have no regrets. these themify guys are on the wave.
March 16, 2018 @ 6:51 pm
Hello,
What to put in the “Styling”? Can it be in “Parallax Scrolling”? And can it be in 100% width? Or it is for just the pistures and txt in the web?
Becouse I put in the Themify Ultra in “General” the code from above and in “Row options” the “tilt-3d” code.
P.S. The web I put is just the test for Themify.
Thanks for undrestending!
Best regards,
NeveN
March 19, 2018 @ 6:37 pm
Hello,
You actually don’t need to add any Parallax scrolling animation. You just need to add the code on your Header code then add the code “tilt-3d” on the additional CSS on each row where you’d like to add this feature.
March 18, 2018 @ 2:27 pm
thanks for the article.
The effect is really beautiful, it’s great, thank you.
April 16, 2018 @ 4:12 am
Thanks guys!
I noticed in the Code, that you pull some Ajax.js from Cloudflare (CDN).
But I also use Cloudflare with Ultra (I have one of their PAID Plans – Business, I think)
I use it for my Website: https://OrganicalBotanicals.com/ (so u can view page source).
QUESTION:
If I wish to implement this effect, is there anything in the Code I would need to “Include/Exclude”??
THANKS!!
November 22, 2018 @ 10:22 am
Thanks a lot for sharing this article, superb 3D effect. Surely I will the same on my website…keep it up and jeep sharing like this article.
January 21, 2019 @ 5:53 am
Hi Kurt,
Thanks a lot the this article
helped me a lot !
i will surely try it on my website :)
Bookmarked site for more content in future :)
February 4, 2019 @ 4:17 am
Hello Krut.
Thanks for this wonderfull Article
It awessome
August 26, 2019 @ 8:54 am
I have tried the effect and it actually looks really great when used with images and color coordination. Thanks for sharing in the simplest form of understanding.