
Plugins come and plugins go, but WordPress and Google are here to stay.
While many webmasters simply resort to using plugins developed by generous authors to include Google Analytics and Tag Manager in their WordPress websites, there’s no telling when said plugins can mess up the scripts or safety of your website (it’s not paranoia if more than 22% websites actually do get hacked via plugin vulnerabilities).
For the rest of us who can rely on our own skills of copying and pasting code, let’s take a gander at what it takes to correctly include and use Google Analytics and Google Tag Manager into WordPress websites for rapidly growing small businesses.
The Introductions:
For those of you who are unaware or somewhat in doubt, take a look at what the two tools are:Google Analytics:
Google Analytics (Standard) is a free code snippet that, once added, collects, consolidates, and filters data about your website traffic and turns it into insightful reports to help your business learn and grow with strategic action.
Google Tag Manager:
Google Tag Manager is also free and a place where you can manage all your code snippets that have been added to your website for data tracking. Essentially, it’s a dashboard that lets you easily add and manage tags (code snippets) from Google, 3rd party vendors, or your own for analytical data collection and tracking
You can add Google Analytics (and more) to your site via the Tag Manager. The following steps will explain how to do that.
Note: Make sure you have a Google Account and you are signed in on that.
The Set-up:
Step 1. Sign in to Google Analytics
Go to https://www.google.com/analytics/ and click Sign In >> Google Analytics. You’ll be brought to the following screen :
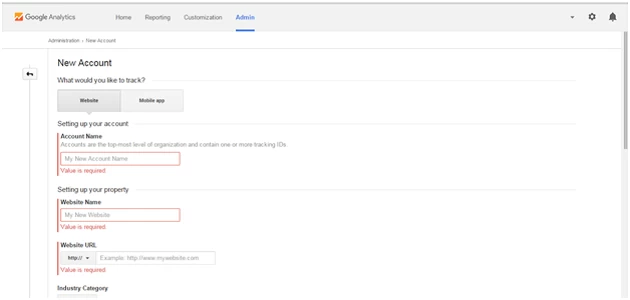
- Fill requisites: Account Name, Website Name, and the URL of website (www.example.com)
- Set Industry Category and Time Zone: Small businesses should select ‘Business and Industrial Markets’ and their local time zones (for best results)
- Click ‘Get Tracking ID’ and you get a Universal Analytics tracking ID.
You are brought to Admin section, where you’ll see the Tracking ID.
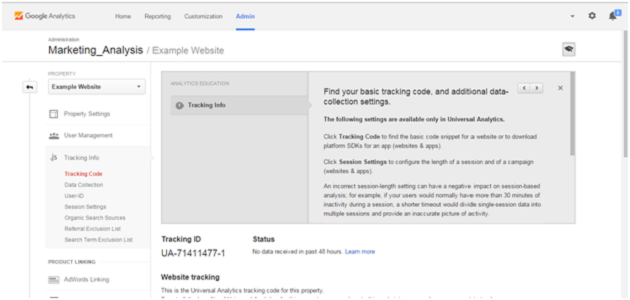
Make note of this Tracking ID. We’re going to need it.
Step 2. Sign In to Google Tag Manager
Go to https://www.google.com/analytics/ and Sign In >> Google Tag Manager with the same account you used on Google Analytics. You’ll be brought to the following screen:
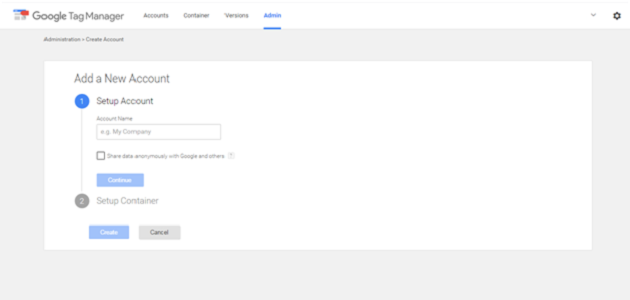
- Fill requisites:Account Name and Setup container (website/app URL).
- Click ‘Create’
You are brought to a screen that gives you code snippet for Google Tag Manager. Copy and paste it on a notepad.
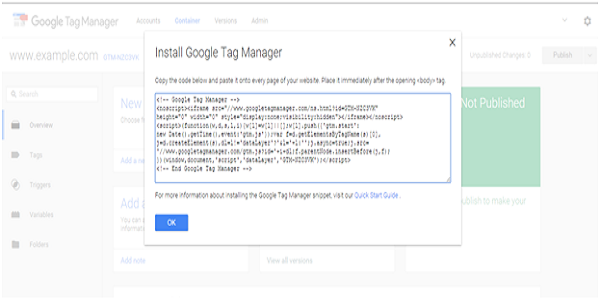
This code creates a GTM container tag that pulls data from HTML DOM of a website via JavaScript. Click OK and you’ll be brought to this screen:
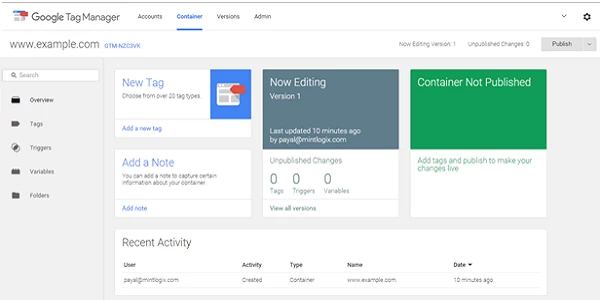
Your installation is almost done. The next step takes you to your website.
Step 3. Add Tag Manager Code in WordPress
You can do this directly on your Themify theme. Simply go to your WP Admin > Themify theme > Themify Settings > General. Scroll down to the Header Code and paste the Tag Manager code. Then save and close.
For third-party WordPress themes, you can do this by going to your WordPress installation folder > wp-content/themes/Your-current-theme/header.php
- Open this file and paste the code from ‘Install Google Tag Manager’ screen right after < body > tag.
- Save header.php and close
Step 4. Add Google Analytics via Tag Manager
In Container section, click New Tag. You’ll be brought to this screen:
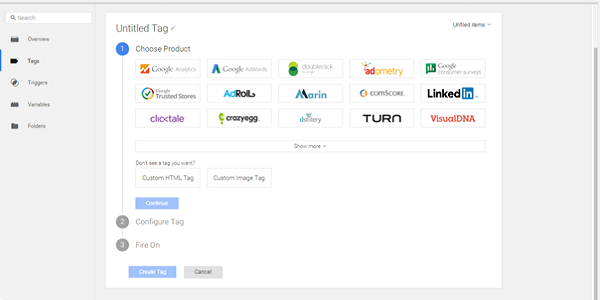
- Choose Product >> Google Analytics
- Choose a Tag Type >> Universal Analytics
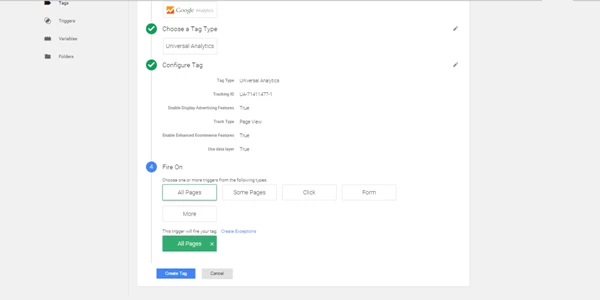
- Configure Tag:
- Add Tracking ID (as gathered from Step 1.) and paste it here.
- Enable Display Advertising Features.
- Optional: Under More Settings >> E-commerce Features, users can Enable Enhanced E-commerce Features (along with Data Layer) only on Page Views.
- Click Continue.
- Fire on: All pages.
- Click ‘Create Tag’
We are almost there.
Step 6. Publish Container
To push the tag on your website, click the red Publish button on the upper right corner of your screen. Then click Publish Now and Done.
TL; DR
Google Tag Manager is not a substitute for Google Analytics. It is only a desk from which you can easily work with and implement Analytics on your websites.
- Sign in to Google Analytics (A Google account will be all you need) to get the Universal Analytics Tracking ID.
- Sign in to Google Tag Manager with the same account you used in Step 1. Copy the code you receive once you fill the form.
- Paste this code to your header.php file of current theme (Found in wp-content/themes/Your-current-theme) after the < body > tag. Tag Manager is now installed in your WordPress website.
- Add Google Analytics by creating and publishing a tag through Tag Manager (see Step 4. Of the Set-Up for more details).
- Publish this container, and you’re done.
Using Google Analytics for Small Businesses:
Now that you have setup Analytics, it’s time to configure it for best results. What you need to do is:
1. Set Up Goals
Back on your Google Analytics >> Admin Screen, start with setting up goals of 4 types: Destination (User reaches a specified page), Duration (User spent at least the specified time on your website/app), Pages/Screens per Session (as viewed by the User), and Events (Clicked a button, watched a video, downloaded a file, etc.).
Goals are an important part of conversions and let you map how far you have come, and how far you have to go.
2. E-Commerce Tracking
In the guide above Step 4 (3c) we enabled Enhanced E-commerce features before publishing the tag on WordPress. This enables Google Analytics to track e-commerce attributes like products and sales performances, transactions, time-to-purchase and more. This feature is a must. Make sure you have enabled it (go to Admin >> View >> E-Commerce Settings to enable them) .
3. Demographics and Interests Reports
Reporting >> Audience >> Demographics >> Overview
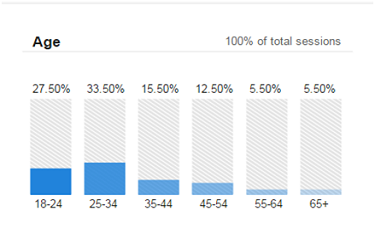
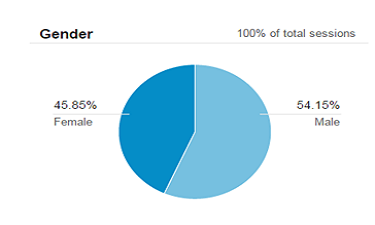

This section includes reports for Age, Gender, and Interests category. When you check the box for Enable Display Advertising features (as mentioned in Step 4. 3b) and enable the Advertising features in Analytics, you can harness this reporting feature to get a better understanding of who your users are and target them more effectively. You can also segment other analytics data to see how your converting and non-converting users differ and adjust your ad campaign strategies accordingly.
4. Behaviour Overview
Reporting >> Behaviour >> Overview
This section helps you find what you are doing right (or wrong). Behaviour Overview gives you an analytical insight on how users are exploring your content.
This is a particularly good feature to use and understand for marketing and UX testing.
-
a. Diagnose Landing Pages : Under Behaviour >> Site Content >> Landing Pages, you get data about the page(s) through which users entered your site/app. The data you’ll need to pay special attention to is Bounce Rate (percentage of visitors who left your site/app after viewing just one page). If it’s higher than your Goal Conversion rate, you have a problem and you should work on modifying your landing pages.
b. Identify Popular Content : Under Behaviour >> Site Content >> All pages, you get data about every single page/screen of your site/app. The metrics to focus on are Bounce Rate (visitors leaving without going further than this page/screen) and Average Time on Page (average time visitors spent on a single or a group of pages/screens).
c. Site Speed Overview: Under Behaviour >> Site Speed >> Overview, you get average load sample times of pages/screens of your site/app to help you determine and improve your performance. The data on average page load speeds can be segmented by Browser, Country, and Page URL to more accurately pinpoint any problems
d. Events Overview: Under Behaviour >> Events >> Overview lies the real ‘star’ of Google Analytics (in my humble opinion), i.e., Event Tracking. For interactive (or even non-interactive) elements on web pages/screens, event tracking is your best friend
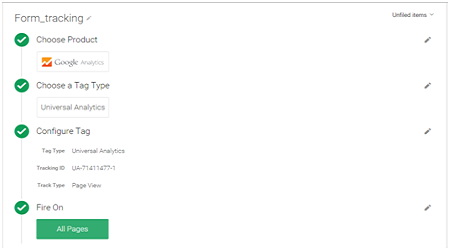
Here’s a brief How-to on Setting up an event tracking tag to record number of form submissions via Google Tag Manager:
Step 1. Create a New Tag (Name it Form_tracking or something similar for comprehension. Product: Google Analytics. Tag Type: Universal Analytics. Configuration (Track Type): Page View. Set it to fire on All Pages.
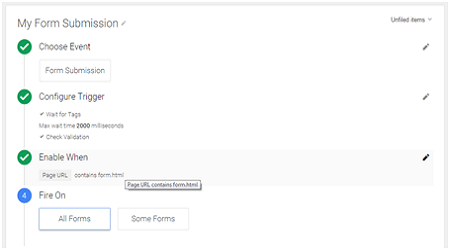
Step 2. Create a Trigger. Event: Form Submission. Configure: Wait for Tags (max. wait time = 2000 ms) and Check Validation. Enable When: Page URL contains form.html (or the link to your forms). Fire on: All forms.
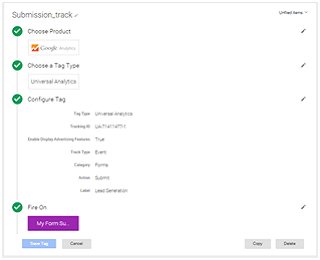
Step 3. Create a new tag (Example: “Submission_Track). Product: Google Analytics. Tag Type: Universal Analytics.
Configure Tag:
Step 4. Fire On: Form. Select The Trigger you created in Step 2 (My Form Submission).
Step 5. Step 5. Create the tag. Save a version of this container and publish it (once you have previewed the changes).
Once fired, this tag will track form submissions that Google Analytics will report in your Behaviour >> Events tab. Remember that you’ll have to create individual tags for interactive elements that you want to track. It’s a good idea to map the significant elements out beforehand.
The Upshot
Google Tag Manager makes Analytics implementation so much easier than ever for those unfamiliar with coding. This is why it is the preferred way (and not just for non-coders) to use Google Analytics and its various features, which would otherwise require direct delving into JavaScript.
It’s your turn to statistics into insights that help your business grow.
So what are you waiting for?
Author Bio:
This article is written by Tracey Jones, a renowned web developer who works with HireWPGeeks Ltd. When she is not developing websites, she helps her clients to Hire WordPress Developer from the team of 150+ experts. She also has a strong passion for writing blogs and articles about technical stuffs in her free time.
January 7, 2016 @ 12:14 am
Amazing article!
I still feel that Google Analytics and the Tag Manager are gravely under utilized. You can do so much with those two programs, they are free and provide a lot of useful data.
What a lot of my clients tell me is that they get lost in Analytics. It can be overwhelming and finding the data that you need time-consuming. Dashboards are a welcome problem solvers in those cases.
January 10, 2016 @ 7:27 pm
Thoank You Tracey Jones, for a cool article. Now i will setup google analytics to check my blog stats. Nice share :)
February 26, 2016 @ 6:19 am
thanks appreciating my work
January 13, 2016 @ 3:41 pm
Google Tag Manager should be placed immediately inside the tag and not in the . Would adding this to header.php be overwritten when the theme (e.g. Themify Ultra) is updated?
January 14, 2016 @ 10:55 pm
Hi Ben,
Please try to edit the core theme files as your changes will be overwritten when the theme is updated. To add code in header or footer, go to Themify panel > Settings > General, then insert your code in Header Code or Footer Code textarea.
March 4, 2016 @ 5:48 am
Hello Jones,
It is really a fantastic article. Thank you very much for this. But I have a question – Is there any problem if I use any plugin to set up analytics on my site?
April 19, 2016 @ 6:17 am
Hello Tracey,
I have set up Google analytics for the blogs but now going to set it for business websites, thank you for making my work easier.
Best Regards,
Karan
June 14, 2016 @ 9:00 pm
Great article helped me to understand to use the Google Tag Manager, thank you. hugs
June 22, 2016 @ 1:06 pm
I know, right? So many people don’t even know the difference between these two awesome Google products that I just had to write this tutorial.
So glad it helped you, Milton. :)
October 6, 2016 @ 8:42 pm
omg THANK YOU for this line:
“Go to https://www.google.com/analytics/ and click Sign In >> Google Analytics. You’ll be brought to the following screen ”
I’ve been on a bunch of help sites and NO ONE says how to get to the page! I don’t have any option for it on my WordPress dashboard page either! It’s only a summary that shows for Google Analytics there.
November 15, 2016 @ 5:07 am
Decent article but now there are a couple issues that I see everyone asking about in the Themify forums:
1) this article is now out of date as the code snippets that GTM is outputting. GTM wants users to post snippet into the and then a second snippet into . So, the instructions are a little off for GTM.
2) Placing GTM code in the Themify settings Header code box (as instructed) may or may not work for users. Plus, there is no easy way to insert the code without creating a child theme or installing plugins.
Even themify support gurus are recommending downloading a plug in to install GTM. Can you please deprecate or update this article with a decent fix as its causing confusion. Thanks
November 15, 2016 @ 5:10 am
clarifying point 1) above since comment software didnt like html tags,
“GTM wants users to post snippet into the “head” and then a second snippet into the “body”..
August 8, 2018 @ 6:44 am
Hello Tracey Jones,
Thanks for sharing this useful article with all of us. I also learnt more many things from this blog about analytics and tag manager. I also running a small business and sometimes these articles and blogs helps me alot. Thanks for sharing again.
August 16, 2018 @ 1:30 pm
I found this much useful blog about google analytics. Google analytics is very important part of SEO service. Very beneficial tool for website. You share the information is very helpful. Thanks!
December 3, 2018 @ 5:28 am
That’s really helpful guide. It took me just a few minutes to set up analytics on my site through this guide.
Thanks!
December 19, 2018 @ 8:54 pm
Techshali, I just followed this guide, but it is outdated. How did you publish your Container? There isn’t a red Publish button and now I can’t publish the container in GTM.
February 5, 2019 @ 7:43 am
Thanks for sharing useful guide about how to integrate google analytics to wordpress via GTM.
March 7, 2019 @ 4:45 am
Much need guide for WordPress beginners!
Thanks you so much.
March 29, 2019 @ 7:53 am
Great stuff. Thanks for the sharing. Keep blogging
June 3, 2019 @ 9:22 am
For people (like me) trying to setup the current version of Google Tag Manager (as of June 2019), which includes a 2nd code snippet that is supposed to come after the tag, there is a topic on Themify support forum :
https://themify.me/forum/topic/google-tag-manager-4
August 11, 2019 @ 4:49 pm
Thank you Nina! Do you know if i need to choose any Conditions on the hook…?
July 4, 2019 @ 5:40 am
Thank you for you sharing. The article is very helpful. It’s help me to analyze and tag.
October 2, 2019 @ 12:38 pm
The article mentions only the adding Google Tag Manager’s code in the WordPress, should I also add a Google Analytics code in my WordPress?
October 3, 2019 @ 9:31 pm
Hi Yana,
Please check the Step 1 of the tutorial above for getting Google Analytics code, from Step 2 we are explaining how to add it using Google Tag Manager.