In this tutorial, we are going to show you in 3 steps how to easily map domains to any WordPress page. It is extremely useful when you run many single-page sites and don’t want to install a separate WordPress for each site.
Let’s say you are an eBook author and you are marketing each eBook on a separate site. Typically you would install a WordPress on each domain. This can be time consuming as you would need to create a database for each site. With domain mapping, you can map any domain you own to a WordPress page (eg. you can map ‘ebook1.com’ to your page ‘/ebook1’). So you only need to install WordPress once, and continue to create unlimited pages for all of your sites.
Also, if you ever decide to change the domain name you are using, there’s an easy way to mass replace your URLs. Or perhaps you’re thinking of taking your WordPress website to the next level. Add an extra layer of security and rank higher in Google searches by adding an SSL certificate to your website.
For this tutorial on mapping domains to WordPress pages, we’ll be using a free plugin called Multiple Domain Mapping on Single Site. You’ll also need to own the domain(s) you’re going to use. With that, let’s begin!
1. Install the Plugin
- First download the plugin zip file: Multiple Domain Mapping on Single Site
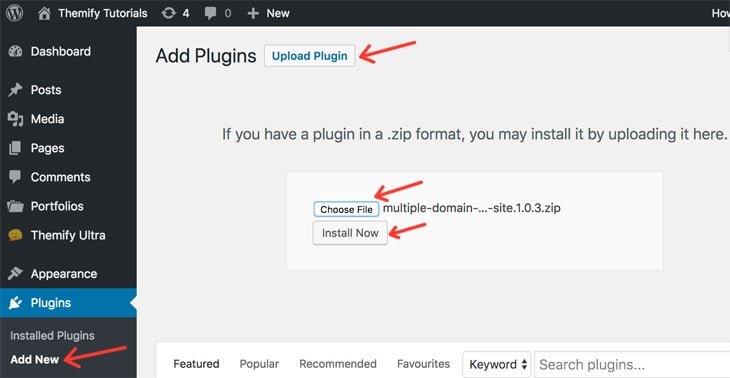
- Login to your WP admin dashboard > go to Plugins > Add New > Upload > Choose File > select the plugin zip file > Install Now > Activate

2. Add A Page
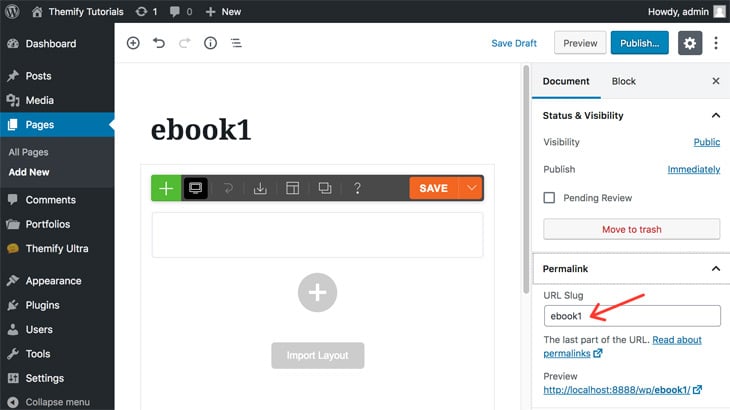
We’re going to be adding the page you want your domain to point to. Don’t forget to double-check the proper page URL slug you want to use.
- WP Admin > Pages > Add New > enter in your page name > double check your URL slug > Save Draft

3. Map Your Domains
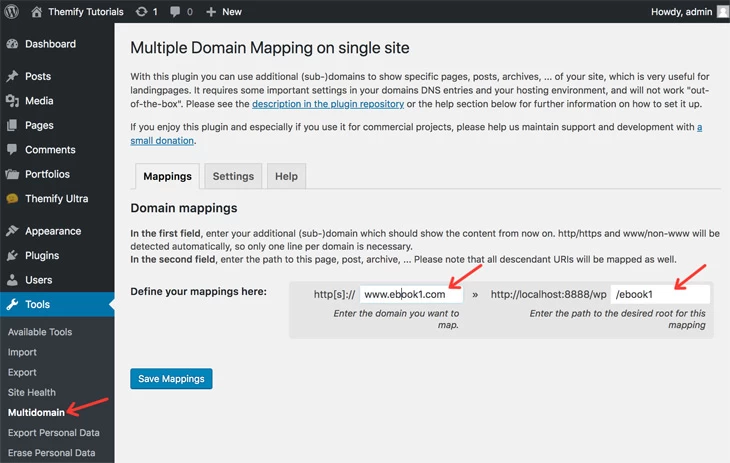
- Go to Tools > Multidomain > enter your domain in the first field > enter the page URL you just created > Save Mappings

That’s it! You’ve just mapped your domain to a WordPress page. We hope you all enjoyed this foundational tutorial, and we’re getting ready to launch some more exciting features. Stay tuned.
July 3, 2019 @ 2:00 pm
Hi. We dont have to do anything on the domain side? Just change domain nameserver to main website and it will find this page automatically?
Thanks, sorry for newbie question!
July 3, 2019 @ 4:11 pm
Hi Terry,
Yes, by following the above tutorial and if your domain’s nameserver is set to the same host as your main site it will map the domain to show the page you’ve created at Step #2.
July 4, 2019 @ 5:33 pm
This is actually pretty powerful simple and needed! Yes Terry you are right. We need to make sure the domain as well is able to reach the hosting provider system. The way I do this is in the godaddy interface (they manage my domains [I don’t host with them]) and point the domain to my hosts name servers. You can also use an ip address but I don’t do it that way.
July 8, 2019 @ 2:18 pm
Thank you this is very useful and seems easy enough to setup.
July 8, 2019 @ 6:14 pm
Ok, and how I must set DNS ? And how it will work with SEO principles?
July 8, 2019 @ 11:28 pm
Hi Roman,
1. About how to set DNS, unfortunately we can’t help as it can be different for every Hosting Provider, please check your Hosting Provider’s Documentation on this topic.
2. It shouldn’t affect your SEO because search engines will index it as a site.
July 14, 2019 @ 8:22 pm
Great suggestions. I run a few single page / landing page sites and anything to simplify this is helpful.
October 8, 2019 @ 7:30 pm
Anybody got this working flawlessly with SSL enabled on the main site? I have the problem that when the landingpage-domains have no SSL, and the pages are being server from SSL enforced hosting, this results in security warnings…
To enable SSL on the landing-domains, I registered them as add-on domain, and then they automatically get another source (from the physical allocated directory), so the mapping plugins mapped source won’t be reached.
Trying this on Siteground. Anybody more success??
October 8, 2019 @ 10:17 pm
Never mind! Got it working.
Read in the documentation that if you have to assign hosting for the domain (which I needed to to be able to install SSL), you must point the other domain to the exact same directory your WordPress installation (the one with this plugin) resides in.
Works like a charm.
December 29, 2019 @ 9:02 am
Wow!!! Simply superb & great suggestion. Great solution dear. I’m facing such kind of problems for a long time. Great initiative indeed. Thanks a lot for all the things you have done here.