
What Is Affiliate Marketing?
Many of you may have heard the term before but what exactly is affiliate marketing and how do you make money from it? To put it simply, affiliate marketing is the process of earning a commission by promoting someone else's products. For example, if you promote a link to purchase another company's product through your website, and someone purchases the item through that link, you get a percentage of the sale. Pretty simple, right? The best part is that anyone can do it!
In this edition of our tutorial series, we will go over how you can create an Amazon affiliate website using WordPress and Woocommerce.
1. Get an Affiliate Amazon Account
You will have to make an Amazon affiliate account known as Amazon Associates. If you already have an Amazon account then you will be able to sign in, otherwise you will have to make an Amazon account.

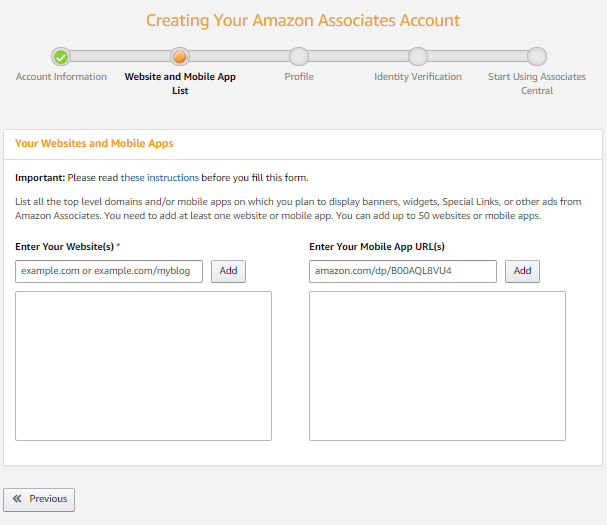
After you complete the signup process, Amazon will then review and approve your Amazon Associates account.
2. Install WooCommerce
We are now going to install WooCommerce, which is an eCommerce plugin that allows you to create and manage an online store. From your WordPress Dashboard, go to Plugins > Add New and search for 'WooCommerce'. Then install and activate the plugin.
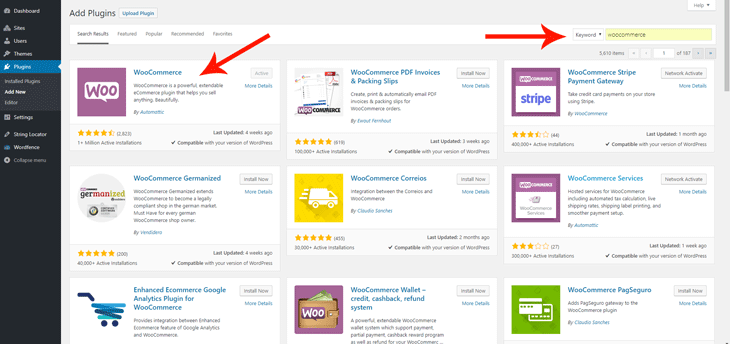
Nice work! We have just installed WooCommerce and signed up for the Amazon Associates program.
3. Get the Amazon Affiliate Link for a Product
To retrieve the Amazon affiliate link for a product, you will have to login to your Amazon Associates account dashboard. Next, search for a product that you would like to promote. This should depend on the niche of your blog/website, so you will want to carefully select products that are related to the purpose of your site.
When you have found a product that you want to use, click Get Link and paste it to your product page in WordPress.

4. Add the New Product with the Amazon Affiliate Link
Now, we are going to create a new product in WooCommerce and assign the Amazon Affiliate link that we have just copied.
Go to the WordPress Admin Panel > Products > Add New. This will open a new product page where we can edit the product information.
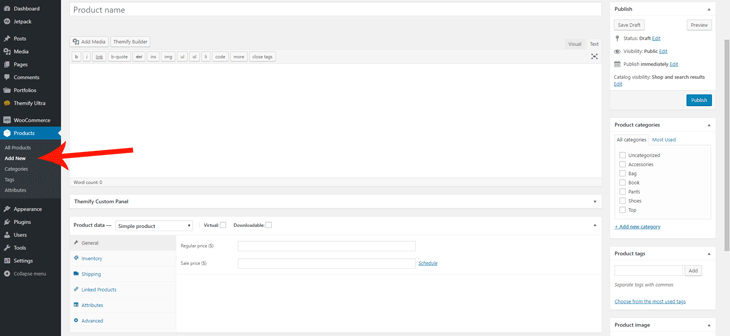
Great work so far. We are now going to populate our product with the product's information:
- Add the product's title
- Add a description of the product, you can use the description from the product's Amazon page
- Add the Categories and Tags
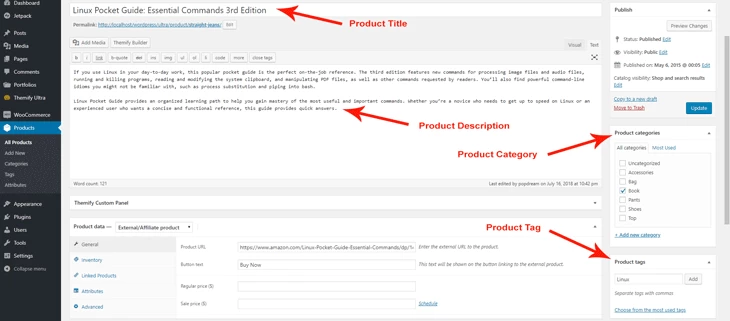
After entering the product information, we want to edit the Product Data section.
- Select the option External/Affiliate Product from the dropdown menu
- Insert the product affiliate link from Amazon
- Upload an image of the product
- This is optional but you can add a gallery for the product
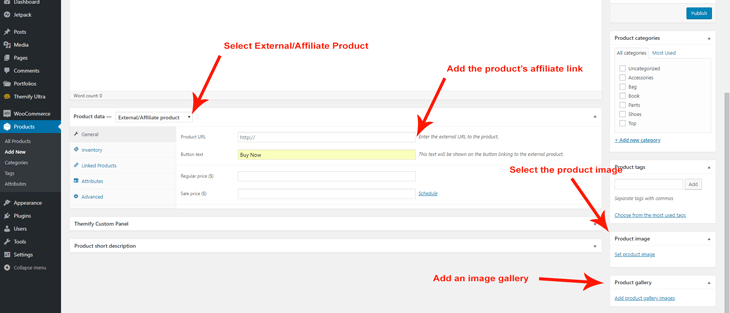
The Add To Cart button will now link to the product page on Amazon and it can be purchased there. The Add To Cart button title can be changed to something more suitable such as 'Purchase Now'.
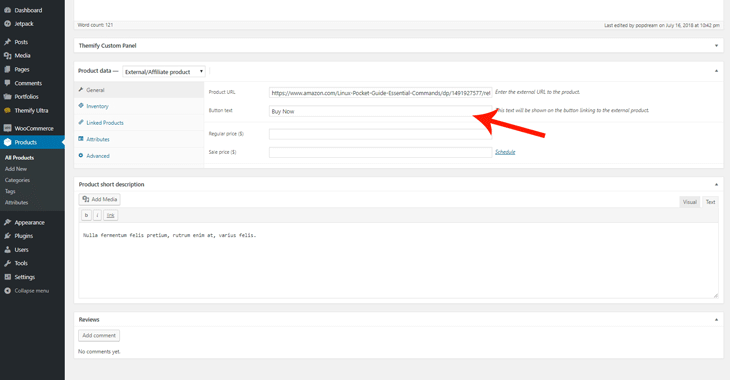
Please be aware that, you need to leave the 'Price' field blank. This will allow users to check the current price on Amazon. Amazon's affiliate program policies don't allow you to manually add the price.
Once you have completely filled out the product information, you can publish the changes. Now, you only need to add more products to the shop!
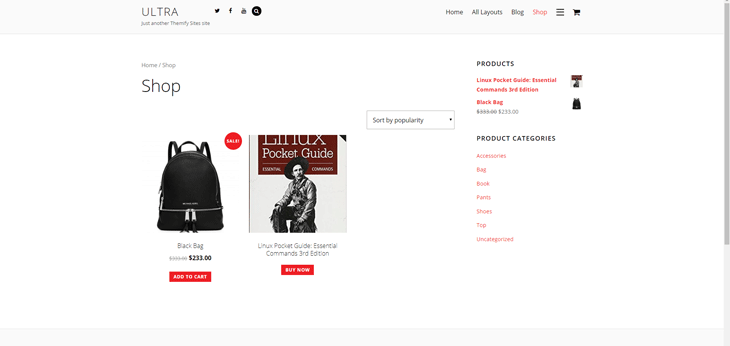
The end result should look like the image below. This was all achieved using our Ultra Theme. You can see that our affiliate product on the right (the book) is using the 'Buy Now' button instead of the 'Add To Cart' button.
And done!
Congratulations! You've just set up an Amazon Associates account and are one step closer to creating a profit from any affiliate links you promote on your website. We've provided the technical expertise required in setting up the affiliate links, however, we recommend searching best practices of promoting said products in an ethically responsible way.
Great work. Now that you've implemented WooCommerce onto your WordPress site, take a look at the best plugins to supercharge it.
We're looking to add more basic tutorials for our Themify and larger WordPress community, so please enjoy and check out the next one!
October 22, 2018 @ 8:36 am
Nice blog! Thanks for sharing info about sharing affiliate site woocommerce.
November 27, 2018 @ 1:34 am
I have a question. So the “Buy Now” button or whatever you name it, that works fine and redirects me to whatever affiliate link I am going for. However, if you click on the product and not the button it takes you to its product page. The “Buy Now” button does not redirect there and is pointless. Any fixes for this?
October 22, 2018 @ 4:47 pm
Is there a quick method to export a number of products from Amazon and import into in to woocommerce?
October 22, 2018 @ 6:01 pm
Cool work! And very up-to-date with current eCommerce market trends!
October 23, 2018 @ 7:28 am
Wow.. I never knew we could use Woocommerce for Amazon affiliate. I thought it only for selling our own products. Thank you.
October 23, 2018 @ 1:21 pm
Is this compliant with Amazon’s policy for affiliates? In other words is it legit to promote amazon products on your site as described without breaking their rules?
October 23, 2018 @ 9:06 pm
hello
this post was exactly the thing that i needed.
thank you so much
December 6, 2018 @ 8:19 pm
don’t use amazon product description use your own wording or get ready for google penalty.
They should mention it in this article…
October 26, 2018 @ 1:26 pm
Ok thats how to set it up but which of the Themify themes is best to use
Thanks
Brian
October 26, 2018 @ 2:15 pm
Hi Brian,
I recommend our Ultra theme (https://themify.me/themes/ultra) because it’ll give you the most flexibility to build any type of affiliate site.
October 27, 2018 @ 1:52 am
Hi Brian,
If you unsure whether Ultra theme suit for you or not, feel free to check out my Ultra theme review and 12 reasons why you should use it.
https://www.jebatonline.com/reviews/ultra-theme/
Shah
November 5, 2018 @ 9:23 am
Useful information, thanks for sharing it.
November 10, 2018 @ 8:41 pm
This is awesome. Thank you. Is it possible to have the link to Amazon open in a new tab so they don’t leave my site if they click on one of the products?
November 12, 2018 @ 12:08 am
Hi Tom,
You can install this plugin to open external links in new window: https://wordpress.org/plugins/open-external-links-in-a-new-window/.
November 12, 2018 @ 7:35 pm
Hi, is it possible to use the official Amazon Affiliate plugin for WordPress to populate the shop instead of the procedure you used?
And is there a way to make a shopping cart (eg using the Shoppe theme, not Ultra) to add many products so the user is redirected to Amazon only at the final step to pay the whole cart?
Thank you!
February 5, 2019 @ 11:48 pm
That’s an excellent WordPress plug-in. And always set the options to “no follow.”
November 18, 2018 @ 5:58 am
I am a regular blogger and thinking to move on affiliate too. But, I was getting confused about how I could add products. I am going to add this to my site. Do you have any suggestions wp theme what would be the best suit for affiliate business?
Thanks in advanced
November 27, 2018 @ 1:37 am
The Button only redirects on the initial page, but if you don’t click the button and instead click on the product image it takes you to the product page. All good so far, however if you click the Buy Now button or whatever you named it, there is no redirect and acts like you added something to the account.
December 3, 2018 @ 3:21 pm
Joseph, I had the same problem, and solved by disabling the Ajax Cart in Themify settings, Shop settings, Ajax Cart -> disable on single product page.
December 5, 2018 @ 1:30 pm
Thank you I will give it a try
February 5, 2019 @ 11:47 pm
I always wonder how people with Amazon affiliate sites who run either on a WordPress blog or a static website manage to automatically have the site content updated whereas their search engine rankings are steadily improving off of the Amazon affiliate content alone.
November 14, 2019 @ 11:54 am
Thanks for your help!