
Take full creative control with your site using Themify Builder - starting with your header! We understand the need to create unique sites that showcase your brand. Whether it's with the post/page layouts, color scheme, or even the fonts used - every little detail counts when making your site stand-out from the competition. Which is why we've created this tutorial to showcase how you can create your own custom header design using the Themify Builder.
Note: This tutorial is only applicable with the Ultra or Shoppe theme.
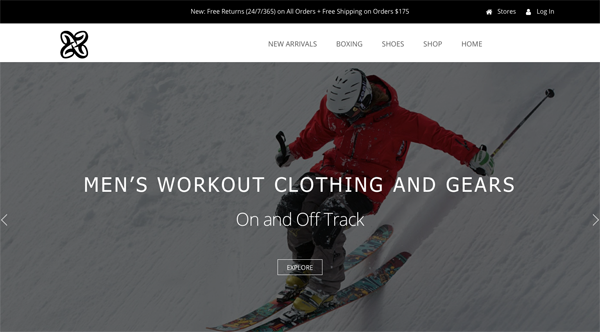
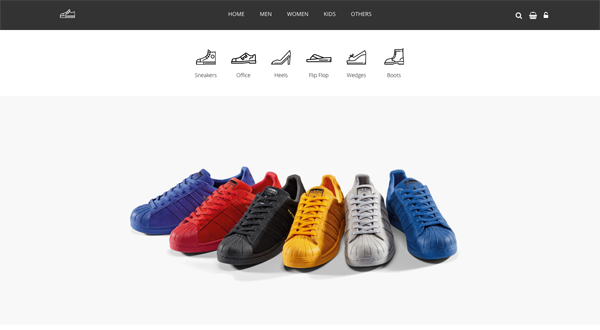
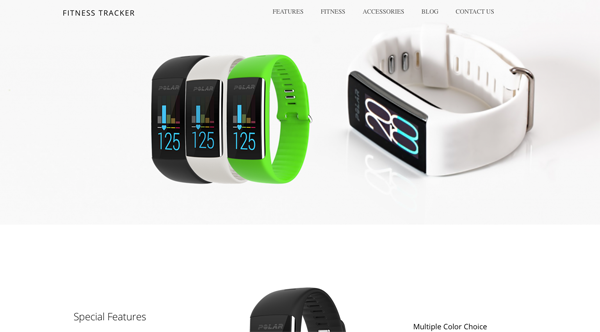
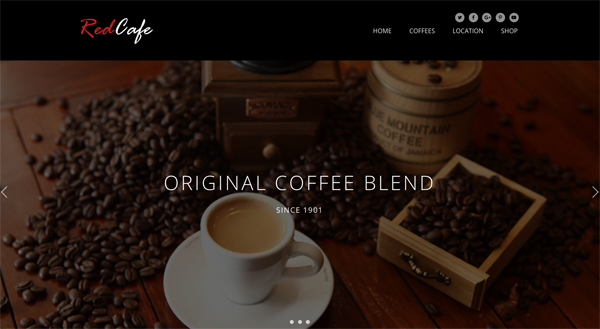
5 Free Header Designs
We wanted to get you started right away, so in addition to the tutorial, as a special treat, we've created 5 free header designs that you can import. You can view and download these demo layouts below.
Requirements:
- Ultra or Shoppe theme activated on user site
Now let's get started!
Step 1:
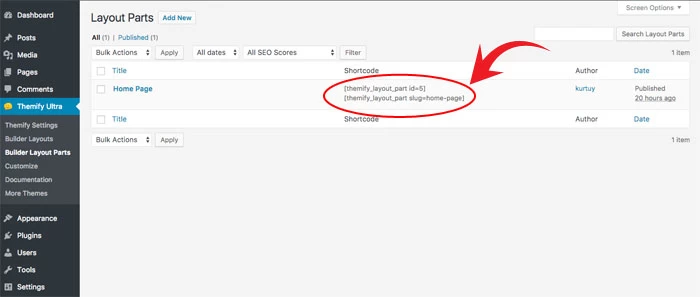
- Go to your Themify theme > Builder Layout Part
- Create a new Builder Layout Part or download one of our free header design here
- Copy the layout part shortcode
Step 2:
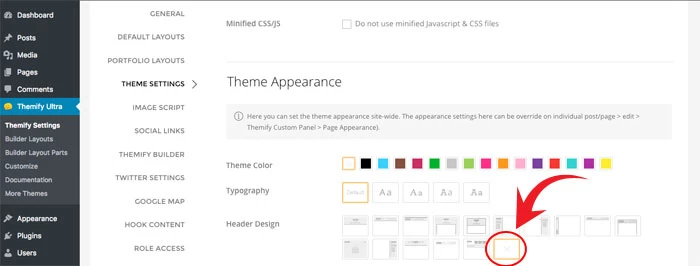
- Go to your Themify Settings > Theme Settings >Theme Appearance
- Select "No Header"
Step 3:
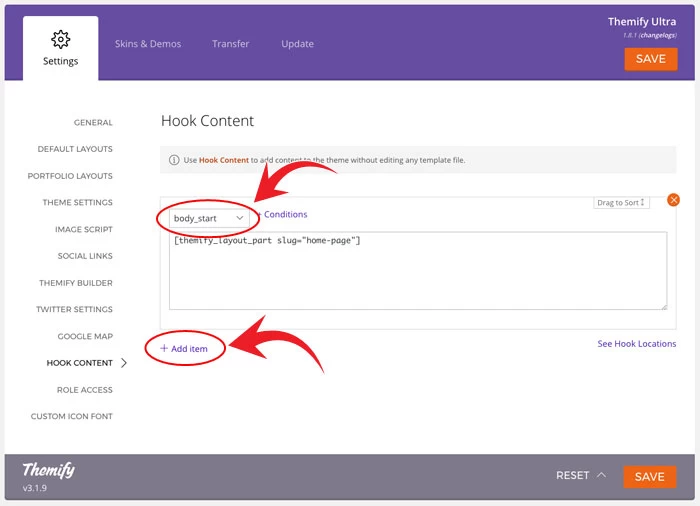
- Go to your Themify Settings > Hook Content
- Add a new hook content in "body_start"
- Insert the layout part shortcode (the header layout created in step 1). This will insert the header layout part in the header area.
- Optional: Add a condition to set which page you would like to use this header only. You can do this by clicking the "+condition" option.
That's it! 3 simple steps to create your own custom header!
Step 4 (Optional): Sticky Header
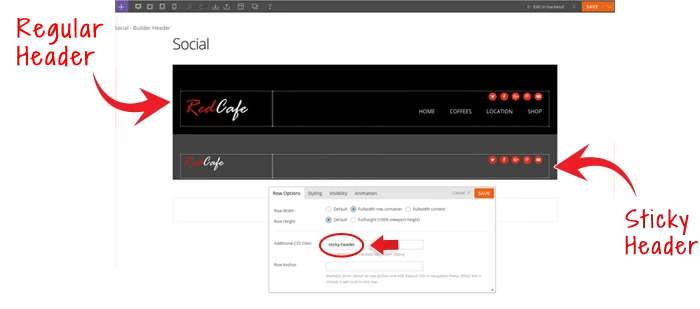
The following steps will show you how to create a sticky header using two Builder rows.
- Go to Themify > Settings > General, add the following code in Header Code:
<style type="text/css"> body:not(.themify_builder_active) .themify_builder_row.sticky-header { position: fixed; top: -100%; opacity: 0; transition: all 1s; z-index: 100; } body:not(.themify_builder_active).builder_sticky_header .themify_builder_row.sticky-header { opacity: 1; top: 0; } </style> <script type="text/javascript" defer> document.addEventListener( 'DOMContentLoaded', function () { var body = jQuery( 'body' ), header = jQuery( '.themify_builder_row.regular-header' ); // element that when we scroll past it, should trigger the fixed header function themify_header_custom_scroll(){ if ( jQuery(window).scrollTop() <= header.outerHeight() ) { body.removeClass( 'builder_sticky_header' ); } else { body.addClass( 'builder_sticky_header' ); } } if ( header.length > 0 ) { themify_header_custom_scroll(); jQuery(window).on( 'scroll touchstart.touchScroll touchmove.touchScroll', themify_header_custom_scroll ); } }); </script> - Edit the Builder Layout Part. Create 2 rows of your desired design (ie. the first row is the regular header and the second row would be the sticky header)
- On the first row, add "regular-header" in the Additional CSS Class field
- On the second row and add "sticky-header" in the Additional CSS Class field
Free Header Designs
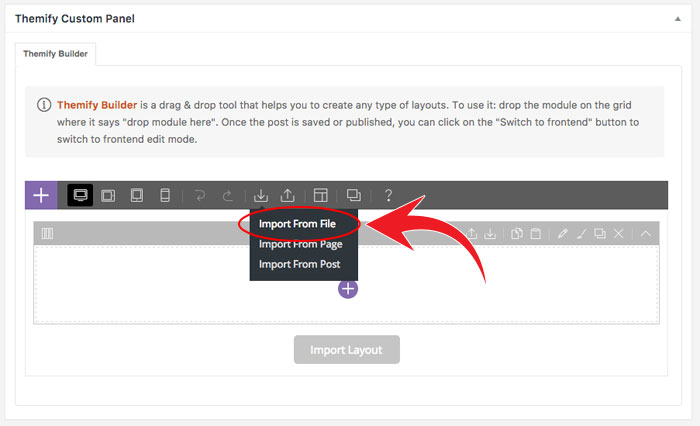
You can import these header designs by clicking on the Import icon and select "Import from File" (screenshot)

July 11, 2017 @ 11:15 pm
This is so great – I would have never thought of using hook content like that. Would love to see you guys post more examples.
Also, do you think you guys could incorporate a feature of making custom headers an option in the Appearance panel? So that you can build one, then toggle it on and off on specific pages via the header options in the appearance panel.
July 13, 2017 @ 2:59 pm
Thank you for your suggestion :) We’ll discuss this with our team and see what we can do with our future enhancements.
July 12, 2017 @ 7:12 am
Hello,
how do I import the pre designed downloaded “Builder Layout Part”?
July 13, 2017 @ 3:02 pm
Hi Denis,
You can import the Builder Layout Part by downloading the .zip file on the header that you’d like. Then import it by going to your Wp Admin > Themify theme > Builder Layout Part > Then create a new one and import it from the downloaded file.
September 1, 2017 @ 2:41 pm
When I download the free header, all I get is a txt. document, no zip file. Cannot import. Am I missing something?
September 6, 2017 @ 5:06 pm
Hi Lianne,
You might be using a Safari browser. Safari has this auto unzip feature when you download a zip file. With that said, please consider to use another browser (ie. Chrome). This will allow you to download the .zip file without auto extracting it.
Hope this answers your question. If you need any further clarification with anything, please don’t hesitate to reach out to us here – https://themify.me/contact.
July 13, 2017 @ 3:36 pm
I would also like to know how to import?
July 13, 2017 @ 11:23 pm
Hey Kyle,
You can import the pre-made Header Designs by following the steps below:
1. Scroll down on the Free Header Design and download the file to the pre-made header design that you’d like
2. Then go to your Wp Admin > Themify theme > Builder Layout Part
3. Create a new Builder Layout Part
4. Then import the file. Here’s a screenshot – https://themify.me/wp-content/uploads/2017/06/import-file.jpg.
February 4, 2019 @ 8:24 pm
Please put this “import pre-made headers” instruction in the main part of the tutorial and not buried in the comments. It isn’t an obvious step. Thanks.
July 12, 2017 @ 1:49 pm
Can’t find a way to import it as well. The import function is only showing what’s already down there and not allowing to import the header file I downloaded from here.
July 13, 2017 @ 3:03 pm
Please allow us to help. Do you mind emailing us with your site URL here – https://themify.me/contact? For now, please make sure you’re using the latest theme version. This will allow us to better provide you support.
December 6, 2017 @ 4:29 pm
Yes the import button isn’t working. I was thinking the fault is the browser (Firefox), but when I opened with other browsers (Chrome, IE, Opera), it doesn’t work the same.
December 6, 2017 @ 10:13 pm
Please allow us to look into this issue. Do you mind contacting us here – https://themify.me/contact and please include your site URL? We’ll look into this and provide a fix for you.
July 14, 2017 @ 12:40 pm
Very interesting! Do more tutorials like this, please. :)
July 18, 2017 @ 5:41 pm
You got it ;)
July 14, 2017 @ 1:50 pm
I tried it but failed. Can you get in there and help me, Kurt?
July 18, 2017 @ 5:43 pm
We can definitely help you with this. Do you mind contacting us here – https://themify.me/contact ? Please outline details where you find difficulty and I’ll provide you with some additional support :)
July 15, 2017 @ 2:33 am
where i can find another unique code and the function for this setting?
July 18, 2017 @ 5:45 pm
Not quite sure what you mean. What other unique code are you referring too?
July 15, 2017 @ 12:51 pm
What actually are these header design? These examples seems to be a one page website, is it that? Tks.
July 18, 2017 @ 5:45 pm
The header designs are the top part of the site where you showcase your logo and menu. The one page design is just to show how it’ll look when used on an actually page layout.
July 18, 2017 @ 1:41 pm
how do I import the pre designed downloaded “Builder Layout Part”?
July 18, 2017 @ 5:48 pm
You can do this by downloading first the header design that you’d like to replicate from this post. After doing this go your Wp Admin > Themify Theme > Builder Layout Part > Create new and then scroll down too the Themify Builder option panel and then click import. Import the header file you’ve downloaded here.
July 18, 2017 @ 4:30 pm
You guys just solved a problem I’ve been having for several websites I’ve been working on with custom header layout parts! ❤️
August 10, 2017 @ 9:01 pm
Hello, I just need to remove the top line from the header Magazine. How do I do that?
August 14, 2017 @ 5:57 pm
Hi Mariana,
We can help you with this. Please post it on our support forum: https://themify.me/forum (don’t forget to include your site URL).
August 14, 2017 @ 2:29 pm
hey guys, how do I deinstall this header design again, to get back my original one
-thank`s
August 14, 2017 @ 5:46 pm
Hi Lisa,
You would remove the Hook Content and then go to Themify > Settings > Theme Settings > Theme Appearance, select a header layout that you like.
August 14, 2017 @ 5:55 pm
Being able to design a custom header is amazing! I used one of the free header designs and then customized it to my liking. The only problem is when I checked it on my phone, it’s not responsive. Is there a solution for this?
August 15, 2017 @ 6:51 pm
Which header are you using? We will check the responsive styling.
August 16, 2017 @ 7:59 pm
I started with Top Bar and then customized it to my preferences.
August 22, 2017 @ 12:15 am
Any luck figuring out why it’s not responsive??
August 28, 2017 @ 10:21 pm
Nick @ Themify, Can you please update me on the responsiveness of the headers? Or do I have to open an issue in Support to get this resolved? Thank you!
September 5, 2017 @ 5:19 pm
I hope they respond soon. I am having a similar issue on a client’s website. The custom header is extremely helpful but I really need the hamburger menu to appear on mobile. I have it set to not show the menu on mobile but need the mobile menu to pop up. HELP!!
September 5, 2017 @ 5:24 pm
I found it! There is a mobile menu checkbox when you are editing the menu. @Laura K, check that and you should have it fixed.
August 16, 2017 @ 12:29 pm
Thanks very much! This inspire me a lot. Can you also show us how to make a two row menu ? Like main menu and top menu in the header ?
August 21, 2017 @ 3:54 pm
Please allow us to help you with this. Do you mind contacting us here https://themify.me/contact and we’ll provide you with more info?
September 28, 2017 @ 8:40 am
Hi Megan where exactly is the mobile menu check box ? I am trying to have the hamburger menu for my mobile version as well. Thanks in advance :)
October 16, 2017 @ 11:25 am
I will like to see a bookstore theme developed by themify
November 9, 2017 @ 10:53 pm
Hi.
I have a problem. Sticky-header does not work. I don’t know, why…
November 10, 2017 @ 5:50 pm
Hi Piotr,
Please allow us to help you with this. Do you mind opening a new ticket on our support forum so that one of our developers can help you with this issue? Please include your site URL as well so that our developers can further investigate the issue.
November 30, 2017 @ 8:30 pm
Hello, I am using the Ultra theme. And I would like to know how to align the phone # to the right on the header. When I add the number in the widget the phone # is right next to the logo which makes it look funny. I would like it to be justified to the right above the social links but on the same row as the logo. Please help if can.
Thank you for your time.
December 4, 2017 @ 8:01 pm
Please allow to help you with this. Do you mind contacting us here – https://themify.me/contact ? Please include your site URL as well.
June 13, 2018 @ 11:52 am
Please help, when I create the custom header and then hook it, it repeats itself… I end up with 2 copies of the same header instead of just one…
June 15, 2018 @ 7:45 pm
Hi,
In the row’s Additional CSS Class, did you add the ‘regular-header’ in the first row and ‘sticky-header’ in the second row?
March 22, 2019 @ 5:06 pm
I followed everything exactly and had the same issue. Duplicate header.
June 14, 2018 @ 4:03 pm
Kurt,
Was curious if I could add the page title in the header instead of it displaying underneath it?
June 15, 2018 @ 6:08 pm
Please allow us to help you with this. Do you mind contacting us here – https://themify.me/contact ? Thank you for your patience.
June 20, 2018 @ 7:46 pm
How do I add one of my menus to the new header? I have tried to download and install the sample headers, but I get stuck in a loop. It won’t import from the main Add New Layout Part page. When I create a new Layout Part, my options only pull from the library. It won’t let me add the downloaded file.
June 25, 2018 @ 10:07 pm
To add menu: first create the menu at Appearance > Menus, then drop in the Menu module and select the menu that you’ve created.
June 28, 2018 @ 3:45 pm
How do I make the regular header a transparent header? thanks
June 28, 2018 @ 9:18 pm
In the regular-header row, if you don’t add any background styling, it should be transparent default.
July 2, 2018 @ 11:05 am
in the row options of the menu in the layout parts, the regular header has default back ground styling like fullcover (background mode), scroll and center center (background position) but there isnt a background attached to this. In the sticky header there is a background .png file and that works perfectly when i scroll down.
The regular header is above the page in a white background. how can i make this regular header transparent so it falls on the page background image.
July 10, 2018 @ 2:14 pm
Could you send us a direct mail here: https://themify.me/contact. Please send us your site URL, so we can inspect it.
June 28, 2018 @ 8:20 pm
By creating my own header layout, will I still be able to retain the features of dropdown menus, etc?
June 28, 2018 @ 9:17 pm
You can use the Menu module and it has the mobile menu option.
August 7, 2018 @ 3:06 am
Hello Themify Team!
I’ve created a two section header layout part, which was pretty easy and painless. But I’m having trouble getting the menu to be responsive and mobile friendly. During preview in mobile view the menu does not shrink down to a mobile menu (hamburger), but instead stays as a regular sized menu. This makes it hard to preview and edit correctly. Has this issue of mobile optimization and preview been addressed in V4 update? I’m not using the newest V4 but the previous one right before. I would love to make some tutorials to help others see the power of Themify’s custom header builder but need to address mobile menu / preview issue first.
Please let me know, thanks for your help.
Sincerely,
David Paul
August 9, 2018 @ 7:21 pm
Hi David,
Please update to the latest V4 because it has many new features and improvements. About the mobile menu concern, on your Menu module, do you have mobile menu enabled and have you entered a mobile menu breakpoint?
August 31, 2018 @ 1:49 pm
HOW CAN I ADD A BUY/ADD TO CART BUTON TO HEADER
November 7, 2018 @ 9:52 am
I’m struggling to get this working right.
I’ve created the rows and added the CSS to each row, copied the code for the header and added the hook content.
I’m getting the regular-header above everything else on my webpage (would like this over the content, not above it)
And I’m not getting the sticky header at all.
Ideally, I’d just like the sticky header in the top all the time so it’s always in the same place on the screen.
November 7, 2018 @ 9:57 am
Website is: https://elainebonfrer.com/home/
November 7, 2018 @ 10:27 pm
Our support team can help you with this. Could you post it on our support forum: https://themify.me/forum
August 29, 2019 @ 4:27 pm
Thanks for the tutorial! This was pretty easy to accomplish.
But I would actually like the regular header to stick to the top at all times instead of being replaced by the sticky header row… I tried to use two rows that are exactly the same but then there is still a moment when the regular header scrolls upwards and the sticky header comes in.
Could you tell me what code to use to have just have one header that sticks to the top at all times?
August 29, 2019 @ 8:43 pm
Hi Lex,
Please send me a link to your website, so I can check. If the site is not public, please send it via email: https://themify.me/contact – General Inquires
September 7, 2019 @ 3:32 pm
The Content if i scroll on page is visible in the custom Header. How do i fix this?
September 7, 2019 @ 10:21 pm
Hi Thomas,
Please send us a link to your website, so we can check.
PS. I the website isn’t public yet, please send us the link via email ( General Inquires ): https://themify.me/contact
September 30, 2019 @ 11:36 am
How to edit responsive menu?
September 30, 2019 @ 7:02 pm
You can style the mobile menu on Menu module > Styling > Mobile Menu.
FYI: Now you can use Builder Pro to create custom header/footer templates without using Layout Parts. Check it out: https://themify.me/builder-pro
December 16, 2019 @ 3:31 am
I am not able to see the menu on a mobile device. Am I missing a setting?
December 16, 2019 @ 8:55 pm
Hi Mike,
If you added a Menu Module in Custom Header, please make sure to enable the Mobile Menu Option and set a Breakpoint: https://share.getcloudapp.com/QwuGKgoG
December 16, 2019 @ 3:04 pm
When using Builder Pro how do I make the regular & sticky headers if selecting a pre-designed header?
December 16, 2019 @ 9:00 pm
Hi Mike,
To create a Sticky Header, please check Step 4 from the above tutorial, you should add “sticky-header” as CSS Class to the Row which holds your sticky header and add the code provided at the above mentioned step to Header Code, so you can have a Custom Sticky Header.
February 6, 2020 @ 4:49 pm
Hi, Can you please tell me how you would change the background color of the nav menu when it is sticky and you are scrolling? I would like it transparent originally, but white or black when scrolling. I don’t suppose there is way to change font color when scrolling as well? Thanks!
February 7, 2020 @ 3:00 am
It is on Step 4 of this tutorial. So you would design 2 rows (one for regular header and another one for sticky header). You would use Builder styling to design both headers.
At the time of this article, we didn’t have the theme builder. We now have Builder Pro which can help you to design any header templates without using Layout Part or Hook Content. Check it out here: https://themify.me/builder-pro
February 13, 2020 @ 4:34 pm
Thanks, Nick. I’m sorry, I’m very new to this. I suspected step 4 was what I needed, but it was all a bit like hieroglyphics to me…and step 2 still has me stumped, but I’ll keep working on it.
I would like to ask about your Builder Pro recommendation though. I am still very confused as to exactly what the difference is between the Premium Theme and Builder Pro. Understandably Builder Pro provides some added functionality…and the Theme comes with pre designed templates to work from. But if I buy Builder Pro, do I really need a premium theme? Will Builder Pro give me all the functionality provided by a premium theme and allow me to design the whole site from scratch? Which despite my beginner status I think I wouod prefer to do.
February 18, 2020 @ 9:14 pm
With Builder Pro, you can build custom templates from scratch how ever you want it. Using premium theme (eg. Ultra), it comes with all pre-built features and layouts. Builder Pro is very simple to use if you are familiar with Themify Builder interface. We have a series of Builder Pro tutorial videos here: https://www.youtube.com/watch?v=3Tcc9Sj491U&list=PL2n4V_o0mrcIlAy4awFMPxG36SEsd9hPL
February 21, 2020 @ 11:55 am
Dear Themify team,
I have a site built with the Ultra premium theme. The logo image is currently defined using Themify Options ► Site Logo and Tagline.
I also have a much broader version of that logo image which extends the mountain ridge to the right : https://www.valaistraductions.ch/wp-content/uploads/2020/02/logo_new2.png
My idea was to have the logo shown just like now but with the right part (the mountains) displayed below the menus.
I tried many different things (for example background image in the Header section) but all failed. Could you give me a hint how to best do it ? Thanks a lot !
February 21, 2020 @ 10:54 pm
Our support team can help you with this. Please post it on our forum: https://themify.me/forum.