How to Setup Email Newsletters for Free with WordPress Using MailChimp & Themify
Experts advise any budding businesses and blogs to start compiling an email database from their first day online to engage and connect your readers or first-time visitors. The internet is a vast place so gently nudging visitors back to your site is one of the most powerful tools to increasing site traffic, user engagement, and converting visitors to customers.
Whether you’re announcing a new product, a sale, or a change in your products or services, newsletters always have the best engagement, reaching your audience personally. Having a nice email subscription form in an optimum spot can increase your subscription rate. And with our free WordPress plugin, Themify Builder, you can display sleek and modern newsletter subscription optin forms for free, anywhere you want, using the Optin Form module. Totally customizable, you can also choose to hide the request for a subscriber’s first and/or last name.
To help you get your email newsletters off the ground, Mailchimp has a free plan available for anyone sending an email newsletter for up to 2000 subscribers. This is great for getting your startup, small business, or personal blog off the ground. If you also need a few pointers on how to start making money from your blog look no further.
Alright, let’s get started with the tutorial!
Step 1: Sign Up
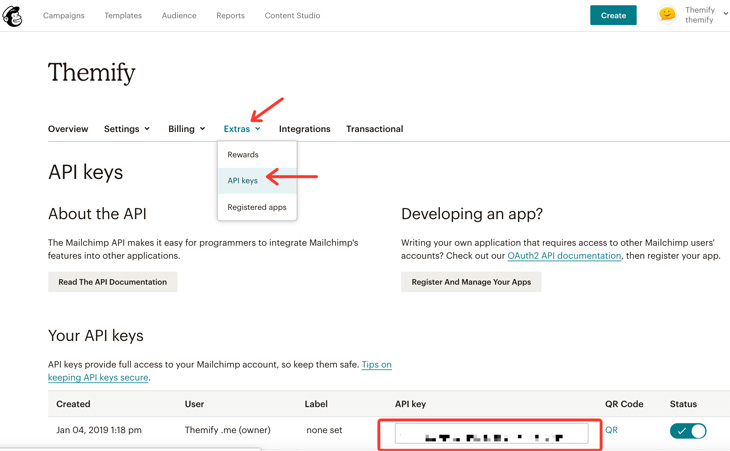
Sign up for a MailChimp account, and retrieve the API key.
- Go to your MailChimp Account > Extras > API keys > copy the API key from the bottom of the page.
Step 2: Plugin Your API
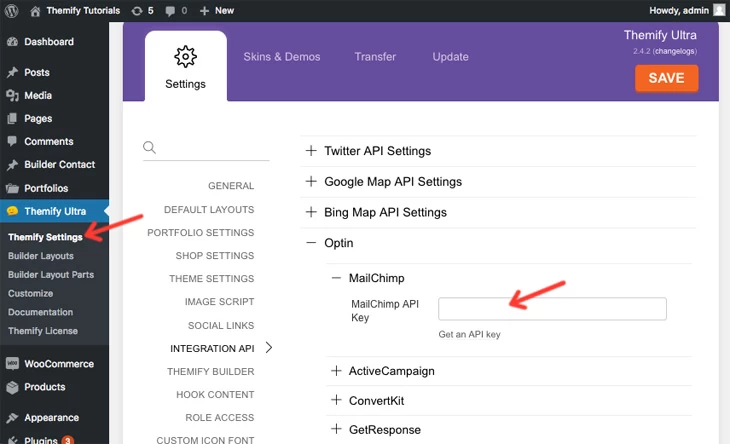
Go to your WP admin dashboard and paste the API key in your settings.
- WP admin > Themify > Settings > Integration API > Optin > Mailchimp > Paste the API key > hit Save
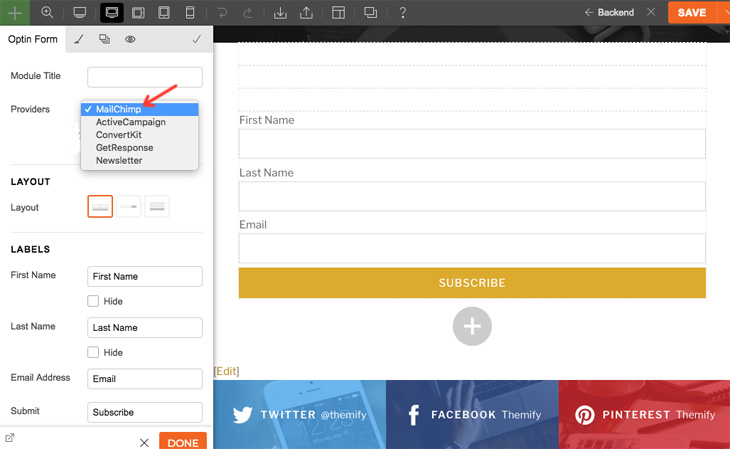
Step 3: Create Your Optin Form
Finally you’re going to drop in your newsletter optin form.
- Turn on the Builder, select and drop in the ‘Optin Form’ module
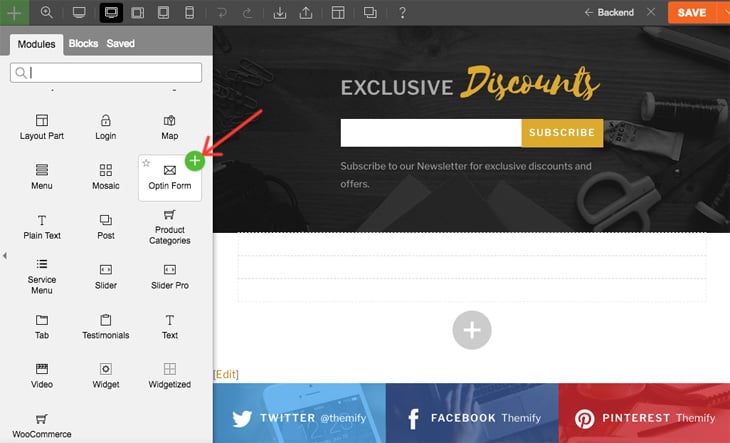
Select MailChimp under the list of Providers. You can opt to hide the First and/or Last Name fields, and once you’ve finished, hit Done. And don’t forget to Save!
Thank you for following another foundational tutorial. Feel free to send us any other tutorial requests by commenting below.
June 18, 2019 @ 10:27 am
Thanks for sharing this article. Its very easy to understand and very intresting also. Keep going
Cheers Nick
September 19, 2019 @ 5:05 am
Is there a way for an Optin Form with MailChimp to have a GDPR tickbox?
September 19, 2019 @ 5:19 pm
Hi Leo,
Unfortunately we don’t have GDPR for Optin Forms at the moment, but we’ll be considering adding it.
September 24, 2019 @ 7:34 pm
Will you be adding any other email providers? I use MailerLite… How can I use the opt in module?
I’m using an embedded form from MailerLite but I don’t like that I can match it to my site.
September 24, 2019 @ 7:36 pm
Hi Kelly,
That is a good suggestion. We will add it.
October 4, 2019 @ 4:00 pm
For some reason, my themify settings doesn’t have the integration API tab.
October 4, 2019 @ 10:30 pm
Hi Tom,
Please update your Themify Theme to the latest version, using the latest Framework version you should see the Integration API field.
November 11, 2019 @ 1:20 pm
Hello,
Is there any short code for Optin Form? I’d like to put it on footer. So it will always be there as I got a lot of pages and I don’t want to add it manually per page.
Thanks!
November 11, 2019 @ 5:08 pm
Hi,
Unfortunately we don’t have a shortcode for the Optin Module, but you can Build it using Builder Layout Parts: https://themify.me/docs/builder#layout-parts and you can use the shortcode of the Layout Part to add it as widget to your footer widget area or you can create a custom footer area in Layout Parts and use Hook Content: https://themify.me/docs/hook-content to add it above your Footer section.
December 2, 2019 @ 9:21 pm
Hi,
Is there any way to send mailchimp confirmation email after subscribing?
December 3, 2019 @ 5:12 pm
Hi Hassan,
If you mean that your subscribers should confirm the subscription by email, then you should enable Double Optin in MailChimp: https://mailchimp.com/help/about-double-opt-in/ here you can see what is difference between the single optin and double optin and varius settings: https://mailchimp.com/help/single-opt-in-vs-double-opt-in/
Hope this helps.
December 4, 2019 @ 10:24 am
HI Csaba,
I have already enabled Double Optin in Mail Chimp, but the problem is that when I am subscribing via Optin form, I am not receiving any confirmation email.
December 13, 2019 @ 10:10 pm
Hi Hassan,
We may have to investigate this issue further on your website, please contact us via email: https://themify.me/contact or support forum: https://themify.me/forum
March 5, 2020 @ 11:16 pm
I do have the same problem. Is there an easy way to fix it or is it just simply not possible to activate the (in mailchimp already enabled) double opt-in?
March 6, 2020 @ 9:46 pm
Hi Luisa,
Sometimes it could be your mail server/provider blocks the confirmation emails. Check your email junk folder.
January 27, 2020 @ 5:08 pm
Can you please add Mad Mimi to your list of email providers (:
March 6, 2020 @ 9:45 pm
It looks like Mad Mimi is not developing their services (they haven’t published any blog or social media for a long time).