Child Theme
WordPress child theme allows you change the functionality of the theme without having to edit the original/parent theme template files. If you need to modify any template file, we recommend to create a child theme instead of editing the theme template files. Since the child theme is stored separately, you don't need to redo the changes next time you upgrade the theme. Coding child themes requires some basic computer skills (ie. creating PHP files, uploading files, and modifying code).
How Child Theme Works
Basically once the child theme is activated, WordPress will look for the template files in the child theme folder first. If the file doesn't exist in the child theme, it will fallback to the parent theme folder. In other words, if there is a "header.php" in the child theme, WordPress will use that "header.php", else it will use the "header.php" file in the parent theme.
Child Theme Generator
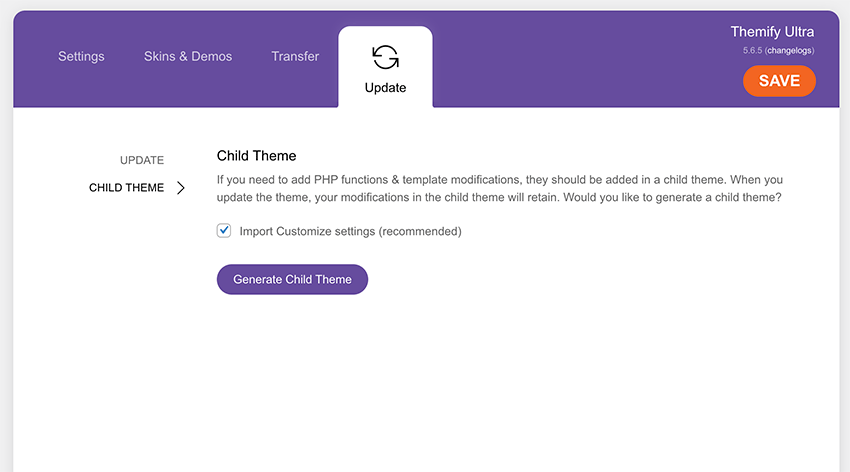
If you are using a Themify theme, you can generate a child theme automatically. To generate a child theme: with a Themify theme activated, go to Themify > Update > Child Theme, click "Generate Child Theme".
The child theme generator will create a child theme with the following files:
- functions.php = Use this file to add custom PHP functions
- style.css = For adding custom CSS
- child-theme-scripts.js = For adding custom Javascript
Creating a Child Theme Manually
Step 1: Create a new child theme folder
- To start a child theme: on your computer desktop, create a new folder (eg. "themify-ultra-child")
Step 2: Create the child theme style.css
- In the child theme folder, create a new CSS file in the child theme folder and name it style.css.
- Paste the sample code below in the style.css file and change the theme name and template name as instructed below.
/*
Theme Name: Themify Ultra Child
Description: Child theme for Themify Ultra
Author: Themify
Template: themify-ultra
*/

/* write custom css below */
- Theme Name (required) = use the parent theme name + child to make it easy to identify (eg. "Themify Ultra Child")
- Description (optional)= you may enter any text here
- Author (optional) = your name
- Template (required) = name of the parent theme folder (in this case, it is "themify-ultra")
- Then you may add any additional custom CSS as you want in the child theme style.css (optional).
Step 3) Installing/activating The child theme
- Once you have the child theme done, zip it (eg. it should be compressed as "themify-ultra-child.zip")
- Login to your WP Admin, then go to Appearance > Theme, install the child theme zip (the same way as installing a WordPress theme), and then activate it.
- NOTE: Make sure the parent theme is installed (ie. if the parent theme is "Themify Ultra", make sure it is installed in your WordPress site).
Download Sample Child Theme
You may download a sample themify-ultra-child.zip theme as a child theme starter. If your parent theme is not Ultra, then extract the child theme zip and change the "Theme Name" and "Template" in the style.css file.
Child Theme functions.php File
If you need to add custom PHP functions, create a 'functions.php' file and store it in the child theme folder (only add functions.php file if you need it). You only need to create the functions.php file if you need to add or modify the theme functions such as enqueuing/dequeuing scripts. Below are some samples that you can do with the child theme's functions.php file.
Remove Default Theme Google Fonts and Add Custom Google Fonts
The following function will remove the Google Fonts added by Themify theme and then add your own custom Google Fonts. The code will add "Cormorant Garamound" font with variants 400, 400 italic, 700, 700 italic and "Raleway" font with variants 400 and 700. Note: do not add space in between the variant comma separator, else the variants won't load.
/** Disable all Google fonts loaded by Themify */
add_filter( 'themify_theme_google_fonts', '__return_empty_array', 99 );

/**
 * Add custom Google fonts to load
 *
 * @return array
 */
function custom_themify_google_fonts( $fonts ) {
	$fonts[] = 'Cormorant Garamond:400,400italic,700,700italic';
	$fonts[] = 'Raleway:400,700';
	return $fonts;
}
add_filter( 'themify_theme_google_fonts', 'custom_themify_google_fonts', 100 );
Remove Parent Theme CSS Files
Lets say you don't want to use any styling from the parent theme, so you can code your custom styling in child theme style.css, below is the snippet to dequeue parent style.css and header CSS files.
function custom_disable_parent_stylesheet() {
	if ( class_exists( 'Themify_Enqueue_Assets' ) ) {
		Themify_Enqueue_Assets::remove_css( 'tf_base' );
		Themify_Enqueue_Assets::remove_css( 'themify_common' );
		Themify_Enqueue_Assets::remove_css( 'theme-style' );
		Themify_Enqueue_Assets::remove_css( 'themify-media-queries' );
		Themify_Enqueue_Assets::remove_css( 'ultra-header' );
	}
}
add_action( 'wp_footer', 'custom_disable_parent_stylesheet', 19 );
Add admin.css File in Admin
function custom_child_admin_stylesheet() {
	wp_enqueue_style( 'child-admin-style', trailingslashit( get_stylesheet_directory_uri() ) . 'child-admin-style.css' );
}
add_action( 'admin_enqueue_scripts', 'custom_child_admin_stylesheet' );
Remove Themify Admin Sidebar Menu Links
function custom_menu_page_removing() {
	remove_submenu_page( 'themify', 'customize.php' ); // Customize
	remove_submenu_page( 'themify', 'themify_docs' ); // Documentation
	remove_submenu_page( 'themify', 'more_themes' ); // More Themes
	remove_submenu_page( 'themify', 'themify_recommended_plugins' ); // Recommended Plugins
}
add_action( 'admin_menu', 'custom_menu_page_removing', 100 );
Remove Themify Updates and News Widget on Admin Dashboard
function custom_remove_dashboard_widgets() {
    remove_meta_box('themify_news', 'dashboard', 'normal');   //Themify News
    remove_meta_box('themify_updates', 'dashboard', 'normal');   //Themify Updates
}
add_action('admin_init', 'custom_remove_dashboard_widgets');
Output Custom Meta <title> Tag
By default, WordPress uses the site/page/post/archive title for the <title> meta tag. You can use third party plugins such as Yoast SEO to customize the title meta tag output. But if you prefer not to use a plugin, below is a sample snippet to change title meta tag. NOTE: make sure you don't have any SEO plugin activated (eg. Yoast SEO), else the plugin might override the function.
function custom_document_title_parts( $title_parts ) {
	if ( is_home() || is_front_page() ) {
		$title_parts['title'] = 'My custom home title';
		$title_parts['tagline'] = 'My tagline';
	}
		return $title_parts;
}
add_filter( 'document_title_parts', 'custom_document_title_parts', 10000 );
Advanced/Optional: Overriding Parent Theme Template Files
Overriding template files is intended for developers who have PHP and WordPress coding knowledge. It is only required if you need to override the parent theme template files. If you are not sure how to do this, consult a developer.
To override the template files in the parent theme, open the original template file and save a copy to the child theme folder with same file name and folder structure. Basically, the file structure has to match with the parent theme.
For example:
- let's say you want to edit the loop.php file in the parent theme and it is stored in the "includes" folder
- open the loop.php file and save a copy in the "includes" folder of the child theme
- edit and save the loop.php in the child theme
For another example:
- let's say you want to edit the page.php
- open the page.php file and save a copy in the child theme
- edit and save the page.php in the child theme
Here are some of the template files that you can override:
- header.php
- footer.php
- index.php
- single.php
- page.php
- sidebar.php
- includes/loop.php
- includes/slider.php
Child Theme Relative Folder Path
The child theme style.css is dynamically compiled into the Themify concate.css file during live page rendering. If you are adding a relative image path in your child theme style.css, the image files must be stored in the 'child_theme_folder/images' folder, as shown in the CSS below. Our framework will automatically convert the relative image path to an absolute path in the concate.css file. The same applies to custom font files, which should be stored in the 'child_theme_folder/fonts' folder.
.selector {
	background-image: url("images/bg-image.jpg");
}
How Customize Data Works
Note Customize data is associated to the activated theme (ie. when you switch to another theme, the Customize options will be different). To carry the Customize data from one Themify theme to another Themify theme, use the Customize's Export and Import feature located on the Customize panel).
Also note that the activated child theme is considered as a separate theme. If you see your Customize data is gone after activating a child theme, don't panic. Simply export the Customize data with the parent theme activated, then switch to the child theme and import the Customize data.