How to Customize Themify Themes (Best Practices)

WordPress themes exist on an extremely flexible system, allowing both users and web developers to customize it easily. Because of its flexibility and variety of customization options, there are chances people are editing and customizing WordPress themes in an incorrect or mistaken way.
In this foundational tutorial, we would like to take this opportunity to provide tips on how to customize Themify themes. We'll introduce you to the best practices and proper WordPress techniques that'll help you avoid unneccessary bugs or glitches while customizing your Themify theme, ensuring it works well alongside other WordPress plugins.
Let's get started.
Do Not Edit Template Files (Use a Child Theme)
Rule number one is DO NOT edit any template or script file in the theme folder. The problem with editing the template file is when you update or reinstall the theme, the changes you made will be gone. If you need to modify the template file, please create a child theme. Do not use third party plugins to generate child themes. You can download a sample child theme zip to start.
Adding Header/Footer Code
If you need to add tracking code or scripts (ie. adding Google Analytics or Facebook Pixel tracking code) in the header or footer of the page, do not edit the header.php or footer.php template file. You can add header/footer code via the Themify panel (located in Themify > Settings > Header Code).

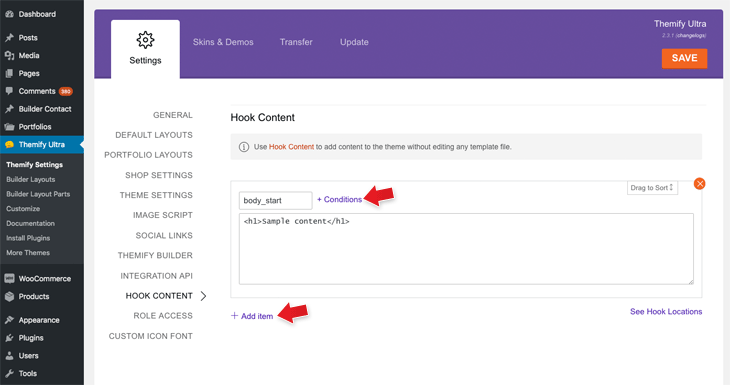
Adding Content Via Hook Content
Hook Content is one of the powerful tools available in all Themify themes. It allows you to insert content/code in the theme without any coding skills or having to modify any template file. Lets say you need to add content in the single post view, the typical way is to modify the single.php template file. With Themify themes, you can bypass this by using the Hook Content feature. To add Hook Content, go to Themify > Settings > Hook Content, click "Add new", then select the display condition and done! It is that simple.
Customizer & Custom CSS
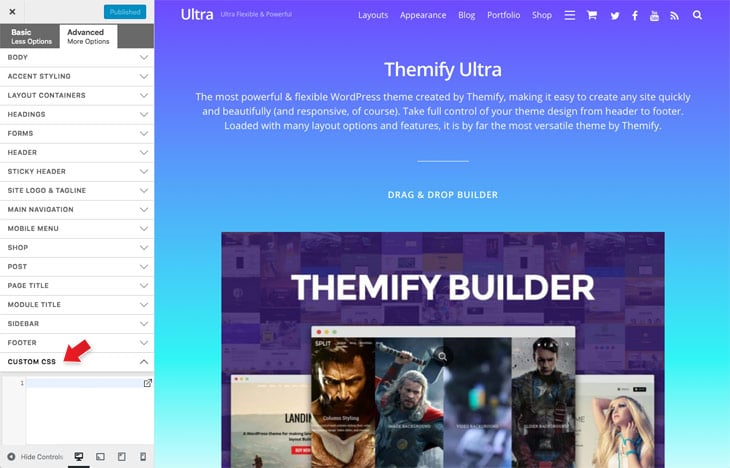
If you need to change the styling of any element, do not edit any CSS file in the theme. You can style the theme with the Customize panel (go to WP-admin > Appearance > Customize). The Customize panel gives you the basic styling options to most elements in the theme. If you need advance styling, you can add custom CSS in the "Custom CSS" panel.
Custom CSS Best Practices
Try to consolidate all your custom CSS in one place. This will make debugging and editing easier. Since the Themify framework already has the Custom CSS panel on the Customize Panel, you don't need to install any third party plugins for custom CSS. Adding CSS code via third party plugins might cause conflicts. Try to keep all your custom CSS in the Customize panel or the child theme style.css file.
If you are creating a child theme for customization purposes, please do not copy the whole style.css file from the parent theme as this will cause conflicts. Only add the CSS rules and properties that you want to override.
For example: if you want to change the letter-spacing on the h1 element, you only need to add the following:
h1 {
	letter-spacing: -.03em;
}
Google Fonts
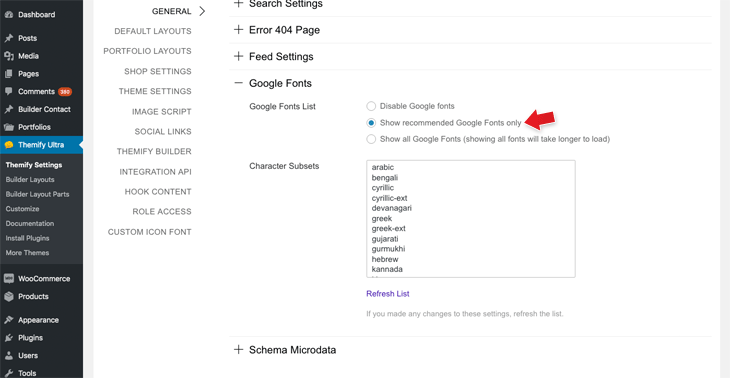
All Google Fonts are included in the Themify framework, so you don't need to install any third party plugins to add Google Fonts. If the Google Font(s) that you want to use are not available on the font list, you can enable all fonts at Themify > Settings > General > Google Fonts (select "Show all Google Fonts" option).
Translating Themes
Please do not edit the template files for translation purposes (ie. do not edit the template files to change the words/language on the template). You can use Loco plugin to translate the theme easily. When you update or reinstall the theme, the translation will be intact.
With that, we hope this provided a little more insight into how to safely and expertly customize Themify themes to your exact liking. While you're on the customization train, don't forget to take a look at our latest customer showcase post to see all the awesome things you can do with Themify themes and builder. Enjoy!
April 26, 2019 @ 11:11 am
Thanks for this customization info. I was really struggling for this.
May 26, 2019 @ 8:48 am
Where are the type settings?
If I go to the Google Font settings as described in this article, I do see the radio buttons for Google Font settings. But I can’t find any actual options that allow the user to configure type settings.
May 27, 2019 @ 9:20 pm
Hi Sunil,
If you mean Type Customizations and Styling, that can be done in wp-admin > Appearance > Customize, for every element separately, if this is not what you are looking for, please let us know exactly which settings you can’t find, so we can help.
October 9, 2019 @ 12:58 pm
heya
i dunno if i perhaps have an outdated version of the plugin but i never seem to have as many options on my Themify Ultra as are demonstrated in these tutorials. i do not, in fact, even have a tab labeled “Themify Ultra”; instead the equivalent in the dashboard seems to be one called “Themify Builder”. this takes me to a different, less diverse list of options (pictured here https://imgur.com/a/LI4U8BQ ).
i want to create a header but i don’t even have the hook-on option available to me. any advice on how to sort this? thanks!
October 10, 2019 @ 4:14 pm
Hi Dominic,
It looks like you are using Themify Builder plugin, not a Themify Theme, the options presented in the Tutorial are for Themify Themes, the Theme used in the tutorial is Ultra Theme: https://themify.me/themes/ultra