Hook Content
Hook Content is a powerful feature that lets you add code to your site seamlessly—no need to modify theme template files. With Hook Content, you can insert various types of code, including text content, shortcodes, HTML, JavaScript, and embed code like Google Ads. Additionally, you can control exactly where this content appears by setting display conditions to apply the hook site-wide or limit it to specific pages.
Adding a Hook Content
- To add a Hook Content, go to Themify > Settings > Hook Content, click "Add item" link.
- Select the hook location where you want to insert content and then enter the hook content. The hook content can be text, HTML tags, CSS, Javascript, embed code, and shortcodes (PHP code is not supported).
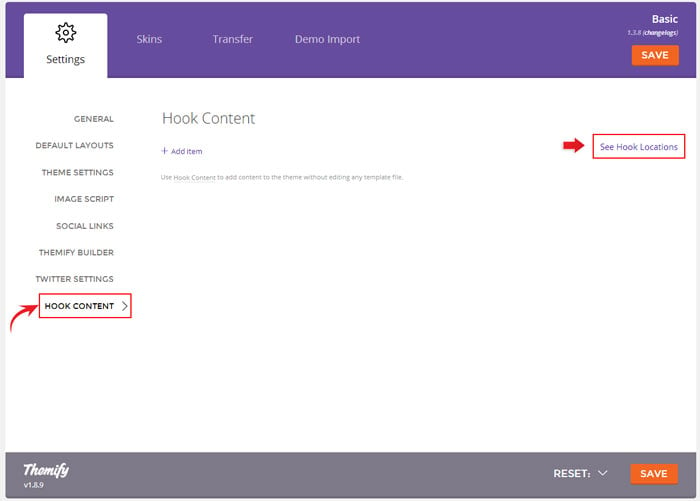
If you're unsure about the hook locations, click "Select Hook Locations." A lightbox will open, displaying where the hooks are located. Clicking on a hook will select it. You can navigate within the lightbox to view hook locations on other pages (for example, you can click on another link in the menu or navigate to the shop or product page to check the available hooks on those pages).
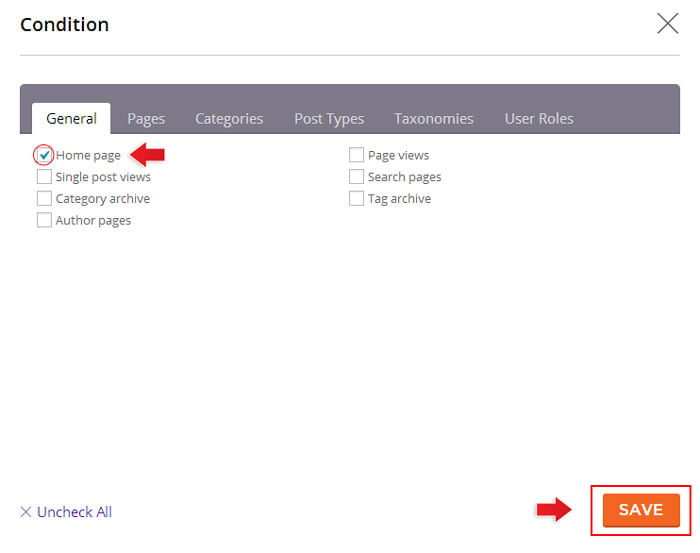
- To display the hook content on a specific page(s), click "Edit/Add Conditions" which will open a popup for you to select the display conditions. If you don't add any display condition, it will apply site-wide.
Hook Locations
Below is the list of all available hook locations.
Layout
- body_start = Beginning of <body> tag
- header_before = Beginning of <div id="headerwrap">
- header_start = Beginning of <header id="header">
- header_end = Before closing </header>
- header_after = After closing </header>
- mobile_menu_start = Beginning of <div id="mobile-menu">
- mobile_menu_end = Before closing </div> of <div id="mobile-menu">
- layout_before = Before <div id="layout">
- content_before = Before <main id="content">
- content_start = Beginning of <main id="content">
- content_end = Before closing </main> of <main id="content">
- content_after = After closing </main> of <main id="content">
- sidebar_before = Before <aside id="sidebar">
- sidebar_start = Beginning of <aside id="sidebar">
- sidebar_end = Before closing </aside> of <aside id="sidebar">
- sidebar_after = After closing </aside> of <aside id="sidebar">
- layout_after = After closing </div> of <div id="layout">
- footer_before = Beginning of <div id="footerwrap">
- footer_start = Beginning of <footer id="footer">
- footer_end = Before closing </footer> of <footer id="footer">
- footer_after = After closing </footer> of <footer id="footer">
- body_end = After closing </div> of <div id="pagewrap">
General
The wp_header hook is intended to add Javascript/CSS scripts or meta tags (if you want to add content to header, use the header_start or header_end instead). You can use wp_footer to add content or tracking code before the </body> closing tag.
- wp_head = Inside the <head> wrap
- wp_footer = After closing </div> of <div id="pagewrap">
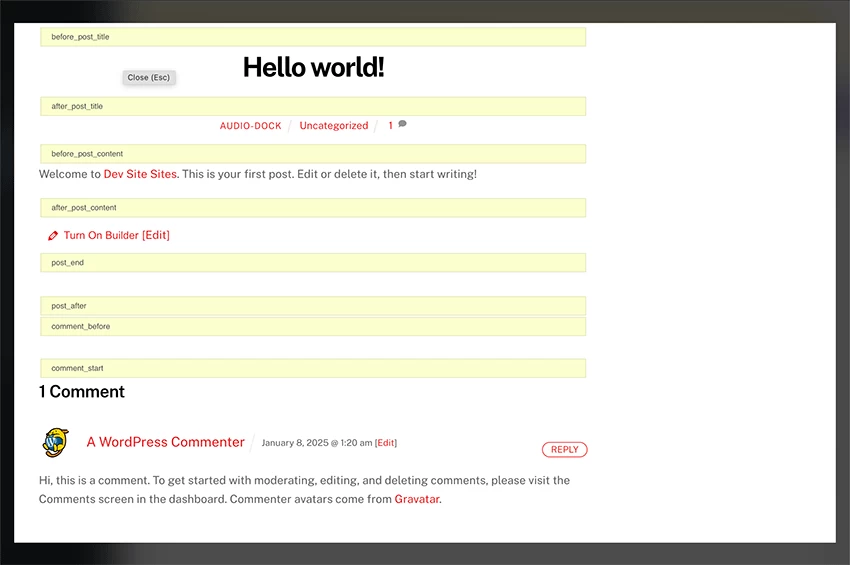
Post
The post hooks apply on both archive and single post view. You would see additional option to output hook content on every "nth" of posts. Example: if you enter "2nth" post, it will display the hook content on every 2nth post. Note that if you enter nth post higher than 2, the hook content won't apply in single post view.
- post_before = Before <article class="post">
- post_start = Beginning of <article class="post">
- before_post_image = Before <figure class="post-image">
- after_post_image = After <figure class="post-image">
- before_post_title = Before <h2 class="post-title"> (archive post view) or <h1 class="post-title"> (single post view)
- after_post_title = After <h2 class="post-title">
- before_post_content = Before post content
- after_post_content = After post content
- post_end = Before closing </article> of <article class="post">
- post_after = After closing </article> of <article class="post">
Builder Post Module
- Similar as "Post" hooks, but these hooks only apply to the Builder Post module.
- These hooks also apply to Slider if "Post" is selected.
Comments
The comment hooks only apply to the comment form.
- comment_before = Before <div id="comments">
- comment_start = Beginning of <div id="comments">
- comment_end = Before closing </div> of <div id="comments">
- comment_after = After closing </div> of <div id="comments">
WooCommerce Pages
- before_single_product = On single product view: before <div class="product">
- before_product_tabs = On single product view: before <div class="woocommerce-tabs"> (product description/reviews tabs)
- after_product_tabs = On single product view: after closing </div> of <div class="woocommerce-tabs">
- after_single_product = On single product view: after closing </div> of <div class="product">
- checkout_start = On checkout page, before <div class="woocommerce-billing-fields">
- checkout_end = On checkout page, after </div> of <div class="woocommerce-billing-fields">
- woocommerce_sidebar_before = If theme has separate WooCommerce sidebar: before <aside id="sidebar">
- woocommerce_sidebar_after = If theme has separate WooCommerce sidebar: after closing </aside> of <aside id="sidebar">
WooCommerce Products
- product_image_start = Before product image or gallery
- product_image_end = After product image or gallery
- product_title_start = Before <h2 class="product_title"> (archive product view) or <h1 class="product_title"> (single product view)
- product_title_end = After <h2 class="product_title"> (archive product view) or <h1 class="product_title"> (single product view)
- product_price_start = Before <span class="woocommerce-Price-amount">
- product_price_end = After <span class="woocommerce-Price-amount">
- before_add_to_cart_form = Before <form class="cart">
- after_add_to_cart_form = After <form class="cart">
- before_variations_form = Before <table class="variations">
- after_variations_form = After <table class="variations">
- before_add_to_cart_button = Product single: before <button class="single_add_to_cart_button">
- after_add_to_cart_button = Product single: after <button class="single_add_to_cart_button">
- product_meta_start = Product single: beginning of <div class="product_meta">
- product_meta_end = Product single: before closing </div> of <div class="product_meta">
In Between Post Content
The in between post content hooks apply to the_content of all post types (single post view only).
- After nth paragraph = Apply hook once after the entered nth paragraph.
- After every nth paragraph = Apply hook on every nth paragraph.
Post Type Builder
If the Post Type Builder (PTB) plugin is activated, additional hook locations specific to PTB posts will be available. These hooks apply to both archive and single post views.
- before_author = Before "Post Author" module
- after_author = After "Post Author" module
- before_category = Before post "Categories" module
- after_category = After post "Categories" module
- before_comment_count = Before "Post Comment Count" module
- after_comment_count = After "Post Comment Count" module
- before_comments = Before "Post Comments" module
- after_comments = After "Post Comments" module
- before_custom_image = Before "Static Image" module
- after_custom_image = Before "Static Image" module
- before_custom_text = Before "Static Text" module
- after_custom_text = After "Static Text" module
- before_date = Before "Post Date" module
- after_date = After "Post Date" module
- before_content = Before "Post Content" module
- after_content = After "Post Content" module
- before_excerpt = Before "Post Excerpt" module
- after_excerpt = After "Post Excerpt" module
- before_permalink = Before "Post Permalink" module
- after_permalink = Before "Post Permalink" module
- before_post_tag = Before post "Tags" module
- after_post_tag = After post "Tags" module
- before_taxonomies = Before "Taxonomies" module
- after_taxonomies = After "Taxonomies" module
- before_thumbnail = Before "Post Featured Image" module
- after_thumbnail = After "Post Featured Image" module
- before_title = Before "Post Title" module
- after_title = After "Post Title" module
Disabling Hook Content Feature
If you want to remove a content hook, you can just click the delete button on each item. However, if you want to disable the Hook Content feature completely, it can be done as well.
To remove the Hook Content tab from the Themify panel, create a child theme's functions.php if it does not exist and paste in this code:
<?php

remove_filter( 'themify_theme_config_setup', array( $GLOBALS['themify_hooks'], 'config_setup' ), 12 );