Builder Pro: Wishlist Products
This tutorial shows you how to create a "wishlist product" page on your WooCommerce site using Builder Pro. The wishlist product feature allows your customers to bookmark products without adding them to the cart.
Step 1) Add the Wishlist Icon to Product Archive & Single Template
In this step, you need to add the "Wishlist Icon" to the product archive and product single templates. Before you start, make sure you are using a Themify theme with the Builder Pro plugin activated. If you are using Builder Pro with a non-Themify theme, install the free Builder Plugin.
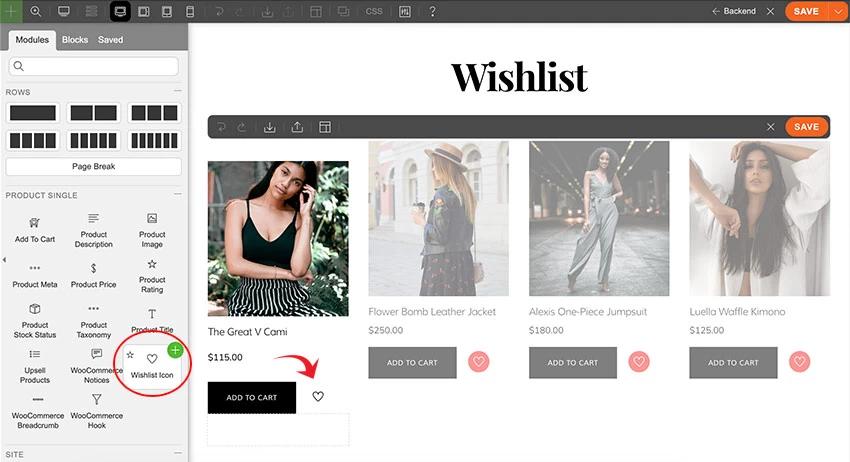
Add Wishlist Icon to Product Archive Template
- To use Builder Pro's wishlist feature, you need to create a Builder Pro template for the product archive and product single templates.
- If you don't have a product template created yet, go to WP-admin > Themify > Pro Templates to add one. Note that you need to have a Pro Theme (located at WP-admin > Themify > Pro Themes) before you can create Pro Templates. Refer to the Builder Pro documentation for more details on how to create a Pro Theme and Pro Templates.
- If you already have a product archive template, edit the template (if you don't have any product archive templates, add a new one).
- On the product archive template, drop in an "Advanced Products" module and then edit it.
- In the Advanced Products layout builder, drop in a "Wishlist Icon" module where you want the wishlist icon to appear. You can configure the Wishlist Icon options and styling as you like (optional).
![]()
Add Wishlist Icon to Product Single Template
- After you've added the Wishlist Icon to the product archive template, you now need to add it to the product single template.
- Go to WP-admin > Themify > Pro Templates and add/edit the product single template (if you don't have a product single template, add a new one).
- In the product single template, drop in a "Wishlist Icon" module and configure the options & styling as desired.
![]()
Step 2) Create a Wishlist Page
Now you need to create a wishlist page where customers can find their wishlisted products.
- Go to WP-admin > Pages > Add Builder Page, and enter the page title (e.g., name the page "Wishlist").
- It will then redirect you to the frontend where you can edit the page layout. Drop in an "Advanced Products" module and select "Dynamic Query = Wishlisted Products" (this step is important, don't miss it).
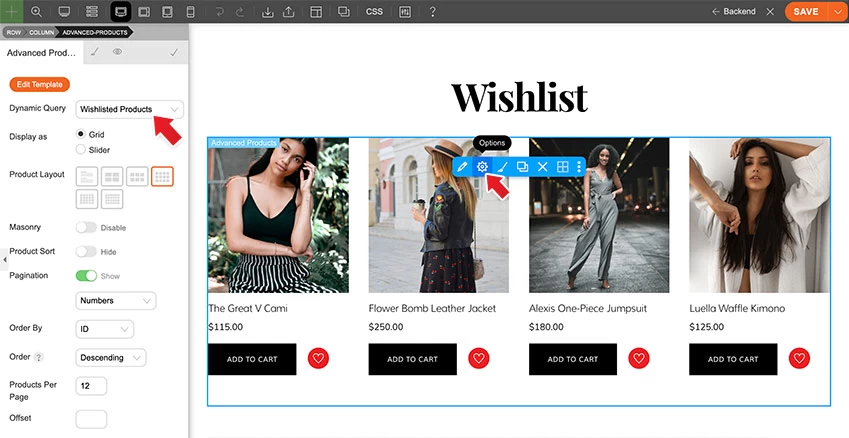
- Then edit the Advanced Products layout and drop in a "Wishlist Icon". When a product is added to the wishlist, clicking on the wishlist icon again will remove the item. Adding the Wishlist Icon in this step will allow customers to remove items from their wishlist.
- Tip: If you want the wishlisted products to have the same layout as the shop template, you can copy the Advanced Products module from the shop template, paste it into the Wishlist page, and then just change the "Dynamic Query" to "Wishlisted Products".
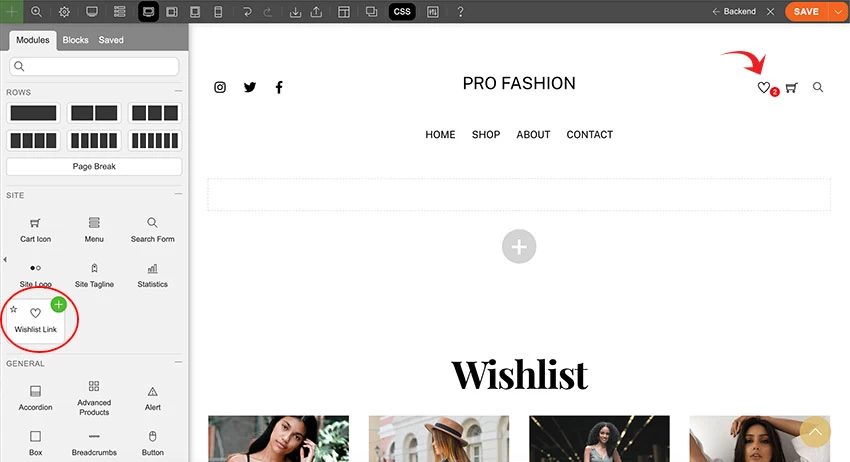
Step 3) Add the Wishlist Link to Header
After the wishlist page is created, you might want to link that page somewhere on your site. Normally, we place the wishlist link in the header area so customers can easily find their wishlisted products. To do that, you would need to create or edit the Pro header template.
- Go to WP-admin > Themify > Pro Templates and add/edit the header template (if you don't have a header template, add a new one).
- In the header template, add a "Wishlist Link" module and configure its options as you like.