Builder Pro Documentation
Themify Builder Pro is a theme builder that allows you to build a complete theme without any coding. It gives you total control of everything on your site: header, footer, and content templates such posts, pages, categories/archives, custom post types, and WooCommerce templates.
Video by James Welbes.
Installation
Builder Pro requires a Themify theme or the free Themify Builder plugin in order to be used. You only need to install one of them (either a Themify theme or the Builder plugin). If you are using a non-Themify theme, you can either switch to a Themify theme or install the free Builder plugin to start using the Builder Pro.
To install Builder Pro:
- First install a Themify theme or Themify Builder plugin (you only need to install one of them):
- Option A) To install a Themify theme: login to the Member Area, download the theme zip of your choice (eg. Ultra theme), then login to your site: WP Admin > Appearance > Themes > Add New, upload the theme zip and activate the theme (learn how to install themes).
- Option B) To install the Builder plugin: download the Builder plugin zip (free), then login to your site: WP Admin > Plugins > Add New, upload the Builder plugin zip and activate it.
- After you have a Themify theme or Builder plugin activated, install Builder Pro:
- To install Builder Pro: login to the Member Area, download the Builder Pro plugin zip, then login to your site: WP Admin > Plugins > Add New, upload the Builder Pro plugin zip and activate it.
Pro Themes
Builder Pro uses the same theme system as WordPress' core. When you create a theme using Builder Pro, it is called a Pro Theme. A Pro Theme consists of various templates: header, footer, post template, page template, etc. When you activate or switch a Pro Theme, all of the associated templates of that Pro Theme will be active or switched. This allows you to change your entire site design quickly, just like installing a different WordPress theme. Before you start creating any templates, you would need to create a Pro Theme first so that your templates will be associated with a specific Pro Theme.
To create a Pro Theme:
- Go to WP Admin > Themify > Pro Themes, click "Add New"
- Enter a Theme Name of your choice, upload the optional theme Thumbnail image, and click "Next".
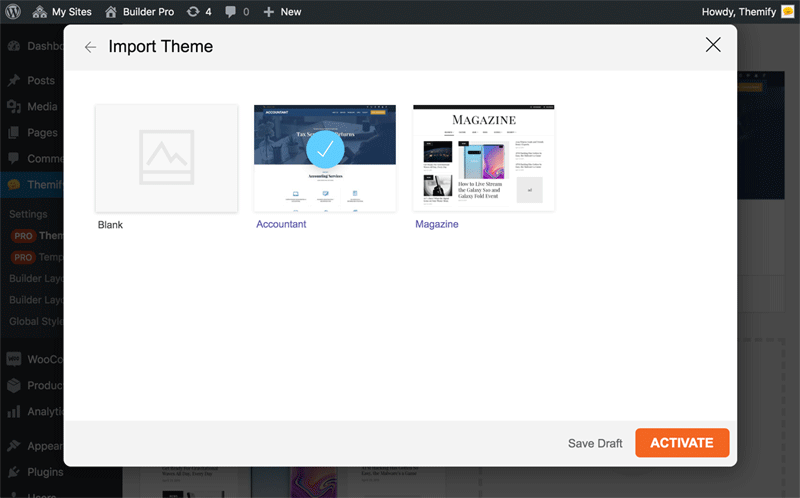
- You will then have the option to create a blank theme or import a premade theme.
- To create a blank theme: select the "Blank" thumbnail and click "Activate".
- To import a predesigned theme: select a theme thumbnail of your choice and click "Activate". When a predesigned theme is imported, it will automatically import the associated templates in the theme.
To deactivate or delete a Pro Theme:
- Go to WP Admin > Themify > Pro Themes
- To deactivate a Pro Theme: click "Deactivate" on the activated theme thumbnail. Once a theme is deactivated, all the Pro Templates will be deactivated as well.
- To delete a Pro Theme: click on the theme thumbnail, then click "Delete". NOTE: You can delete the activated Pro Theme. In order to delete it, you have to deactivate the theme first, then delete it.
Pro Templates
Pro Templates are the layouts that define how the page should look like on the frontend. Before you start creating any Pro Templates, learn the types of templates first to understand what they do.
Pro Template Types
- Header: The template covering the header area.
- Footer: The template covering the footer area.
- Single: A single template is used for a single post view (eg. when you view a blog post, that would be considered a single post view).
- Archive: An archive template is used on archive views (eg. when you view a blog post category, or tag pages, they are considered archive views).
- Page: The template for static pages (eg. a homepage or 404 page).
- Product Single: A product single template is used on the single product view (eg. when you view a product).
- Product Archive: A product archive template is used on product archive views (eg. product category pages, product tag pages, and the shop page would be considered product archive views).
- NOTE: If the WooCommerce plugin is not yet activated, you won't see the Product Single and Product Archive template types.
To create a Pro Template:
- Go to WP Admin > Themify > Pro Templates, click "Add New"
- NOTE: In order to create a Pro Template, you need to have a Pro Theme activated. If you haven't created/activated a Pro theme yet, go to Themify > Pro Themes to do so.
- Enter in the following to create a new Pro Template:
- Name: choose a template name of your choice
- Associated Theme: you should select your activated theme, or you can select a different theme if you want the template to be used in another theme
- Type: select a "Template Type"
- Display Conditions: select the "Display Conditions" to specify where to use the template, then click "Next"
- Then you will have the option to create a blank template or import from a predesigned template.
- To create a blank template: select the "Blank" thumbnail and click "Publish".
- To import a predesigned template: select a theme thumbnail of your choice and click "Publish".
- After the template is published, it will redirect you to the frontend to design the template.
- The frontend template edit uses the same Themify Builder to design the layout (learn how to use Themify Builder here).

Display Conditions
Display conditions allow you to choose when the template should be used. For example: if you want a template to be used on only specific posts or categories, you would use the display conditions.
To set Display Conditions:
- Go to WP Admin > Themify > Pro Templates, either add a new template or click a template's "Options" to edit an exisiting template's display conditions.
- On the template's options lightbox, you will see "Display Conditions"
- The first selection (a grey button) will allow you to choose whether to "Include" or "Exclude" the template (eg. if you select "Include" for all post categories, then the template will be used on all post category views).
- The second selection allows you to choose where to use the template:
- Entire Site: It means the template will be used on the entire site (eg. for the header template, you would select entire site so the header template will appear on every page).
- Archives: It refers to all general archive views (eg. post category pages, tag pages, custom taxonomy views, etc.)
- Singular: It refers to all single post views (eg. single view of all post types)
- NOTE: A third selection only shows depending on the second selection. The fourth selection only shows depending on the third selection. They are further options you can choose for more specific conditions (ie. it allows you to choose the template to be included/excluded on specific posts, pages, categories, etc.).
- TIPS: You can add multiple display conditions on a template to refine the template display. For example: you can set a header template to be included on the entire site, but be excluded from a specific category. To do that, you would select "Entire Site" for the first condition, then add a new condition and select "Exclude > Categories", then select the category you want the template to be exclude from.

Display Condition Examples
To display a template on a few select pages only:
- On the display condition, select Include > Singular > All Pages > uncheck "All" and select the page(s) that you want to display the template on

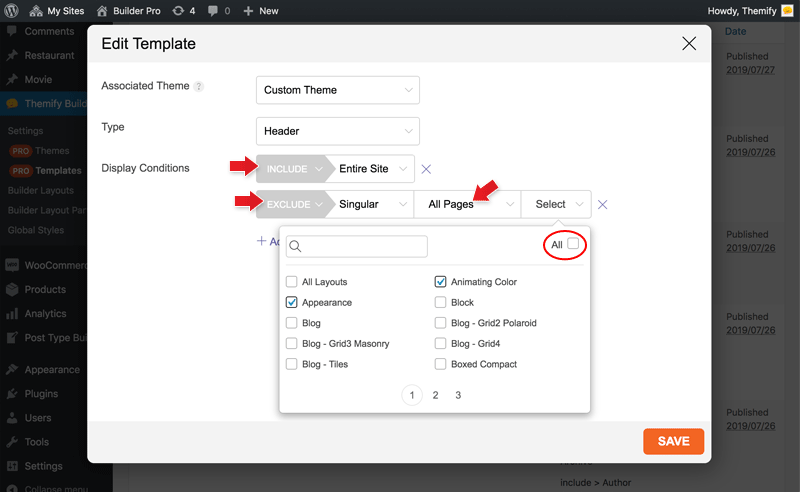
To display on the entire site, but exclude on a few pages:
- On the first condition, select Include > Entire Site
- Add a new condition, select Exclude > Singular > All Pages > uncheck "All" and select the page(s) that you want to exclude
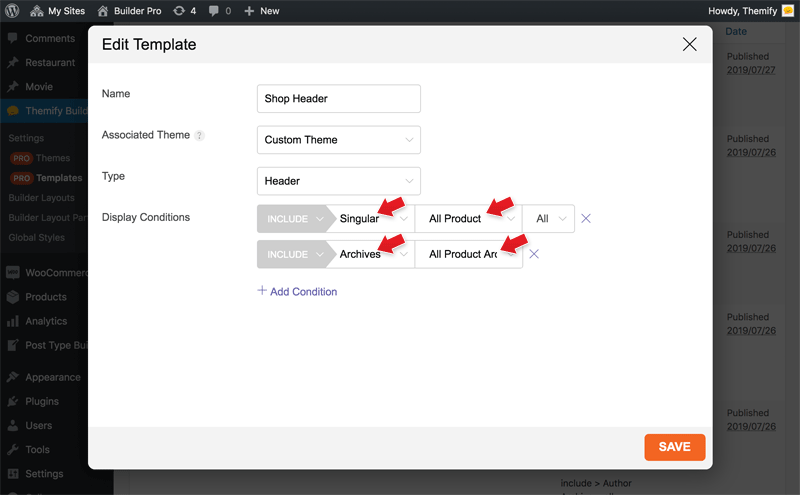
To display a shop header on WooCommerce shop pages:
- On the first condition, select Include > Singular > All Product
- Add a new condition, select Include > Archives > All Product Archives (the template will display on all product pages and product archives)
WooCommerce Templates
WooCommerce is a popular free eCommerce WordPress plugin.
Requirements:
- In order to create the product templates, you must have the WooCommerce plugin installed and activated. If you haven't installed WooCommerce yet, download the WooCommerce plugin here. Login to your site: WP Admin > Plugins > Add New, upload the WooCommerce plugin zip and activate it.
- After you have WooCommerce installed, you also need to have at least one published Product and Product Category. To add a product: go to WP Admin > Products > Add new.
To create WooCommerce templates:
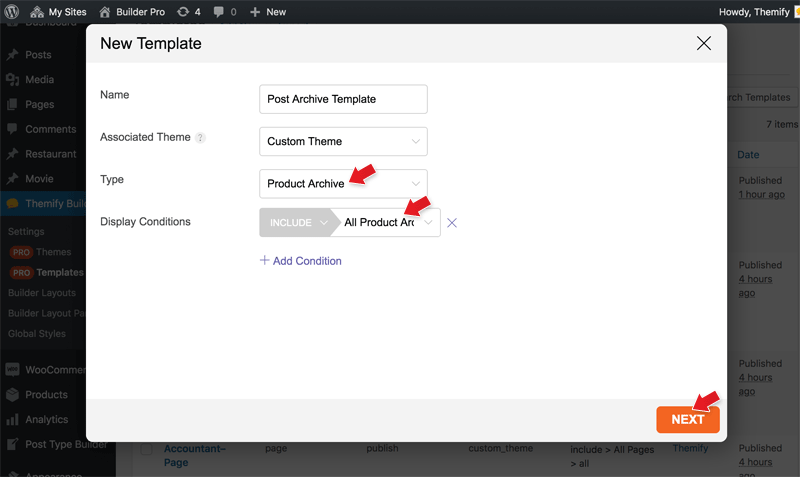
- Go to WP Admin > Pro Templates, click "Add New"
- Enter the template name (eg. Product Archive Template)
- Leave "Associated Theme" as is (it should have your current activated theme selected)
- Select "Type" to "Product Archive" or "Product Single" (if you don't see the product type options, it means you don't have the WooCommerce plugin installed/activated).
- Product Archive: It refers to the shop page, product category and product tag pages.
- Product Single: It refers to a single product page.
- Cart: Template for the cart page.
- Checkout: Template for the checkout page.
- Leaving "Display Conditions" with the default selection is fine. If you want to include or exclude the template on specific views, you can further select the display options. See "Display Conditions" for more details.
- Tips: If you want to have a different template for the shop page and product categories/tags, you would create 2 templates: set one template display condition to the shop page only and another template to display on product categories and product tags only.
- Then click "Next" and you will have the option to create a blank template or import from a predesigned template. When you click "Publish", it will direct you to the frontend to edit the template.
Dynamic Content
Dynamic content is a feature allowing you to display on the frontend, the dynamic content/info (such as custom fields) attached with each post. It is a powerful tool to create dynamic templates that change based on a post's content without having to do the manual work. You can use the dynamic content feature to create advanced archive layouts such as property listing site. Below are a few sample usages of dynamic content.
Displaying custom field value:
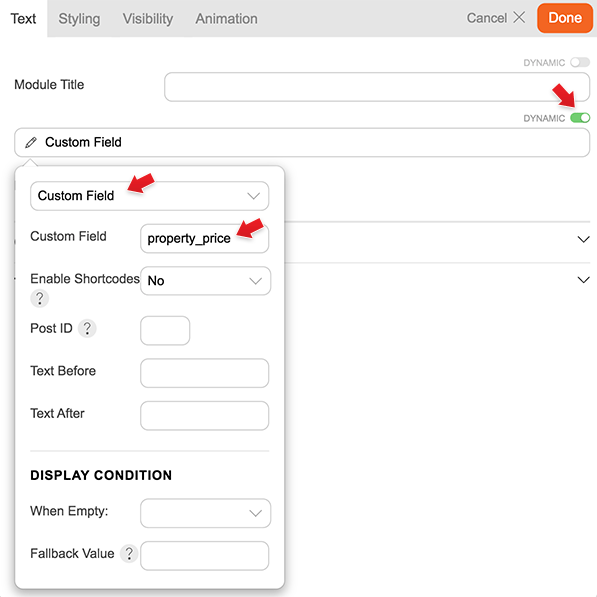
- To display custom field value, on any module that has the "Dynamic" switch (eg. Text module), enable the "Dynamic" switch, select "Custom Field" and enter the "Custom Field" name (eg. if you have a property post type with custom field slug property_price, you would enter that to display the property price custom field.
- If the custom field is a shortcode, you can enable the "Enable Shortcodes" option. Do not enable shortcode if the custom field value is not a shortcode.
- You can add text before and text after the custom field value.
- On the "Display Condition", when the custom field is empty, you can choose to hide the row, module, subrow or show the fallback value.
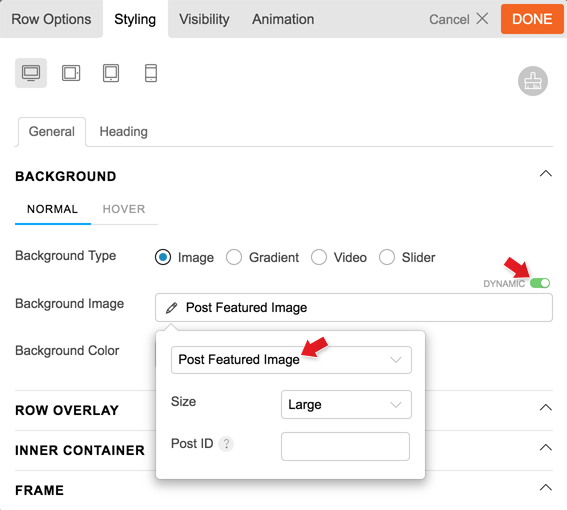
Displaying Post Featured Image as a background image:
- Edit the single post Pro Template
- On any row, column, or module styling, enable the "Dynamic" switch and select the "Post Featured Image". On the single post view, you will see the featured image being used as a background image.
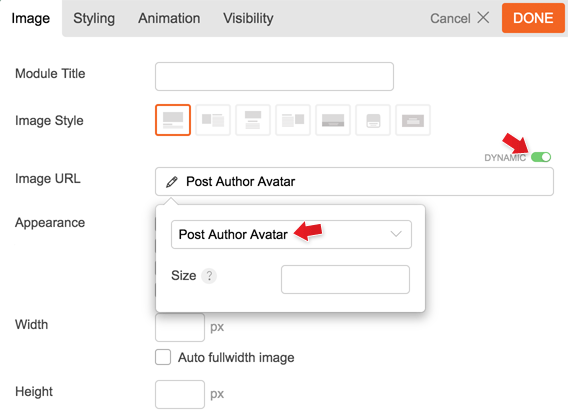
Display an author's picture with the Image module:
- Edit the single post Pro Template
- Drop in an Image module
- Enable the "Dynamic" switch and select "Post Author Avatar". If you view a live post, you will see the author's picture displaying in the image module. This feature is great if you run a site with multiple authors and you want to display the author picture on each post, without having to manually change it each time.
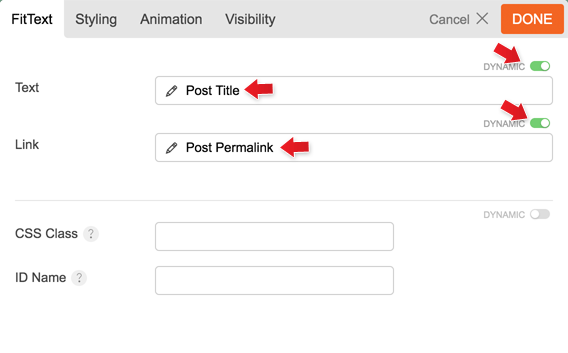
Using FitText addon as the post title:
- Edit the single post Pro Template
- Drop in a FitText module (if you don't see the FitText module, you need install the FitText addon)
- Enable the "Dynamic" switch on both the "Text" and "Link" field. On the "Text" field, select "Post Title" and on the "Link" field, select "Post Permalink" (link option is optional). Now if you view a single post, you should see the FitText addon being used to display the post title.
Using Image Pro as an archive post layout:
- Edit the post archive Pro Template
- Drop in an Advanced Posts module and edit it
- Then on the archive post layout, then drop in an Image Pro module (if you don't see the Image Pro module, you need install the Image Pro addon)
- Enable the "Dynamic" switch on the following fields:
- "Image URL" and select "Post Featured Image"
- "Link Type" and select "Post Permalink" (you may select the optional "Lightbox" feature which will open the post in a lightbox)
- "Image Title" and select "Post Title"
- "Image Caption" and select "Post Excerpt"
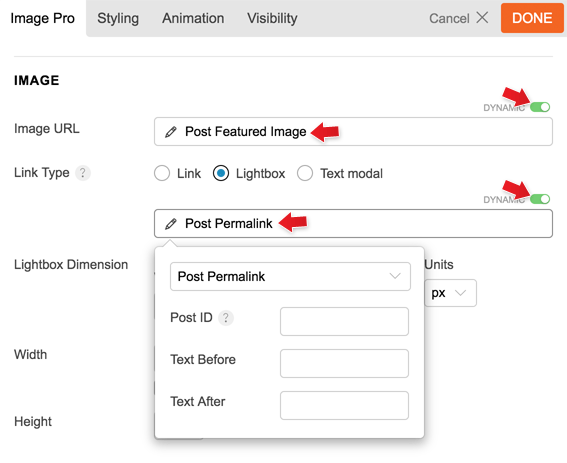
- Now if you view a post category, you should see the Image Pro being used to display the post featured image, title (linked to single post), and post excerpt.
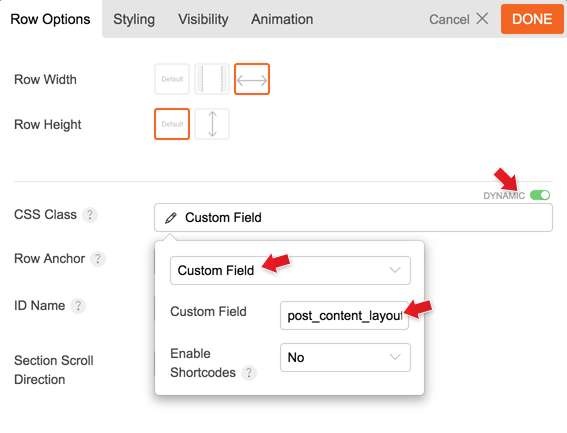
Adding dynamic custom CSS Class:
- Let's say your theme has a post layout option and that is stored in the post meta data (ie. custom field). You can display that layout value as the row/column custom CSS class in the template.
- Edit the single post template
- On a row option, enable "Dynamic" on the "CSS Class" field, select "Custom Field" and enter the "Custom Field" name. Now if you view a live post, you should see that custom field value being added in the row class. You can use that CSS class to apply custom CSS for unique layout styling.
Theme Import/Export
Theme import/export allows you to transfer your Pro themes from one site to another. Or you can use it to backup your themes.
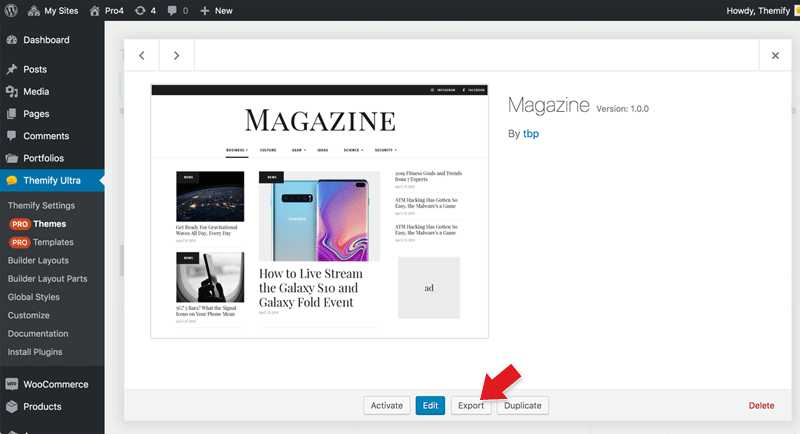
To export a Pro theme:
- Go to WP Admin > Pro Themes
- Click on the theme thumbnail to view theme details, then click the "Export" button. It will prompt you to download a zip file (that is your theme data). When a theme is exported, it automatically exports all associated templates in the zip file.
To import a Pro theme:
- Go to WP Admin > Pro Themes
- Click "Import" and upload the Pro theme zip file that you previously exported. When a Pro theme is imported, it automatically imports all associated templates stored in the zip file.

Template Import/Export
The template import/export tool allows you to transfer select templates, instead of a whole theme and its associated templates.
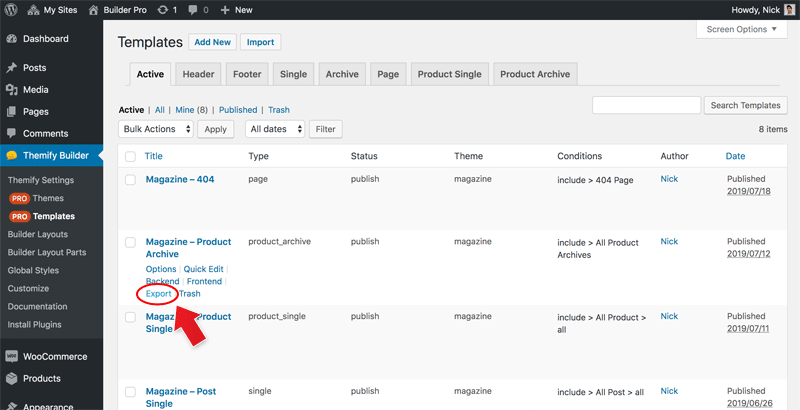
To export a single Pro Template:
- Go to WP Admin > Pro Templates
- Hover over the template that you want to export and click "Export" (it will prompt you to download the template data zip file)
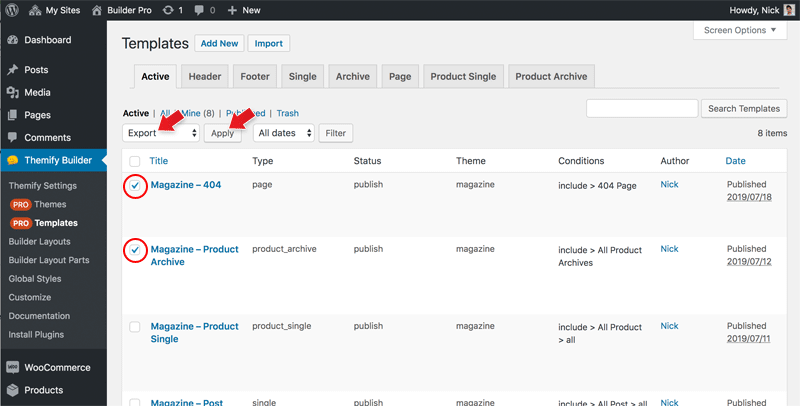
To export multiple Pro Templates:
- Go to WP Admin > Pro Templates
- Check the templates that you want to export, from the "Bulk Action" menu, select "Export" and click "Apply" (it will prompt you to download the template data zip files)
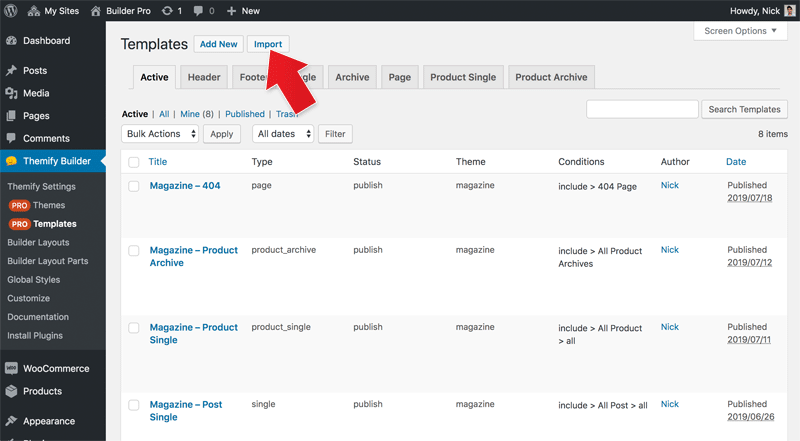
To import Pro Templates:
- Go to WP Admin > Pro Templates
- Click "Import" and upload the template data zip file that you previously exported
Builder Pro Modules
Builder Pro includes a bunch of additional modules that are specifically for template building. Pro modules are grouped as: Site, Single, Archive, Product Single, and Product Archive. The Pro modules are loaded on the module panel according to the template type that you are editing (eg. if you are editing a single template, it will show the single module group).
Pro Module Groups
- Site: General site elements such as site logo, tagline, menu, search, etc. (mainly used on header and footer templates)
- Single: Modules that are related to post elements such as post title, post meta, featured image, post content, etc. (mainly used on single post and single custom post types)
- Archive: Modules that are related to post archives such as archive title, archive posts, etc. (mainly used on archives)
- Product Single: Modules that are related to product elements such as product title, price, product image, add to cart, etc. (mainly used on product single)
- Product Archive: Modules that are related to product archives such as archive title, archive products, etc. (mainly used on product archives)
- Note: In order to see the WooCommerce related modules (product archive and single group), the WooCommerce plugin must be activated.
Pro Modules
- SITE
- Cart Icon: Ajax WooCommerce cart button (ie. it displays the items that customers added to their cart). You need to have the WooCommerce plugin activated in order to use this module.
- Menu: It displays the WordPress custom menus that you create in Appearance > Menus.
- Search Form: It displays the WordPress search form.
- Site Logo: It displays the site logo. You have the option to display the logo as either text or image.
- Site Tagline: It displays the site tagline that you entered at Settings > General.
- Wishlist Link: An icon which links to the wishlist page.
- ARCHIVE
- Advanced Posts: It displays posts in archive views. It is the advanced version of the "Archive Posts" module which allows you to add additional modules inside the post layout.
- Archive Description: It displays the category/taxonomy description (TIPS: to add the category description: go to Posts > Categories, edit a category and add description)
- Archive Posts: It displays the posts in archive views.
- Archive Title: It displays the archive title (eg. category title).
- SINGLE
- Author Info: It displays the post's author profile such as author name, picture and biography.
- Comments: It displays a comment list and the comment reply form.
- Featured Image: It displays the post's featured image.
- Post Content: It displays the post's content (you can choose either content or excerpt).
- Post Meta: It displays the post's meta data such as published date, comment count, author, and categories.
- Post Navigation: It displays the previous and next post link.
- Post Title: It displays the title of the post.
- PRODUCT ARCHIVE
- Advanced Products: It displays the products in product archive views (such as the shop page and product category pages). It is the advanced version of "Archive Products" module which allows you to add additional modules inside the product layout.
- Archive Description: It displays the product category/tag description.
- Archive Products: It displays the products in product archive views.
- Archive Title: It displays the product category/tag title.
- PRODUCT SINGLE
- Add To Cart: It displays the add to cart button.
- Product Description: It displays the product description with an option to display either a long or short description of the product.
- Product Image: It displays the product image.
- Product Meta: It displays the product category and tag links.
- Product Price: It displays the product price.
- Product Rating: It displays the product's star ratings.
- Product Reviews: It displays the WooCommerce product description tabs (description, customer reviews, and additional information).
- Product Title: It displays the product title.
- Related Products: It displays the related products.
- Upsell Products: It displays the upsell products (TIPS: you can enter the upsell products by editing it in the backend, on the product metabox, click "Linked Products" and enter the upsell products).
- Wishlist Icon: An icon/button that allows customers to add products to their wishlist.
- WooCommerce Breadcrumb: It displays the WooCommerce breadcrumb navigation (normally placed at the top of the content area).
Creating Multilingual Templates with WPML
With WPML, a multilingual translation plugin, you can create your templates in any language, and assign them to whatever page you want. These templates will automatically be displayed for the translations of those assignments as well.
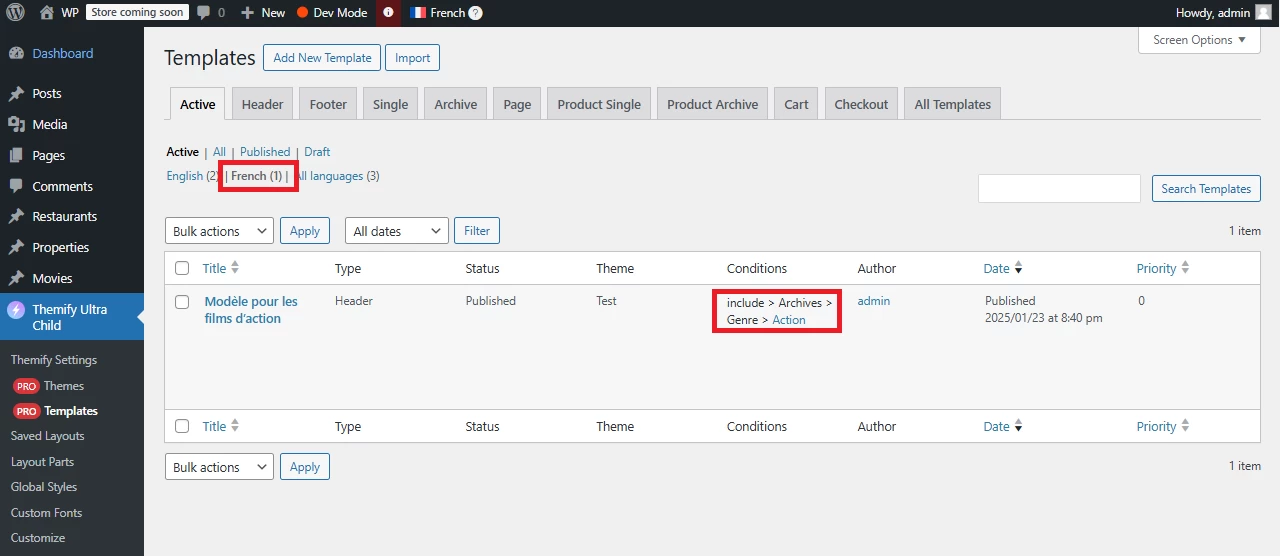
For example, if a website's default language is set to English, and the template is added in French for the Genre/Action archive pages, this template will also be used for the English archive pages of genre/action. You don't need to assign templates for each language individually; assigning templates in one language is sufficient.
However, if you wish, you can create different templates in different languages as well. In this case, Builder Pro will use the template in the correct language for the page being visited. This makes managing them super convenient.
Creating Multilingual Templates with Polylang
Polylang is a free multilingual plugin similar to WPML. By default, Builder Pro templates are displayed for all languages of your website. Builder Pro automatically manages template assignments. For instance, if you assign a template to a specific page, that template will also apply to all translated versions of the page.
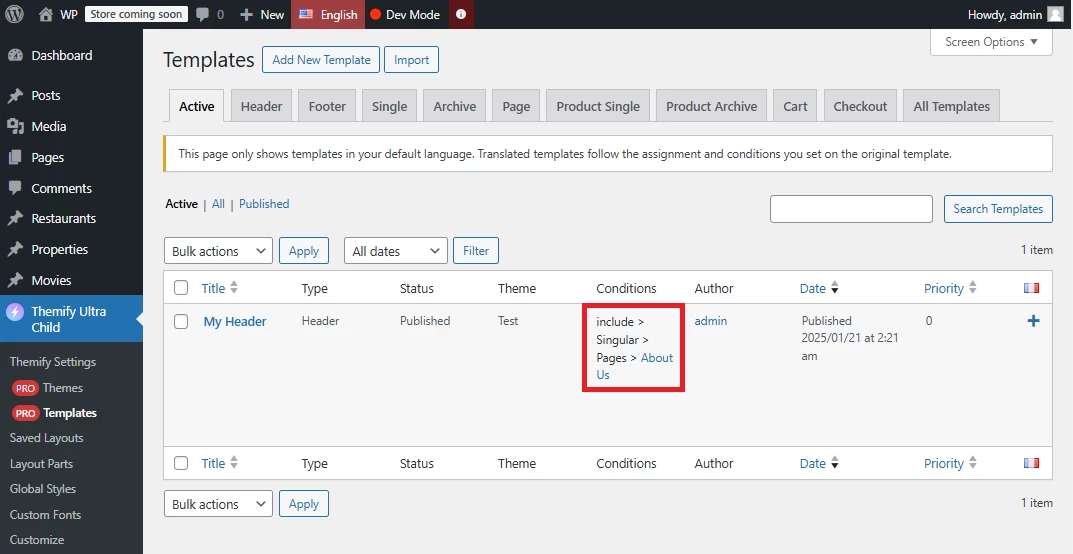
In the screenshot above, a header template is assigned to the About Us page. As a result, the same template will also be used for the French version of the About Us page.
If you want your header to look different for the French version, you'll need to translate the template.
Polylang: Enabling Template Translation in Builder Pro
To make your templates translatable, go to WP-admin > Languages > Settings, under the Custom Post Types and Taxonomies section, click the Settings button. Check the box for Templates (tbp_template) and click Save Changes.

Polylang: Managing Multilingual Templates
With Polylang, Builder Pro templates are only created in your website's default language. For other languages, you need to translate the existing template into those languages. To translate a template, click the + (plus) button under the flag of the target language to begin translating.
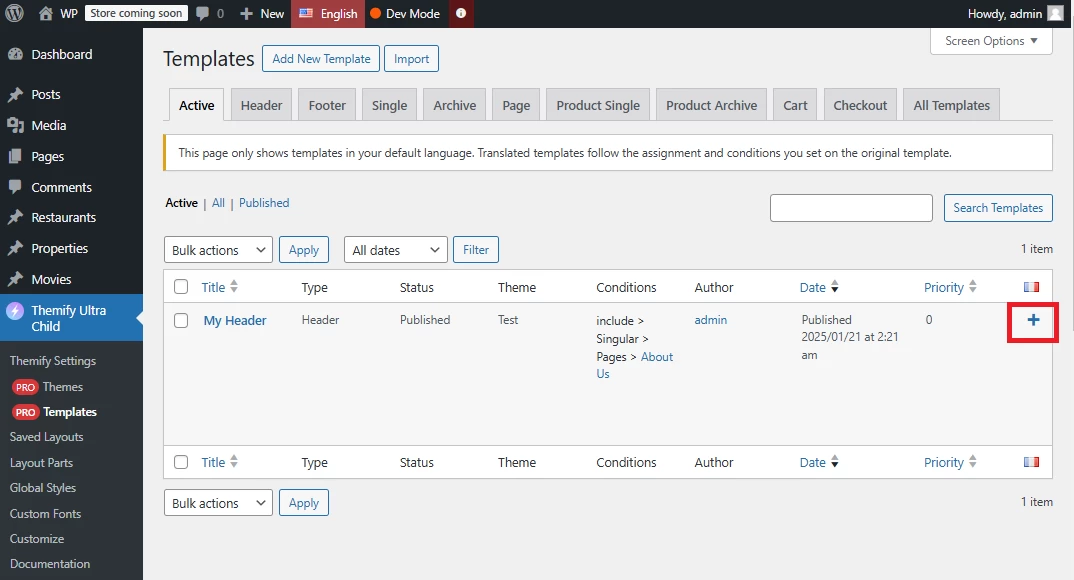
Builder Pro will automatically copy all modules and settings from the original template to the new one. You can then customize the translated template as needed. Once you're satisfied with the changes, click Publish. That's it! Your page will now have a unique header for each language.
Please note that on the Themify > Templates admin page, it only lists templates in the default language. Switching languages using the admin toolbar will not update this list.