In our last tutorial we recorded a video on how to create a dynamic property site with Builder Pro and Pods plugin. To demonstrate that Builder Pro is compatible with all major custom post type plugins, we are writing another tutorial on creating a movie review site with Builder Pro and the Post Type Builder (PTB) plugin). Builder Pro has full integration with PTB. That means whatever post types and custom fields you create with PTB, you can use Builder Pro to create the templates for them. In this tutorial, we will cover every step on creating custom post type, custom fields, taxonomies, and custom templates. You will learn how to create a complete custom movie review site from scratch with dynamic content.
1. Requirement: Install Builder Pro and Post Type Builder (PTB) Plugin
Before you begin, please make sure you have Builder Pro, PTB, and PTB Extra Fields addon installecd. They are Themify premium plugins. You can sign up Master Club to get all of them. To install them, download them from the Member Area (a membership is required) and then install them on your site > WP admin > Plugins area. To work with Builder Pro, you need to use it with a Themify theme or the free Themify Builder plugin. For faster installation, you can use Themify Updater to install all of them with the 1-click installer as long you have an active membership/license key.
2. Creating a Movie Post Type
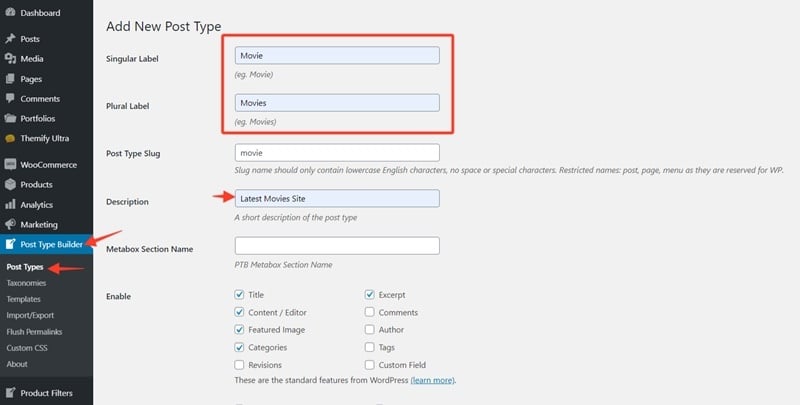
After activating all required plugins, use the PTB plugin to create a post type called "Movie".
- Go WP Admin > Post Type Builder > Post Type.
- Then click "Add New".
- Enter the singular and plural label for the post type as "Movie" and "Movies".
- You may enter the optional short description of the post type.
Creating Custom Fields
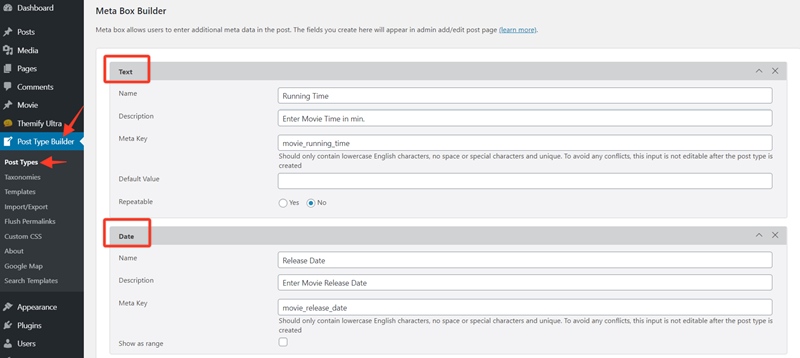
Once you have created the post type, add the custom fields related to the post type under the Meta Box Builder section. These custom fields give unique data of each movie review post.
- To add custom fields, hover on "Add Field" (displays several fields).
- Select the "Text" field.
- Enter the name for the first custom field. (e.g: "Running Time").
- Repeat these steps for other fields like: Rating checkbox and Release Date.
- For Rating Checkbox select "Checkbox" field (add checkbox options: G, PG, PG-13, and R).
- For Release Date select "Date" field.
- Once done, click Save. Now you should have the Movie post type with the Running Time, Release Date, and Rating custom field.
Creating Taxonomies
Next we need to add a new taxonomy to categorize the movie genre, movie directors, casts, and writers.
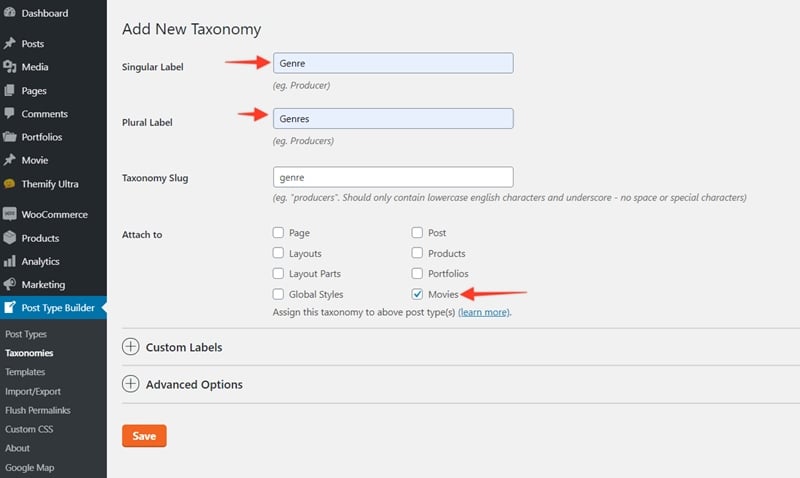
- To create a taxonomy, go to WP Admin > Post Type Builder > Taxonomies > Add new.
- Enter the singular and plural label as "Genre" and "Genres" respectively.
- Under "Attach To", select the"Movies" post type.
- Note: This links the taxonomy to the Post Type.
- Repeat the above step to add a taxonomy "Director" and assign it to the Movie post type.
3. Adding Sample Movie Posts and Taxonomies
After creating the post type and taxonomies, you would need to add some sample movie posts and taxonomies. This will help to preview the layout while editing the templates.
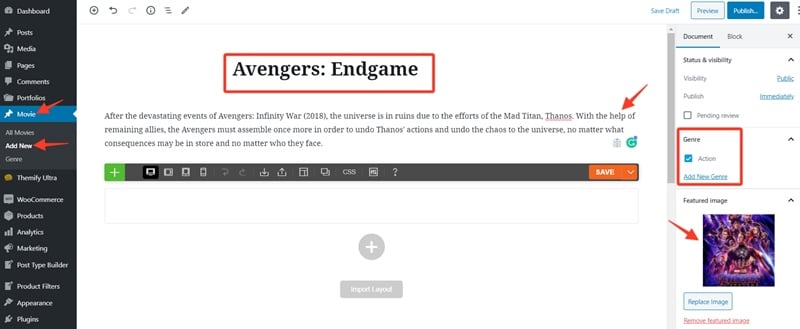
- To create a movie post, go to WP Admin > Movies > All Movies > Add New.
- Enter the title and description in the content editor.
- On the right-side panel, add new Genres (i.e. add "Action", "Comedy", etc.)
- Upload a Featured Image.
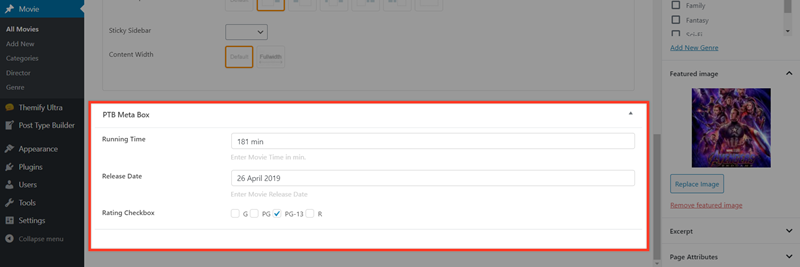
- Next, scroll down to the "PTB Meta Box" section.
- Enter the running time, release dae, and select the rating checkbox.
- Once done, click "Publish".
- Repeat the above steps to add a few more sample movie posts.
4. Creating a Pro Theme
By now you should have created some sample movie posts with custom fields. Next, you need to create a Builder Pro theme and templates to display them. Ensure Builder Pro plugin is activated for this step.
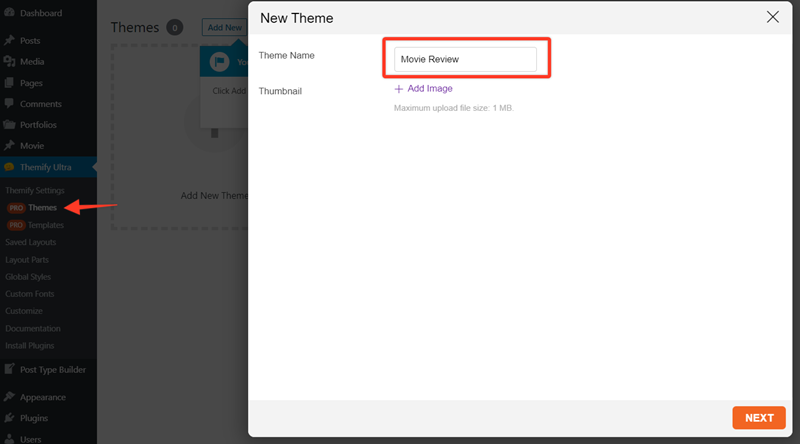
- To create a Pro theme, go to WP Admin > Themify > Pro Themes, click "Add New Theme".
- A lightbox then appears, enter the theme name "Movie Review" and click "Next" to proceed.
- It redirects you to another screen to select a predesigned theme, select "Blank" to create it from scratch, and click on "Activate".
5. Creating the Movie Archive Template
Once the Pro theme is created, you can now build an Archive Template and link it to the Theme. This template displays the layout of the Movie Post type page.
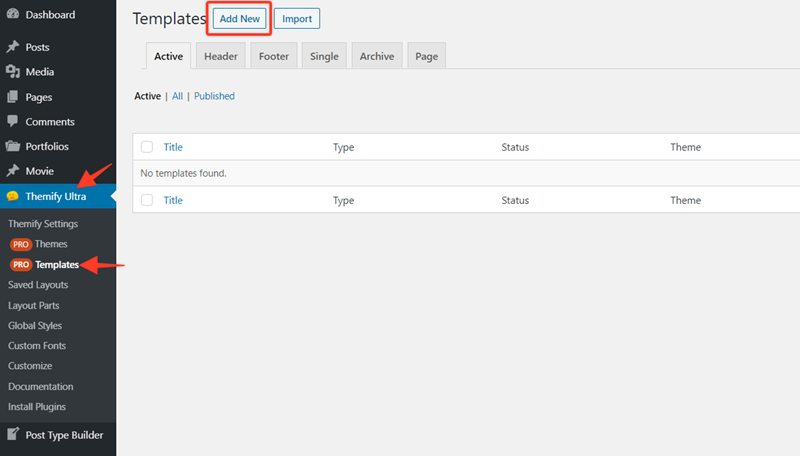
- To create a new template, go to WP Admin > Themify > Pro Templates, click "Add New".
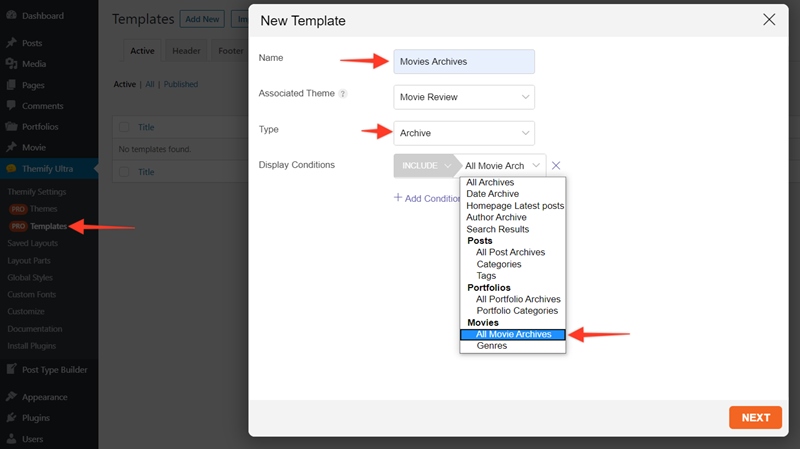
- A lightbox will appear that prompts you to enter the template name. We named our template "Movie Archives".
- Choose the "Associated Theme". Select the one you created in the previous step.
- Select the template type as "Archive" from the drop-down list.
- Set the display condition to "All Movie Archives".
- Upon clicking Next, it should prompt you to import a predesigned template, select "Blank", and click "Publish".
Editing the Archive Template
Once you have added the template, it should redirect you to the frontend where you can design it.
TIPS: If it doesn't redirect to the template frontend, you can get it from the backend admin area:
- Go back to WP Admin > Themify > Pro Templates.
- Hover on the template, and click on "Frontend" (this will redirect you to frontend and turn on the Builder).
Displaying the Archive Title
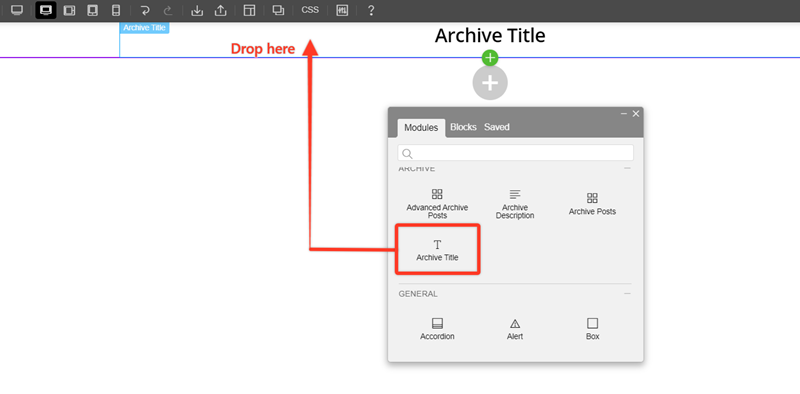
Once you have the Builder on the archive template frontend, drop in an "Archive Title" module and save the template.
Editing Archive Template with Live Content and Preview
To make it easier to design the template, we will show you how to design the template with real content preview. You would need to view a movie archive (eg. view a genre on the frontend) and edit template on the frontend.
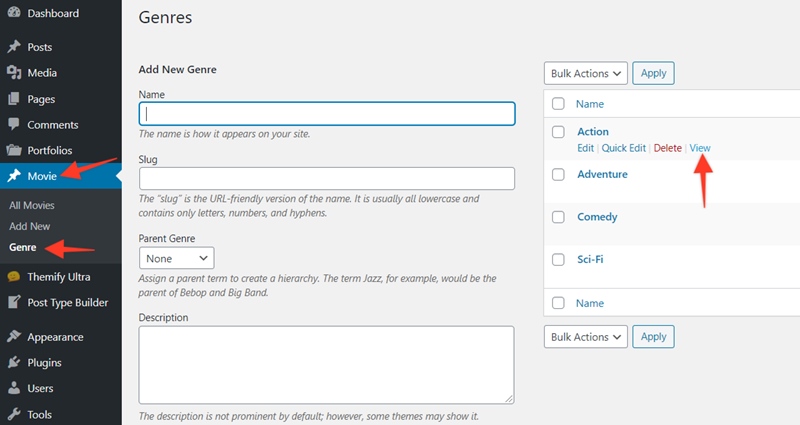
- Go to WP Admin > Movies > Genre, hover on a Genre, and click "View".
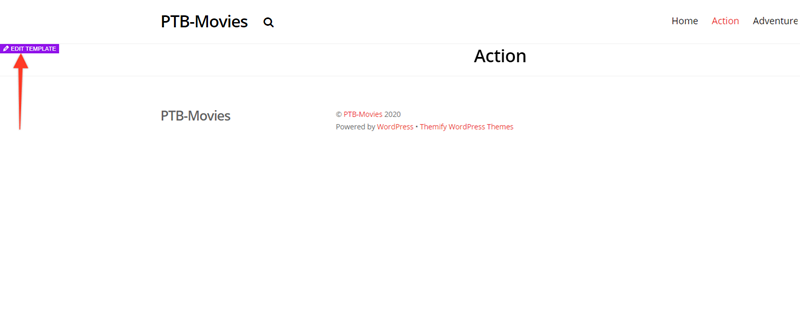
- This will redirect you to the frontend of the movie genre, hover on the content area and click "Edit Template".
- This turns on the Builder, where you can edit the template with live content.
Adding an Advanced Posts
You would then need to add the Advanced Posts from the frontend of the page. This displays the movie archive posts.
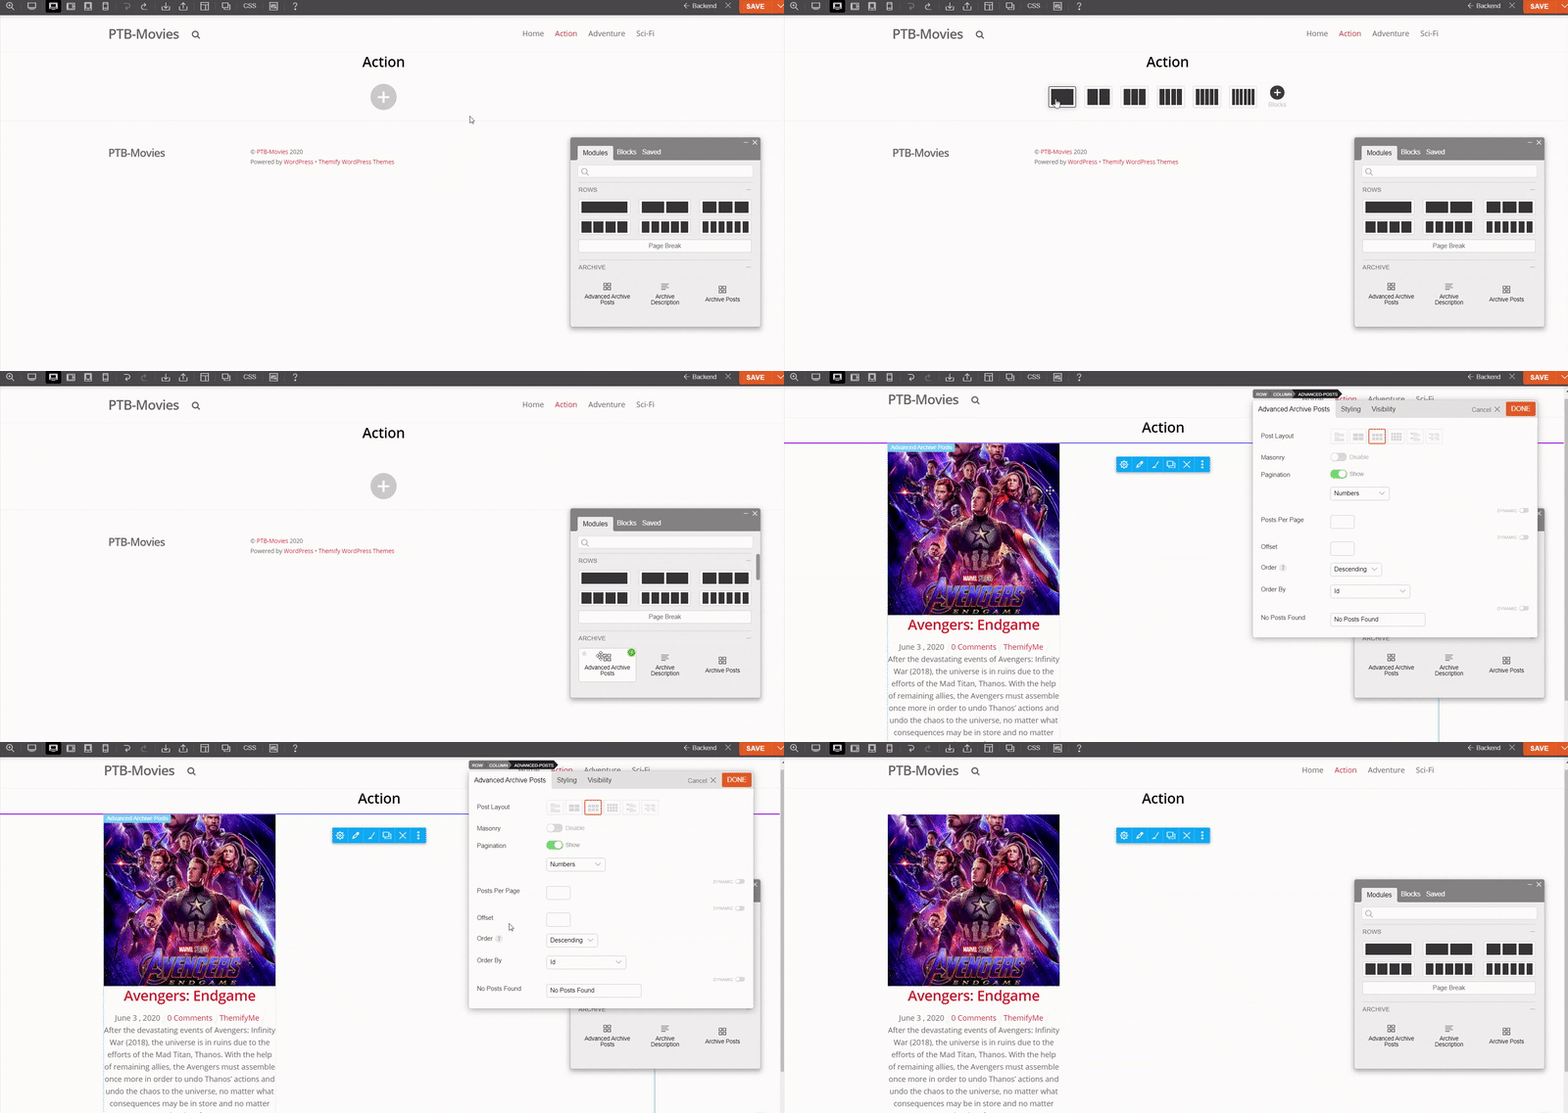
- First, add a row module below the Archive Title.
- Drop in an "Advanced Posts" module.
Editing the Advanced Posts
In this section, you'll learn how to edit the Advanced Posts by adding custom dynamic fields we created using PTB.
- Hover the Advanced Posts module and click on the pencil icon to edit it.
- Remove Post Content module.
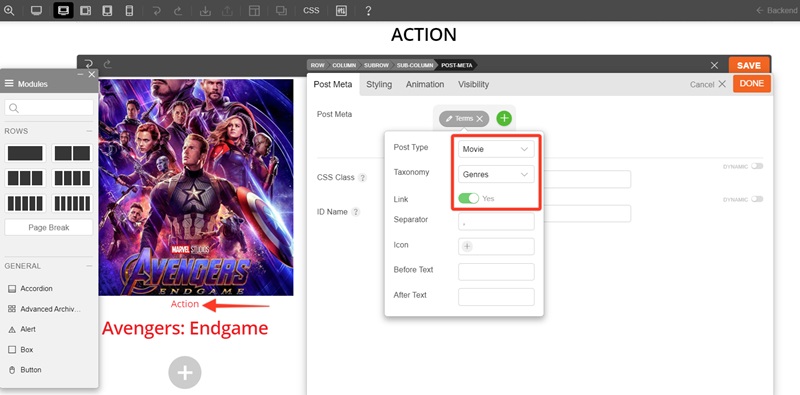
- Drop in a Post Meta module. Delete "Date", "Comments", and "Author". Edit the "Terms" item and change the Post Type to "Movie".
- Under Taxonomy, select Genre.
- Then, drag the Post Title below the Post Meta module.
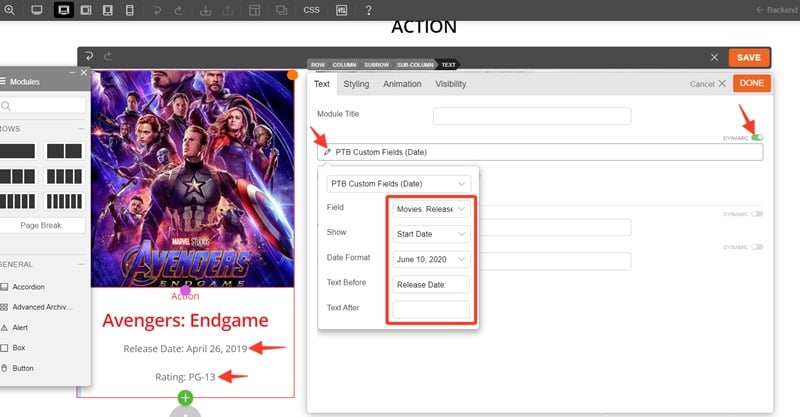
- Below the Post Title module, drop in a "Text" module. Click on the "Dynamic" switch to enable it, and select "PTB Custom Fields (Date)".
- On the Field section, select the "Movies: Release Date" field type.
- On "Text Before", enter "Release Date:"
- Repeat the above steps for the Rating field.
- Select "PTB Custom Fields (Checkbox)"
- Enter "Rating:" as "Text Before"
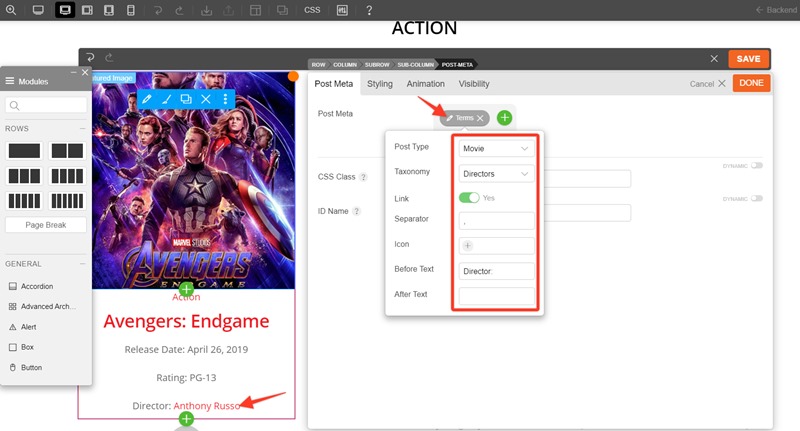
- Below it, drop in another Post Meta module. This time for Director taxonomy.
- Delete "Date", "Comments", and "Author". Edit the "Terms" item and change the Post Type to "Movie".
- Under Taxonomy, select Director.
- On "Before Text", enter "Director:"
NOTE: This tutorial focuses on how to create the dynamic templates. You can always use Builder to style the layout as you like.
6. Creating the Movie Single Post Template
In this section, we will create a single template that will be used to render the movie single page.
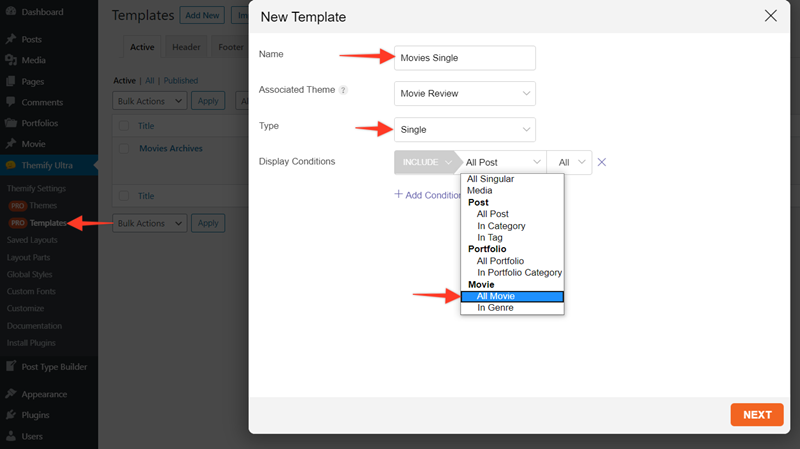
- To create a new template, go to WP Admin > Themify > Pro Templates, click "Add New".
- Name the new template. We labeled it "Movies Single".
- Choose the "Associated Theme" as the one you created before.
- Under Template Type, select "Single" from the drop-down list.
- Change the display condition to "All Movie" and click "Next".
- On the next page, it should prompt you to import a predesigned template, select "Blank" and click "Publish".
Add Featured Image in the Single Template
After you add a new template, it should redirect you to the template frontend where you can design it.
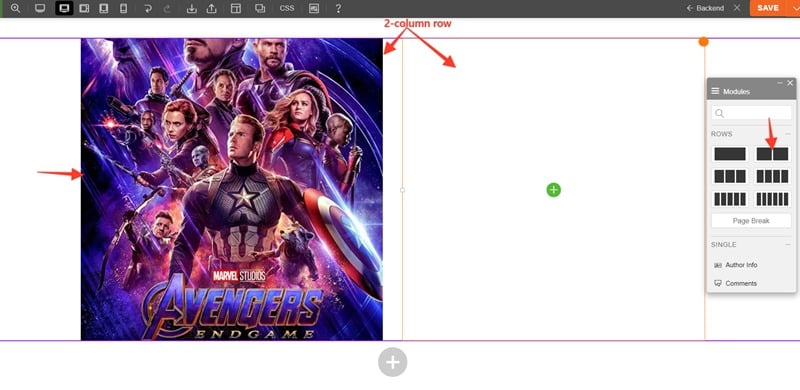
- On the first row, change the row grid to 2-column.
- Drop in a Featured Image module on the left column. Click "Save" to save template for now.
Editing Single Template with Live Preview
Again we are going to view a single movie post type on the frontend and edit the template real content.
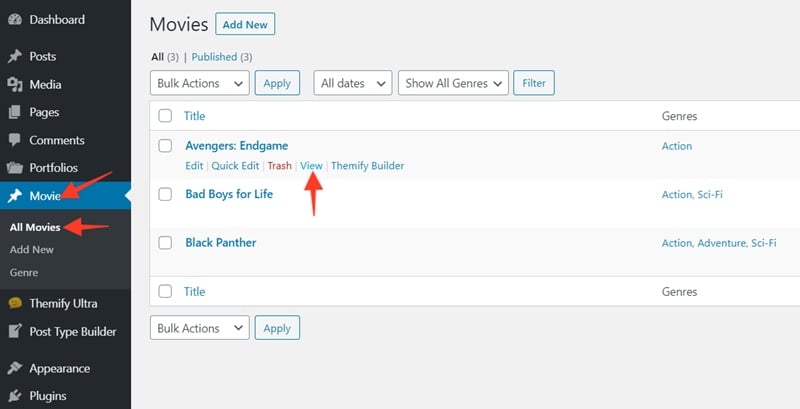
- To view a sample Movie post, go to WP Admin > Movies > All Movies.
- Hover the movie post list and click "View" (it will redirect you to the post's frontend).
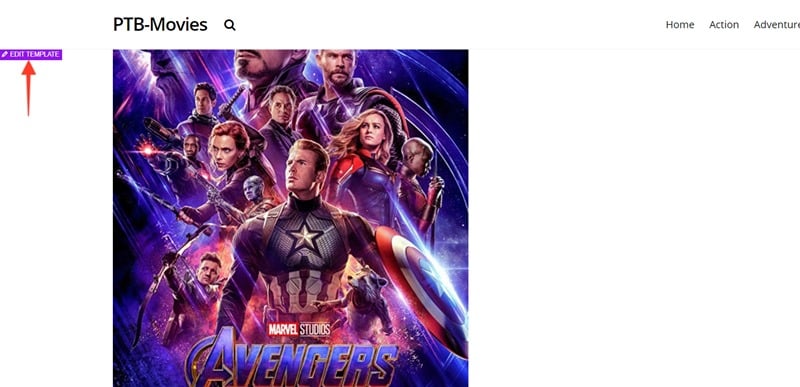
- Hover on the content area and click "Edit Template" (this will turn on the Builder for you to edit the template).
Adding Taxonomies
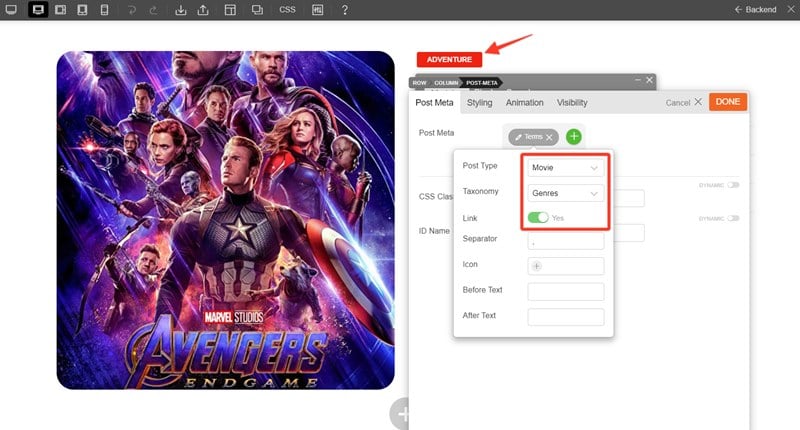
- On the right column, drop in a Post Meta module
- Delete "Date" and "Comments". Edit the "Terms" item and change the Post Type to "Movie".
- Under Taxonomy, select Genre.
- On "Before Text", enter "Genre".
- Repeat the above steps for displaying the Directors taxonomy.
Adding Post Title and Custom Fields
- Next, drop in a Post Title module below the Post Meta module. Select Heading 1 for HTML Tag (but you can select any HTML tag as you like).
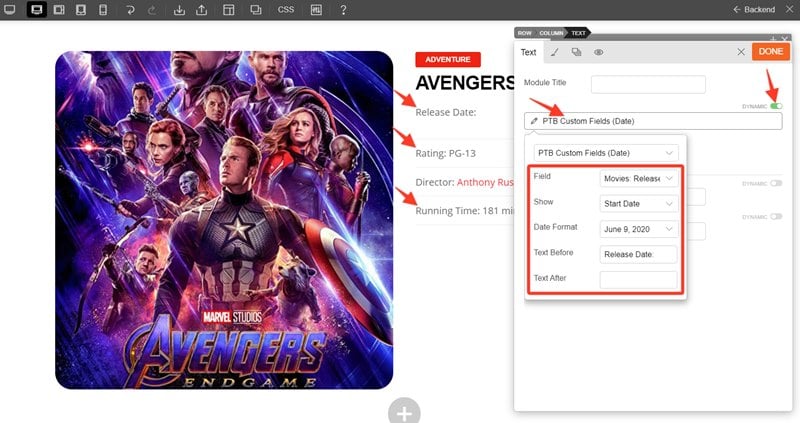
- Drop in a Text module after the Post Title module.
- Click the "Dynamic" switch to enable it, and select "PTB Custom Fields (Date)".
- On the Field section, select the "Movies: Release Date" field type.
- On "Text Before", enter "Release Date:"
- Repeat the same steps for the Rating field and Running Time. as Text Before.
- For Rating, select the "PTB Custom Fields (Checkbox)" and enter "Rating:" as Text Before.
- For Running Time, select the " PTB Custom Fields (Text)" and enter "Running Time:" as Text Before.
Adding Post Content
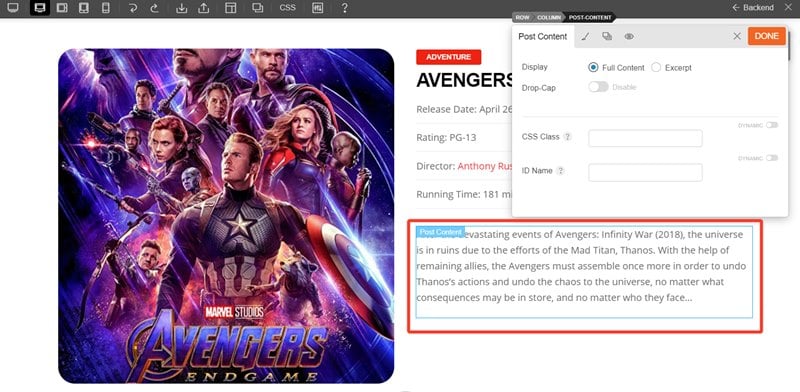
After displaying the custom fields, add a Post Content module to display the movie review description. That is all for our single movie template. You may add more design details or other modules as needed.
8. Copying the Advanced Posts Data
In the following step, we will show you how to display the movie archive posts on a static page with the same data structure and styling. First you need to copy the Advanced Posts from the archive template.
- Go to WP Admin > Themify > Pro Templates.
- On the Movies Archive template, click "Frontend"
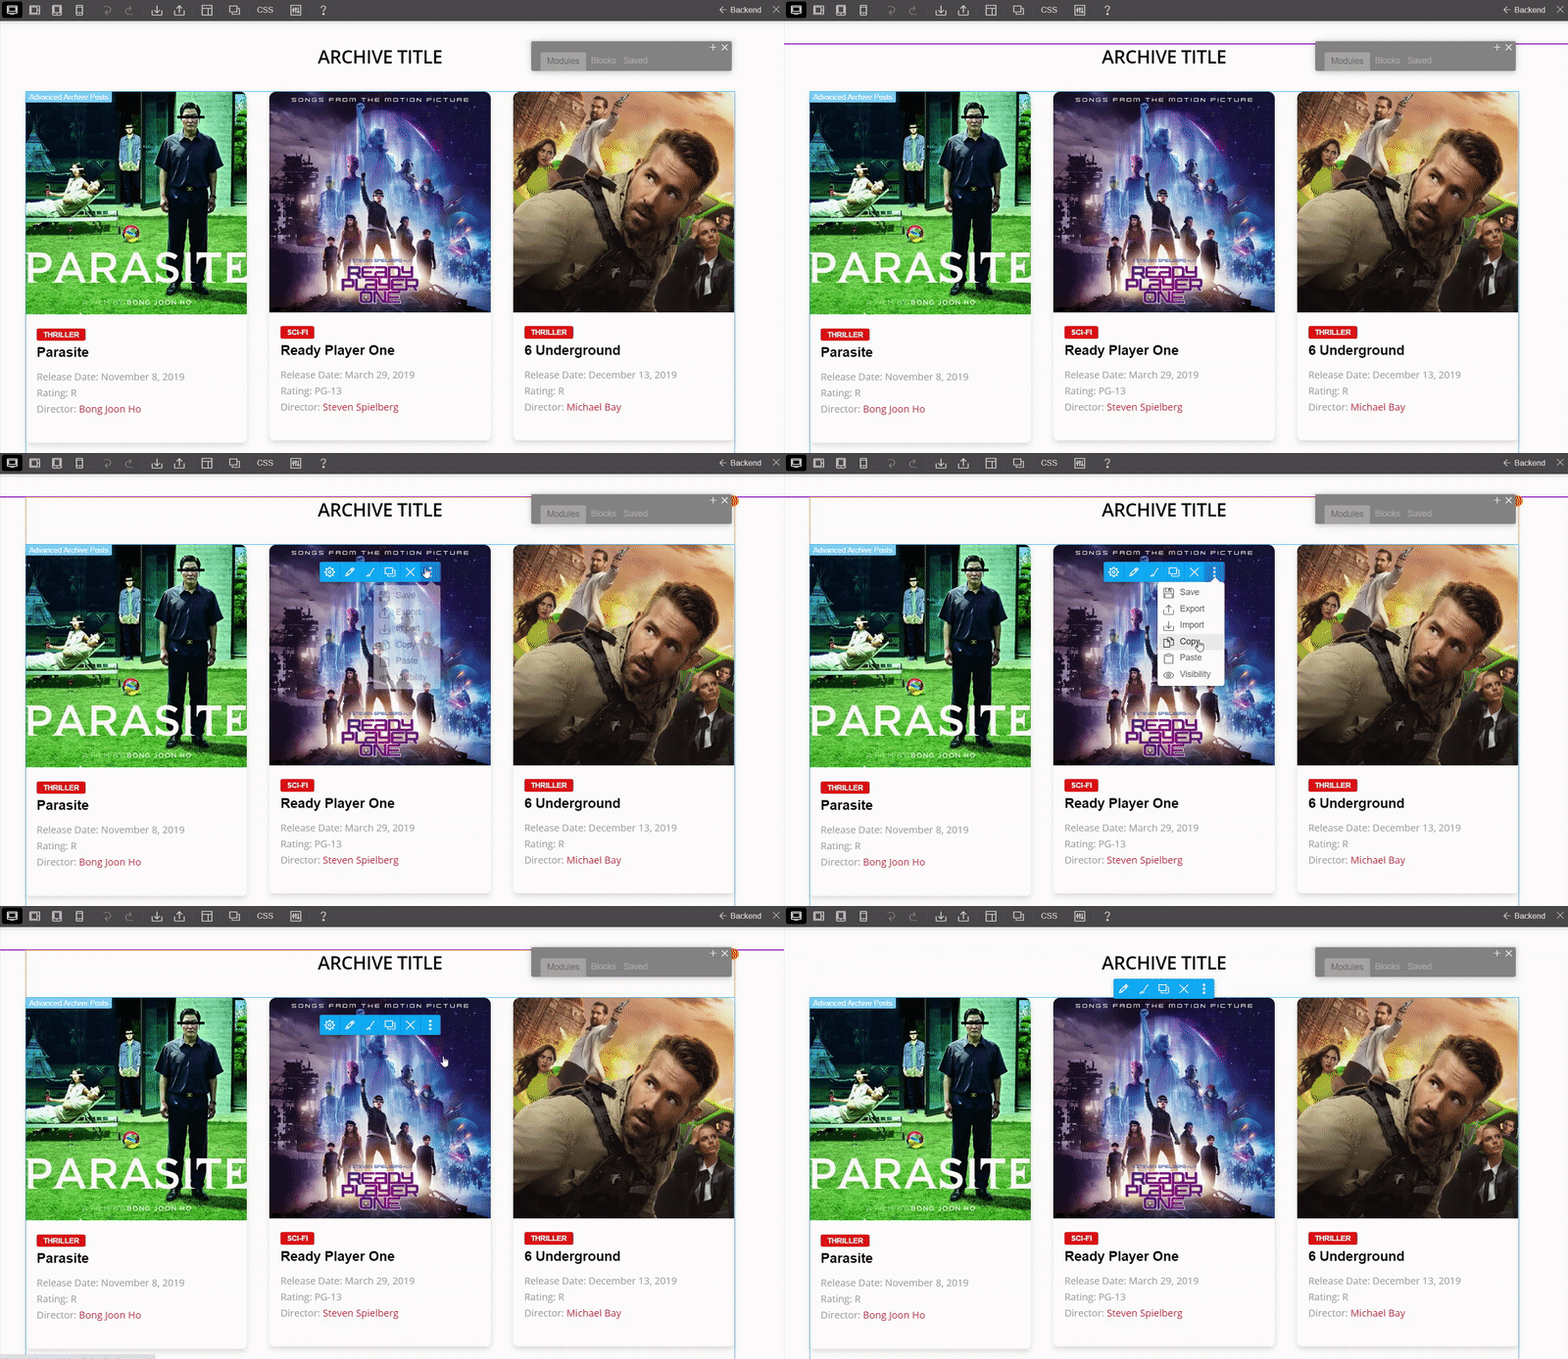
- On Advanced Posts module, hover on the more dropdown icon ( ⋮ ) ,then click "Copy". This will copy the Advanced Posts data which we will paste on the Advanced Posts module on the homepage (so they both have the same data and styling).
9. Creating a Static Front Page
Now we will create a static page and assign it as the frontend.
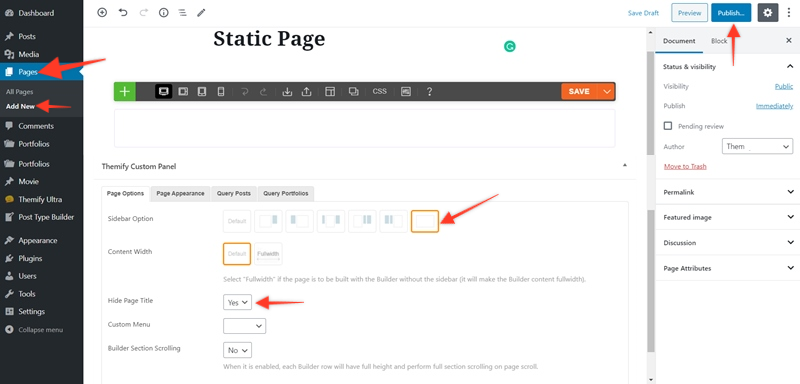
- Go to the WP Admin > Pages > Add New.
- Enter the Title of the page
- Scroll down to "Themify Custom Panel" and set "Sidebar Option" to No Sidebar.
- Under Hide Page Title select "Yes" then click Publish.
To set the page as the front page,
- Go to WP Admin > Settings > Reading.
- On "A static page", choose the page you created above as the front page.
Editing the Front Page
Edit the homepage in the backend and click the "Frontend" button on the Builder toolbar.
To add a Movie Post Slider:
- First, add a Row module in the top section.
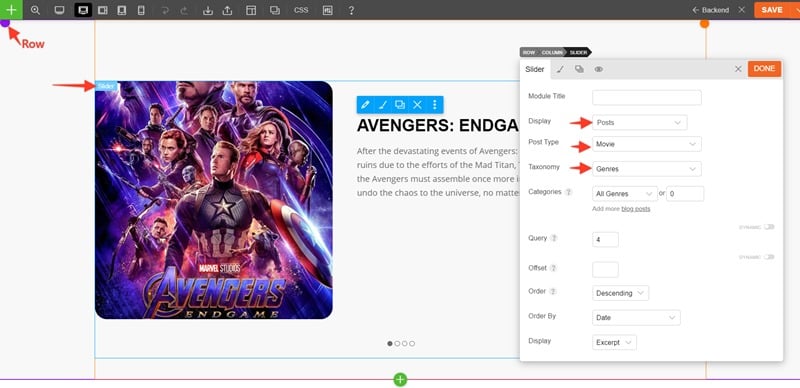
- Then drop in a Slider module in the Row.
- Change the Slider options as follows:
- On Post Type, select Movie.
- On Taxonomy, select Genre.
- Select "Agency" for Slider Layout.
Adding the Advanced Posts
After adding the post slider, you would need to add the Advanced Posts module to display the movie posts.
- Add a new row below the Slider module.
- Then drop in an Advanced Posts module.
- On the Advanced Posts module, hover on the more dropdown ( ⋮ ) and click "Paste". This should paste the data structure and styling from the movie archive template that you copied in the previous step. Now your movie posts should have the exact same layout as archive template. If it doesn't paste anything, refer back to step 8 on how to copy the Advanced Posts data.
10. Creating the Site Header and Footer Template
After building the movie archive and single templates, you can create a custom header and footer.
To create the Header template:
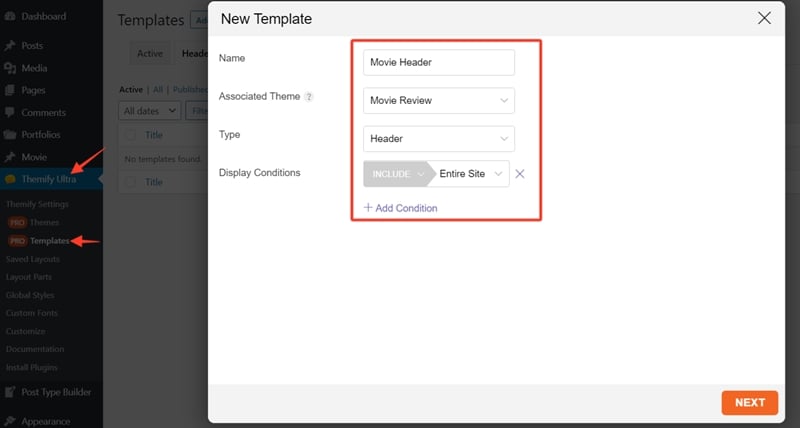
- Go to WP Admin > Themify > Pro Templates, click "Add New".
- Enter the template name. We labeled it as "Movie Header".
- Choose the "Associated Theme" as the one you created before.
- Under Template Type, select "Header" from the drop-down list.
- Change the display condition to "Entire Site" and click "Next".
- On the next page, it should prompt you to import a predesigned template, select "Blank" and click "Publish".
Editing Header template
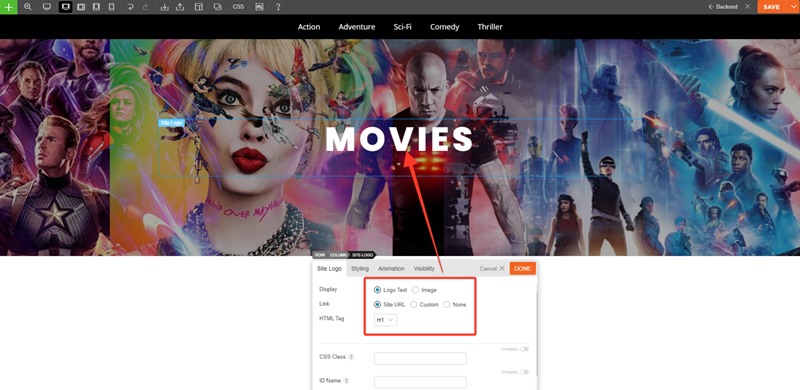
In this part, we will build a Header that features a menu bar, a banner, and the site logo.
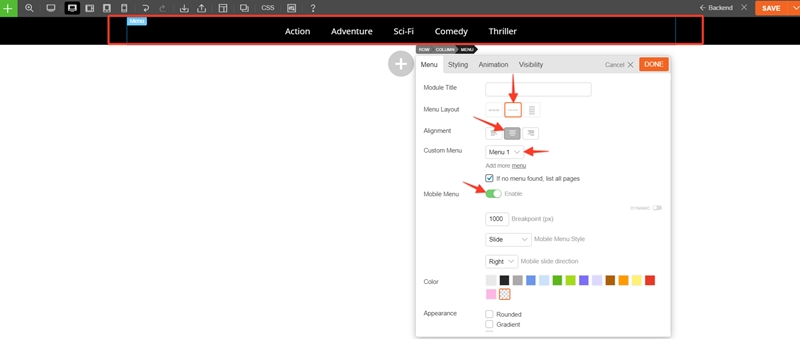
- On the first row, drop in a Menu module. Set its options as:
- Menu Layout - Fullbar
- Alignment - Center
- Custom Menu - Select a Menu (you can create the custom menus at WP Admin > Appearance > Menus).
- Next, add another Row module below it. Add a row background image as you like.
- Then, drop in a Site Logo module.
Creating the Footer template
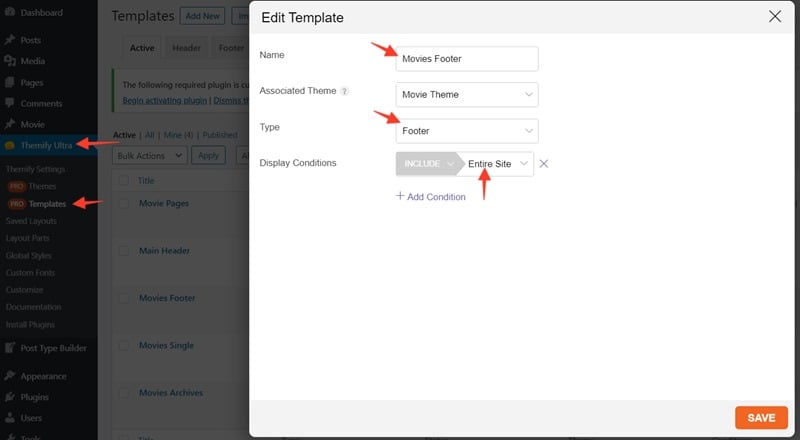
Repeat the above steps to create the Footer template. Enter the following template options:
- Template Name = Movie Footer
- Template Type = Footer
- Display Conditions = Entire Site
Editing Footer Template
For our demo, we have a very simple footer to display the copyright disclaimer.
- Drop in a Text module on the first row.
- Enter the copyright disclaimer or any text as you like.
Final Remarks
To keep this tutorial simple, we only created a few custom fields and taxonomies. Using PTB and Builder Pro, you can create additional custom fields, taxonomies and templates as you want. You can create a different movie template for each genre. The design options are limitless.


July 19, 2020 @ 12:29 pm
How much does it cost for Builder Pro?
July 21, 2020 @ 2:29 am
It is $69. For more details, please see: https://themify.me/builder-pro
July 12, 2023 @ 12:07 am
Thanks for this demo!
I have really struggled previously to make great designs with the built in archive and template editor of Post Types Builder.
Finally I can work with responsive design much easier, as well as have more control over the design instead of relying on complex css as with the defauls ptb sinle page and archive editor.
A lot of steps to keep track of, but ultimately worth the effort.
This opens up a world of opportunities! Once people catch on to this, it will be a game changer for you guys!
Thanks Themify Team!
/Marcus & Emelie
If anyone is struggling with designing their Themify-theme, check out our themify portfolio on the links below, we’d be happy to help you:
https://itforrealty.com
https://iits.es