Image Pro
Installing Builder Addons
Required: Builder Addons require the Themify Builder. You can use it with either any Themify theme or the Builder plugin.
Installing Builder Addons is exactly the same as installing WordPress plugins.
To install the addon:
- Firstly, download the addon zip file from the link provided in your Themify Member Area.
- NOTE: some browsers (eg. Safari) auto extract zip files automatically. Right-click on the download link and select "Save Linked File As" and it will allow you to download as a zip file.
- Login to your site's admin area.
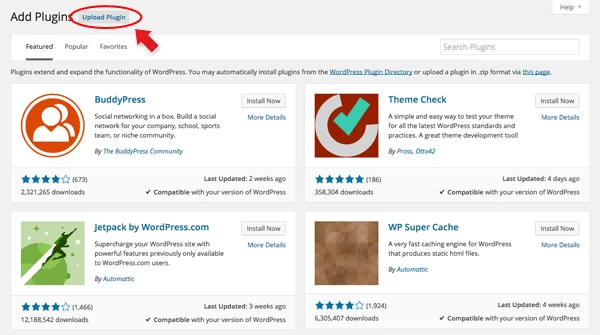
- Navigate to WP Admin > Plugins > Add New.
- Now, click the "Upload Plugin" link.
- Select "Browse" and navigate to the plugin zip file which you downloaded in the first step and then select the "Install Now" button.
- This will initiate the plugin installation process, and once finished, you can then activate the plugin.
Importing the addon demo layout
Each addon zip file contains a sample Builder data file which you can import to your site. It helps you to understand how the addon demo is created.
To import the addon demo data:
- First, extract addon zip file to your local computer
- You should have a folder of the addon. Inside there is a folder named "sample", and inside that folder there is a Builder data file in a zip format (eg. "addon_name_sample-builder-layout.zip").
- To import the Builder layout, login to admin and then go to the page frontend where you want to import the Builder layout. From the top admin bar > select Themify Builder > Import / Export > Import, upload the sample zip file.
Using the Image Pro Addon
Once addon is installed, you will find the Image Pro addon module in the Themify module panel. The module is available in both backend and frontend edit mode (just like all standard modules).
- Create or edit any page and turn on the Builder.
- You will see the Image Pro module in the module panel, under the "Addons" section.
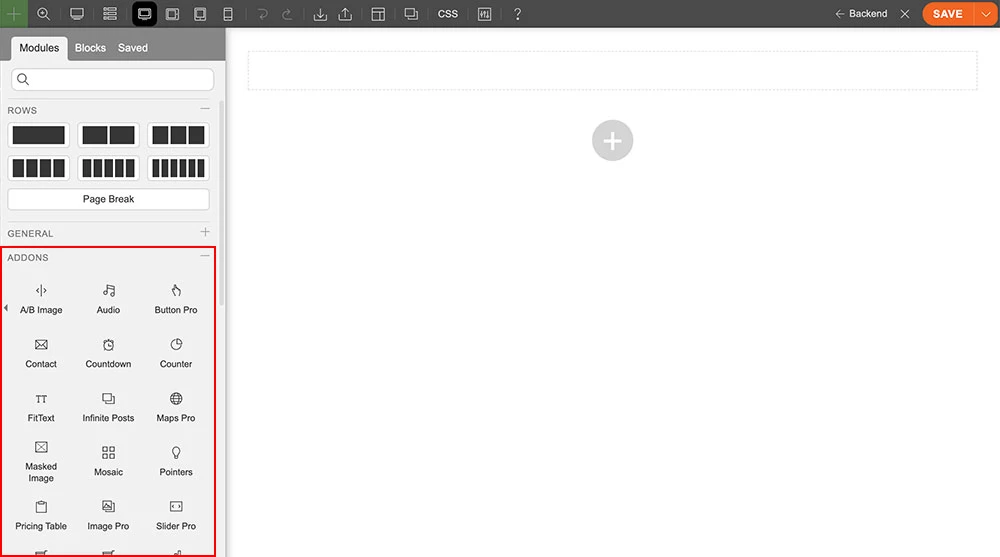
- Drag and drop a Image Pro module in a row.
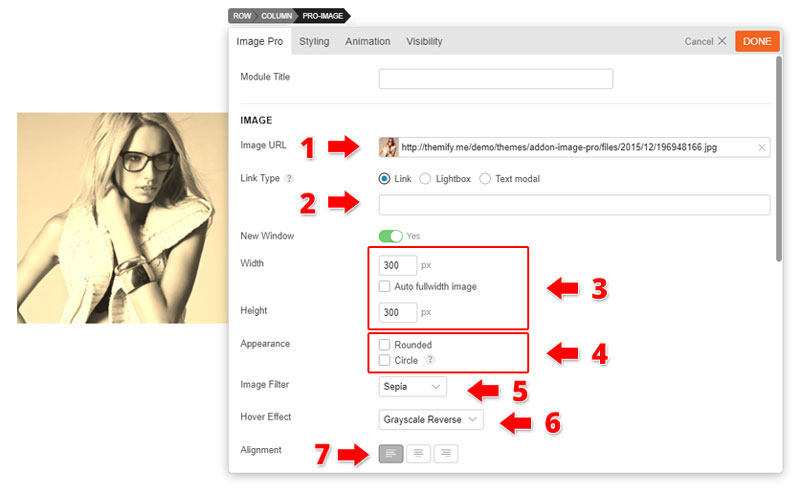
- Image Pro Options:
- Module Title = (Optional) Input any module title you would like that will appear at the top of the module.
- Image
- 1) Image URL = Upload or select any image from your library.
- 2) Width and Height = Set the desired pixel width and height of the image.
- Selecting the Fullwidth option will allow the image to span across the available width of the container.
- 3) Image Appearance = Select rounded for images to have rounded edge, or circle. The circle image appearance works best for images with square image formats.
- 4) Image Filter = Choose from grayscale, grayscale reverse, sepia, or blur
- 5) Image Hover Effect = Choose from zoom in, zoom out, rotate, shine, or glow.
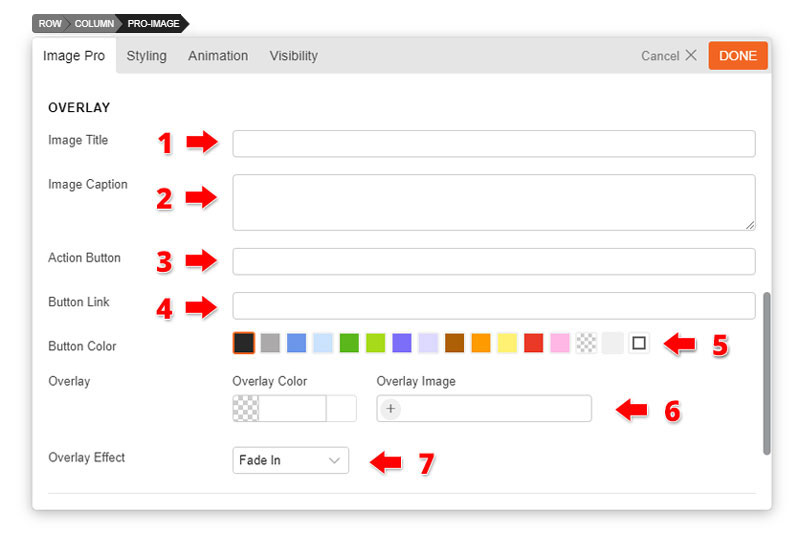
- Overlay
- 1) Image Title = (Optional) Input title text that will appear when user hover over the image. Note: For partial overlay this will appear at the bottom of the image.
- 2) Image Caption = (Optional) Input caption text that will appear when user hover over the image.
- 3) Action Button = (Optional) Input any text you would like to appear inside the action button.
- 4) Link = Input link where you would like users to be redirected to
- Link Type = Select how you would like to users to be redirected when they click on the button
- 5) Button Color = Select pre-set button color options.
- 6) Overlay = Choose to use color, image, or both types of overlay
- Overlay Color = Use the color to select any type of color. You can also adjust opacity by toggling with the opacity bar beside the color picker.
- Overlay Image = Upload or select any image from your library
- 7) Overlay Effect = Choose from 12 overlay effect that'll appear as user hover over your image.
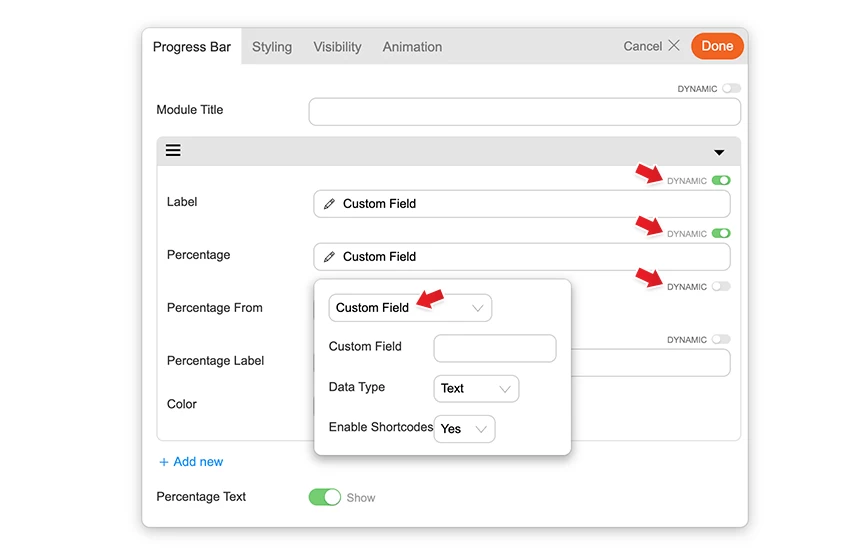
Builder Pro Dynamic
You can use Builder Pro to display addon fields dynamically. Once you have Builder Pro activated, you will see a "Dynamic" toggle button on each field. NOTE: Some fields might not have the "Dynamic" feature if it is unavailable or incompatible. With the dynamic feature, you can display field data from post metadata, shortcodes, custom fields, and other fields created with plugins such as Post Type Builder and Advanced Custom Fields. Refer to Builder Pro Documentation for more information.