Post Type Builder Plugin
Step-by-step Video Tutorial
Post Type Builder (PTB) is a WordPress plugin that allows you to create custom post types with custom fields, taxonomies, and post type templates. This is a video tutorial that breaks down everything you need to know on how to create your own custom post types. The tutorial is really simple and easy to follow as we've divided it into 4 different stages:
Installing the Plugin
To install the plugin:
- First, you will need to download the plugin zip file from the Member Area on the Themify site.
- Note: Some browsers (e.g. Safari) may auto-extract zip files. Right-clicking on the download link and selecting "Save Linked File As" will allow you to download the ZIP version.
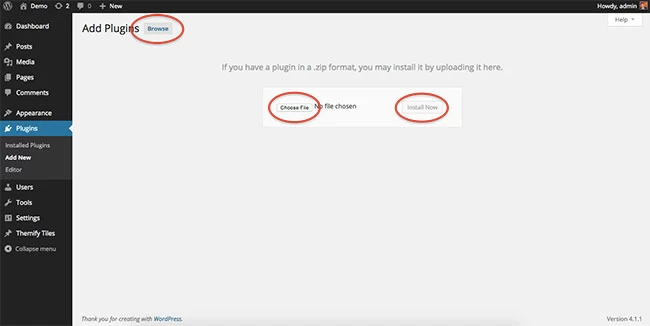
- Then go to your WP Admin > Plugins > Add New > Upload Plugin.
- Now upload the plugin zip file and click "Install Now".
- After the plugin is installed, click "Activate Plugin" to activate the plugin.
FYI: If you can't install the plugin using WordPress plugin installer, you may also use a FTP software to install the plugin. To install plugins with an FTP method: extract the plugin zip on your local computer then upload the plugin folder to your FTP server where you installed WordPress > wp-content > plugins folder. Then login to your WP Admin > Plugins to activate the plugin.
Step-by-Step Overview:
- Create a new Post Type
- Configure the Meta Box Builder (adding custom fields)
- Create optional Taxonomies associated with the Post Type
- Create Templates for the post type
- Edit the Archive Template
- Edit the Single Template
- When you are done with the post type and templates, you'll be ready to add custom posts
- After custom posts are added, you may use the shortcode generator to display custom posts on any post/page
Post Types
Custom Post Type is the additional post types created in addition to the standard WordPress post types "Posts" and "Pages".
To create a new post type:
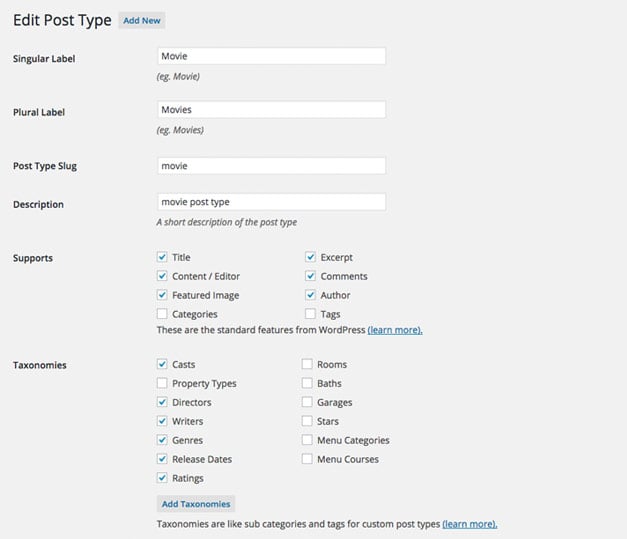
- Go to WP-admin > Post Type Builder > Post Types > Add New
- Singular Label = Singular descriptive name of the post type (eg. Movie).
- Plural Label = Plural descriptive name of the custom post type (eg. Movies).
- Post Type Slug = Post type slug which is used in permalink (friendly URL structure).
- NOTE: Below are a few post type slug restriction.
- You cannot use the following slug names: Menu, Posts, Pages, Action, Author, Order, Theme. These are default post types reserved by WordPress. Click here to find the complete list of default reserved post types by WordPress.
- Slug names have to be lower case, no space, unique, and written only in English characters
- NOTE: Below are a few post type slug restriction.
- Description = This description will appear on the "Post Types" lister where you see all the post types created with Post Type Builder (PTB).
- Supports = These are the standard WordPress post features. Check which one(s) you want to enable the feature support.
- Taxonomies = Taxonomies are like groups and types of the custom post type (ie. they are like post categories). For example, if you are creating a "Movie Review" post type, you would need taxonomies like Actors, Directors, Genre, etc.
- NOTE: If you are going to assign custom taxonomies with the post type, create the taxonomies first before adding the post type. If you forgot to create the taxonomies, you can always come back and edit this. Read the Taxonomies section for more details.
- Custom Labels = In Custom Labels panel, you can enter the label text used in WordPress admin interface. You may leave the labels as default or enter your custom labels.
- Advanced Options = In Advanced Options panel, you can specify the advanced options. Generally, it is fine to leave everything as default.
Meta Box Builder (Custom Fields)
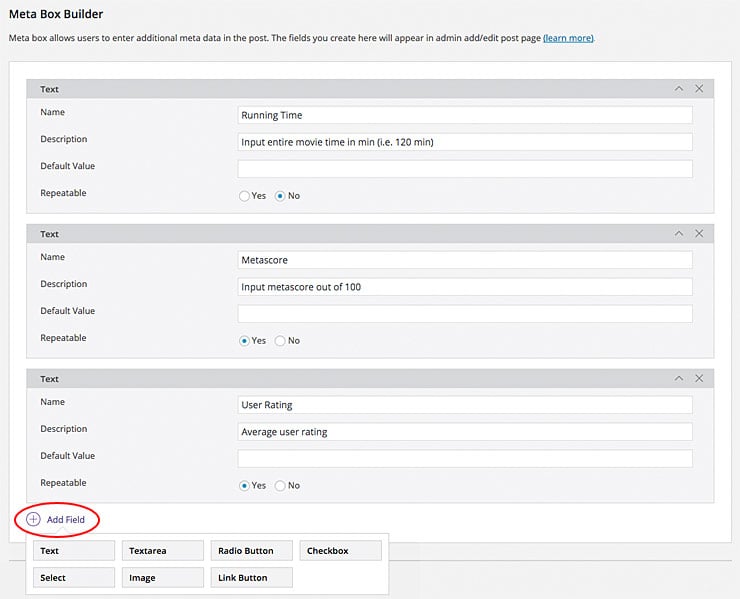
WordPress post types only offer the standard fields such as title, content, featured image, etc. Meta Box allows you to insert custom fields that are tailored to the custom post types. The fields you create here will appear in the Meta Box panel when users add/edit a post. For example, if you are creating a "Property Listing" post type, you would need meta data like: price, area, lot size, property taxes, etc.
To add custom fields in Meta Box:
- On the Meta Box Builder, hover the "Add Field" button and click on the field type button to insert.
- Then enter the field name, description, and options of the field. Refer to "Meta Field Types" below to learn how each field type works.
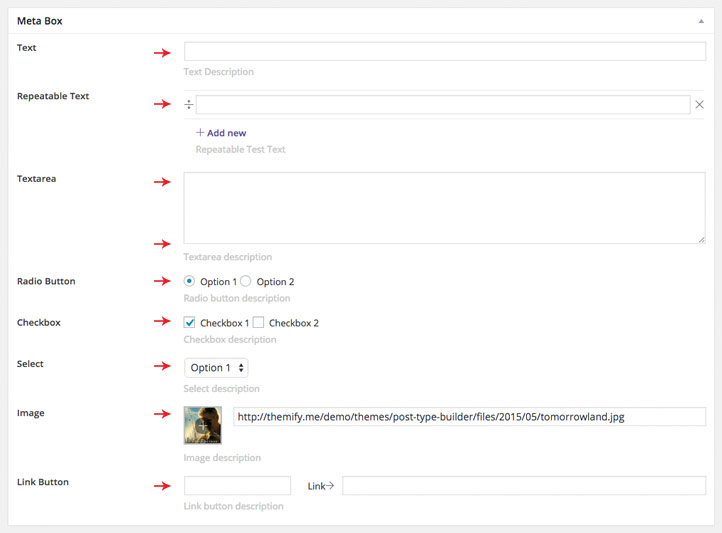
Meta Field Types:
- Text = Allow users to enter text input
- Repeatable = Allow users to enter multiple/repeatable text in the same field
- Textarea = Allow users to enter a large block of text
- Radio Button = Allow users to select only one option in the radio group
- Checkbox = Allow users to select multiple options (difference between radio and checkbox is radio only allows one selection whereas checkbox allows multiple selections)
- Select = Allow users to select only one option from a dropdown select (if you have a lot of options, it would be better to use select dropdown instead of radio buttons because radio buttons might take a lot of space in the meta box)
- Image = Allow users to insert/upload an image
- Link Button = Allow users to enter a link button with custom link text
- Video = Allow users to insert/upload a video (YouTube, Vimeo, mp4, etc.)
- Rating = Allow users to rate/vote posts
- Map = Allow users to enter an address to display a Google Map
- Date = Allow users to insert a date with date picker
- Slider = Allow users to create an image or video slider
- Gallery = Allow users to insert a gallery
- Progress Bar = Allow users to display a progress bar
- Icon = Allow users to display an icons from FontAwesome library
- Audio = Allow users to insert/upload an audio (mp3, etc.)
- File = Allow users to insert/upload files
- Email = Allow users to enter an email address
- Accordion = Allow users to display an accordion
- Telephone = Allow users to display a phone number
- Number = Allow users to enter numbers (numbers only, no text will be allowed in number type)
Templates
Templates are the layouts that your post type will appear on archive or in single view. When you finish adding a new post type, you will be redirected to edit the template for the new post type.
You can also create templates manually at WP-admin > Post Type Builder > Templates > Add New.
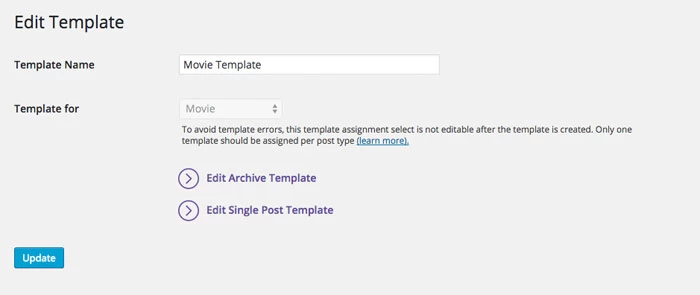
- Template Name = Enter the name of the template (eg. Movie Template)
- Template for = Select the post type which this template should be used for (eg. if you are creating the movie template, then select the "Movie" post type).
- NOTE: To avoid template errors, only one post type is allowed to assign in each template. If you see the select option is grayed out, it means there is already a template assigned to that post type. Once the template is created, the template assignment is not editable. You would need to delete the template and redo the template again.
- Edit Archive Template = Archive template will be used in archive views of the post type
- Example of archive views:
- Category/taxonomy views of the post type.
- When you use the PTB shortcode to display the posts, archive template will be used.
- Additional Archive Templates = Additonal archive templates can be used to display different archive post loop layout using the [ptb] shortcode.
- To add additional templates, click "New Archive Template", enter the template name, click edit the new template, build the template and save it.
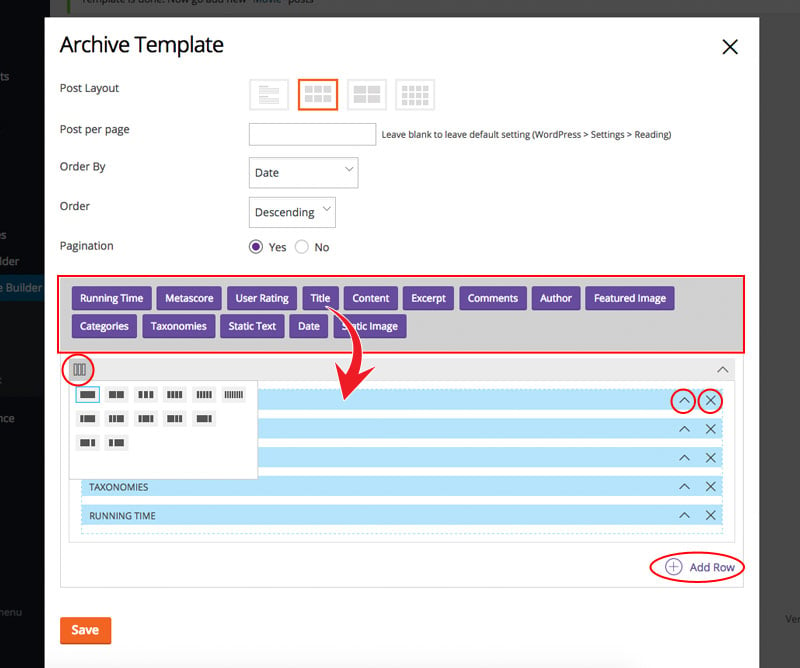
- Archive Template options:
- Post Layout = Display the posts in either list-post, 4-column, 3-column, or 2-column
- Posts per page = How many posts to display per page
- Orderby = How the posts should be ordered/sorted (default is ordered by post publish date)
- Order = Whether to display in descending or ascending order
- Pagination = Whether to display the pagination
- Example of archive views:
- Edit Single Post Template = Single post view of the post type.
Template Builder
The Template Builder loads only the enabled supports (title, content, featured image, etc.) and the associated custom fields and taxonomies that you've created in the meta box.
Using the Template Builder:
- To drop in modules: drag the modules to the placeholder grid and then enter the module options.
- To set the column grid: hover the column icon located on top-left corner of the row top bar and select the layout as you like.
- To new rows: click on "Add Row" button.
- To move the modules around, drag and drop the active modules around within the grid.
- To collapse/expand the active modules: click on the arrow up/down icon
- To delete an active module: click on the X icon
General Module Options:
- Text Before = This text will be added before the output (great for using as labels)
- Output Tag = The HTML tag that will be used to output
- Text After = This text will be added after the output
- Display Inline = If Display Inline is checked, the module will have left float, so the next following modules will display next to it (ie. instead of displaying the module in a new line, it will display in one-line).
- Note that the other options may vary depending on the field types you created in the meta box.
Displaying Posts with Shortcodes
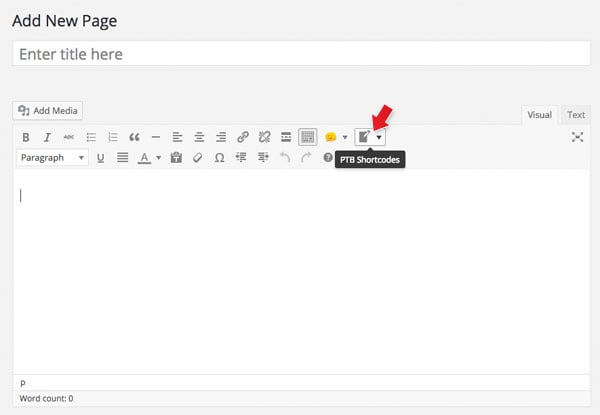
PTB plugin comes with a shortcode generator which allows you to display the custom post types anywhere by using shortcodes. Note that PTB shortcode generator is only available on the WordPress's Classic Editor. If you are using the new WP Block (Gutenberg) editor, you can write the shortcode manually or install the "Classic Editor" plugin.
To generate shortcodes:
- Add any post or page, on the Classic Editor, you should see the PTB Shortcode button
- Click on the PTB Shortcode button and click the post type that you want to display
- NOTE: if you don't see this PTB Shortcodes button or if certain post type(s) is not on the list, it means the post type does not archive view enabled (you may enable archive view by editing the post type > Advanced Options > Has Archive = Yes) or the post type is missing PTB Template (you may create a PTB Template at Post Type Builder > Templates > Add new)
Shortcode options:
- type = Post type slug to query (eg. 'property' is a custom post type created with PTB)
- orderby = How the posts should be ordered/sorted (default is ordered by post publish date)
- 'date', 'id', 'author', 'title', 'name', 'modified', 'random', and the custom fields you've added in the post type.
- order = Whether to display in descending or ascending order.
- 'asc' (ascending) or 'des' (descending)
- pagination = Whether to display the pagination
- '0' (no) or '1' (yes)
- style = Post layout style (display the posts in list-post, 4-column, 3-column, or 2-column)
- 'list-post', 'grid2', 'grid3', 'grid4'
- masonry = Display the posts in masonry layout style (masonry style = posts stacking on top of each other instead of aligning in a grid)
- '0' (no) or '1' (yes)
- offset = How many posts to offset (eg. offset=5 means it will skip the first 5 posts in the query)
- pagination = Whether to display the pagination navigation.
- '0' (no) or '1' (yes)
- posts_per_page = The number of posts per page (eg. posts_per_page=10 means 10 posts per page in the pagination)
- logic = The logic between multiple taxonomies. Example: if you query posts from catA and catB and the logic is 'AND', that means only posts that are assigned in both catA and catB will display (ie. the posts only assigned to catA won't show - if you want it to show as well, set logic to 'OR').
- 'and' or 'or'
- template = Optional: entering the name of the additional archive template will display the posts using that template. Exclude the template attribute if you want to use the default PTB template.
- Note that the other shortcode options may vary depending on the taxonomies that you created. Example: if you have a taxonomy 'ptb_tax_property_types' and the term is 'condo', you can query the posts from condo with 'ptb_tax_property_types=condo'.
It will generate a shortcode like below, which will display 10 recent "property" posts from "condo" taxonomy.
[ptb type="property" orderby="date" order="desc" masonry="1" offset="0" pagination="1" posts_per_page="10" style="grid3" logic="or" ptb_tax_property_types="condo" template="Second Property Archive Template"]Displaying Single Post
To display a single post with the [ptb] shortcode, enter the 'post_id' number and post 'type' name. In the sample shortcode below, it will display the movie post with ID number 820. The 'template' attribute is optional. If you leave 'template' empty, it will display the post using the default PTB single template. Entering the 'template' name (that is the additional PTB archive template name) will use that template to render the post.
[ptb post_id="820" type="movie" template="New Movie Template"]Taxonomies
Taxonomy is a grouping mechanism for custom post types (ie. taxonomies are like categories). For example: if you creating a Property Listing post type, you would need taxonomies like property types, number of rooms, parking spaces, and baths.
To create a new taxonomy:
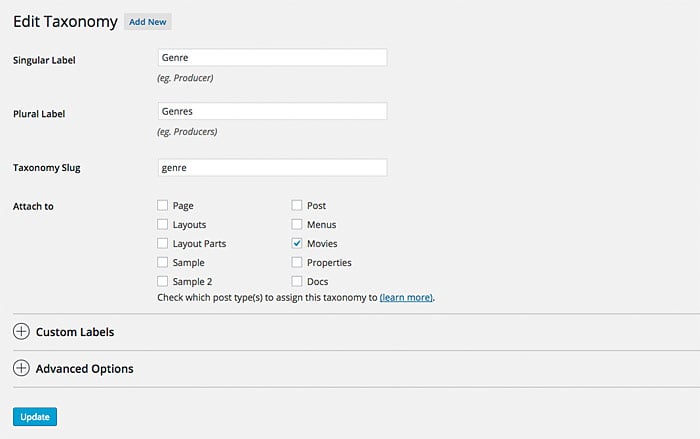
- Go to WP-admin > Post Type Builder > Taxonomies > Add New
- Singular Label = Singular descriptive name of the taxonomy (eg. Property Type).
- Plural Label = Plural descriptive name of the custom post type (eg. Property Types).
- Taxonomy Slug = Taxonomy slug which is used in permalink (friendly URL structure).
- Attach to = Check the post type(s) that you want to assign this taxonomy to (then the taxonomy meta box will appear in the post edit/add screen).
- Custom Labels = In Custom Labels panel, you can enter the label text used in WordPress admin interface. You may leave the labels as default or enter your custom labels.
- Advanced Options = In Advanced Options panel, you can specify the advanced options. Generally, it is fine to leave everything as default.
Taxonomy Shortcode
You can use the [ptb_taxonomy] shortcode to display a list of taxonomy links. The shortcode below will display the "release_date" taxonomy from "movie" post type.
[ptb_taxonomy type="movie" tax="release_date" children_level="2" starting_parent="1" tag="ul" hyperlinks="1" order="DESC" assigned_taxonomy="0"]Import / Export
You may use the PTB import/export tool to transfer post types, taxonomies, and templates to another site that has PTB installed. You may also use this export tool for backup purposes.
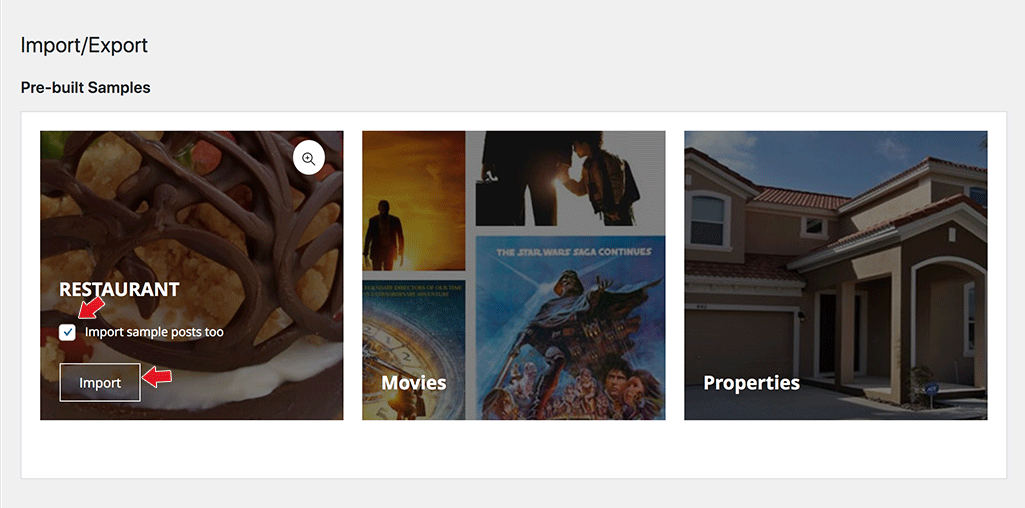
To Import Pre-built Samples:
- Go to WP-admin > Post Type Builder > Import/Export
- Under the "Pre-built Samples" section, hover the banner image of the post type you want to import (Restaurant, Movies, or Properties), select the"Import sample posts too" checkbox if you want to import the sample posts too, and then click "Import" button.
- The sample post type along with the associated taxonomies, custom fields, and sample posts will be created on your site.
To Export PTB Post Types:
- Go to WP-admin > Post Type Builder > Import/Export
- Under the "Export" section:
- Export Post Types and its associated Taxonomies & Templates = Post types and associated taxonomies and templates will be exported tegether.
- Export separately = All post types, taxonomies, and templates will be exported separately.
- Check the post type(s) that you want to export and then click "Export" (then it will prompt you to download a .json file).
To Import PTB Post Types:
- Under the "Import" section, you can upload the exported .json and click "Import" button.

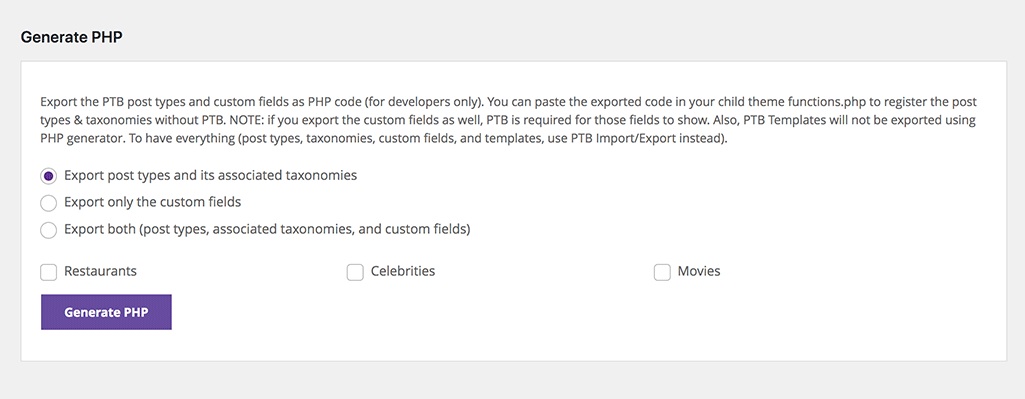
Generate PHP
If you are a developer and need to export the post types to a child theme or plugin, you can use Generate PHP feature to export the code. Once you exported the code, you can paste them in a child theme functions.php or as a plugin. This feature is strictly for developers with coding knowledge. If you are not a coder, you should use the PTB import/export tool.
To export the generate PHP code:
- Go to WP-admin > Post Type Builder > Import/Export
- Under the "Generate PHP" section, select one of the following option, select the checkbox of the post type(s) that you want to export, and click "Generate PHP" button
- Export post types and its associated taxonomies = generate the registration code of the selected post type(s) and associated taxonomies
- Export only the custom fields = generate the custom fields code of the selected post type(s)
- Export both (post types, associated taxonomies, and custom fields) = generate the code of the selected post type(s) and the associated taxonomies and custom fields
PTB Field Shortcode
The [ptb_field] shortcode allows you to display the custom field value in the post. Note that the ptb_field shortcode must be in the post loop in order to show (ie. the shortcode must be present in the content where the post has the custom field value).
To generate ptb_field shortcodes:
- If you have the WordPress Classic Editor, you can generate ptb_field shortcodes by clicking on "PTB Fields" button on the editor, then select the post type and the field name.
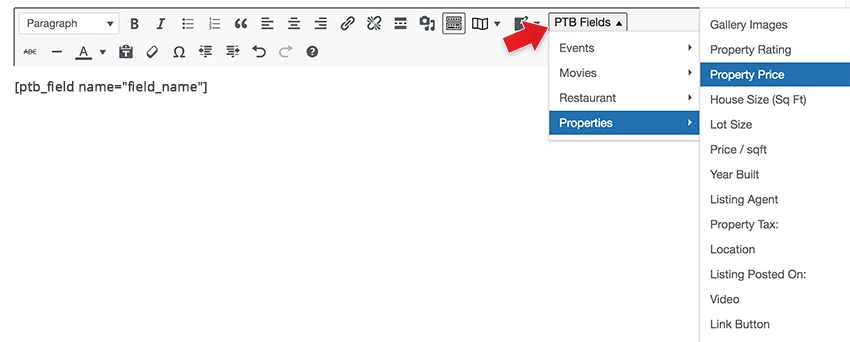
If you don't have the Classic Editor, you can write the [ptb_field] shortcode and the field name manually like the sample below.
[ptb_field name="field_name"]
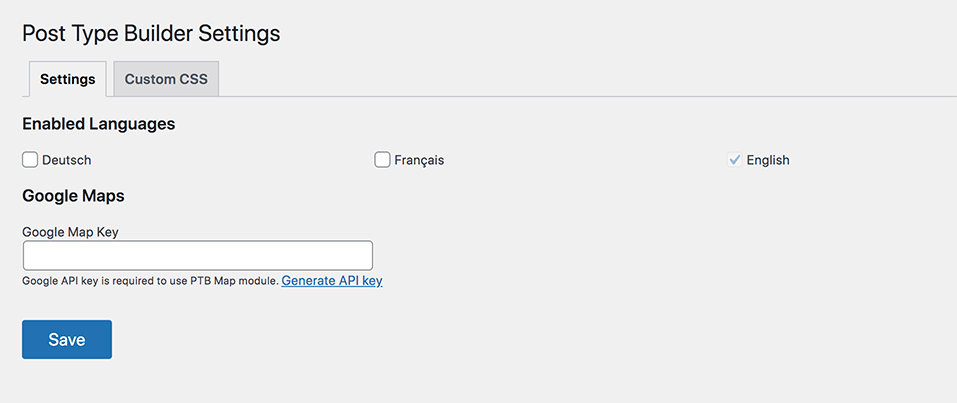
PTB Settings
On the Post Type Builder Settings page, you can enable the language(s) for PTB, insert Google Maps API key and custom CSS.
To access PTB Settings:
- Go to WP-admin > Post Type Builder > Settings
- Then you have the following options:
- Enabled Languages = You will see a list the languages that been enabled on your WP Settings > Site Language.
- Google Maps = Only need to insert the Google Maps API if you use the map field.
- Custom CSS = If you need to add additional CSS, they can be inserted in the Custom CSS tab.
WPML Integration
With the WPML plugin and additional languages enabled, you will be able to create multilingual post types.
To use with WPML:
- Install a copy of WPML plugin (WPML is a third party plugin and not included in PTB plugin).
- With WPML plugin activated, go to WPML > Languages, click "Add / Remove languages" and check the additional language(s) that you would like to enable
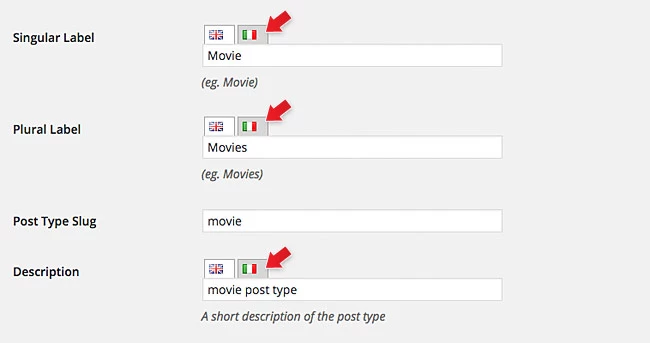
- After the languages are added, you will see the additional language flag icons above each input. Click on the flag icon to switch the input to the selected language.
- WPML doesn't automatically translate all your content for you. You will have to manually input the translated content on each field where there are flag icons. This includes:
- Post Type Singular and Plural labels are mandatory (description is optional)
- Meta box labels
- Taxonomy Singular and Plural Labels
- Text Before and Text After labels on templates
- Individual posts
- WARNING: Renaming your post type slug after you've added multilingual posts with WPML, it will merge all your multilingual posts to English due to the way WPML handles the posts.
Notes:
- If you enable multiple languages in WPML, the required fields must be entered for all languages that you enabled.
- If you enable WPML mutliple languages after the post type and meta box is already created, you might see empty labels on WP admin interface and meta box. Simply edit the existing post types and enter the missing language inputs.
- WPML Import/Export Issues: When using "WP > Tools > Export" to export the multilingual posts created with WPML, the posts will be merged as English after import. Even if your post is in another language it will sort the post as English.