Themify Tiles Plugin
Installing the Plugin
To install the plugin:
- First, you will need to download the plugin zip file from the Member Area on the Themify site.
- Note: Some browsers (e.g. Safari) may auto-extract zip files. Right-clicking on the download link and selecting "Save Linked File As" will allow you to download the ZIP version.
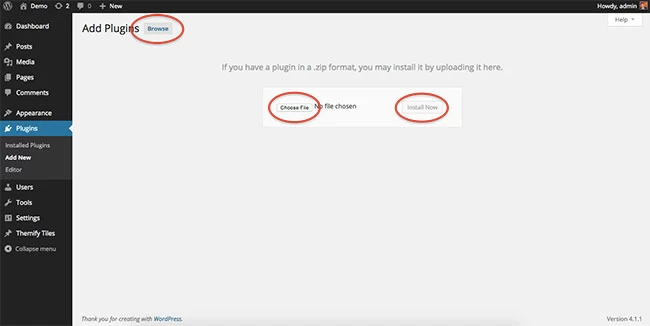
- Then go to your WP Admin > Plugins > Add New > Upload Plugin.
- Now upload the plugin zip file and click "Install Now".
- After the plugin is installed, click "Activate Plugin" to activate the plugin.
FYI: If you can't install the plugin using WordPress plugin installer, you may also use a FTP software to install the plugin. To install plugins with an FTP method: extract the plugin zip on your local computer then upload the plugin folder to your FTP server where you installed WordPress > wp-content > plugins folder. Then login to your WP Admin > Plugins to activate the plugin.
Import Sample Data
If you are starting a new site and would like to import the sample content as seen on the demo site, here are the steps:
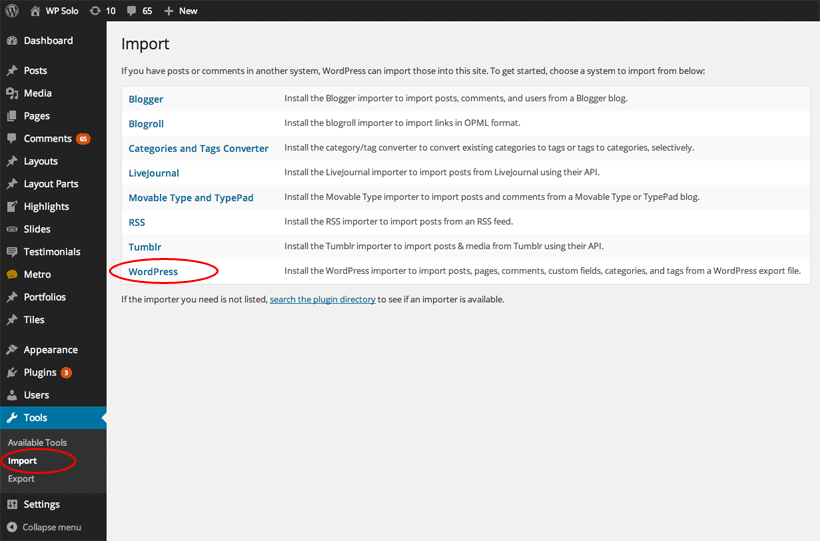
- Go to "WP admin > Tools > Import"
- Click WordPress (if you are prompted to install the importer plugin, do so)
- Upload the sample-content.xml file (located in the theme folder > sample folder > sample-content.xml file)
- You will be asked to map a user to the content and import the file attachments. Check "Download and import file attachments" to import the demo contents.
- If the content don't seem to import, try to import again without checking "Download and import file attachments" checkbox.
- Now you may edit or delete the content as you like.
Demo Images
The images shown on the demo site are not part of the theme package, nor are they included in the sample content. As such you will see placeholder images for the sample content and, should you wish to, these can be replaced after importing.
Tiles Plugin Demo Video
Using the Tiles Plugin
Once plugin is installed, you will find the Themify Tiles section in the WP Admin panel. Similar to a custom post type you can create your tiles layout with live preview at the backend, and the publish it on any post/page by inserting the shortcode.
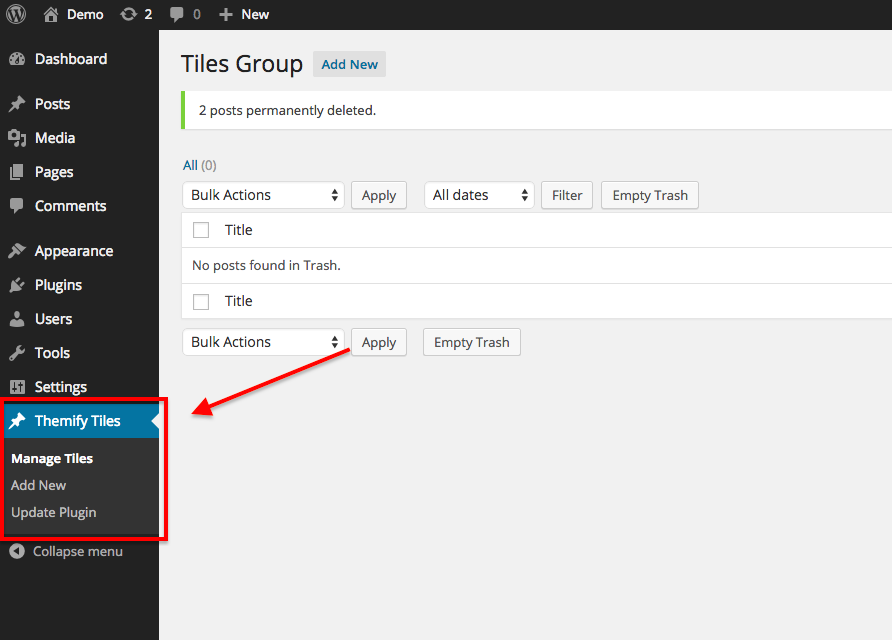
- Let's start by first creating a new tiles group. You can do this by clicking "Add New".
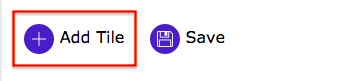
- Click "Add Tile" found at the bottom of the page. A popup window will appear where you can a list of tile options will appear.
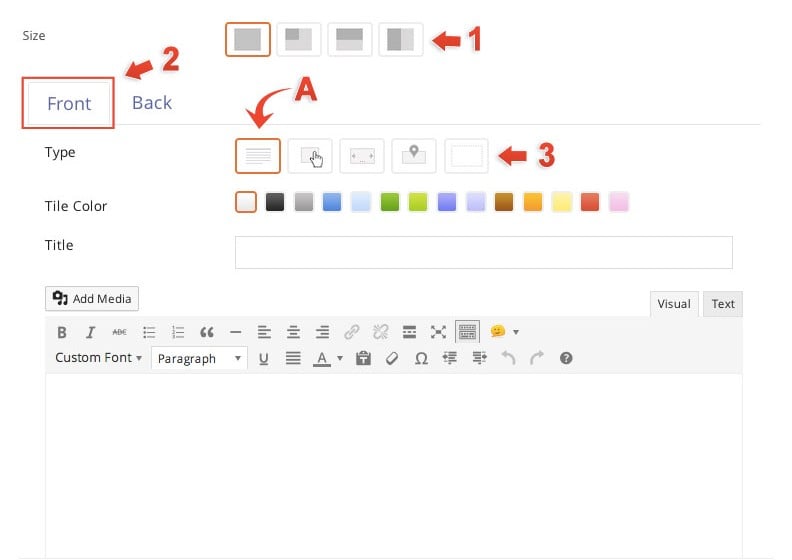
- Tiles Options
- 1) Size = There are 4 tile sizes.
- Large = large square block
- Square = small square block
- Landscape = horizontal half block
- Portrait = vertical half block
- 2) Front Tile tab = Click the front tab to edit the front of the tile.
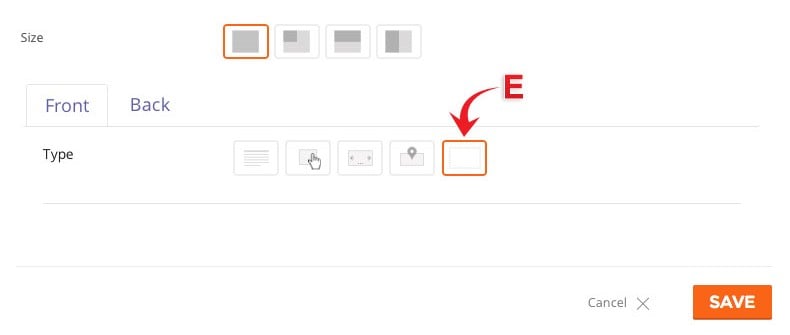
- 3) Type = Choose from 5 different types of tiles.
- A) Text = Display text content in Tile.
- Enter "Title" (optional)
- Enter text in content editor (shortcodes are supported).
- Enter "Action Button Text" this will appear at the bottom left corner of your tile.
- Enter "Action Button Link" this link will redirect users when they click the action button text.
- Open as a lightbox = Open link in a lightbox
- Open in a new tab = Open link in a new tab
- Custom Style = Below are some color options that you can customize
- Background Color = Use the color picker to pick a color for the background of the tile.
- Text Color = Use the color picker to pick a color for all the text on the tile.
- Link Color = Use the color picker to pick a color for all text links on the tile.
- Add a background image by inserting a image URL from your media folder or upload it directly.
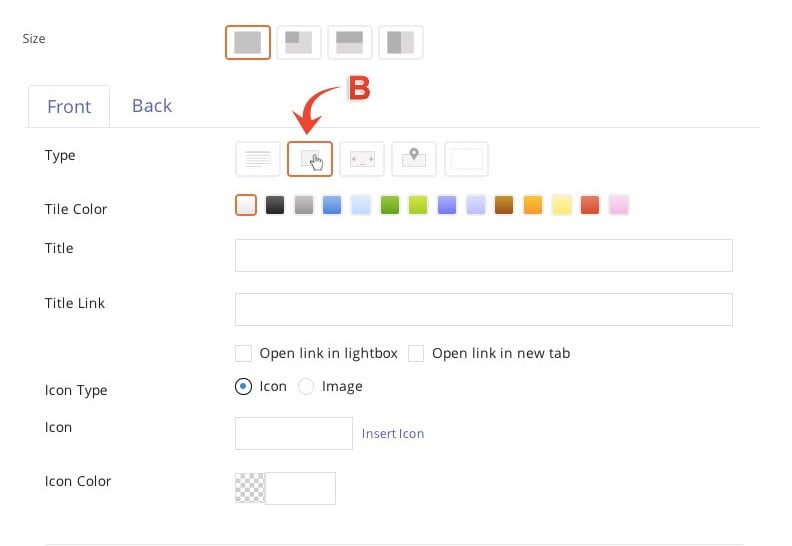
- B) Button = Create a clickable button type tile
- Enter "Title" (optional)
- Enter "Title Link" which will allow your title to open an external link
- Open as a lightbox = Open link in a lightbox
- Open in a new tab = Open link in a new tab
- Choose what kind of icon type you would like:
- Icon = Choose an icon from over 320+ icon list
- Choose an "Icon Color" from the color picker
- Image = insert a image URL from your media folder or upload it directly. The image will appear at the center of the tile.
- Custom Style = Below are some color options that you can customize
- Background Color = Use the color picker to pick a color for the background of the tile.
- Text Color = Use the color picker to pick a color for all the text on the tile.
- Link Color = Use the color picker to pick a color for all text links on the tile.
- Add a background image by inserting a image URL from your media folder or upload it directly.
- Icon = Choose an icon from over 320+ icon list
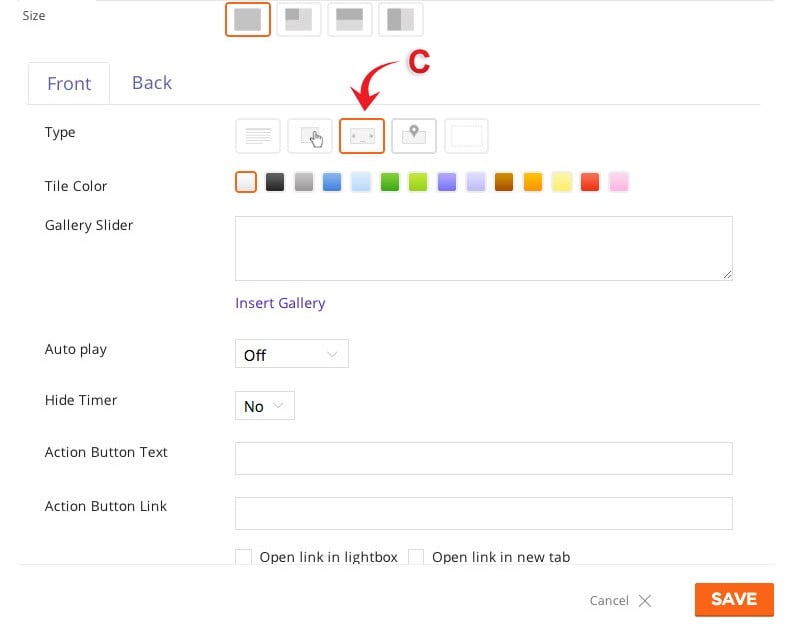
- C) Gallery = Create a gallery type tile
- Insert a "Gallery Slider" by clicking "Insert Gallery". Choose images from your media library or upload new images.
- Choose the amount of second you would like your gallery to "Auto play" or turn it off by selecting "Off" on the drop down menu.
- Choose to hide or display the timer.
- Enter "Action Button Text" this will appear at the bottom left corner of your tile.
- Enter "Action Button Link" this link will redirect users when they click the action button text.
- Open as a lightbox = Open link in a lightbox
- Open in a new tab = Open link in a new tab
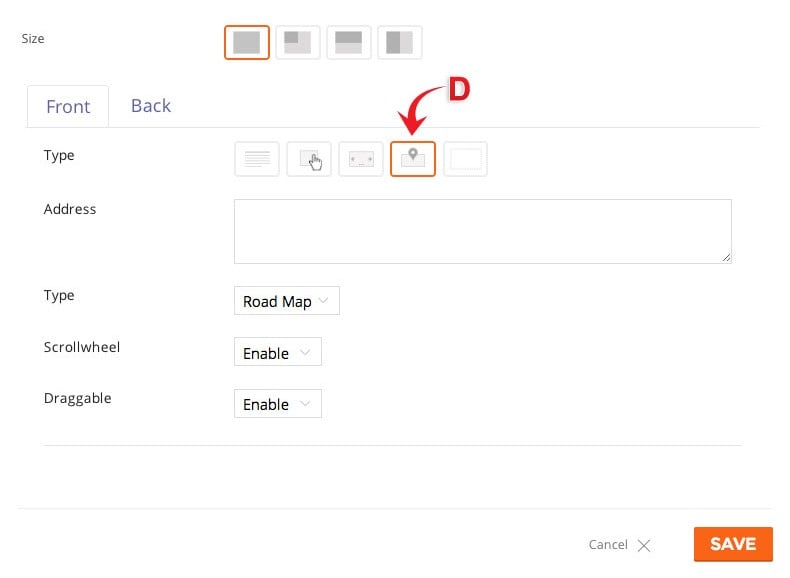
- D) Map = Display where you are with the map type tile.
- Enter "Address" as you like.
- Choose which map "Type" you would like to display - Road Map, Satellite, Hybrid, or Terrain.
- Choose to enable or disable the "Scrollwheel".
- Choose to make the map "Draggable" when users drag the click on a certain part of the map.
- E) Blank = Display nothing at the front of your tile.
- A) Text = Display text content in Tile.
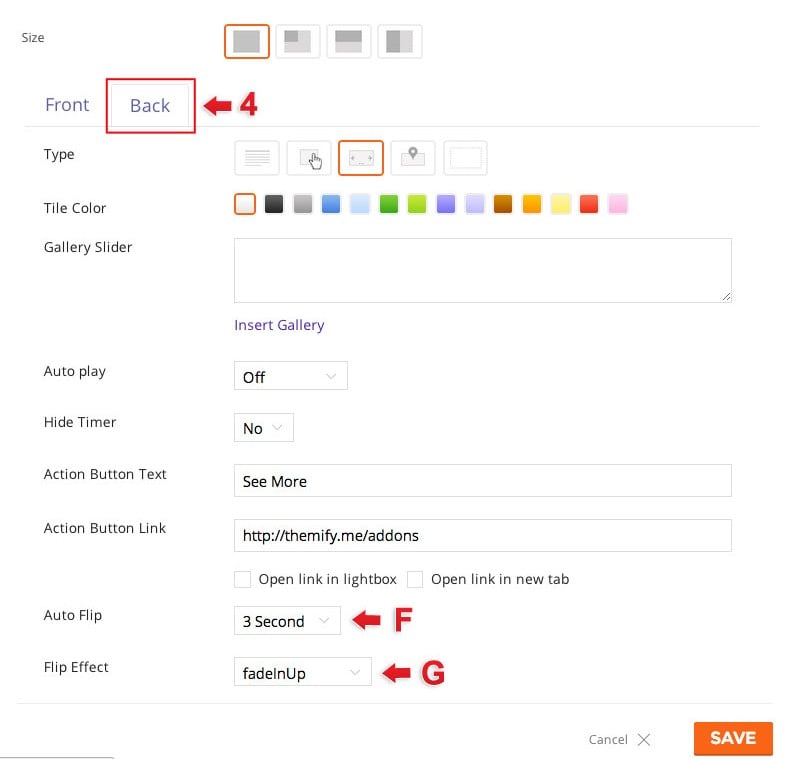
- 4) Back Tile tab = Click the back tab to edit the back of the tile.
- The back tile can be edited just like the Front tile but with some additional features highlighted below:
- F) Auto Flip = Disable or choose the amount of second you would your tile to flip automatically.
- G) Flip Effect = Choose from 10 different flip effects. We highlight all the flip effects on our Tiles demo page.
- The back tile can be edited just like the Front tile but with some additional features highlighted below:
Adjust tile sizes
To customize the size of the tiles you can use this custom CSS code (if you're using the Builder plugin you can go to Themify Builder > Custom CSS and paste it in there, otherwise go to Themify > Customize > Custom CSS and paste):
body .tf-tile.size-square-large,
body .tf-tile.size-square-large .map-container {
	width: 480px;
	height: 480px;
}
body .tf-tile.size-square-small,
body .tf-tile.size-square-small .map-container {
	width: 240px;
	height: 240px;
}
body .tf-tile.size-landscape,
body .tf-tile.size-landscape .map-container {
	width: 480px;
	height: 240px;
}
body .tf-tile.size-portrait,
body .tf-tile.size-portrait .map-container {
	width: 240px;
	height: 480px;
}
IMPORTANT: The tile masonry is based on the small tile dimension where large tile size is 2 times (eg. if the small tile is 240px, then the large tile is 480px). Be sure to match the large and portrait tile size by 2 times the small tile size)
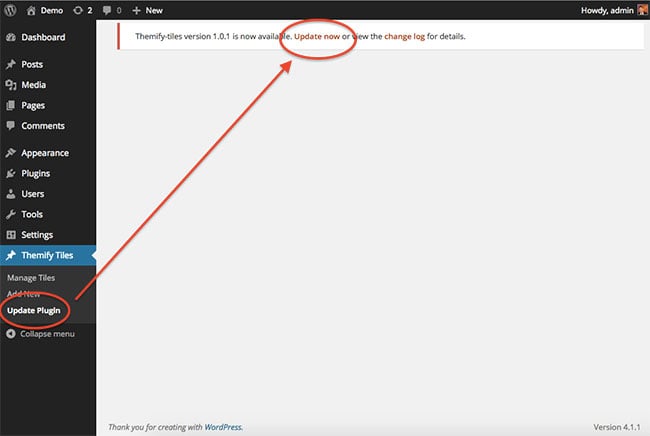
Update Plugin
You will receive notifications of updates to the plugin whenever you are on admin dashboard page for the plugin, these notifications will provide a link that will redirect you to the Update plugin page for the Tiles plugin on your dashboard.
You can find a list of updates and the changes made in each in the Builder changelogs which are also linked in the notification.
You can also manually update by downloading the latest ZIP file from your Themify member area and either deleting the plugin on your site and following the installation instructions above again, or by uploading the contents of the new ZIP via FTP and overwriting the existing plugin folder.
Reinstall Plugin
If the auto plugin update does not work, you may reinstall the Themify plugin by following the steps below. Reinstalling the plugin shouldn't affect the content/data because they are saved separately in the database. To be safe: you should backup your WordPress content (posts, pages, menus, etc.) before reinstalling it. To backup your WordPress content, go to wp-admin > Tools > Export and export all content to a zip file. You may use wp-admin > Tools > Import to import these content in the future if necessary.
- Login to Member Area to download the latest themify-builder.zip (keep it as .zip file, do not extract it)
- Login to your site wp-admin
- Go to Plugins (where WordPress lists all the plugins on your site)
- Deactivate the Themify plugin (plugin can not be deleted if it is active)
- Now click on the "Delete" button to remove the Themify plugin (the "Delete" link is located under the Themify plugin name)
- Remain on the Plugins page, click on the "Add new" button (located at the top of the page), click on the "Upload Plugin" link, upload the latest themify-[plugin-name].zip and activate it (basically the same procedure as you would install a new plugin)
- 1) Size = There are 4 tile sizes.
Force responsive tiles on all screen sizes
You can enable or disable this feature in the plugin's settings page.