Themify WooCommerce Product Filter Documentation
Installing the Plugin
To install the plugin:
- Download the free plugin zip from our Plugins page.
- Note: Some browsers (e.g. Safari) may auto-extract ZIP files. Right-clicking on the download link and selecting "Save Linked File As" will allow you to download the ZIP version.
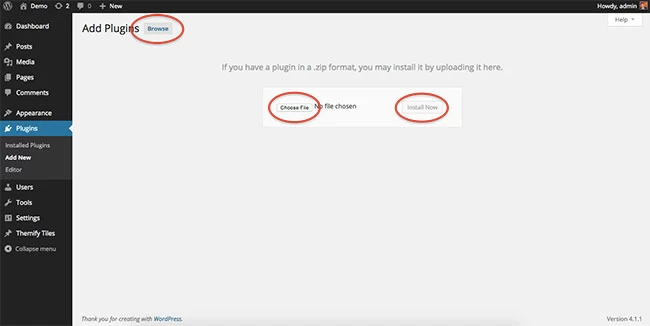
- Then go to your WP Admin > Plugins > Add New > Upload Plugin
- Now upload the plugin zip file and click "Install Now".
- After the plugin is installed, click "Activate Plugin" to activate the plugin.
FYI: If you can't install the plugin using WordPress plugin installer, you may also use a FTP software to install the plugin. To install plugins with an FTP method: extract the plugin zip on your local computer then upload the plugin folder to your FTP server where you installed WordPress > wp-content > plugins folder. After, login to your WP Admin > Plugins to activate the plugin.
Requirements:
Before starting please make sure that you have the following requirements on your site:
- WooCommerce Plugin - Installed and activated.
- A few products with category, tags, price, and/or attributes.
Using the WC Product Filter plugin
With the WC Product Filter plugin you can help shoppers easily find products faster on your WooCommerce shop. As soon as you activate this plugin you'll see a "Product Filters" option appear on your dashboard where you can create your filter templates. All filter options will be linked with the product category, tags, attributes, price, and stock that you've set. After creating the filter template you can then copy and paste the shortcode and place it on any text editor or widget on your site. Below using this plugin make sure to check the requirements above:
1. Create a New Product Filter
To start, add a new product filter. Go to your WP Admin > Product Filters > Click Add New. A lightbox will then appear where you can set the parameters of your product filters.
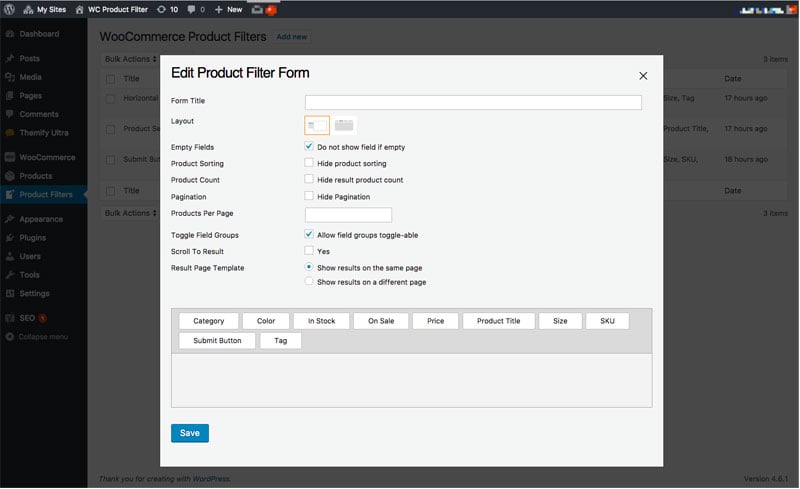
You'll see the following options:
- Form Title: Input the title of the product filter form.
- Layout: There are 2 layouts - Vertical and Horizontal (Note: We recommend the vertical for sidebar layouts).
- Empty Fields: Option to hide a field if it's empty.
- Product Sorting: Show or hide the ability to sort the products. This is a dropdown selection that'll appear on the upper right corner.
- Product Count: Show or hide result product count.
- Pagination: Show or hide the pagination of your products.
- Product Per Page: Maximum number of products that'll appear on a search result.
- Toggle Field Groups: Add an option for users to toggle whether to collapse or expand a filter option panel.
- Scroll To Result: Select to scroll to the result field.
- Result Page Template:
- Show results on the same page: means the product results will display on the same page without page reload.
- Show results on a different page: allows you to select any static Page to display the product results (the product results will display below the page content).
Now you can drag and drop the modules on your template builder. Where you place the modules in the Builder will be how it'll appear on your site.
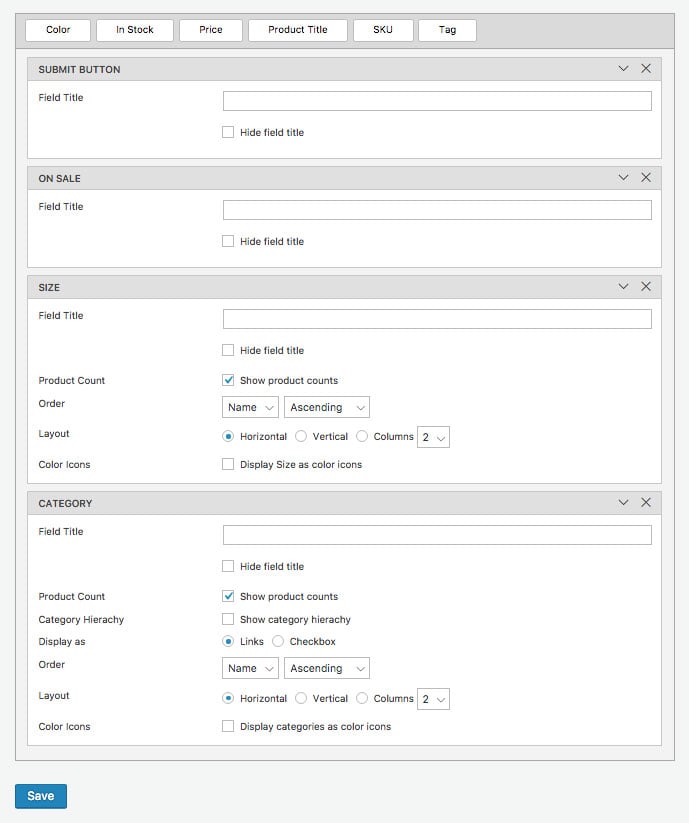
- On-Sale: Show products that are on-sale
- In Stock: Show products that are in-stock
- Price: Display a price slider
- Product Attributes (eg. Color, Size):
- Field Title: The label name that'll appear above the filter option.
- Product Count: Show or hide the number of products in the category.
- Display as: Select to show the options as (1) Links or (2) Checkbox
- Order: Set the order of how you would like the items to appear.
- Layout: Choose to show the options in (1) Horizonal, (2) Vertical, and (3) Columns.
- Color Icons: Choose to display categories as color icons.
- Select the background and text color.
- Choose to input an optional icon text.
- NOTE: These attribute modules would only appear if your WooCommerce products have attributes such as sizes, colors, etc.
- Tags: Display the product tags
- The options in Tag module are similar to the product attributes.
- Category: Display the product categories
- The options in Category module are similar to the product attributes.
- Category Hierachy: Show or hide the category hierachy.
- Submit Button: When added to your form, it'll disable the live search results. Instead it will show the search results based on what you've selected on the "Result Page Template" option.
After setting the parameter make sure to click "SAVE" found at the bottom right corner of the window.
2. Input Shortcode on any Text Editor
After setting up your product filter form. Copy the shortcode and paste it on any text editor.
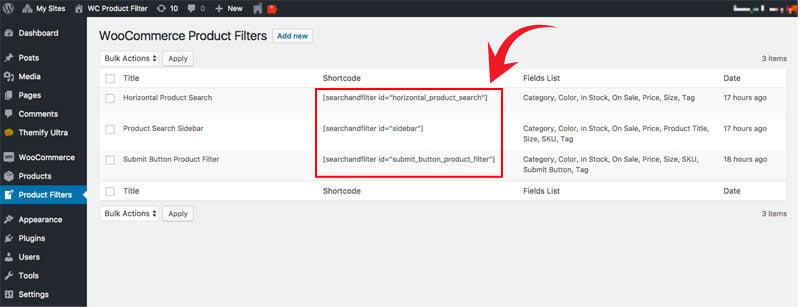
That's it!
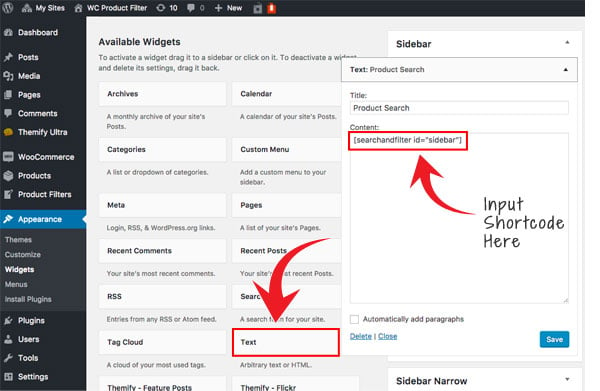
How to Display Widget Sidebar Filter
To display the WC Product Filter on a sidebar, please go to your WP Admin > Appearance > Widgets. Expand the sidebar dropdown option then drag and drop a text widget. On the text widget copy and paste the filter shortcode. This will then show it on all pages and posts where you have the sidebar available.
Reinstall Plugin
In the event there are issues/bugs with the plugin or you can't auto update the plugin, try to reinstall it with the latest version. Since WP 5.9, you can reinstall plugins by re-uploading the plugin zip. Reinstalling the plugin shouldn't affect the content/data because they are saved separately in the database. To be safe, you should backup your WordPress site before reinstalling it.
To reinstall a plugin:
- Download the latest plugin zip
- Go your site WP Admin > Plugins > Add new
- Then upload the new plugin zip and WordPress will ask if you want to replace the current version, click "Replace current with uploaded"
How to Translate Plugin or Change Text with Loco
In case you need to translate the plugin into another language or change the text output by the plugin, you can do that with the free Loco plugin.
Installing Loco plugin
First you need to install the Loco plugin.
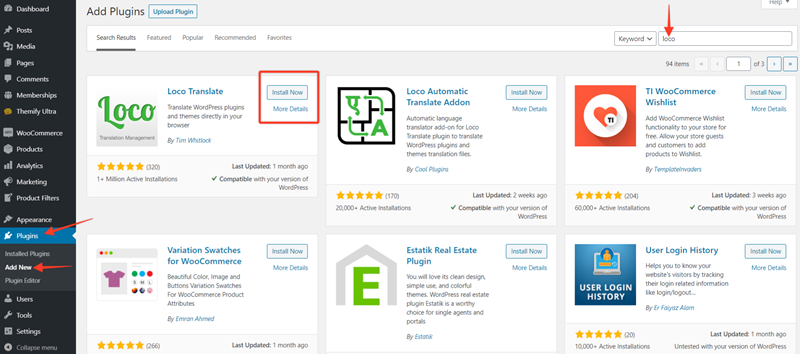
- Go to your site’s Dashboard > Plugins >Add New.
- Search for "loco" and it should appear.
- Then click on “Install Now” and then “Activate”.
Translate the plugin
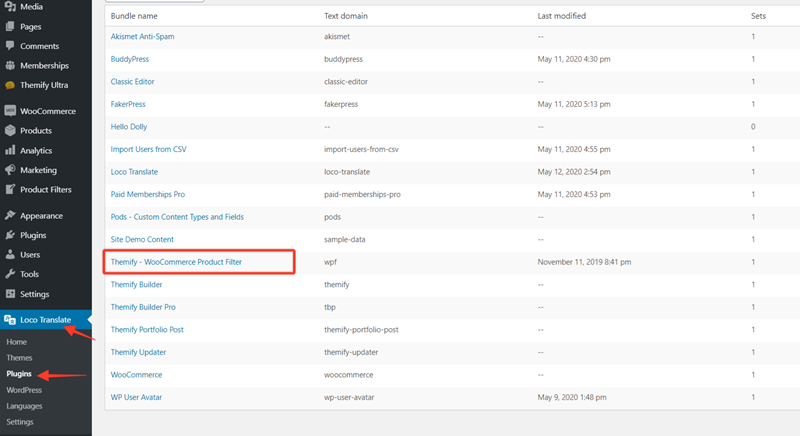
After the plugin is installed, you should notice the Loco Translate on the left sidebar of your WordPress admin area.
- To start the translation, go to Loco Translate > Plugins.
- Then click the “Themify - WooCommerce Product Filter” as the plugin you want to translate.
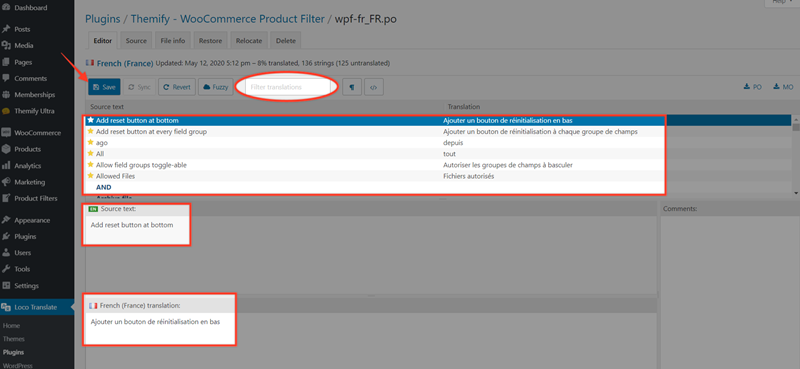
Sample Translation To French
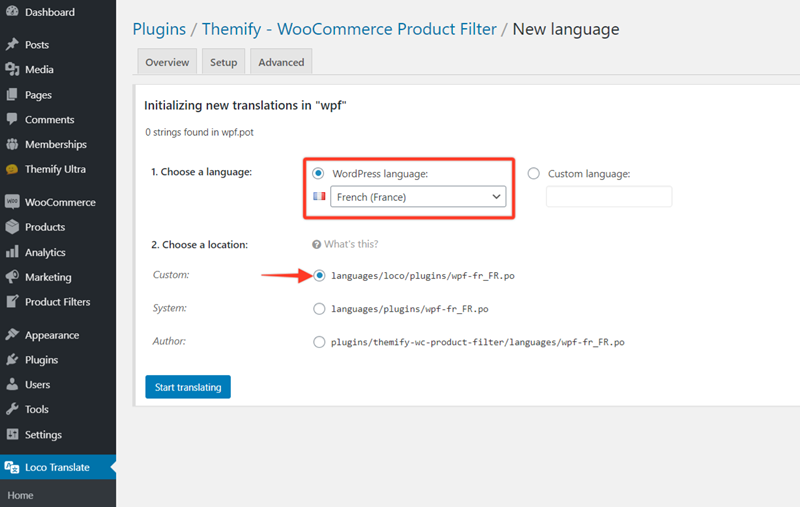
Then you should be redirected to a page where you can add a New Language.
- Then click on New Language.
- On the next page select your preferred language under “WordPress Language” (in our example, we select French).
- Below it you need to “Choose a location” where the translation files will be saved, select “Custom”.
- Once done, click on “Start translating”
It will then take you to the editor where it pulls all available text strings from the plugin where you can translate them.
- To translate the text strings, click to select it and then enter the translation text. You can translate all or selective text strings as you need.
- Note: If you know a specific text string that needs to translate, you can search for it on the “Filter translations” input.
- Once you are done with all the strings, click “Save”.
Changing Text/Strings
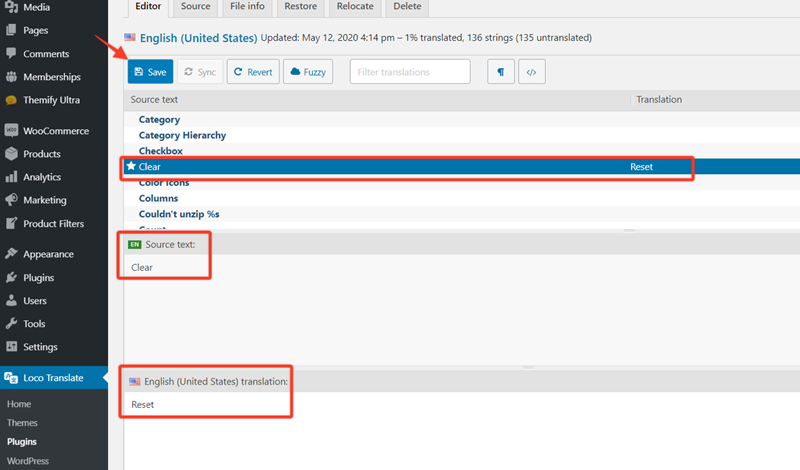
You can also use Loco plugin to change the text strings on the frontend.
- To do so, go to Loco Translate > Plugins and select the “Themify - WooCommerce Product Filter” plugin
- Then, click on New Language again and select your language on the next page. In this case, we choose "English".
- Next, choose the text you want to change and type in the translation. In our example, we change the "Clear" button text to "Reset".
- Once you are done, click on Save for changes to take effect.
FAQ
How to run custom JavaScript code after the plugin loads new products?
Sometimes it's necessary to re-initialize some code after WPF loads new products, for example if you're using a masonry library to create masonry layouts, it has to be re-applied on the new products loaded in so they too get the effect you're looking for. For this, the plugin offers a custom event that can be used to execute any JavaScript code after WPF has loaded the items, and it can be used like so:
jQuery( document ).on( 'wpf_ajax_success', function() {
    // new products are loaded in the page. Yay!
} );