
WordPress relies on PHP memory to run core functions, themes, plugins, page builders, WooCommerce, imports, updates, and other admin tasks. If your site does not have enough available memory, you may experience errors, slow performance, failed updates, incomplete saves, or blank pages.
Increasing the WordPress memory limit gives your site more resources to complete these tasks properly. This is especially useful for larger websites, online stores, membership sites, multilingual sites, or sites using advanced themes, builders, and multiple plugins.
Common Symptoms of a Low Memory Limit
- White screen or blank page
- “Allowed memory size exhausted” error
- WordPress admin loading slowly or failing to load
- Builder, theme, or plugin settings not saving
- Updates failing for WordPress, themes, or plugins
- Import, export, or backup processes timing out
- WooCommerce pages or large admin screens crashing
- Random 500 internal server errors
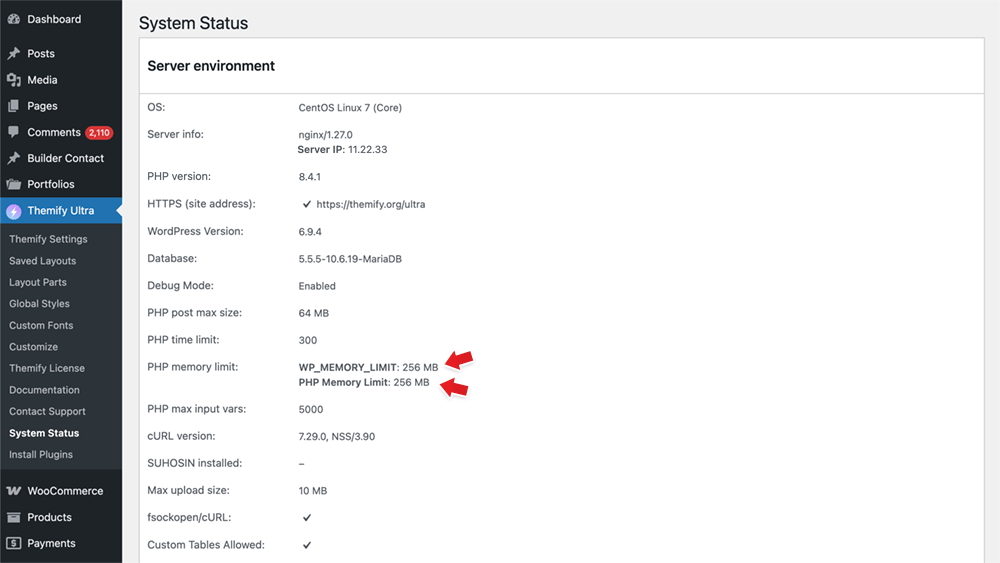
Check Your Current Memory Limit
Before making changes, check your current memory values in WordPress:
- If you are using a Themify theme, log in to your WordPress admin and go to Themify > System Status.
- Look for the server PHP Memory Limit and WP Memory Limit.
The PHP memory limit is the maximum memory allowed by the server. The WP memory limit is the amount WordPress is allowed to use. If the server PHP memory limit is lower, WordPress cannot use more memory than the server allows.
Recommended Memory Limit
For most WordPress sites, set the memory limit to at least 256M. Larger sites, WooCommerce stores, membership sites, or sites with many plugins may need 512M.
Method 1: Increase Memory Limit in wp-config.php
This is the most common method.
- Connect to your site using a FTP software or your hosting file manager (eg. cPanel > File Manager).
- Edit the wp-config.php file in the root folder of your WordPress site.
- Add the following line before the line that says /* That's all, stop editing! Happy publishing. */:
define( 'WP_MEMORY_LIMIT', '256M' );Save the change in wp-config.php. Then view your site and reload. If you see any error, undo the change and double check the code.
Method 2: Increase Memory Limit in .htaccess
If your server uses Apache, you may be able to increase the memory limit through the .htaccess file.
- Connect to your site using a FTP software or your hosting file manager (eg. cPanel > File Manager).
- Edit the .htaccess file in the root folder of your WordPress site.
- Add this line:
php_value memory_limit 256MSave the file, then reload your site. Again, check your site frontend and reload in case of entering wrong code.
If this causes a 500 error, remove the line. Your hosting server may not allow PHP values to be changed through .htaccess.
Method 3: Increase Memory Limit in php.ini
Some hosting accounts allow you to edit or create a php.ini file.
- Connect to your site using a FTP software or your hosting file manager (eg. cPanel > File Manager).
- Open or create a php.ini file in your site root folder.
- Add or update this line:
memory_limit = 256MSave the file. Depending on your hosting setup, you may need to restart PHP or ask your host to apply the change.
Method 4: Increase Memory Limit in .user.ini
On some servers, especially PHP-FPM servers, you may need to use a .user.ini file instead of php.ini.
- Open or create a .user.ini file in your site root folder.
- Add this line:
memory_limit = 256MSave the file. The change may take a few minutes to apply.
Method 5: Change It in Your Hosting Control Panel
Many hosts allow you to change the PHP memory limit from the hosting control panel.
- Log in to your hosting account.
- Look for PHP settings, PHP options, MultiPHP INI Editor, or Select PHP Version.
- Find memory_limit.
- Set it to 256M or higher.
- Save the change.
Method 6: Contact Your Hosting Provider
If the memory limit does not change after trying the methods above, your host may be restricting it at the server level.
Contact your hosting provider and ask them to increase the PHP memory limit for your site to 256M or 512M.
Final Step: Verify the Change
After increasing the memory limit, go back to Themify > System Status and check the values again.
- Confirm the PHP Memory Limit has increased.
- Confirm the WP Memory Limit has increased.
- If the value has not changed, first double-check that your edit was applied successfully. If you have confirmed the change was applied correctly but the new value still does not appear in Themify > System Status, the server is likely overriding the setting. In that case, contact your hosting provider and ask them to increase the PHP memory limit directly on the server.
May 12, 2026 @ 6:54 pm
Hi team,
Would it not be better to have the following code placed at the exact same position?
define( ‘WP_MEMORY_LIMIT’, ‘256M’ );
define( ‘WP_MAX_MEMORY_LIMIT’, ‘512M’ );
So basically have a limit for max
And a minimum limit for normal usage
May 14, 2026 @ 12:07 am
HI! Thanks for the post…. I have increased the php memory limit on different sites I manage through my hosting control panel and changes are seen in System status on PHP Memory Limit and NOT on WP Memory Limit…. seems like if I change php memory limit doesn’t affect WP Memory limit at all…. what could happend here? what should I do? what would the problem be?
Thank you so much,
Jose Lozano