
We've got a fun new update for all Builder Pro users — you can now add Wishlist Products to your site! This means your customers can save their favorite products while they browse, making it super easy for them to come back and buy later. It's a great way to keep shoppers engaged and help boost your sales without any extra hassle. Setting it up is quick and simple, and you can customize it to match your site's style using the drag & drop Builder. View the "Pro Fashion" demo to see the new wishlist feature in action.
How to Add the "Wishlist" Feature
Here's a quick tutorial to show you how to add the "Wishlist" feature to your WordPress site. You can also refer to the "Builder Pro Wishlist Products" documentation for full, detailed steps.
Make sure you have the latest version of the Builder Pro plugin, which includes these 2 new modules:
- Wishlist Icon: An icon/button that lets customers add products to their wishlist.
- Wishlist Link: An icon that links to the wishlist page.
- Note: You must have the WooCommerce plugin activated in order to see the WooCommerce-related modules.
Step 1) Add the Wishlist Icon to Product Archive & Single Template
The first step is to add a "Wishlist Icon" to the product archive and product single templates.
- Go to WP-admin > Themify > Pro Templates, and edit a Product Archive template (or create a new one if you don't have one).
- Drop in an "Advanced Products" module, edit the Advanced Products layout, then drop in a "Wishlist Icon" module (this adds the wishlist icon to the product archive loop).
- Next, add or edit a Product Single template, and again drop in a "Wishlist Icon" module (this adds the wishlist icon to single product pages).
![]()
Step 2) Create a Wishlist Page
The next step is to create a "Wishlist" page where your customers can view their saved products.
- Go to WP-admin > Pages > Add Builder Page, and enter a page title (e.g., "Wishlist").
- Drop in an "Advanced Products" module and set "Dynamic Query = Wishlisted Products" (this step is important, so don't miss it).
- Then edit the Advanced Products layout and drop in a "Wishlist Icon".
- Tip: If you want the wishlisted products to have the same layout as your product archive, you can copy and paste the Advanced Products module from the product archive template — just remember to change the "Dynamic Query" to "Wishlisted Products."
![]()
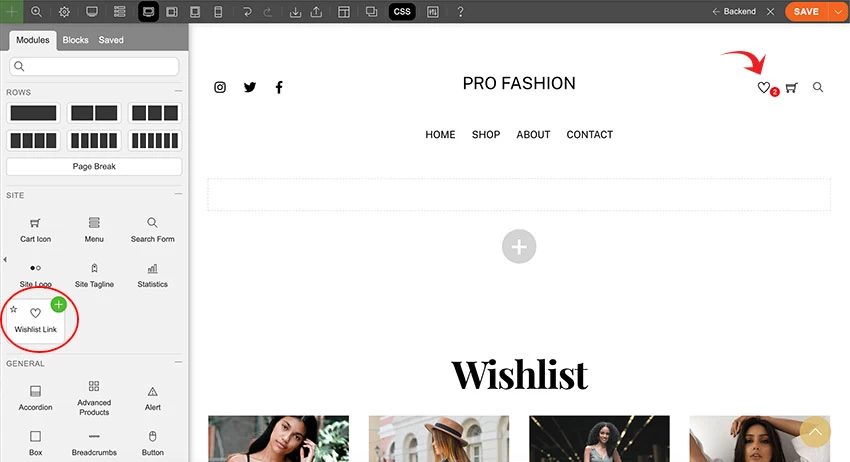
Step 3) Add the Wishlist Link to the Header
The final step is to add a "Wishlist Link" icon to your header.
- Go to WP-admin > Themify > Pro Templates, and add or edit a header template (create a new one if you don't have one).
- In the header template, drop in a "Wishlist Link" module.
April 29, 2025 @ 6:38 am
This is an amazing feature. Thank you!
I have one last question. Do we get the “x” button to delete products from the Wishlist?
April 29, 2025 @ 11:20 am
Great afdition 😁
April 29, 2025 @ 12:44 pm
Pro Fashion doesn’t work for me. Wishlist-Icon appears with products, they are clickable, and wishlist icon counts items… But upon clicking the wishlist – icon on the header bar, an empty wishlist appears, with a zero again in the wishlist counter.
Going back to the shop page: counter remains 0. Clicking products already clicked before does nothing. click a new product: link works, counter jumps from 0 to 4 (had clicked 3 products earlier).
Visiting the wishlist page: Empty page and counter 0 again…
April 30, 2025 @ 3:45 am
It was the CDN caching the wishlist page. The issue has been resolved now.
May 4, 2025 @ 3:32 pm
There’s still an issue with the demo.
For example, click “White Dress”, go to the Wishlist page, it’s there – no problems. Now click the menu “Shop” and the heart is no longer red for “White Dress” and it’s not clickable again.
May 6, 2025 @ 4:51 am
That was related to the CDN cache. We’ve pushed another update to address the issue.
April 29, 2025 @ 4:16 pm
Sounds like a great feature!
I too am having the same issues with the demo.
What would also be a good addition to Themify (not necessarily in BP or WooCommerce) is to have the like option to posts like in the Pinboard theme.