You have got a brilliant website ready – all dressed up in a stunning (and feature-packed) theme, powered with a handpicked retinue of premier plugins, and awesome content just waiting to wow your audience…
…but they'll probably never see it; unless you get your site indexed by the major search engines.
Despite seeming that way, search engines aren’t all-powerful and omnipotent. They can’t automatically know your site’s existence and display you as a relevant result if a user enters a search query. You have to take the first step forward in this partnership and tell the search engines about your website in a process called indexing.
What is Indexing?
A search engine (including Google, because that’s the only one most people know of or need) is nothing but a giant, sprawling index, a sort of database, which lists the sites (and related information) that it knows about.
Once the search engine indexes a site, it delves in further to collect more info about it using crawlers/ spiders/ bots (because search engines are disturbingly creepy with their terminology). This includes every nook and cranny – the robots.txt, the .htaccess, the XML sitemap, the meta tags, and so on. These same creepy crawlies will do their job that much quickly if you diligently (but sparingly!) practice inline linking, a feature you’ll recall from WordPress 4.5 and something which SEO experts have been harping about for ages, but that’s beside the point.
In this post, I’ll walk through some steps that will make sure your brand new WordPress website / blog isn’t spurning any attention away from search spiders by accident.
Let’s get your site noticed:
Create a XML Sitemap
A XML Sitemap will give search bots a ‘layout’ of sorts about the pages on your website and how they are laid out or interconnected (see: inline linking). You can also use them to leave ‘directions’ for search bots to crawl your content easier and faster.
On WordPress, this is extremely easy. Almost every major SEO plugin – I am talking about Yoast SEO, All in One SEO Pack, Premium SEO Pack, ect, all has the XML sitemap generation feature. There are even dedicated sitemap plugins for just this purpose too, examples being XML Sitemaps by BestWebSoft and Google XML Sitemaps.
Once you create a sitemap using the plugin, you’ll be able to see it at www.your-domain.com/sitemap.xml. This is the XML document which contains information about what your site is and where the content is posted and stuff.
As a side tip: Remember to make an HTML sitemap of your WordPress website too. It won’t do you much favor when it comes to being noticed by search engines, but it may affect your search engine result page ranking. And you can always pull it up and show it to people who hit a wall with a ‘404 Error: Not Found’ page on your website.
Submit Website Domain information to Search Engines
As I said, internet is large and search engines, powerful as they are, don’t automatically know everything. So when you create a new WordPress website, you have to tell the search engines about it.
Here’s how you do it:
If you don’t already have one, start with a Google account. Just create one on any of the Google products (Google+, Gmail, YouTube, etc.). If you’re already using one of those products, you can use the same account practically everywhere else on Google.
- Sign in to your Google account.
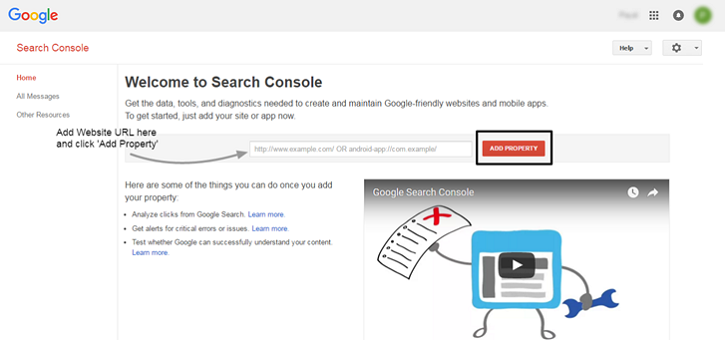
- Head to Google Search Console (erstwhile Webmaster Tools). You’ll be brought to this screen:

- Add your website URL and click the ‘Add Property’ button.
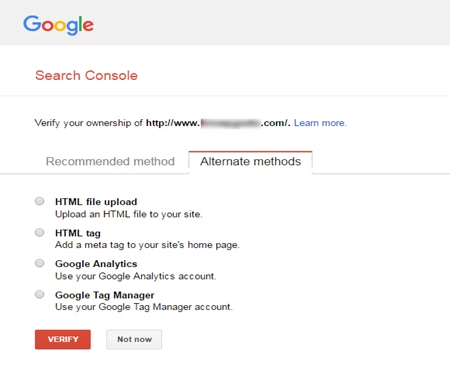
Then, the Search Console will require verification of your ownership (of the domain). The 'recommended method’ is to sign into your domain provider account and verify through that. ‘Alternate methods’ let you do it via 4 ways: HTML file, tag, Google Analytics, or Tag Manager.

- Adding Google Tag Manager is the best way to go about it, mostly because Google Tag Manager will let your add other Tracking and Analytics codes to your website in a safer, easier way.
Here is a step-by-step guide about adding Google Tag Manager (and using it to setup Google Analytics) on WordPress. Check it out and follow through to set up GTM properly.
- If you want to go the HTML route, you’ll need access (login credentials) to your hosting account. Sign in, copy the HTML file that’s generated, and paste it in your website directory.
Another way is to copy the HTML meta tag provided by the console, which is perfect and pain-free for WordPress installation. Then go to your WordPress admin >> Appearance >> Editor, select header.php from the list on the right. Paste the HTML meta tag from Google after <header> tag.
Note: An easy way to do that is to simply install WordPress SEO Plugin from Yoast, go to the SEO dashboard, and paste the HTML tag in the field marked “Meta Tag for Google”
Bing
Repeat the entire thing with Bing. Create a Bing account, login to Webmaster tools, and click “Add website” from the menu. Proceed as instructed. Bing will also need you to verify that you are the owner of the domain. Again, this can be done in one of 4 ways, all of them same as mentioned above for Google.
Submit the XML Sitemap to Search Engines
The XML sitemap created in Step 1 serves one purpose – getting your site indexed by search engines. For that, you need to submit it to the search engines of your choice, say Google and Bing.
Google Search Console
Once you have verified ownership, go to Search Console and select your site.
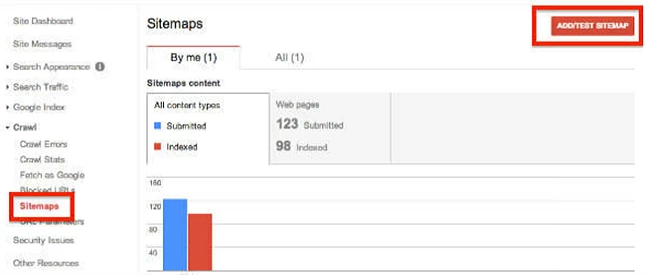
On left hand side, click Site Configuration >> Sitemaps. Click the “Add/Test Sitemap” button on the top right side. In the field that appears, add the link to your sitemap (or enter /system/feeds/sitemap). Click submit.

Bing Webmaster Tools
It’s a similar deal. Go to Configure My Site >> Sitemaps, add your sitemap URL to the input field and click submit.

Linkbacks
Backlinks (aka Inbound links) are links that direct people to your domain and blog. There are many ways for a user to build backlinks, but the most useful is when someone uses your content (properly) as a reference in their own posts, mentions your product/service, or sometimes when you guest post on other blogs.
Why are they important? Because this is a method you can use to get indexed (and high rankings on SERPs) without even submitting your sitemaps to search engines or using webmaster tools. When a user enters a search query, the search spiders travel through their database to find content that is more relevant and gives it a higher rank – quality and number of backlinks are both important factors here.
Building up a natural, highly contextual (niche-specific) network of backlinks will:
- Improve your organic search ranks
- Get you indexed faster. A collection of sturdy backlinks will make a sort of ‘network of brides’ that search spiders can use to get to your content and index it.
Remember the times when external linking was frowned upon because it gave visitors an easy ‘exit’ route off your own content? Those days are bygones. Today, people want to cite credible external sources in their content. It fosters a feeling in the audience that the author took the time to research before writing.
Long form, evergreen guides; a master list of resources (about anything); tutorials and walkthroughs; opinions and insights from a thought leader - these are the types of content that are often linked back to. These are authentic, legitimate pieces of information that lend an air of credibility to the referent (the author who links to the content).
But more than that, search engines (Google included) factor in both domain and page level backlinks while ranking a site on SERPs. Even Moz, after an extensive round of studying the data and surveying the marketers on ranking factors, concluded that backlinks are, by far, “the most influential factor in a site’s ranking”.
Tip: Aim for high quality links with natural and keyword-rich anchor text. Try to get a follow link to get link juice and build your domain authority.
Warning: Avoid black-hat practices like purchasing backlinks, getting tangled in link exchange networks, building links from personal blog networks and more.
Keep in mind: Even if your content is awesome but your site looks (or is) too spammy, the most generous publishers will end up giving you a nofollow backlink, which may send you some referral traffic but won’t do much else.
What Else You can do to Improve Your Online Visibility
- Add your RSS feed to Feedburner to make it noticeable (WPBeginner has a nice tutorial on their blog).
- Show off your website on every (relevant!) social media channel by placing the URL in the ‘About’ section of the profile.
- Always, always create share worthy content and post it on your WordPress website as well as your social media accounts.
- Keep in mind that if you and your website are in it for the long haul, then stay away from black hat SEO practices, no matter how promising they look. Those will get you de-indexed and banned before you can say ‘organic traffic’.
Think beyond here-today-gone-tomorrow trend and news content – that media publishers are better setup to cover anyway – and focus on what you know about your products and brand that could truly benefit your customers.
Endnote
That was easy, right?
Once your site goes live, it’s imperative that it’s being indexed regularly by all major search engines. How else are you going to get that sweet, sweet organic search traffic that’s practically ready for conversion (if you play your cards right)? This post ought to clear your way towards indexing.
This is only the beginning – once you get indexed, focus on marketing and distribution of your awesome content – and watch your traffic (and conversions) soar like never before.
Keep learning and have fun.
Author Bio: Catherrine Garcia is an experienced Web Developer and a passionate blogger. She loves to share her knowledge through her articles on web development and WordPress.

October 2, 2016 @ 1:53 pm
Nice article Catherrine!
October 2, 2016 @ 3:05 pm
We can indexed our site just following google web master guidelines.Google love natural backlink so,everything should be natural.according to me, we can indexed & rank our site on google doing proper seo strategy.we should avoid any back hat method.thanks for your tips.I appreciate your handwork :)
October 17, 2016 @ 6:42 am
Having sitemap is always better, this way you can submit sitemap in Google/Bing webmaster central. But without sitemap you won’t be missed because WordPress ping search engines when there is a new post published.
November 3, 2016 @ 4:31 pm
Hi Guys,
I just finished creating my Themify website, and I tried to create an XML Sitemap with Yoast, but it created a 404 error. What should I do to fix this error? Any tips or ideas? Here is what populates: http://www.insurancelancasterca.com/sitemap_index.xml
I don’t know how to fix it. Please advise.
November 3, 2016 @ 8:18 pm
It seems to be working. Check the post sitemap: http://www.insurancelancasterca.com/post-sitemap.xml (it contains the post URLs).
February 15, 2017 @ 10:20 am
Your article is very deeply giving guideline about build indexing your site. I really need this type of information so thanks :D
May 31, 2019 @ 9:22 am
Any official plugin for instant indexing of word press, my blog articles indexing very slowly
May 31, 2019 @ 4:14 pm
Hi,
I don’t know any plugin specifically for this purpose, but the following plugins may help you for faster indexing: https://wordpress.org/plugins/yoast-seo-search-index-purge/ https://wordpress.org/plugins/google-sitemap-generator/ and if you have a Cache plugin first of all please try to clear your cache.
June 19, 2019 @ 9:03 am
After recent Google Algorithm update, all articles are indexing fastly, if site health is in good condition.
September 25, 2019 @ 11:59 am
After submitting the sitemaps in Search Console. My site was indexing very fast. Thanks dude.
December 26, 2019 @ 2:58 am
Recently my blog was restore from the new Google Algorithm update. Now iam very happy my site was crawling very speed.
January 15, 2020 @ 12:09 pm
Few days before my site was back from the Google Lastest update. Now iam very happy my blog was indexing in Google. Iam waiting for more tips from this blog
February 4, 2020 @ 5:12 am
Thanks, Now my site indexing fast
February 26, 2020 @ 11:59 pm
Hello this is somewhat of off topic but I was wanting to know if
blogs use WYSIWYG editors or if you have to manually
code with HTML. I’m starting a blog soon but
have no coding expertise so I wanted to get guidance from
someone with experience. Any help would be greatly appreciated!
March 12, 2020 @ 12:46 pm
one of my websites is not indexing even though I use the inspection tool from GSC
June 2, 2020 @ 6:04 am
Hello is there any official plugin for instant indexing of wordpress post, my blog articles indexing very slowly