This foundational tutorial is brought to you by our Support Experts as one of the most commonly asked questions on our Support Forum. Adding custom icon fonts to your WordPress site has become a staple of modern web design. They're incredible easy to use and help you spice up and add a unique element to your design.
The one drawback with some icon fonts is that even if you have only a handful of icons you want to use, you have to load the entire set which can be weighty and slow down the loading of your website. That's where a free custom icon font selection service will come in handy, and we're going to show you how to achieve this in 3 easy steps!
We've found Fontello's free service to be useful in helping us create a custom icon font that is handpicked by you. With the help of Themify's framework, you will have the option to automatically integrate your selected icons to your website.
1. Select Your Icon Fonts
To get started, let's first go to Fontello.com. Here you will be able to a number of different icon fonts that are available for free. The process is very simple. Just click on the icons you want to use, or click-and-drag your mouse to select multiple icons at once. You can select any icon you want from any of the fonts. After you have selected your desired icons, click on the red "Download webfont" button on the top right corner. The number beside it shows how many icons you have selected.
![]()
2. Upload Your Custom Icon Font .zip File
After you have downloaded the custom icon font .zip file, head over to your website's WP Admin Dashboard, and follow these steps:
WP Admin > Themify Theme > Settings > Custom Icon Font > Browse Library > upload the ".zip" file you downloaded > press Save
![]()
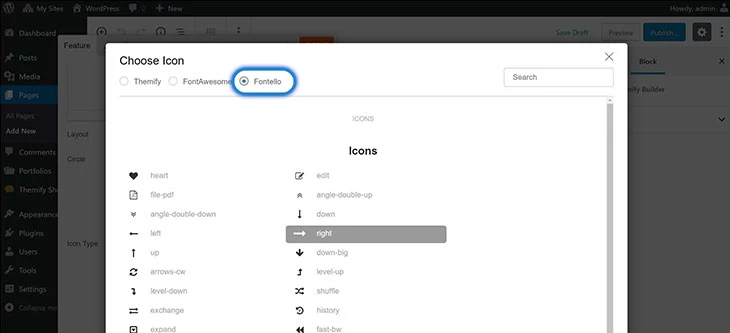
3. Use Your Icons
Would you believe it, that's absolutely all! Now anywhere in the Themify framework or Builder where you have an option to insert an icon, you will see the hand-picked icons from your custom icon font by selecting the Fontello option at the top.
We hope this easy, peasy tutorial has helped build upon your WordPress foundational knowledge. Please let us know in the comments if you've found it helpful and what other foundational basics you'd like to see.
June 20, 2020 @ 3:07 pm
Hi.
I’m trying to to that, but in fontello space not appear the icons.
February 9, 2022 @ 8:00 pm
Give your font a name by typing something in the field (font name)
June 14, 2021 @ 8:33 pm
I am having the same problem. I downloaded the zip file from the selected icons that I picked on Fontello. I then uploaded that zip file by selecting Browse Library next to Fontello Icon Package. I had selected perhaps 28 icons.
Then after installing the icon package, I edit my menu (for example) and click the Insert Icon button. I select Fontello and it just tells me how to add icons, it is empty.
Something is not working properly. So I opened up the zip file that I had downloaded. There are two folders in the zip file. One is “css” and the other is “font”. Inside the font folder lies a few different font types, one of which is TTF. I opened the True Type Font and it only shows two icons in the font set. That doesn’t seem right at all. The two font icons that it shows happens to be the first two that I selected on the Fontello page.
I went back to Fontello and deselected those two font icons that did appear in the font package. I downloaded a new zip package and looked inside the font folder and again, this font package had only two icons in it.
So obviously there must be something wrong with Fontello, unless someone has any suggestions.