We’ve seemed to have covered a lot of ground with our foundational tutorials, but as we add more features and brand new modules, there’ll be even more awesome tutorials to come. This tutorial will cover how to best design a custom login page for your WordPress website, using Themify’s login module. In fact, check out our custom login module demo now for inspiration.
Login pages are important for WordPress websites, especially for those looking to run membership sites, online stores, or subscription services. A login page allows users to input their credentials in order to access a privileged part of your site and its contents. Login pages also allow users to contribute to your business’ community though posts, comments, and media attachments.
Customizing a WordPress login page is essential in ensuring the continuity of your website’s branding and image. Start creating a custom WordPress login page now with the login module and you’ll be able to customize all of the following:
- Log-in success message
- Redirect to a URL after successful login
- After a failed login: redirect to a URL, redirect to a custom page, or show a message
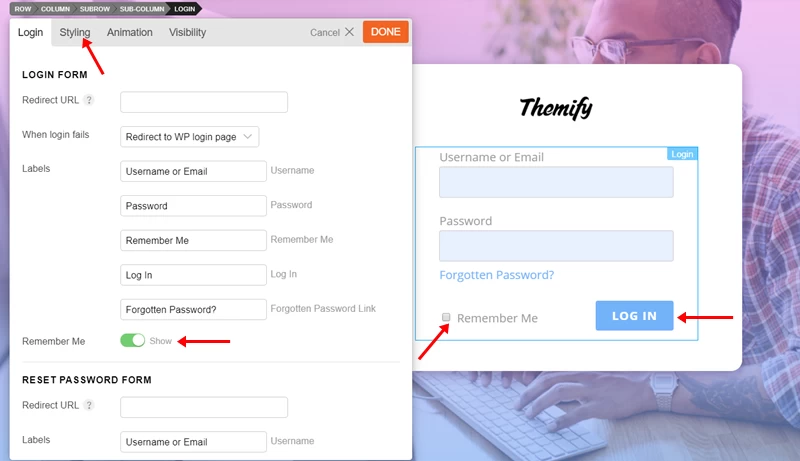
- Enter custom field labels for: username, password, log in button, forgotten password link, remember me checkbox
- Reset password form options
- Redirect to a URL after reset password is selected
- All of the above, including the container background, and buttons can be styled to your preferred colour, font, size, padding and more!
Let’s get started on how to use Themify's Login module to design a custom login page:
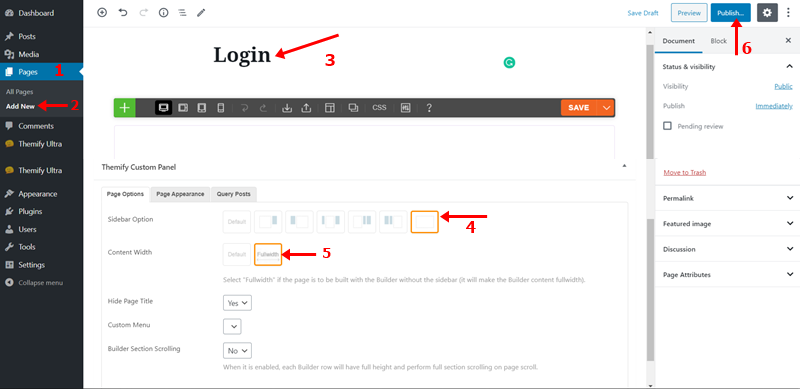
1. To create a new page with a fullwidth setting:
- Go to your site’s WP Admin Dashboard > Pages > Add New
- Enter a page name of your choice, scroll down to the Themify Custom Panel and select: ‘No Sidebar’ + ‘Fullwidth’
- Click ‘Publish’
2. To customize your row in the frontend:
- Select ‘View Page’, to view your page on the frontend
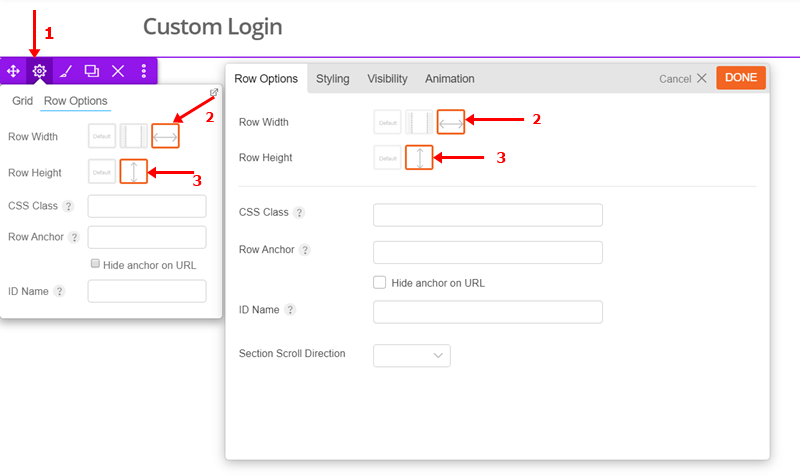
- Turn on the Builder and hover over the purple dot to open your row’s action bar
- Click the row’s gear icon > select ‘Row Options’ > enable ‘Fullwidth’ + ‘Full Height’
To add and customize your sub-row:
- Click the green plus icon on your row and select the 3-column row to add your sub-row
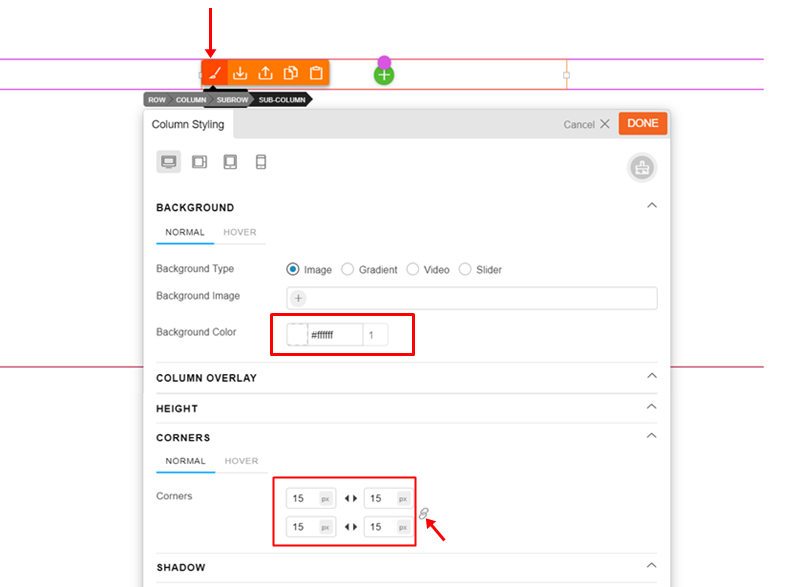
- To open the middle column’s styling panel double click the column or hover over the middle column’s small orange dot to open the action bar, then click the paint brush icon
- To add a white background in the styling panel, click Background > choose white
- To round the corners of your middle column, click Corners > add 15 pixels to all corners
- Click Done
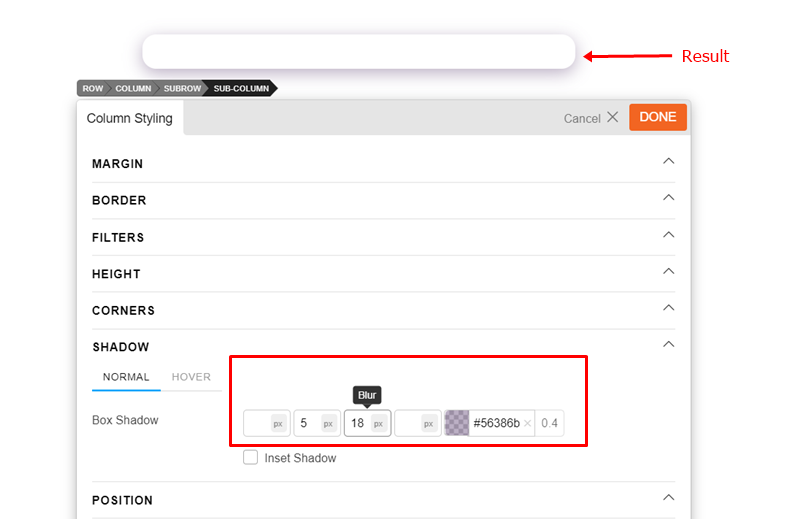
To further style the look of what will be your login form’s container, add a shadow:
- Go to the column’s styling panel, select Shadow > add a 5 pixel Vertical Offset, 18 pixel blur, select a dark purple colour (#55386b) with a transparency of about 50%
3. To add a background image to your row:
- Hover over your row’s purple dot and click the paint brush to open the styling panel
- In the styling panel, select Background > in Background Type select ‘Image’ > for Background Image select and upload a background image
- Select ‘Fullcover’ from the list of Background Mode options
- Click Done
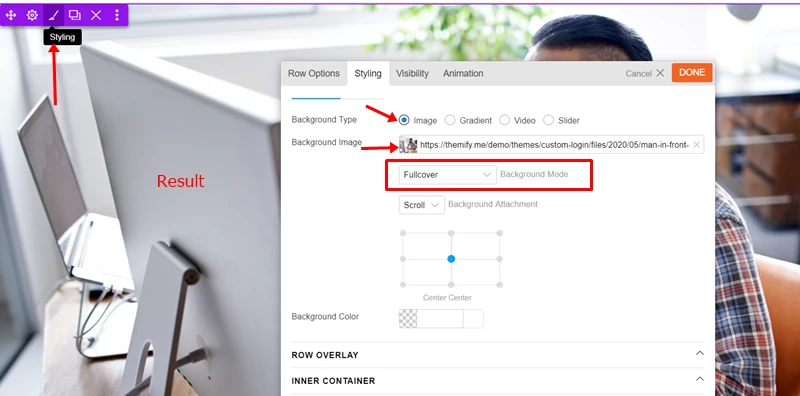
To further style the look of your row’s background image:
- On your row’s styling panel, click Row Overlay, select ‘Gradient’, and add a gradient colour and adjust the transparency to your liking
- We selected a light pink and light orange as our gradient colours with a transparency of about 50%
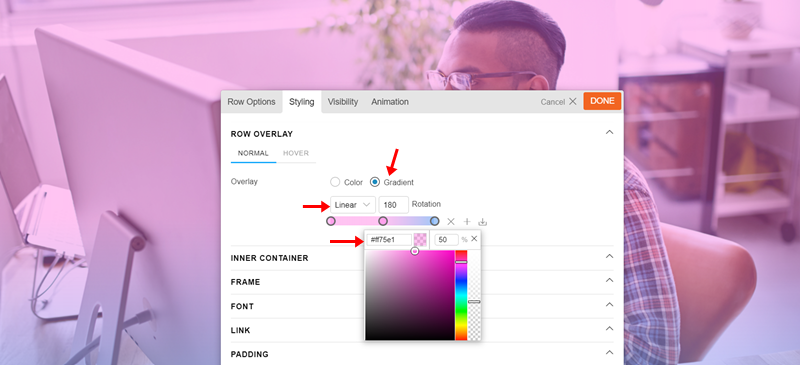
4. Drop in your logo or other image:
- Drag and drop the image module into your middle column, and upload or select your image file
- From your image module’s Image Style options, select the third icon for Image Center, in the Width enter a value of 100 pixels
- To give it some room, we’ll adjust the margin by opening up the styling panel > Margin > enter 35 pixels to the bottom margin field
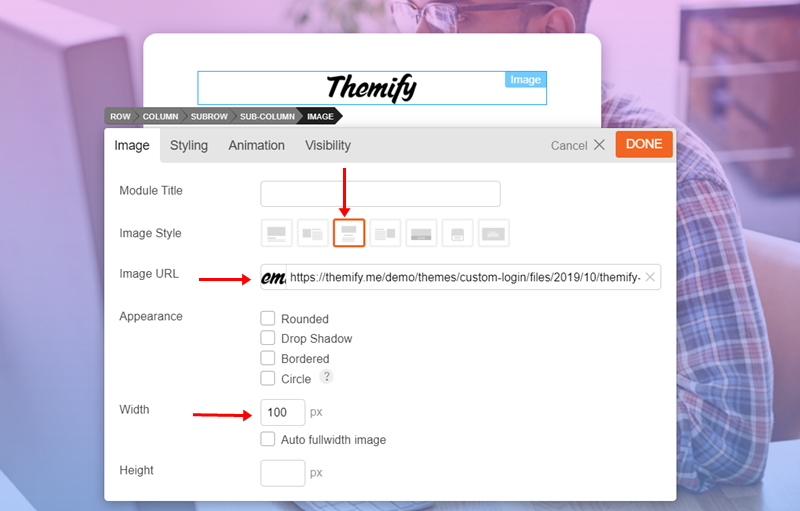
5. Drop in the Login Module:
- Drag and drop the login module underneath your logo image, customize the settings to your preference, and style all the elements to your liking
- We’ve left the login module as is except for the submit button’s background colour (#73b2fa)
And that’s it! You’ve successfully created a sleek, minimal, and professional custom login page. If you want to learn how to create a complete site from scratch, Astra blog has a complete guide here.

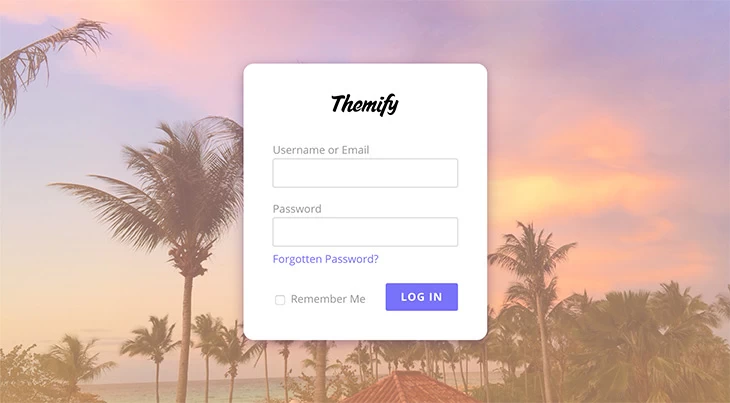
June 3, 2020 @ 2:27 pm
Tnxs … love this … looks professional.
How about project pagespeed ???
June 3, 2020 @ 4:11 pm
Pagespeed framework is coming along. It is taking a bit longer than we expected. Sorry for the delay.
June 3, 2020 @ 2:31 pm
This is awesome, does login form support Captcha ? That would be a great feature.
June 3, 2020 @ 4:11 pm
That is a good idea. We use default WordPress login form. Don’t think they have Captcha by default. You can probably install third party plugin to add Captcha.
June 4, 2020 @ 8:46 am
Hi Nick. Great idea for a login page.
I think recpatcha is a must for you to integrate because many of us use this already. If your excellent dev team addressed this then it would remove yet another plugin and another layer of code and headaches.
Simon Watson and I use a well known third party security plugin to integrate recaptcha on the login page, be it v2 or v3. The problem is that this software is probably too expensive for a lot of clients.
June 3, 2020 @ 3:22 pm
This can replace the default login page?
June 3, 2020 @ 3:27 pm
I would be interested in that too :-)
June 3, 2020 @ 3:42 pm
Yes, nice if this custom login page replace WP default login page. Possible?
June 3, 2020 @ 4:10 pm
Yes, you may do that if you wish.
June 3, 2020 @ 7:30 pm
@Nick We wish!
June 3, 2020 @ 7:51 pm
How would this work? Are there specific settings for changing the WP login screen?
June 3, 2020 @ 9:51 pm
How remplace the wp-login.php with this?
June 3, 2020 @ 4:37 pm
Is there a way to add additional fields to the form like TYPE of membership?
Is there a way to have the subscriber modify their profile info?
Can the administrator be notified when a new subscriber is created?
Can the administrator be notified when a subscriber modifies their profile info?
Thank you
June 3, 2020 @ 7:46 pm
Any potential issues with security?
June 3, 2020 @ 11:36 pm
So how do you replace the wp login page with this one?
June 4, 2020 @ 5:27 am
Hello
is it possible to change the default login URL?
eg, “mysite.com/myLogin?
June 4, 2020 @ 1:02 pm
Here is a workaround for those that want to hide the default wp-login access from spammers. You will follow the instructions as laid out above. It doesn’t matter what the page name is, but change your permalink to something original or unique to the site you are designing. The following includes 1, 2, or 3 options.
No membership plugin, just basic login, and logout.
Download Login or Logout Menu by cartpauj https://wordpress.org/plugins/login-or-logout-menu-item/
This will default to the wp-login even if it is changed to the new permalink you created and offers a logout menu if you are using conditional menus.
When you create the login page it doesn’t matter what the page name is, but change the permalink to something for the site you are working on. Be sure that this information is documented if you are designing for someone else.
Many people like membership plugins, I use one on almost all sites a build. You may have a custom page designed by the members’ plugin for login but still want to hide the default wp-login (wise decision).
Download WPS Hide Login by WPServeur, NicolasKulka, tabrisrp https://wordpress.org/plugins/wps-hide-login/ Go to Admin Panel > Settings > General and at the bottom, you will find the WPS Hide Login. Use your original shortcode there. If someone tries to use wp-login they will be taken to the 404 pages (customize if you like). Now there is not really a reason to create a custom login page here unless you desire to do so.
In the Appearance > Menu for Login use the page you have created and name the link what you would like, ie: new dimension, crazy world, or just login!! LOL
Now with the login logout menu, you may use the conditionals menu for different user groups and still have the logout on each menu you create easily. This is a nice little feature to use.
To sum it up: WPS Hide Login will allow you to change the URL (permalink) to your desired link and wp-login will direct the user to 404 pages. The login or logout is great for both membership sites as well as a basic login/logout site.
I Hope that helps everyone!
@Nick, because of the other plugins available I don’t think it’s necessary for Themify to concentrate on hiding the original wp-login page.
June 4, 2020 @ 1:09 pm
Hmm, I saw a couple of typos I can’t edit. If it says shortcodes, I meant permalink. Time for another cup of coffee!!
June 20, 2020 @ 11:26 pm
Great guide! Thank you.
June 4, 2020 @ 1:03 pm
Hello,
Great looking login page. I am using a child theme so could you let us know the php code needed to replace the wp-login.php with this custom page
Thank you
Rob
June 7, 2020 @ 9:44 am
Hey! this is wonderful login page plugin, does form impact on website page loading ? That would be help for smooth functioning.
June 8, 2020 @ 1:02 pm
great
June 10, 2020 @ 3:02 pm
how can i redirect to previous page after login also how to add create account to this page
June 11, 2020 @ 8:14 am
Hi, looks great, but how can I create a sign up page?
Thanks
June 15, 2020 @ 3:29 pm
Wow! it make the login page more profressional. This is nice post
June 19, 2020 @ 5:04 pm
Hello Nick,
Thank you for this tutorial.
How do you actually set this as the default WP login page?
Thank you.
January 20, 2021 @ 12:32 pm
Thanks for this tutorial – found it really useful this mornign.
E xx
February 1, 2021 @ 8:07 am
Hey is there any option to connect it to BPS plugin? Whne I log in there is captcha error and it redirects me to normal LOGIN site….
THX
February 11, 2021 @ 4:12 pm
Followed tutorial. When I go to from end the login form does not show? what am I doing wrong…
February 11, 2021 @ 8:26 pm
This tutorial shows how to design a custom login form. If you want to redirect wp-admin login to a custom page, use this plugin: https://wordpress.org/plugins/wps-hide-login/
August 11, 2022 @ 12:51 pm
Tried that – does not work for me. It opens default WP login page, not a custom login page.
March 13, 2021 @ 4:53 pm
I had to be logged out to see the login screen. Now I’m trying to add an element that only shows up when the user is logged in. Now I want a log out button.
We are using a membership plug in. It seems to change some of the ordinary WordPress behavior, so this may not work for you.
August 14, 2021 @ 9:44 pm
i saw someone use a 301 redirect plug-in that was easily used to redirect a default wp-login page to a custom page.
October 12, 2021 @ 9:48 am
I followed the tutorial but after saving and trying to view the page, the Log In form does not show.
July 28, 2022 @ 6:54 am
Hi all,
is there any way to add BPS Securits (JTC-LITE) option?
THX =)