Popup Documentation
Installing the Plugin
To install the plugin:
- Download the free plugin zip from our Plugins page.
- Note: Some browsers (e.g. Safari) may auto-extract ZIP files. Right-clicking on the download link and selecting "Save Linked File As" will allow you to download the ZIP version.
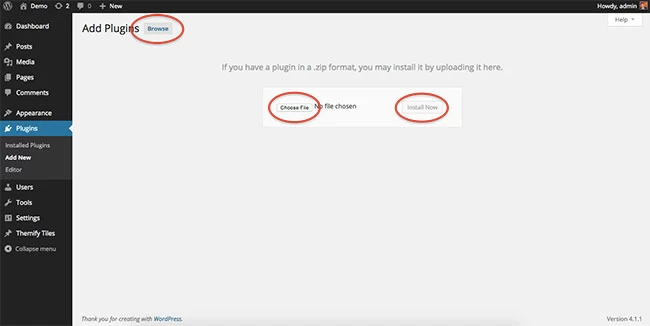
- Then go to your WP Admin > Plugins > Add New > Upload Plugin
- Now upload the plugin zip file and click "Install Now".
- After the plugin is installed, click "Activate Plugin" to activate the plugin.
FYI: If you can't install the plugin using WordPress plugin installer, you may also use a FTP software to install the plugin. To install plugins with an FTP method: extract the plugin zip on your local computer then upload the plugin folder to your FTP server where you installed WordPress > wp-content > plugins folder. After, login to your WP Admin > Plugins to activate the plugin.
How to Use Themify Popup
To Use Themify Popup:
- Once you have Themify Popup installed and activated, go to wp-admin > Popups > Add new to add a new popup
- Enter the popup title
- If you want to use the default WordPress content editor for the popup content, then enter text/content in the WordPress editor. We recommend to use Themify Builder, Builder Lite (free), or any Themify theme (all Themify themes come with the builder).
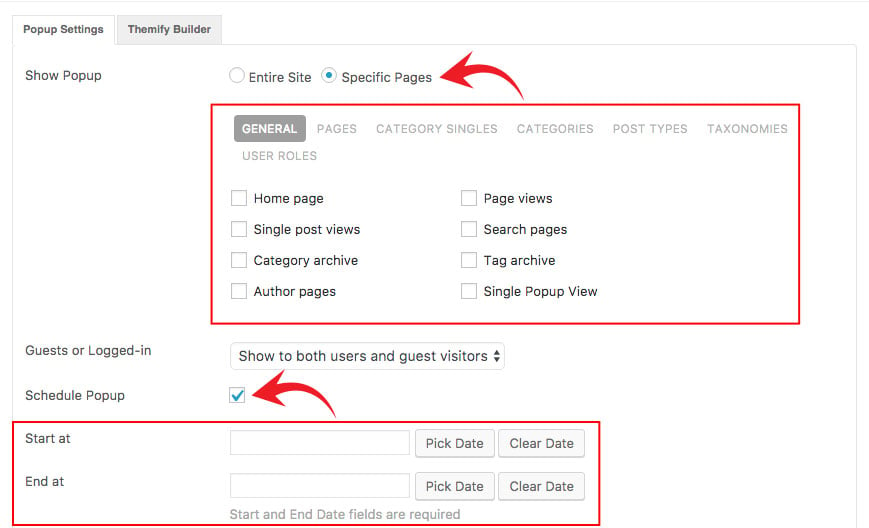
- On the Themify Custom Panel, you will see the follow popup options (see screenshot):
- Show Popup:
- Entire Site: Popup will show on the entire site
- Specific Pages: Popup can be shown on specific pages
- When "Specific Pages" option is selected, you will see the sub option tabs. Check the option(s) where you want the popup to appear:
- General: General pages such as home page, general pages, general single view, author pages, etc.
- Pages: WordPress static Pages
- Category Singles: Single post view of specific categories.
- Categories: Category view of specific categories.
- Post Types: Single post view of specific post types.
- Taxonomies: Archive view of specific custom taxonomies.
- User Roles: Show popup to specific logged in user roles.
- When "Specific Pages" option is selected, you will see the sub option tabs. Check the option(s) where you want the popup to appear:
- Guests or Logged-in: Show popup either to guest visitors or logged-in users, or both.
- Schedule Popup: Show popup during a specific time period. If schedule popup option is checked, then pick the start and end date (see screenshot).
- Trigger Popup:
- Time Delay: Trigger the popup after a number of seconds (entering "0" will trigger the popup immediately).
- Page Viewed: Trigger the popup after the visitor views a number of page counts.
- Scroll Position: Trigger the popup when the visitor scrolls to a certain position (value can be pixel of %)
- Manual Launch: If manual launch is selected, popup will not be launched automatically. You would need to insert the popup shortcode manually. Refer to Manual Launch Popups for more details.
- Popup Style:
- Classic: Classic style will show popup with an overlay.
- Position: Choose the position of the popup.
- Popup Dimension: Enter the desired popup width and height (check "Auto Height" if you don't want to have fixed height)
- Overlay Color: Pick a color for the overlay.
- Slide Out: Popup will slide out without the overlay.
- Position:
Choose the position of the popup.
- Position:
- Popup Dimension: Enter the desired popup dimension.
- Fullscreen: Popup will cover the entire screen completely. NOTE: Google might penalize sites with fullscreen popup on mobile. If you choose the fullscreen option, it is recommended to check "Mobile Disable" option to disable the popup on mobile.
- Classic: Classic style will show popup with an overlay.
- Open Animation: Select an animation effect when the popup opens.
- Exit Animation: Select an animation effect when the popup closes.
- Display Limit: Some the popup for a number of time until the user's browser cookie is expired.
- Auto Close: If this option is checked, you can specify the popup to close after a number of seconds.
- Mobile Disable: Mobile disable will not trigger the popup on mobile.
- Overlay As Close: If this option is checked, the user can click anywhere on the popup overlay to close it.
- Show Popup:
Manual Launch Popups
Manual launch button is great when you want to showcase your content in a lightbox. This ensures that your users won't be bothered with an automated popup as they review your site (view demo).
To use Use Manual Launch feature:
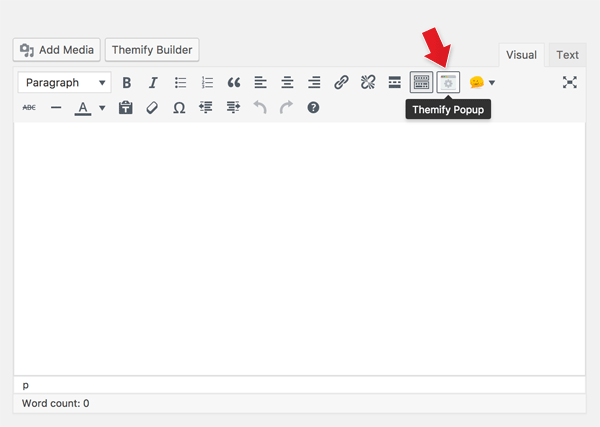
- First you have to add a popup, on the "Trigger Popup" option, select "Manual Launch" option (IMPORTANT: You must select this option in order to trigger popup manually)
- Then on the WordPress content editor, click the Themify Popup icon (see screenshot)
- A lightbox will appear for you to configure the button shortcode options (see screenshot):
- Link Button To: Select the popup that you would like the button to link to.
- Button Text: Enter the desired button text (eg. Launch Popup)
- Button Color: Select a built-in preset color style.
- Button Size: Select the button size.
- Custom Background Color: Optional: if you want a custom background color, enter the color code or click the color picker beside the input to choose a color.
- Custom Button Text Color: Optional: enter or pick the color for custom button text color.
- Fullwidth Button: If this option is checked, it will display the button fullwidth.
- Additional Styles: The plugin stylesheet comes with the following additional button styles: outline, gradient, flat, rounded, and embossed. You can enter one or more additional styles (eg. 'rounded embossed gradient' will show the button with rounded corners, embossed style, with a glossy gradient overlay). If you have a custom CSS class that you want to add, you may enter it here as well.
- After the configurations are done, clicking "OK" will generate a shortcode in the editor. Now you may insert this shortcode anywhere where shortcode is supported (ie. post/page editor, sidebar text widget, Themify Builder's Text widget, etc.).
Themify Builder Integration
Use with Themify Builder (free) or any Themify theme, you can design popups on the frontend or at the backend with our drag & drop interface.
To Use Themify Builder:
- Install and activate Themify Builder (NOTE: if you are using a Themify theme, you can skip this step because all Themify themes come with the Builder)
- Go to wp-admin > Popups > Add new to add a new popup
- To use Themify Builder in the backend mode: on the Themify Custom Panel, click the "Themify Builder" tab. Then you can drag & drop modules on the layout. For more info on how to use the Builder, refer to the Themify Builder documentation.
- To use Themify Builder on the frontend mode: after you add the popup, click "View Post" which will direct you to the frontend, then click "Turn On Builder" to design the popup layout.
To Import Sample Popup Layouts:
- With either Themify Builder or Builder Lite activated, go to wp-admin > Popups > Add new to add a new popup
- View the new post on the frontend, click "Turn On Builder", on the top admin bar, select the following: "Themify Builder > Layouts > Load Layouts", then click the "Themify Popup" sub-tab, and click a thumbnail to import the layout.
- Now you may edit the imported layout.
Manual Close Button
If you use Themify Builder to design the popup layout, you can create a manual close button with a module such as Button and Icon module.
To create a manual close button:
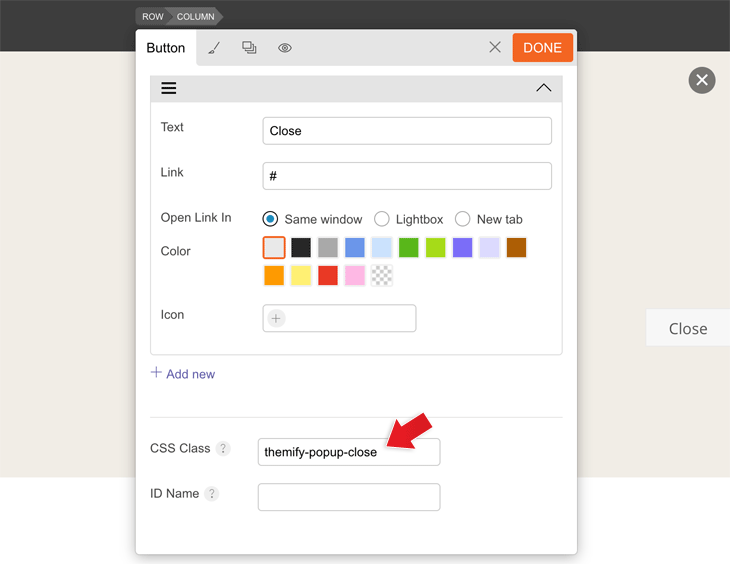
- On the Popup layout, drop in a Button or Icon module
- Enter "#" in the "Link" field
- Enter "themify-popup-close" in "CSS Class" field
- When users click on the Button, it will close the popup
- TIPS: You can also create a manual close button by inserting
class="themify-popup-close"in any link/button element
Mailchimp Newsletter Forms
We use Mailchimp newsletter services on our demo. You can sign up for free and it will allow you to send up to 2,000 subscribers.
To Embed the Mailchimp Subscription Forms:
- Login to Mailchimp (if you don't have an account, you can sign up for free)
- After you login, go to "Lists" (if you don't have a list, create a new list), then click the list in which you want to embed the newsletter sign up form.
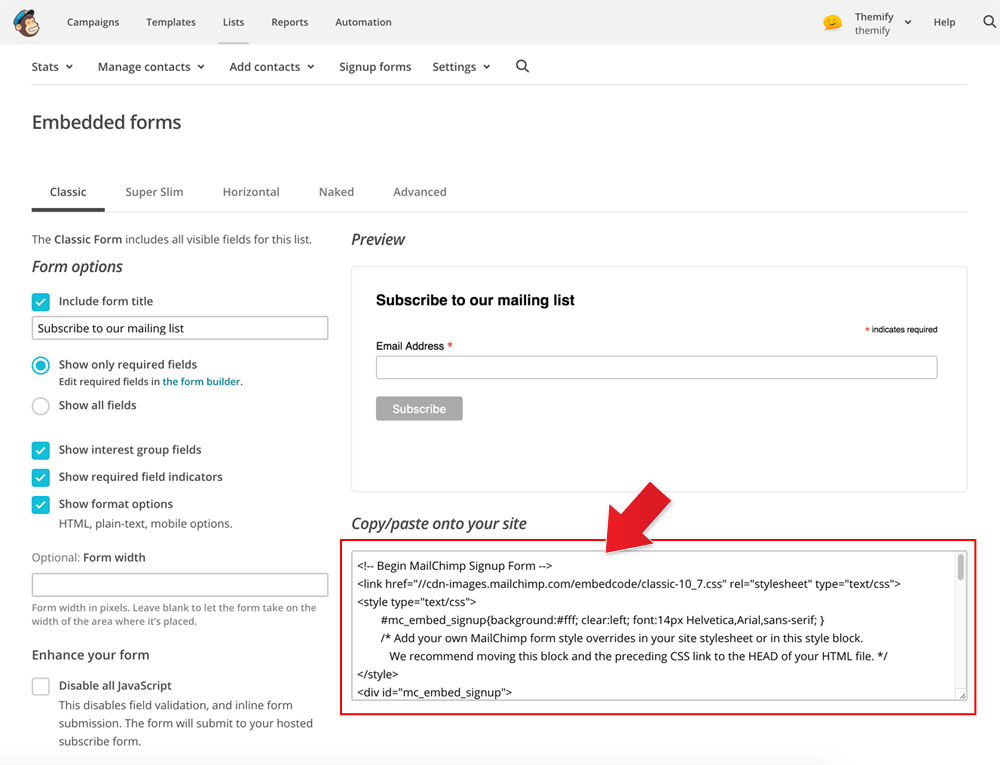
- Then click on "Embed Forms"
- It will direct you to configure the form options (see screenshot)
- After you are done with the configuration, copy the code provided
- To embed the subscription form in the WordPress editor: first click on the "Text" tab on the editor, then paste in the Mailchimp form code.
- To embed the subscription form via Themify Builder: drop in a "Plain Text" module and then paste in the Mailchimp form code.
Cookies used by plugin
The popup plugin adds one/several cookies depending on your configuration. themify_popup_page_view is added to count how many pages the current site visitor has navigated (this is useful when you use the "Page Count" option to show the popup only after certain number of page views).
Also if you use the "Limit display" option (this controls how many times the same popup is displayed to the visitor), another cookie named themify-popup-ID is saved (where ID is the popup post ID). This is stored separately for each popup that uses this option.
Reinstall Plugin
In the event there are issues/bugs with the plugin or you can't auto update the plugin, try to reinstall it with the latest version. Since WP 5.9, you can reinstall plugins by re-uploading the plugin zip. Reinstalling the plugin shouldn't affect the content/data because they are saved separately in the database. To be safe, you should backup your WordPress site before reinstalling it.
To reinstall a plugin:
- Download the latest plugin zip
- Go your site WP Admin > Plugins > Add new
- Then upload the new plugin zip and WordPress will ask if you want to replace the current version, click "Replace current with uploaded"