PTB Extra Fields
About
The Extra Field addon is a WordPress plugin that works together with the Post Type Builder (PTB). It adds new meta box fields when you build custom post types. Below are the following fields that are included:
Installing the Plugin
To install the plugin:
- First, you will need to download the plugin zip file from the Member Area on the Themify site.
- Note: Some browsers (e.g. Safari) may auto-extract zip files. Right-clicking on the download link and selecting "Save Linked File As" will allow you to download the ZIP version.
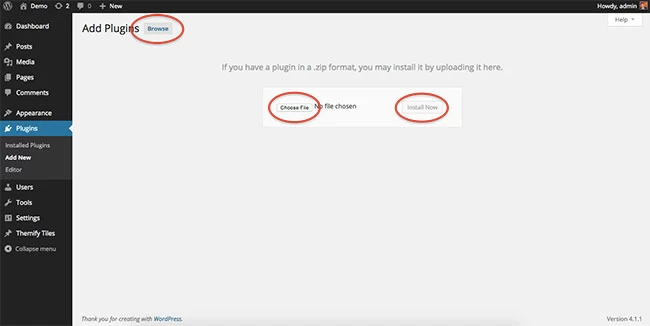
- Then go to your WP Admin > Plugins > Add New > Upload Plugin.
- Now upload the plugin zip file and click "Install Now".
- After the plugin is installed, click "Activate Plugin" to activate the plugin.
FYI: If you can't install the plugin using WordPress plugin installer, you may also use a FTP software to install the plugin. To install plugins with an FTP method: extract the plugin zip on your local computer then upload the plugin folder to your FTP server where you installed WordPress > wp-content > plugins folder. Then login to your WP Admin > Plugins to activate the plugin.
How It Works:
Note: This plugin will not work without the Post Type Builder (PTB) plugin installed.
- Install and activate the Extra Fields addon on your site.
- Go to your WP Admin > Post Type Builder > Post Types. Choose any custom post type you've created with the PTB, or create a new post type.
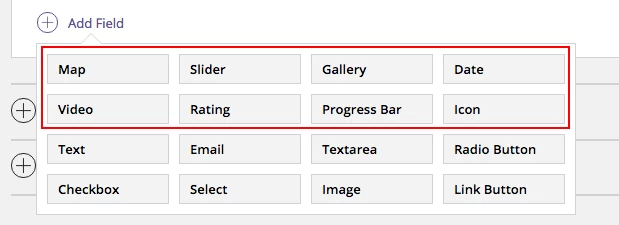
- Scroll down to the Meta Box Builder, and click "Add Field". Here you will see all your new modules. Click any of them to add them to your post type.
Video
The Video module supports Youtube, Vimeo, or any MP4 video.
- To add the Video module to your post type. Go to your WP Admin > Post Type Builder > Post Types > and choose the custom post type, or add a new one > scroll down to the Meta Box Builder > Add Field, then select "video".
- Add a name and description for the module.
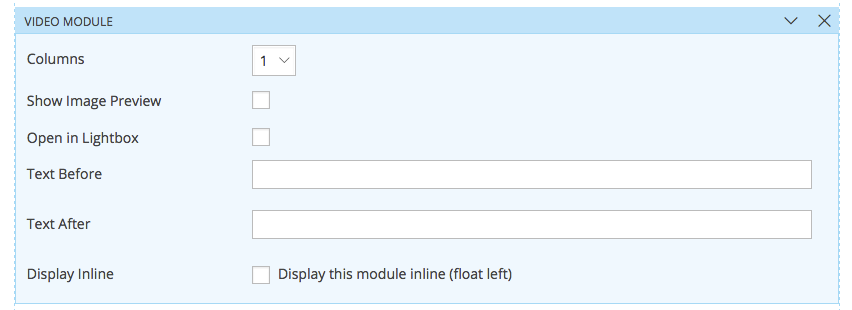
- On the template of your custom post type, you'll see the name of the video module you've just added to your Meta Box Builder. Drag and drop this anywhere on your template, and then you'll see the following options:
- Column = Choose the number of columns that you would like to display your videos. Options range from 1-4 columns.
- Show Image Preview = This option allow your videos to display only the image thumbnail of your video. This option is very useful, especially if your showcasing a lot of videos, as this will allow your page to load faster.
- Open in Lightbox = This option allows users to view your videos in a lightbox
- Link to post permalink (Archive template only) = This allows users when they click on the video to be redirected to the post instead of directly to the video.
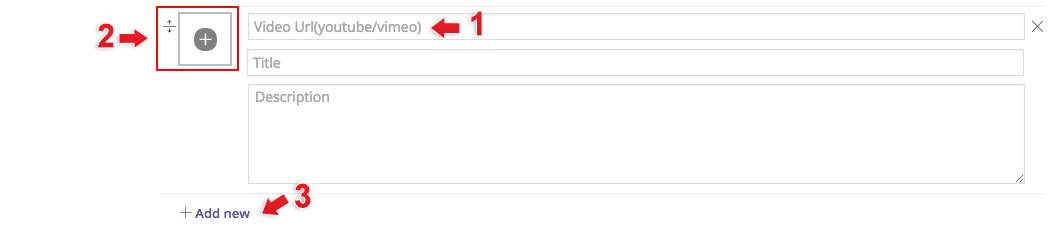
- Post Type Options:
- 1) Insert any Youtube/Vimeo Link that you would like
- 2) Click on the "+" icon to insert an MP4 video from your media library
- 3) Click "Add new" to insert a new video.
Rating
The Rating module allows you to choose from over 320+ icons to showcase the rating of your post.
- To add the Rating module to your post type. Go to your WP Admin > Post Type Builder > Post Types > and choose the custom post type, or add a new one > scroll down to the Meta Box Builder > Add Field, then select "rating".
- Add a name and description for the module.
- Rating Count = Select the number of icon (star) that you would like to appear where users/admin will be able to rate it out off.
- Who can rate:
- Admin/Editor = Only users who have Admin/Editor access will be able to rate the post
- Public Visitors = All users will be able to rate the post, by clicking on the backend. Users will be tracked based on their IP Address.
- The count will be shown at the backend of the post. The number of voters, total number of votes, and the average will be shown at the backend of each post. Note: Admin/Editor's will be able to view and change these figure.
- On the template of your custom post type, you'll see the name of the rating module you've just added to your Meta Box Builder. Drag and drop this anywhere on your template, and then you'll see the following options:
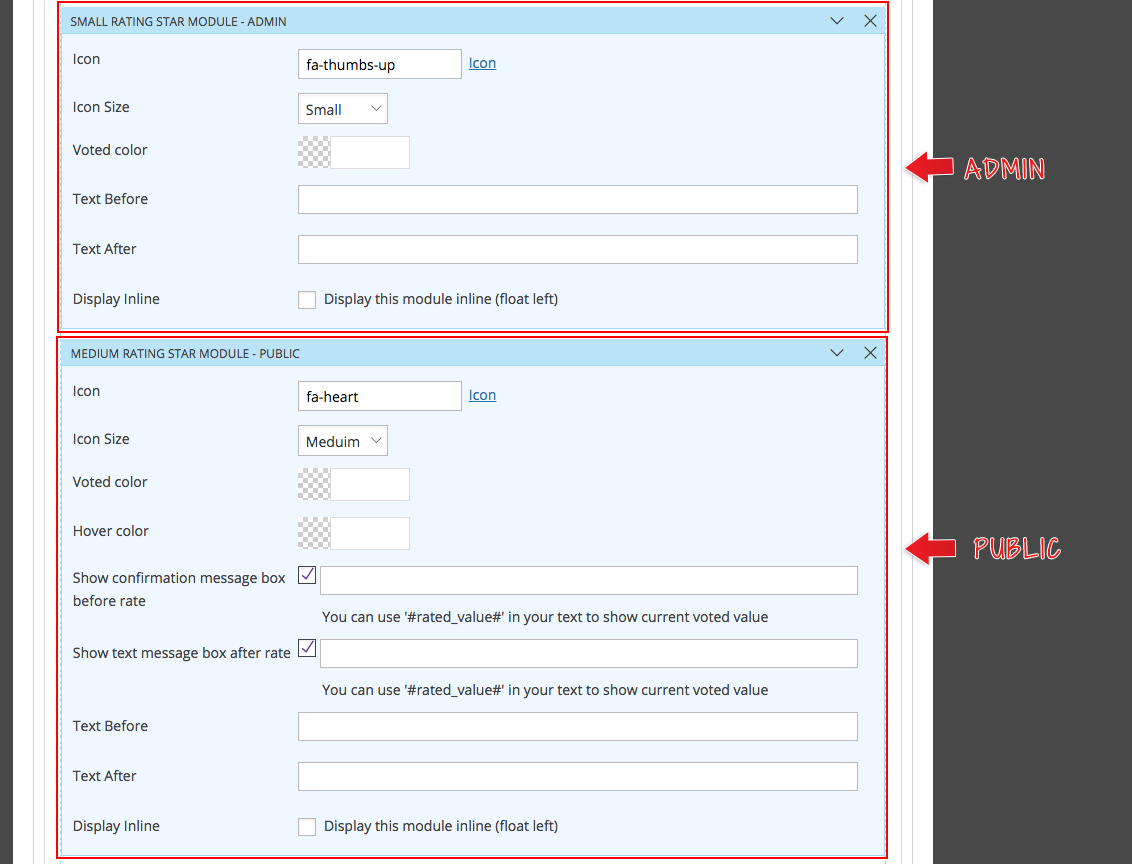
- Rating - Admin/Editor:
- Icon = Choose an icon that you would like to showcase this rating
- Icon Size = Choose how big you would like to display the icon
- Voted Color = Choose the color that the icon will appear after the admin/editor inputs the rating
- Rating - Public Visitors
- Icon = Choose an icon that you would like to showcase this rating
- Icon Size = Choose how big you would like to display the icon
- Voted Color = Choose the color that the icon will appear after the admin/editor votes
- Hover Color = Choose the color that'll appear when the hovers their cursor as they are about to vote
- Show confirmation message box before rate = When checked, the text inputed will appear before the user rates the post
- Show text message box after rate = When checked, the text inputed will appear after the user rates the post
- Rating - Admin/Editor:
- Post Type Option - Admins:
- Simply input the rating for the post
- Post Type Option - Public Visitors:
- Click = This shows you the total number of users that rated your post
- Sum = This shows the sum of all the ratings that were given this post
- Rating = This shows the average rating based on the Sum divided by the total number of Click

Map
The Map module allows you to showcase a map on your post. This module also allows you to place a map pointer with text on the map.
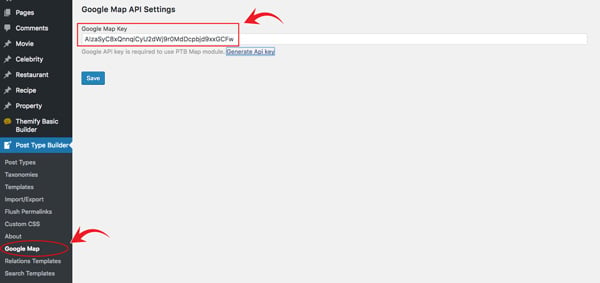
- Before you can use the Map module, you'll first need to input a Google Map Key. To do this go to your WP Admin > Post Type Builder > Google Map > Input your Google API key > Then click "Save".
- To add the Map module to your post type. Go to your WP Admin > Post Type Builder > Post Types > and choose the custom post type, or add a new one > scroll down to the Meta Box Builder > Add Field, then select "map".
- Add a name and description for the module.
- On the template of your custom post type, you'll see the name of the map module you've just added to your Meta Box Builder. Drag and drop this anywhere on your template, and then you'll see the following options:
- Zoom = Choose how zoomed-in you want your users to view your map. It ranges from 8-17 zoom-in.
- Width = Input the width in either % or px of your map
- Height = Select the height in px of you map
- Type = Select the type of map that you would like your map to appear as. There are 4 options of map types.

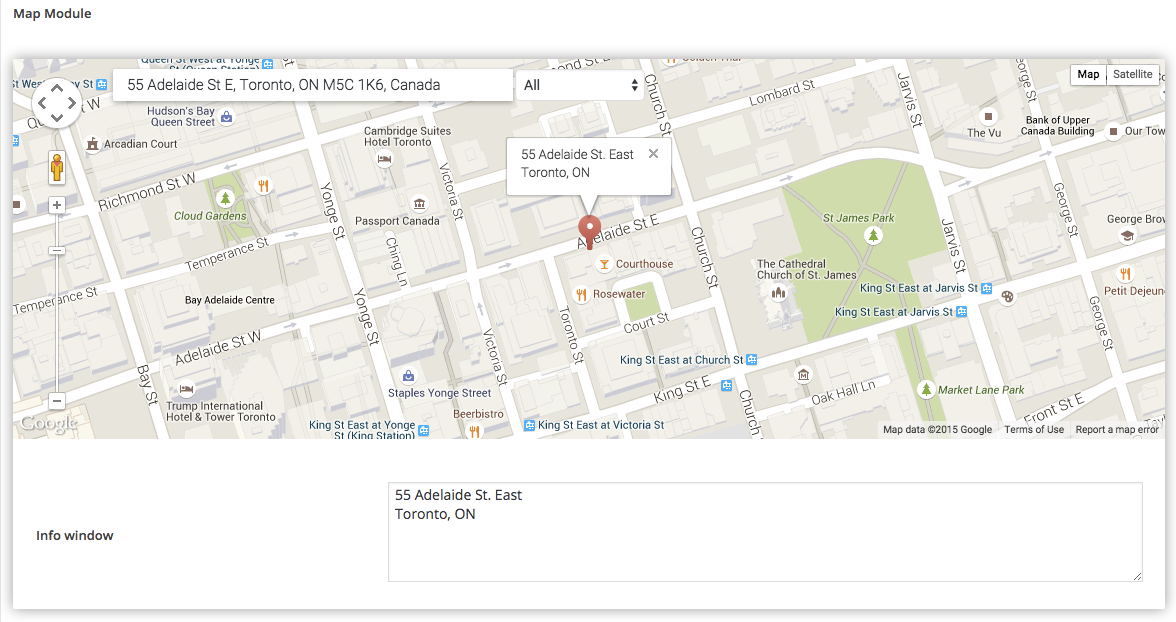
- Post Type Option:
- A Google map preview is shown as a preview for you to see how your map will look like on the frontend. Input the address that you would like to showcase on the top (1) address bar.
- Info Window = The text inputed in this window will appear at the top of the map pointer where you've set your address.
Date
The Date module allows you to showcase your date anywhere on your site in any format that you would like. Users can use a calendar to pick their times and times.
- To add the Date module to your post type. Go to your WP Admin > Post Type Builder > Post Types > and choose the custom post type, or add a new one > scroll down to the Meta Box Builder > Add Field, then select "date".
- Add a name and description for the module.
- Show as Range = Check if you would like the date to have a start and end date with it.
- Date Format = Choose the format you would like your date to appear as
- Time Format = Choose the format you would like your time to appear as
- Time Separator = This will divide the time and date.
- On the template of your custom post type, you'll see the name of the Date module you've just added to your Meta Box Builder. Drag and drop this anywhere on your template.
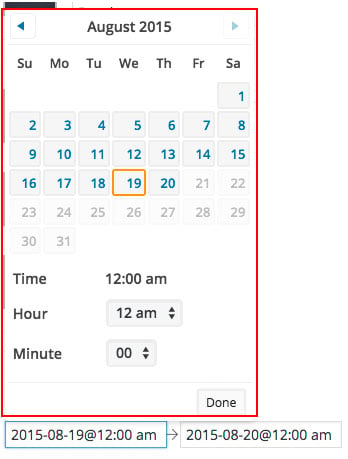
- Post Type Option:
- Click on the bar and a calendar picker will appear. Choose the date and time that you would like to show on this post.
Slider
The Slider module allows you to showcase both your images and videos (Youtube, Vimeo, MP4), in a slider layout.
- To add the Slider module to your post type. Go to your WP Admin > Post Type Builder > Post Types > and choose the custom post type, or add a new one > scroll down to the Meta Box Builder > Add Field, then select "slider".
- Add a name and description for the module.
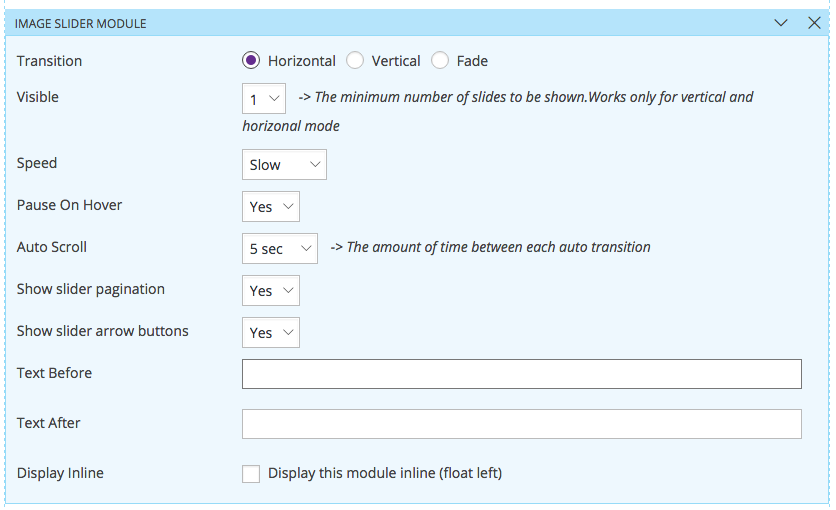
- On the template of your custom post type, you'll see the name of the Slider module you've just added to your Meta Box Builder. Drag and drop this anywhere on your template, and then you'll see the following options:
- Transition = Choose to either have a horizontal, vertical, or fade transition effect for your image/videos
- Visible = Set the number of slides that will appear at a time. This option only works on the vertical and horizontal transition.
- Speed = Choose the speed of the transition of your slider
- Pause On Hover = Choose if you would like your slider to pause when cursor hover of it
- Auto Scroll = Choose the number of seconds that you would like each slide to transition, or turn it off by selecting the "Off" option
- Show Slider Pagination = Choose if you would like to display the pagination or not
- Show Slider Arrow Buttons = Choose if you would like to display the left and right arrows of your slide
- Post Type Option:
- 1) Select an image/video from your media gallery
- 2) Input the title of your image/video. You can also leave this blank if you would like.
- 3) Add an additional image/video slider
- Note: All Youtube, Vimeo, and MP4 videos work with the slider.

Gallery
The Gallery module allows you to showcase your images in grid, showcase, or lightbox layout.
- To add the Gallery module to your post type. Go to your WP Admin > Post Type Builder > Post Types > and choose the custom post type, or add a new one > scroll down to the Meta Box Builder > Add Field, then select "gallery".
- Add a name and description for the module.
- On the template of your custom post type, you'll see the name of the Gallery module you've just added to your Meta Box Builder. Drag and drop this anywhere on your template, and then you'll see the following options:
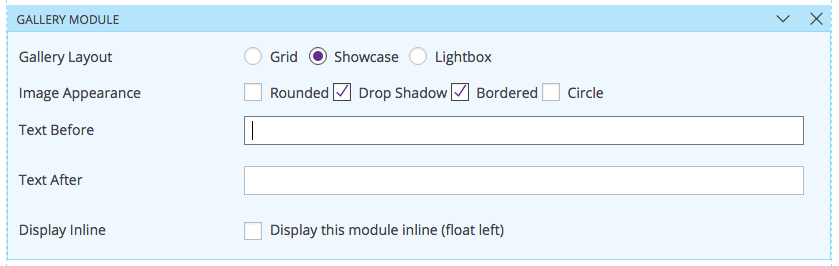
- Gallery Layout = Choose to showcase your image in either grid, showcase, or lightbox
- Columns = Select the number of columns that you would like the images to appear
- Image Appearance= Select how you would like your images to appear. Note: If you would like to create a circle image make sure that your image size has the same height and width (i.e. 400 x 400)
- Post Type Option:
- 1) Select an image from your media gallery
- 2) Input the title of your image. You can also leave this blank if you would like.
- 3) Feel free to input a description for your images
- 4) Add an additional image

Progress Bar
The Progress Bar module allows you to showcase your skills, in-progress projects, in a cool animated progress bar.
- To add the Progress Bar module to your post type. Go to your WP Admin > Post Type Builder > Post Types > and choose the custom post type, or add a new one > scroll down to the Meta Box Builder > Add Field, then select "progress bar".
- Add a name and description for the module.
- Orientation = Choose either to display your progress in a horizontal or vertical orientation
- Labels = At the text that you would like to appear on the each progress bar. Click "Add new" to add more progress bar.
- On the template of your custom post type, you'll see the name of the Progress Bar module you've just added to your Meta Box Builder. Drag and drop this anywhere on your template, and then you'll see the following options:
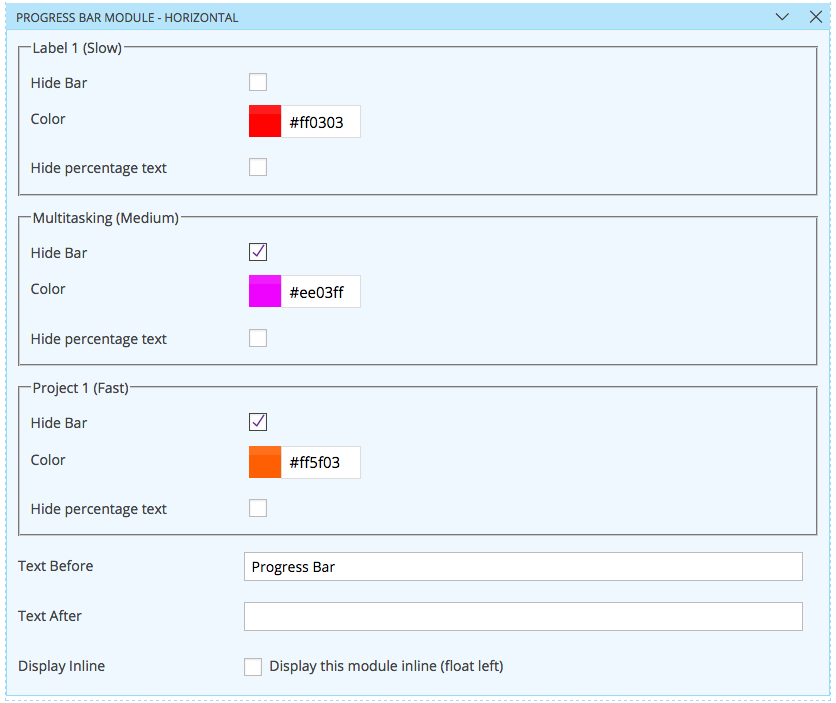
- Each label that you've set on the post type has it own set of options:
- Hide Bar = You can choose to hide the bar, if you would like
- Color = Choose a color from the color picker
- Hide Percentage Text = Check this to hide the percentage animation that'll appear when your progress bar is loading.
- Each label that you've set on the post type has it own set of options:
- Post Type Option:
- Input the percentage out of 100 of each label.

Icon
The Icon module allows you to choose from over 320+ icons and display it anywhere on your post with a custom link, color, and label.
- To add the Icon module to your post type. Go to your WP Admin > Post Type Builder > Post Types > and choose the custom post type, or add a new one > scroll down to the Meta Box Builder > Add Field, then select "icon".
- Add a name and description for the module.
- On the template of your custom post type, you'll see the name of the Icon module you've just added to your Meta Box Builder. Drag and drop this anywhere on your template, and then you'll see the following options:
- Size = Choose the size you would like the icon to appear
- Open in = Choose to open the link to showcase the link in a lightbox, new window, or no (no is default)
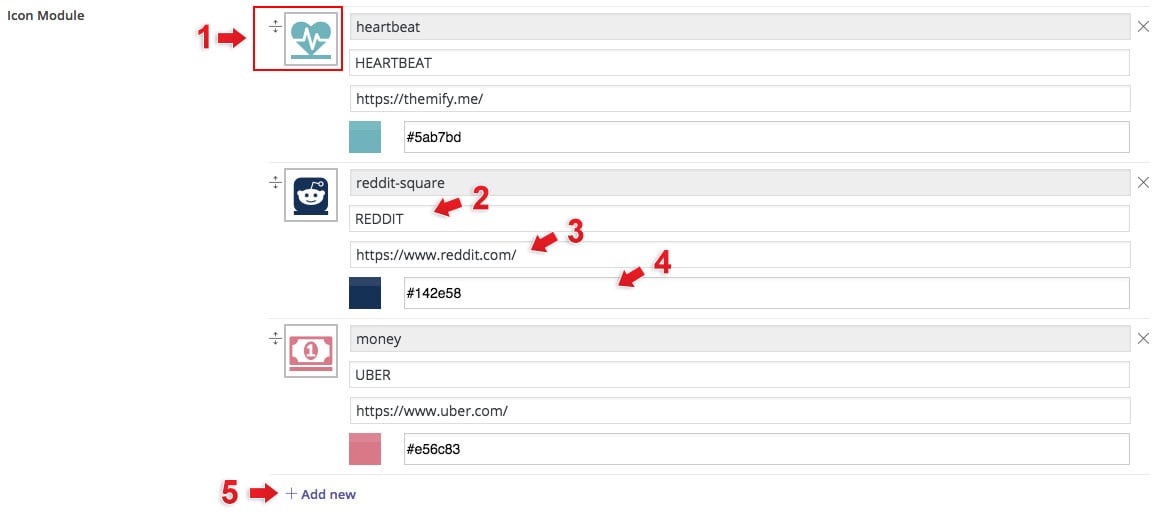
- Post Type Option:
- 1) Select the icon you would like to use
- 2) Input the label of the icon. You can leave this blank if you would just like to showcase the icon
- 3) Input the link you would like to redirect users when they click on the icon/label
- 4) Select the color that you would like to use with the icon.
- 5) Add another icon
Audio
The Audio module allows you to upload your own audio tracks into the custom post type. You can insert an unlimited number of tracks and set the column (1-4) design on how the audio track will appear.
- To add the Audio module to your post type. Go to your WP Admin > Post Type Builder > Post Types > and choose the custom post type, or add a new one > scroll down to the Meta Box Builder > Add Field, then select "audio".
- Add a name and description for the module.

- On the template of your custom post type, you'll see the name of the Audio module you've just added to your Meta Box Builder. Drag and drop this anywhere on your template, and then you'll see the following options:
- Columns = Select the number of columns where the audio tracks will be displayed
- Post Type Option:
- 1) Select/upload the audio file that you would like to showcase on the track
- 2) Input the label of the audio. You can leave this blank if you would just like to showcase the audio track
- 3) Add a description of the audio if you'd like
- 4) Add another audio
File
The File module allows you to upload files into your custom post type where your users can download the files. This module allows you to insert an unlimited number of files.
- To add the Files module to your post type. Go to your WP Admin > Post Type Builder > Post Types > and choose the custom post type, or add a new one > scroll down to the Meta Box Builder > Add Field, then select "file".
- Add a name and description for the module.

- On the template of your custom post type, you'll see the name of the File module you've just added to your Meta Box Builder. Drag and drop this anywhere on your template, and then you'll see the following options:
- Open in = Choose to open the link to showcase the link in a lightbox, new window, or no (no is default)
- Show file icons = There are preset icons for each file type. On the image above you'll see the icon for a PDF file
- Color = Select the color of the file. The color will apply to both the icon and the file name
- Show as = Select if you'd like to show the file in a list format or block format
- Post Type Option:

- 1) Select/upload the file that you would like to showcase on the track
- 2) Input the label of the file
- 3) Add another file
The Email module allows you to add an email address on your post type. This email address is very useful when you create a contact page and would like to input the email of the person. When this is clicked it will automatically allow the user to send an to the email address.
- To add the Files module to your post type. Go to your WP Admin > Post Type Builder > Post Types > and choose the custom post type, or add a new one > scroll down to the Meta Box Builder > Add Field, then select "email".
- Add a name and description for the module.

- On the template of your custom post type, you'll see the name of the File module you've just added to your Meta Box Builder. Drag and drop this anywhere on your template, and then you'll see the following options:
- Show Gravatar= Check to allow the gravatar of the user to appear
- Gravatar Size = Select the size of the email gravatar that'll appear (i.e. 16x16, 64x64, 256x256, 512x512)
- Post Type Option:
- 1) Input the email address. If you've checked gravatar option on the template it'll automatically grab the gravatar of the email and showcase it on the post
Disable the automatic update
<?php

function custom_disable_ptb_extra_update() {
	remove_action( 'ptb_check_update', 'ptb_extra_check_update' );
}
add_action( 'plugins_loaded', 'custom_disable_ptb_extra_update' );