
PTB Submissions
About
The Submissions addon is a WordPress plugin that works together with the Post Type Builder (PTB), allowing users to create submission forms that's seamless with their custom post types. This allows users to create a form that's linked with all the custom post type meta boxes, and post type templates.
Installing the Plugin
To install the plugin:
- First, you will need to download the plugin zip file from the Member Area on the Themify site.
- Note: Some browsers (e.g. Safari) may auto-extract zip files. Right-clicking on the download link and selecting "Save Linked File As" will allow you to download the ZIP version.
- Then go to your WP Admin > Plugins > Add New > Upload Plugin.
- Now upload the plugin zip file and click "Install Now".
- After the plugin is installed, click "Activate Plugin" to activate the plugin.
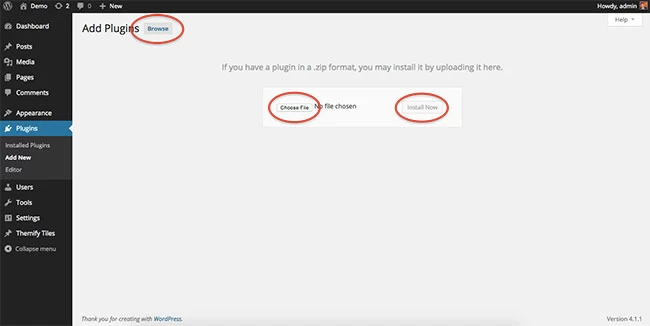
FYI: If you can't install the plugin using WordPress plugin installer, you may also use a FTP software to install the plugin. To install plugins with an FTP method: extract the plugin zip on your local computer then upload the plugin folder to your FTP server where you installed WordPress > wp-content > plugins folder. Then login to your WP Admin > Plugins to activate the plugin.
How It Works:
Note: This plugin will not work without the Post Type Builder (PTB) plugin installed.
- After installing and activating the Submissions addon on your site, you'll see a new option on your WP Admin called "PTB Submission".
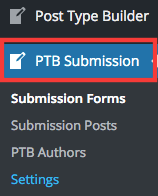
- Go to PTB Submissions > Submission Forms > Add New. Choose any custom post type you've created with the PTB, or create a new post type.
- A lightbox will appear where you are given a set of parameters that you fill out to set up your form.
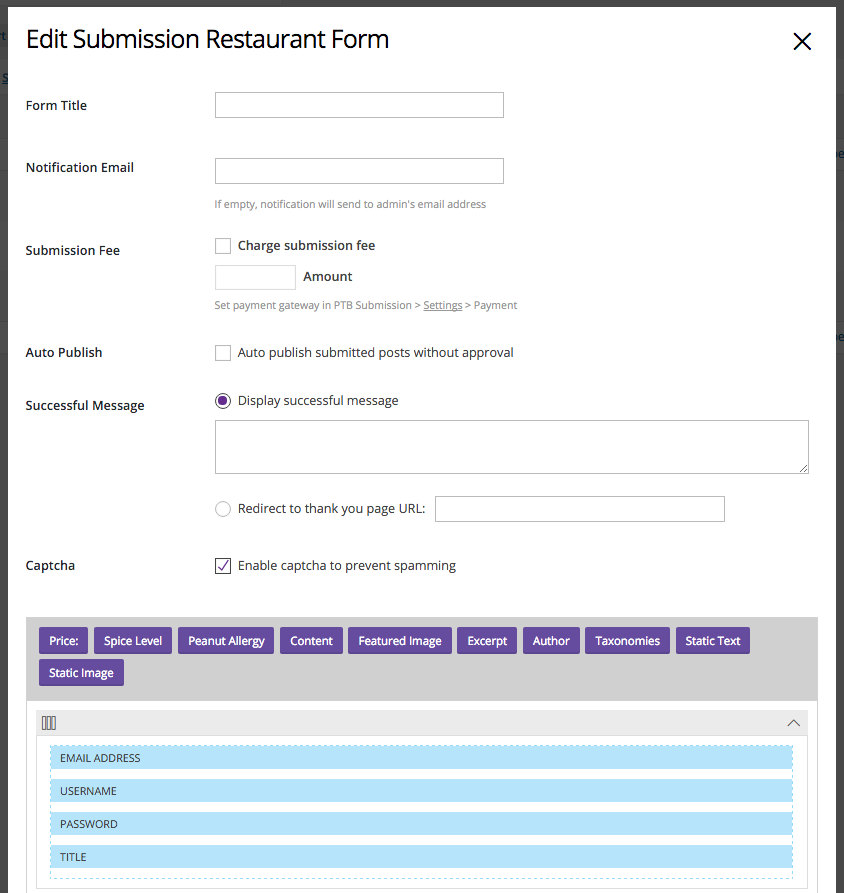
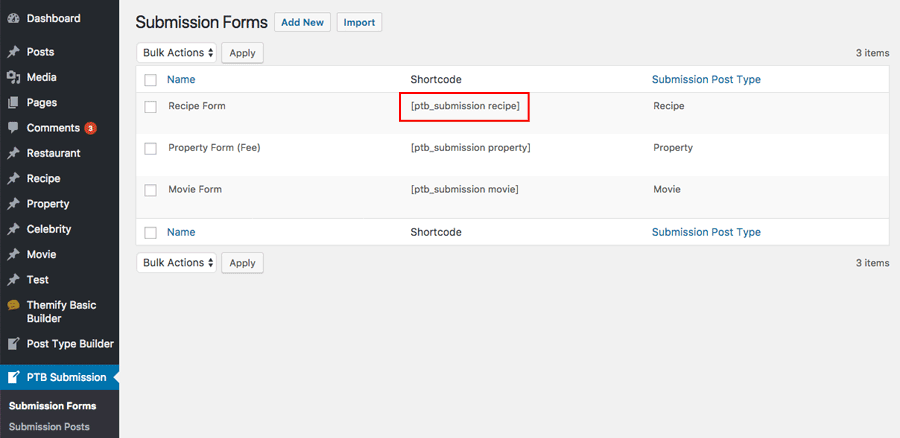
- After the Submission form is created, a shortcode will be provided. Copy that shortcode and paste it in a page where you want the form to display.
Form Options
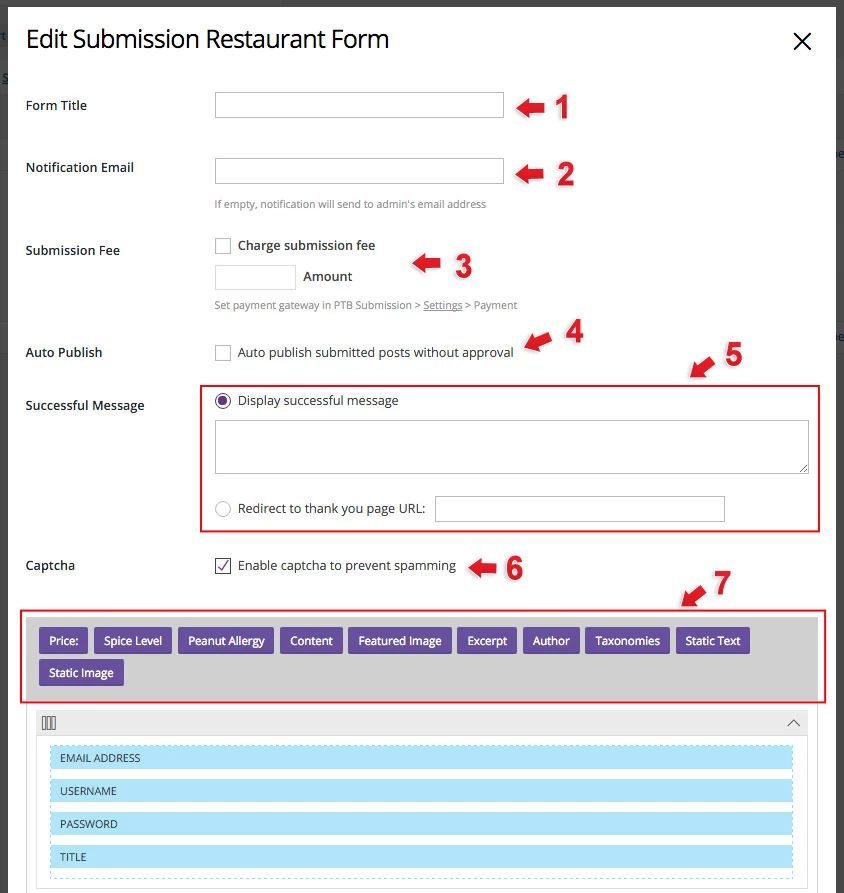
- 1) Form Title: Input title form title. This will only appear on the backend of your site.
- 2) Notification Email: Input the email where you would like to send a notification when an form is submitted. Default is set to send to admin email.
- 3) Submission Fee: Require user to complete payment and enter the amount of the submission fee, before user can submit form. Go to the Payment Gateway for more info on how to set up your payment gateway.
- 4) Auto Publish: Publish content that users submit immediately on your site.
- 5) Successful Message:
- Display successful message: Enter message that you would like to appear after user successfully submits their form.
- Redirect to thank you page URL: Users with successful form submissions will be redirected to another page.
- 6) Captcha: This is used to distinguish human from machine input which deters spam. A box will appear that will require users to answer correctly in order to submit the form.
- 7) Form Modules: Drag and drop meta box modules that are linked to your custom post type. If you would like to add a meta box, you can do so by going to your PTB Meta Box Builder.
Author Profile
You can also edit accounts of users who submitted their form to your WP Admin > PTB Submissions > PTB Authors. This will show you all users who submitted a form on your site. This page allows admin to manage user profiles, allowing you change roles, update profile info, or help with user account password set-up. Admin can also choose to delete users.
Admin Submissions Managements
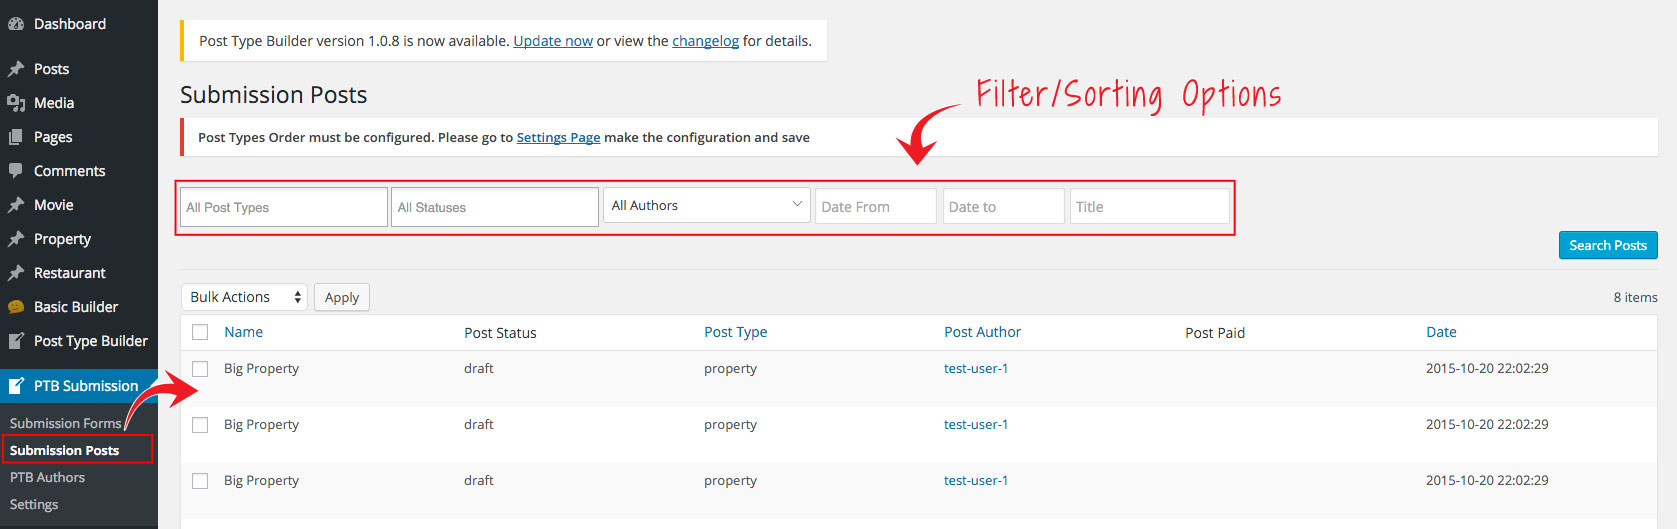
You can view all submitted posts on all forms by going to your WP Admin > PTB Submissions > Submission Posts. This allows admins to manage form submission. You will be able to filter, edit, view, delete, and publish submitted forms.
User Submissions Management
You can allow users to manage their submitted forms by with the user submission shortcode. This shortcode can be place on page on your site, and it allow users to login with their account and manage their submitted form. They can edit, view the status, or the delete the forms they sent. With the filtering option above, they are even able to sort by the date, status, or type of post they've submitted and view the form.
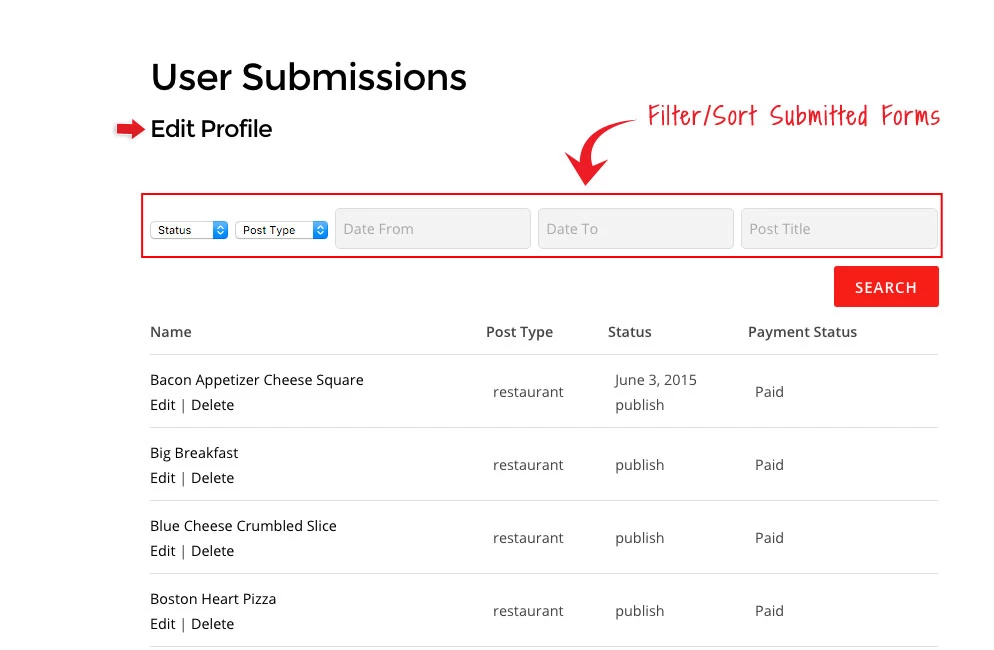
To create a user submissions page.
- First select/create a page.
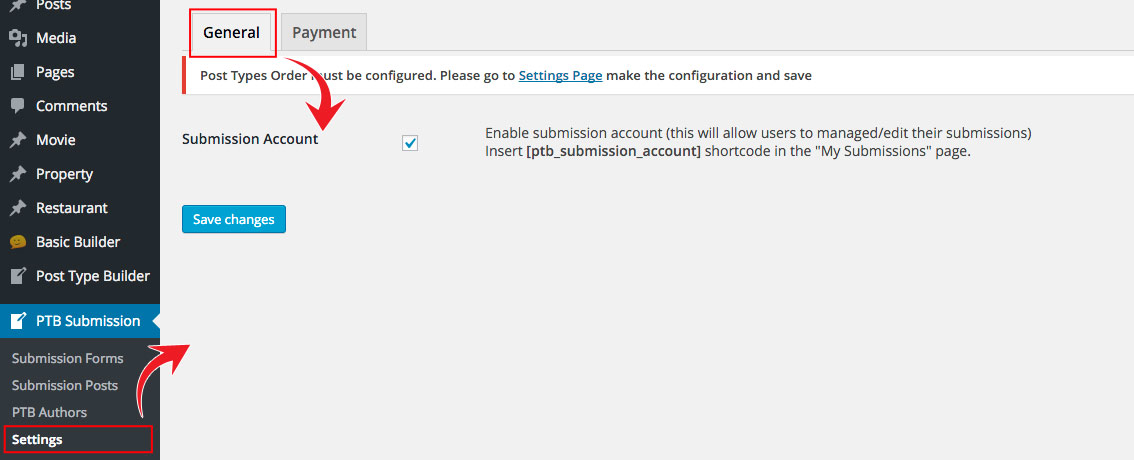
- Go to your WP Admin > PTB Submission > Settings > General Tab.
- Check the "Submission Account" option
- Copy and paste the shortcode on the description "[ptb_submission_account]" on the page you've created on step 1.
Payment Gateway
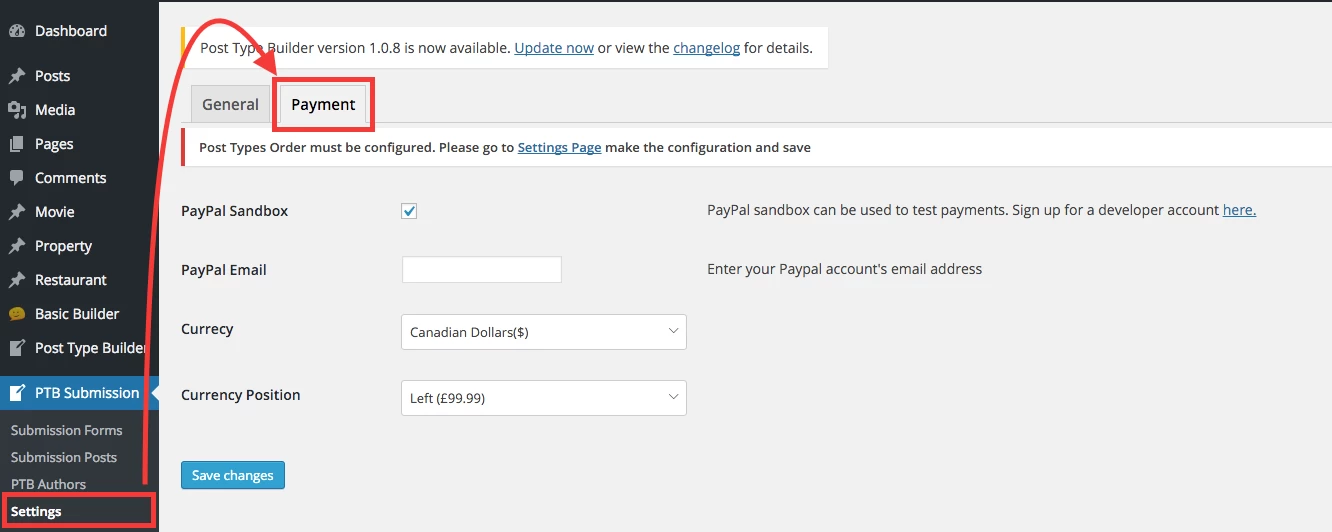
- To set up your payment gateway go to your WP Admin > PTB Submission > Settings > Select the Payment tab.
- Below are the options:
- Paypal Sandbox: Only select to test your PayPal payment. You will need to have a developer account in order to use this feature.
- PayPal Email: Enter email that's linked to your PayPal account. Note: This is where the payment will be sent to, when you select a submission fee.
- Currency: Select the currency that you would like to charge users that submits the form.
- Currency Position: Select the position on how you want the currency to appear on your form.
PTB Submissions Webhooks
PTB Submissions can now automatically send submission data to external services. When someone submits, updates, pays for, or gets a submission approved, PTB sends a JSON webhook to a URL you configure — so you can connect your forms to tools like N8N, Zapier, Make, Google Sheets, CRMs, Slack, and more without writing custom code.
How It Works
- Add your webhook URL in PTB Submission → Settings → Integrations.
- Choose which events to send (new submission, update, payment completed, admin approval).
- Your connected service receives structured data including post title, status, submitter info, custom fields, taxonomies, and payment details.
You can set one global webhook for all forms, or override it per form with its own URL. For paid forms, you can wait until payment is completed before sending the data.
Use Cases
- Log submissions in Google Sheets
- Add leads to a CRM
- Send Slack or email notifications
- Trigger custom workflows in N8N or Zapier
Webhooks run in the background, so they won't slow down form submissions. An optional secret header lets you verify requests on the receiving end.
Example 1: Set up N8N + Google Sheets Integration
- Create a new workflow in N8N.
- Add a Webhook node → method POST → path e.g.
ptb-submission. - Copy the Production URL.
- Add a Google Sheets node → Append Row → connect account → select spreadsheet.
- Map columns:
{{ $json.event }}{{ $json.post_id }}{{ $json.title }}{{ $json.status }}{{ $json.submitter.email }}{{ $json.fields.ptb_YOURFIELD.value }}(replace with actual field keys)
- Activate the workflow.
Then configure PTB Submissions:
- Go to PTB Submission → Settings → Integrations.
- Enable Enable Webhooks.
- Paste the N8N Production URL into Webhook URL.
- (Optional) Set a Webhook Secret and verify it in N8N with an IF node on header
x-ptb-webhook-secret. - Select which events to send.
- Save changes.
Example 2: Set up Zapier
- Create a new Zap.
- Trigger: Webhooks by Zapier → Catch Hook.
- Copy the Custom Webhook URL.
- Submit a test entry on your PTB form so Zapier receives sample data.
- In Zapier, click Test trigger and confirm the payload arrived.
- Action: Google Sheets → Create Spreadsheet Row.
- Connect your Google account and select spreadsheet and worksheet.
- Map columns:
eventpost_idtitlestatussubmitter → emailfields → ptb_YOURFIELD → value(replace with actual field keys)
- Test the action, then Publish the Zap.
Then configure PTB Submissions:
- Go to PTB Submission → Settings → Integrations.
- Enable Enable Webhooks.
- Paste the Zapier Custom Webhook URL into Webhook URL.
- (Optional) Set a Webhook Secret and add a Zapier Filter step to verify the
x-ptb-webhook-secretheader. - Select which events to send.
- Save changes.