
After the recent launch of the beta version of our Builder Pro, we’re thankful for the positive feedback and messages of support from our small but mighty community. As we work and test out the capabilities of the Builder Pro, we’re excited to bring you another new feature with the beta version, and it’s called the Advanced Archive Posts!
It might sound a little familiar already, and that’s because the Builder Pro already has the Archive Posts module, which allows you to customize the way your own blog or post categories look. So it’s only natural that the Advanced Archive Posts (AAP) module will take things to the next level.
Previously with the archive posts module, there were limitations to customizations, meaning you could only turn default elements on or off and not add anything new (including any modules). But now with the AAP module, you can drop pretty much ANY module into your archive layout. Let’s say if you want a divider, alert button, or gallery slider in between your post title and post content, just drop them in and see the module reflected in every post when you’re on archive view.
The AAP also brings new possibilities when used in combination with the dynamic content feature. Combining them both, you can use any module to creatively display your post’s dynamic content/info, including the post’s featured image, post element, or custom fields. For example, drop in a FitText module addon to replace the typical post title, or replace your post’s featured image with the Image Pro to create awesome colour overlays or read more buttons directly on the photo as you hover over it.
If you stick around, we’ll actually show you how to do this in a tutorial below.
Advanced Archive Posts Sample Tutorial
You can now allow your featured blog post image to be overlayed with a transparent colour and add a direct read more button right on the photo, using the Builder Image Pro addon.
To do this, ensure you install the Builder Pro beta on a test site, activate the Builder Image Pro addon, then follow the instructions below:
To create an Archive Template:
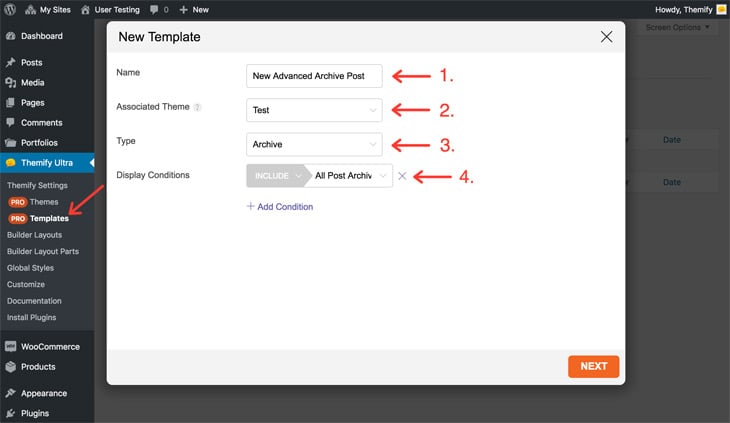
- Go to WP Admin > Themify Theme > Pro Templates > Add New > fill out the following to create a new template:
- 1. Name: Enter your choice of template name
- 2. Associate Theme: Select which theme you want this template to be active with (your active theme is selected by default)
- 3. Type: Select what type of template you want, in this case it would be the ‘Archive’
- 4. Display Conditions: You can keep the default ‘All Post Archives’ selected
- Select Next > Blank > Publish
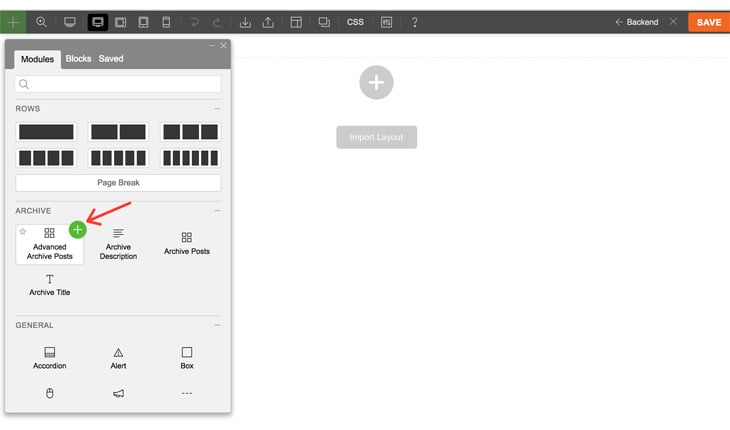
To drop in the Advanced Archive Posts module:
- Click the green (+) icon in the top left corner to open the module panel, in the top section, you’ll see the Advanced Archive Posts module.
- Click the green (+) icon to add the Advanced Archive Posts module, or drag the module onto your live preview area
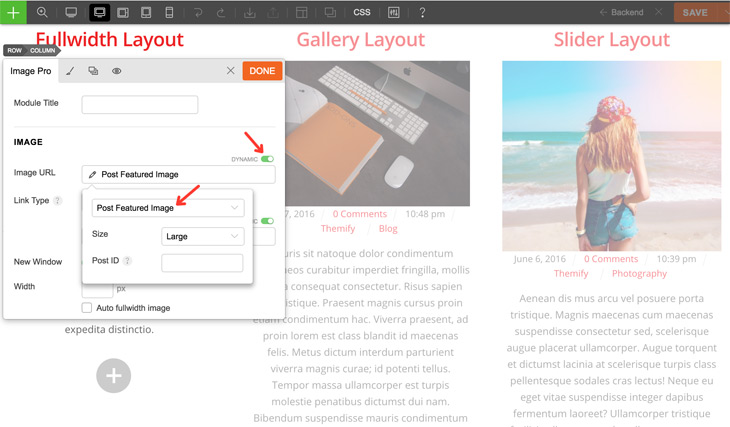
To use the Image Pro module:
- Remove the Featured Image module by hovering over it and press the (X) button
- Drag the Image Pro module where the Featured Image was, don’t select an image, and close the media library
- In the Image Pro options panel, for the image URL, enable the ‘Dynamic’ switch, select the ‘Post Featured Image’, and choose a size (large would be good for this demonstration)
- For the Link Type, enable ‘Dynamic’ and select ‘Post Permalink’
- To create the image’s overlay with a transparent background, the post title, and a read more button, scroll down to Overlay, enable ‘Dynamic’ > ‘Post Title’, insert ‘Read More’ in the Action Button field, enable ‘Dynamic’ on the Button Link and select ‘Post Permalink’
- Next, choose your overlay colour, and don’t forget to toggle the transparency bar beside the colour bar in order to see your photo behind the overlay
- Click Done > Save
And that’s it! You’ve just created photo overlays with each post’s title and a read more button for every single post. Just view your blog in an archive view, or click one of your blog categories to see each post displaying all of the changes you just made.
Advanced Demo
The above tutorial is just one of the many ways you can use AAP and the dynamic content feature. And there are so many more things you can do - see this Dynamic Content demo that we've created with the Builder Pro and Post Type Builder (PTB). The Property and Movie post type is created with PTB. The archive and single template is created with Builder Pro. It uses the dynamic content and custom field feature to output the custom field data created with PTB. As you can see, it is an extremely powerful feature that opens up many possibilities for building dynamic WordPress sites.
We hope you’ve enjoyed this tutorial to show you how the Builder Pro can open up many more creative and unique design possibilities. For more information on the Builder Pro, use our extensive guide/documentation. Let us know how you are finding the Builder Pro so far with feedback or any issues, let us know here.
August 5, 2019 @ 1:26 pm
I did not understand that. Do you have a video or something?
Thanks,
Denis
August 5, 2019 @ 8:21 pm
Hi Denis,
We will be working on this shortly. Thanks for the feedback and stay tuned :)
-Themify Team
August 5, 2019 @ 3:00 pm
awesome.. can’t wait to dive into the builder pro.
I have a question regarding the single light-box image for the property in the dynamic content demo. was that created via the PTB?
August 5, 2019 @ 8:30 pm
Hi,
Sorry, but I am not sure to which “single light-box” image you are referring to, could you, please post a link to the demo page in question? Only the Post types were created with PTB, but if you can post a link to the demo page where you saw the light-box image you are referring to, then I can tell you how it was created.
August 5, 2019 @ 4:47 pm
A video tutorial would be great.
Congratulations for the awesome work, this will surely be of great use!
August 5, 2019 @ 8:22 pm
Thanks Andres for letting us know! Will do.
-Themify Team
August 6, 2019 @ 12:25 am
Nice! These two features are in beta version so it’s not available for live site yet?
August 6, 2019 @ 3:53 am
Glad to hear you like the new update. You can use Pro on live sites now. We are just fine tuning the features for the official release.
November 9, 2020 @ 5:52 am
Hi guys,
Where is the video?