
Back in the old days, creating an advanced custom site with WordPress would require coding skills (CSS, PHP, and Javascript). As WordPress and technology advance, we are able to create dynamic sites without any coding. With Builder Pro, you can create custom themes and templates without having to write any code. We've recorded a full length video tutorial to show you how to build a property listing site using Builder Pro and Pods plugin. This detailed tutorial will walk you through from installing the required plugins to adding custom post type, taxonomy, custom fields, and building the templates. You can watch the video or follow the instruction with screenshots below.
Watch the Video
The video covers the following:
- How to install Builder Pro and Pods
- Creating a custom post type, taxonomy, and custom fields with Pods
- Creating a theme and templates with Builder Pro
- How to display the custom fields with Builder Pro
1. Required: Builder Pro
To get started with this tutorial, you need to install the Builder Pro plugin. If you already have it installed, just activate it. If you don’t have it, download it from the Member Area (a membership is required to download it) and then install it. You also need to use it with a Themify theme or the free Themify Builder plugin.
2. Required: Pods Plugin (Free)
To add the property custom post type and the associated custom fields, you would need to install the Pods plugin.
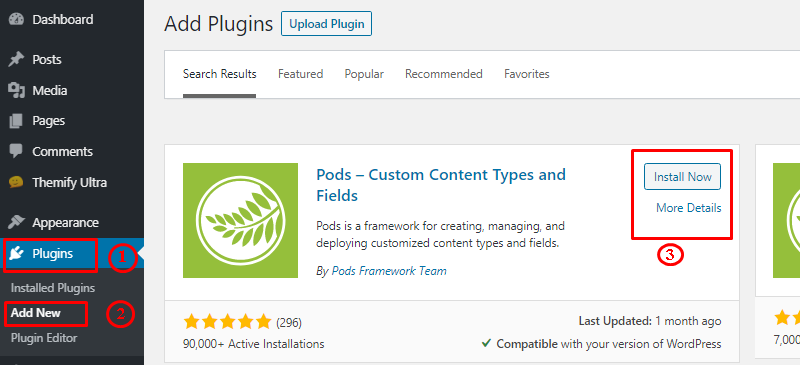
- To install the plugin, go to WP Admin > Plugins > Add New.
- On the plugins page, just search "Pods" and it should appear on the first search result.
- Then click on "Install Now" and activate the plugin to proceed as shown.
3. Adding Property Custom Post Type
After you have Pods installed, create a new custom post type called "Property" which we will use to display the property listing.
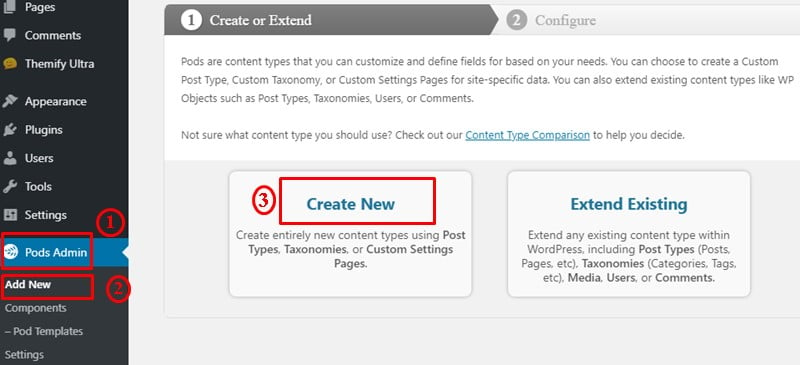
- Go WP Admin > Pods Admin.
- Then click "Create New".
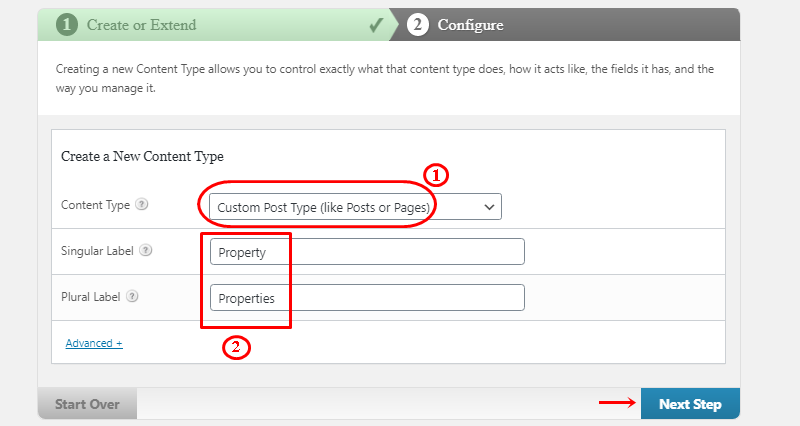
- Keep the "Content Type" selected as "Custom Post Type".
- Enter the singular and plural label for the post type as "Property" and "Properties" respectively and click "Next Step".
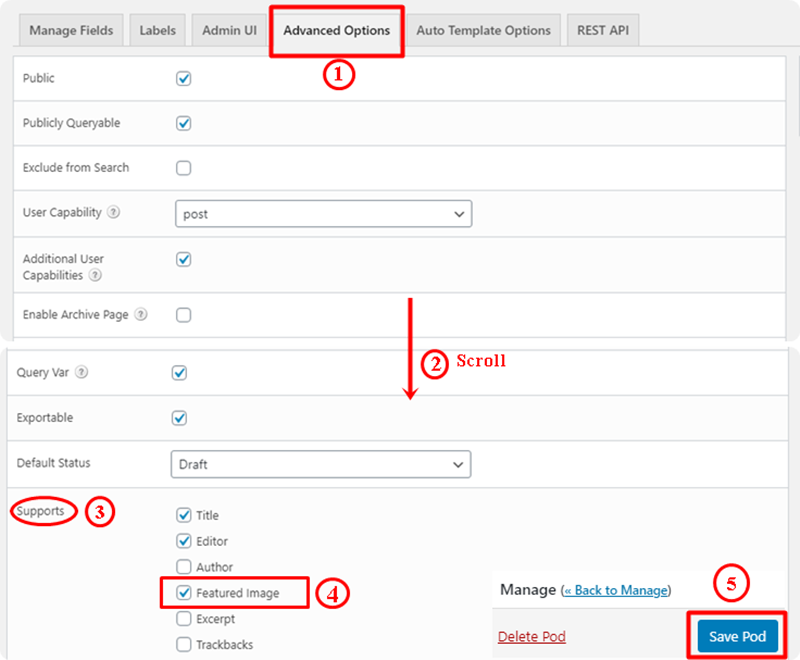
Make sure you have the "Featured Image" enabled in the property post type.
- Go to the "Advanced Options" tab, then scroll to the "Supports" section. Select the Featured Image checkbox and click "Save Pod".
4. Adding Property Custom Fields
After the property post type is added, we need to add the custom fields related to the property listing. Custom fields give unique information about the property. For this property listing site, we have the following custom fields: property size, price, bedrooms, bathrooms, and number of parking spots.
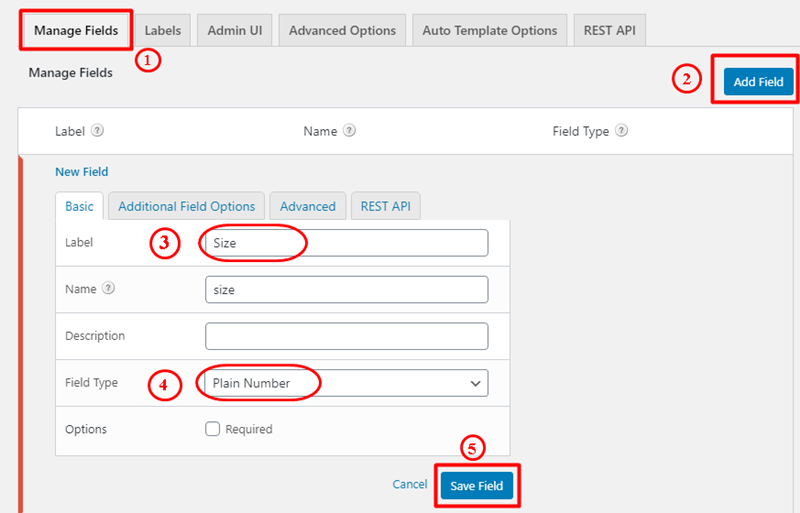
- To add custom fields: on the "Manage Fields" tab, click "Add Field".
- A form should show up. For the first field, label it as "Size" and select "Plain Number" for the field type.
- Click "Save Field" once you are done.
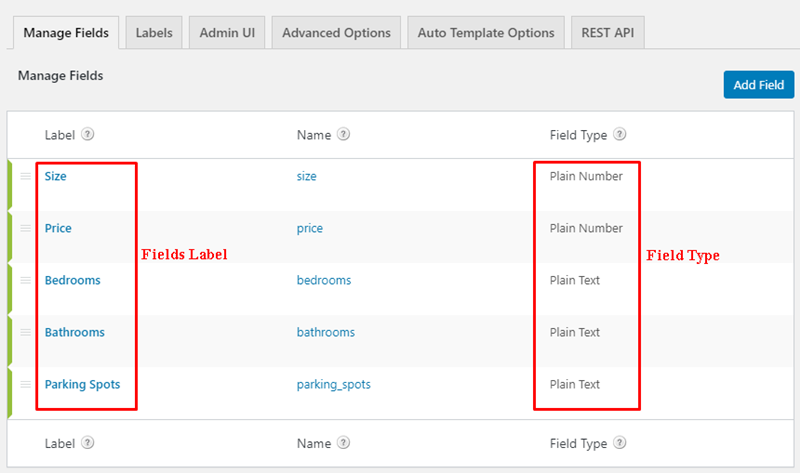
Repeat the above step to create the other fields: price, bedrooms, bathrooms, and parking spots.
- You should set the field types used in bedrooms, bathrooms, and parking spots to use "Plain Text" and use "Plain Number" in the price field (if the field value will only contain numbers, then use "Plain Number" as the field type).
- Once you’ve created all fields, click "Save Pod". You should have the custom fields as shown on the screenshot below.
5. Adding Custom Taxonomy
In WordPress, taxonomies are used to group posts that have something in common. An example of a taxonomy is a category or tag. In this step, we will create a taxonomy "Property Type" which will categorize the properties in: condo, detached, townhouse, etc.
- To create a taxonomy, go to WP Admin > Pods Admin > Add New.
- On the next page choose the content type as "Custom Taxonomy".
- Enter the singular and plural label as "Property Type" and "Property Types" respectively.
- Then click "Next Step" and save your new taxonomy.

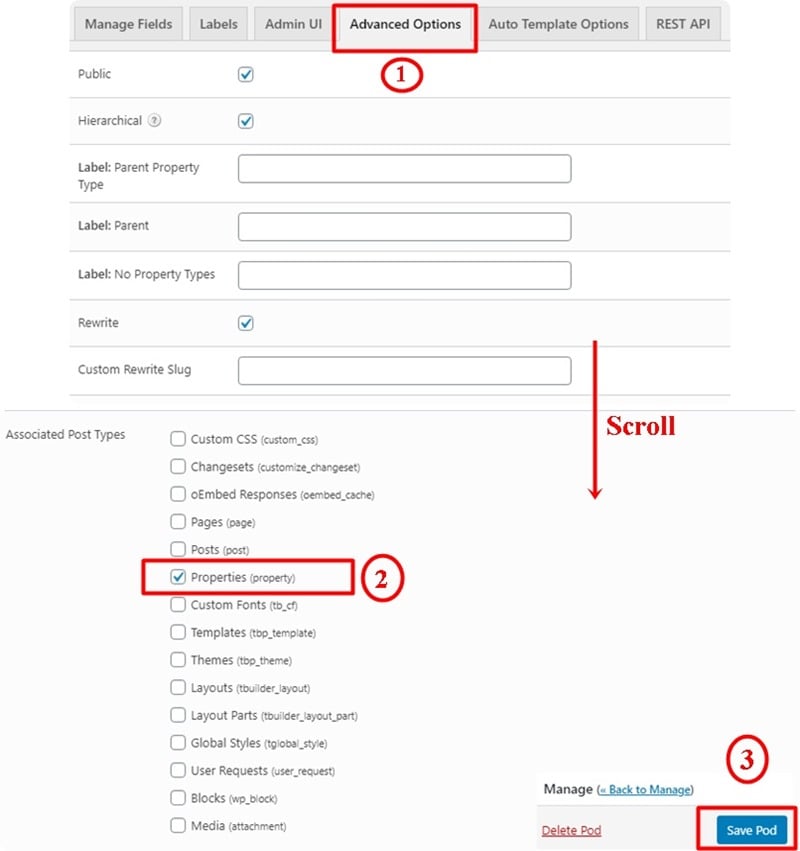
Next, you need to associate the "Property Type" taxonomy with the "Properties" post type.
- Go to the "Advanced Options" tab and scroll down to the "Associated Post Types" section.
- Select the checkbox "Properties" and click "Save Pod".
6. Adding Sample Property Posts and Property Types
Now you would need to create a sample property post and property type, so you can preview live content while editing the templates.
Lets add some sample property types first.
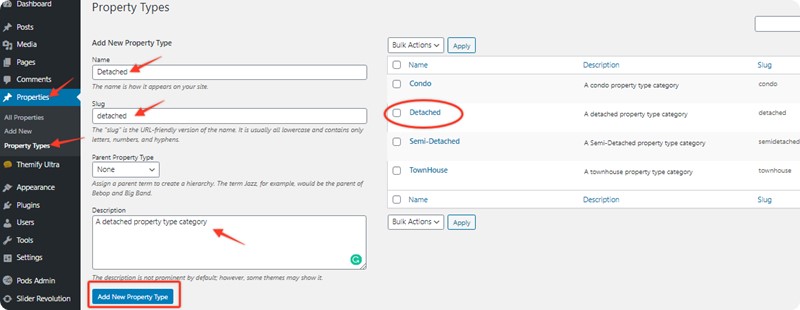
- You can do this by going to WP Admin > Properties > Property Types.
- Click "Add New Property Type".
- Enter the "Name", "Slug", and a "Description" and click "Add New Property Type".
After the property types are added, now add a sample property post.
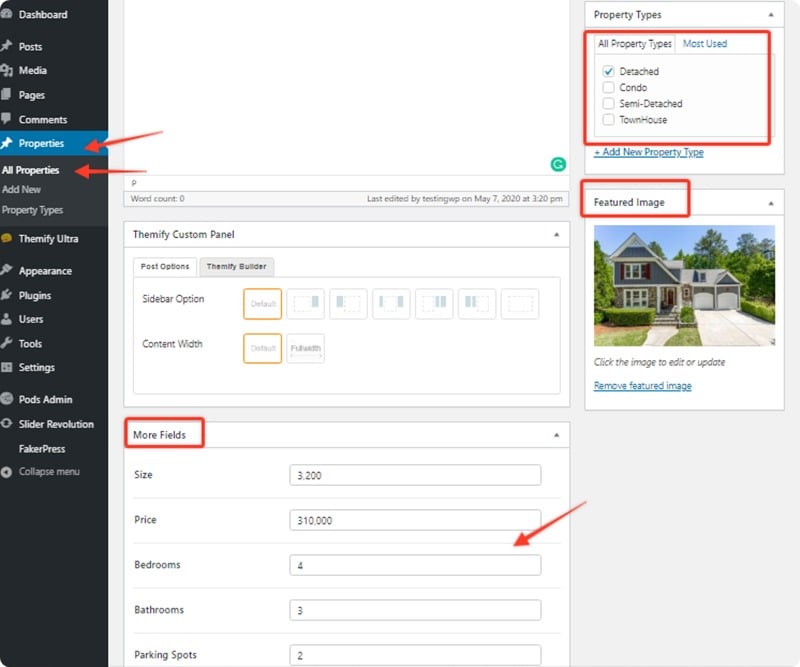
- To create a property post, go to WP Admin > All Properties > Add New.
- On the editor page, enter the Title and description in the content editor.
- On the right-side panels, select the Property Types (ie. select "Detached", "Condo", etc.)
- Upload a Featured Image.
- Scroll down to the "More Fields" section.
- Enter a value in each field according to the property.
- Once done, click "Publish"
- You would repeat the above steps to create more Property posts in the future.
7. Creating a Pro Theme
Now you've created the custom post type and custom fields, the next step is create a Builder Pro theme and templates to display them. You would need Builder Pro for this (make sure you have it activated).
Before you can add the Pro templates, you need to create a Pro theme first.
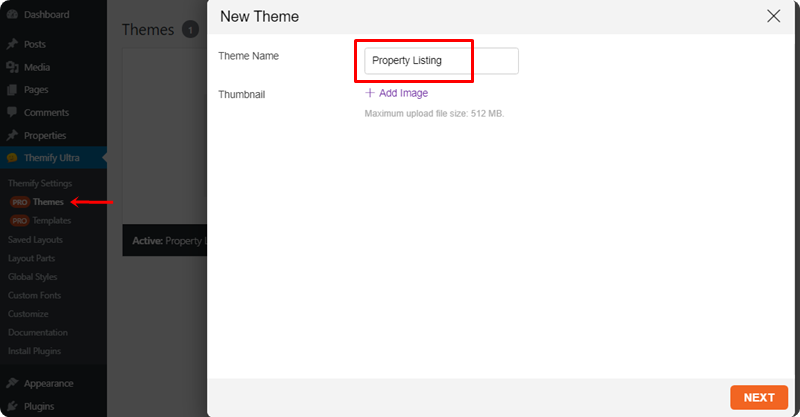
- To create a Pro theme, go to WP Admin > Themify > Pro Themes, click "Add New Theme".
- A lightbox will then appear for you to enter the theme name. Enter the name "Property Listing" and click "Next" to proceed.
- It will direct to another screen to import a predesigned theme, select "Blank" to create from scratch and click on "Activate".
8. Creating the Property Archive Template
After the Pro theme is created, we will build the property archive template first (ie. when someone visits the property type page, this template will be used to render the layout).
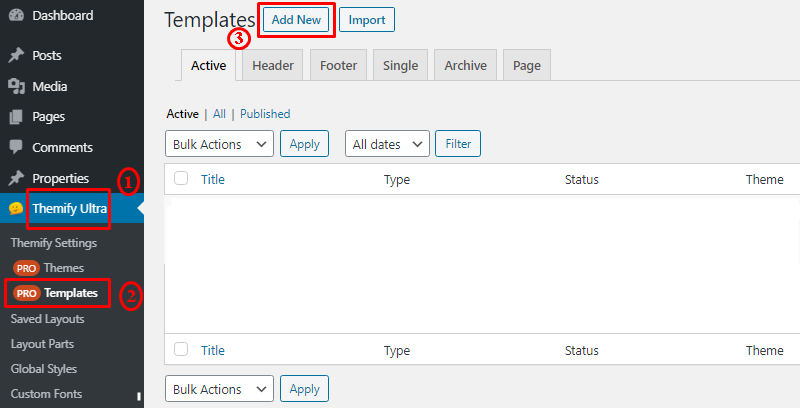
- To create a new template, go to WP Admin > Themify > Pro Templates, click "Add New".
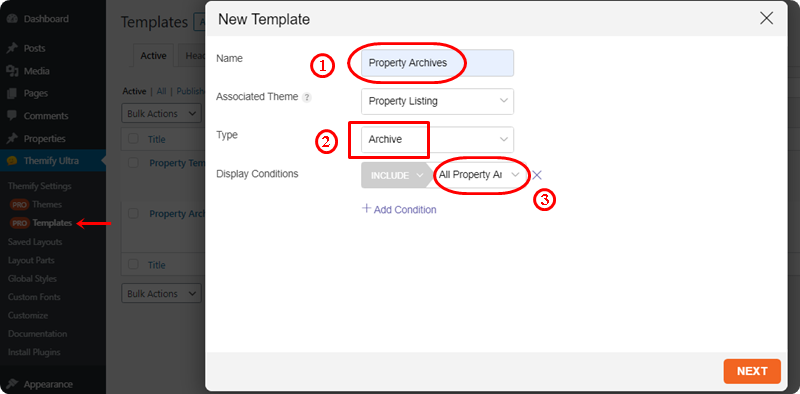
- A lightbox will appear for you to enter the template name. We named our template as "Property Archives".
- Choose the "Associated Theme" as the one you created in the previous step.
- Select the template type as "Archive" from the drop-down list.
- Change the display condition to "All Property Archives" (so this template will apply to property archives only) and click on "Next".
- On the next screen it will prompt you to import a predesigned template, select "Blank" and click "Publish".
Editing the Template
After you add a template, it should redirect you to the frontend where you can design the template.
In case you are not on the template frontend edit mode, you can always access it from the backend:
- Go back to WP Admin > Themify > Pro Templates.
- Hover on the template, and click on "Frontend" (it will redirect you to frontend and turn on the Builder).
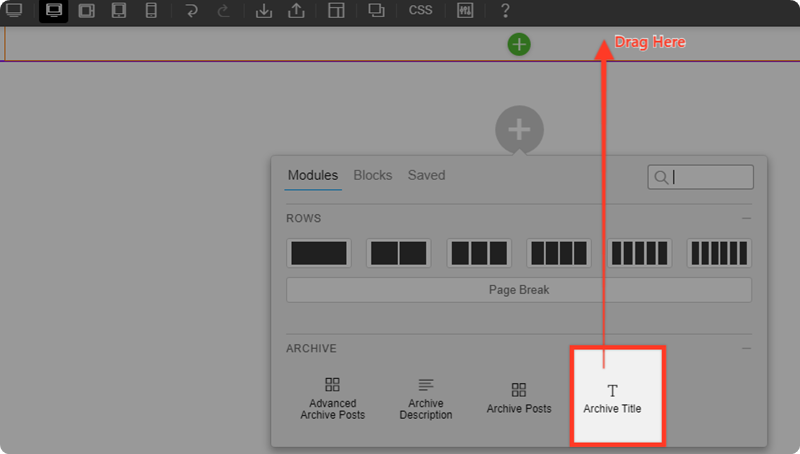
Displaying the Archive Title
Once you have the Builder on the archive template frontend, drop in an "Archive Title" module.
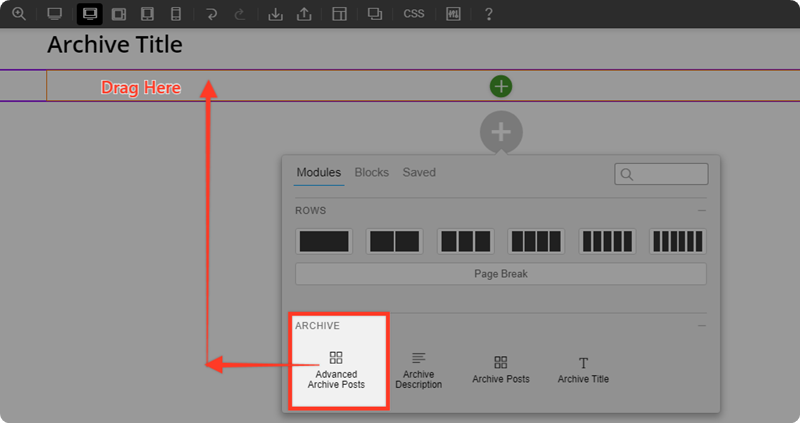
Displaying the Archive Posts
To display the property archive posts, drop in an "Advanced Archive Posts" module, then save the template for now.
Editing Archive Template with Live Content and Preview
To preview the template with live content, you can view a sample Property Type taxonomy page on the frontend and edit it.
- Go to WP Admin > Properties > Property Types, hover a Property Type and click"View".
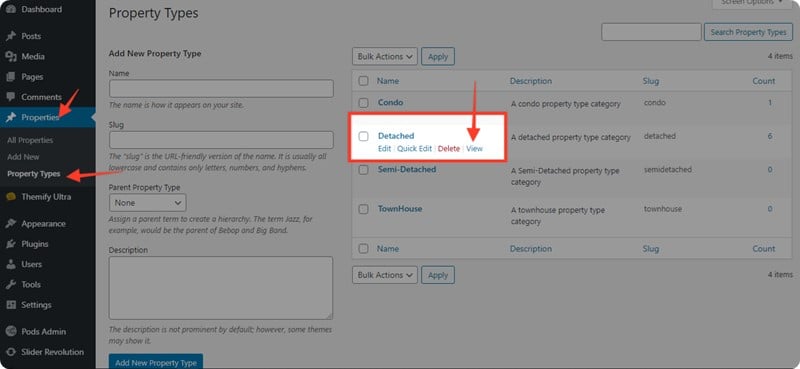
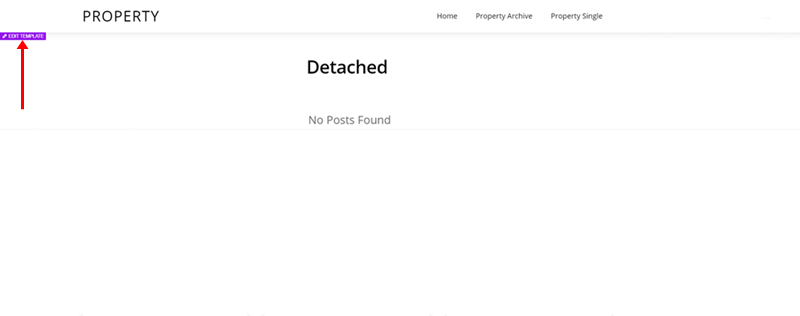
- This will redirect you to the frontend of the Property Type, hover on content area and click "Edit Template".
- It should turn on the Builder, which you can edit the template with live content (ie. it will display the custom fields you have in the property post type).
Editing the Advanced Archive Posts
In this section, we will show how to edit the "Advanced Archive Post" to display the custom fields that you added in the Property post type.
- Edit "Advanced Archive Posts" (AAP) module that you’ve dropped. It will take you to the AAP edit mode where you can design the layout within.
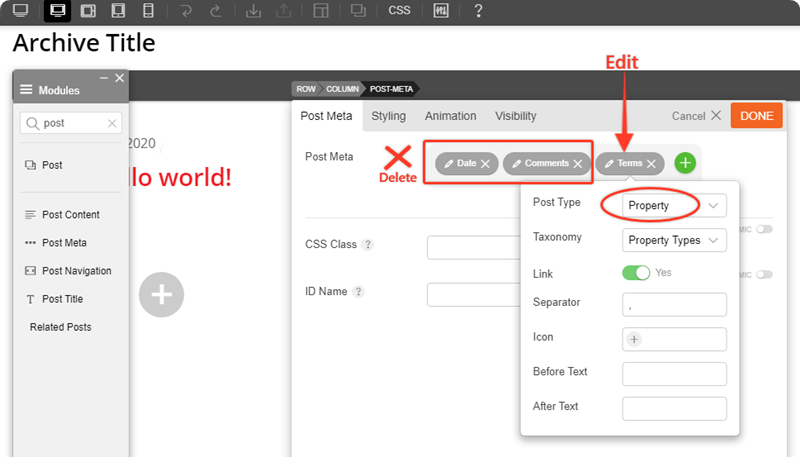
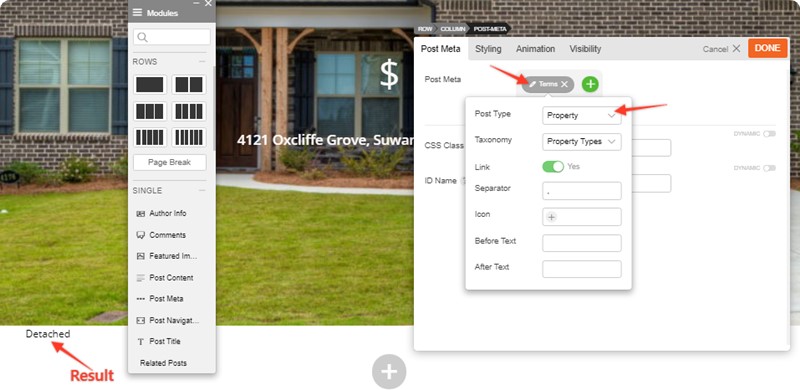
- Next, drop in a "Post Meta" module just below the Featured Image module.
- On Post Meta options, delete "Date" and "Comments". Then edit the "Terms" item and change the post type to "Property".
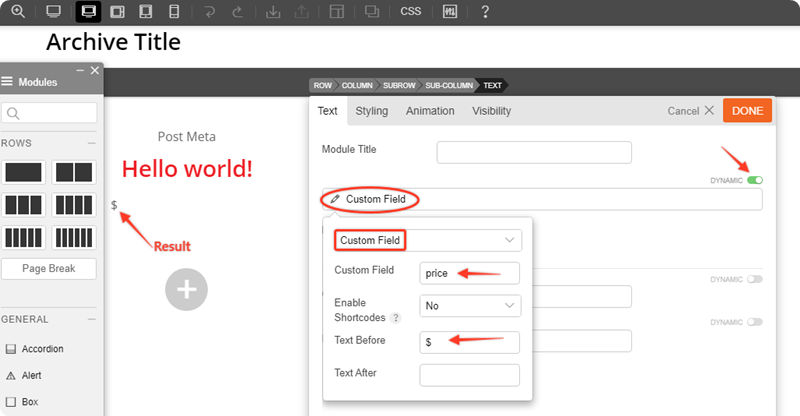
- Then drop in a Text module. We will use the Text modules to display the custom fields.
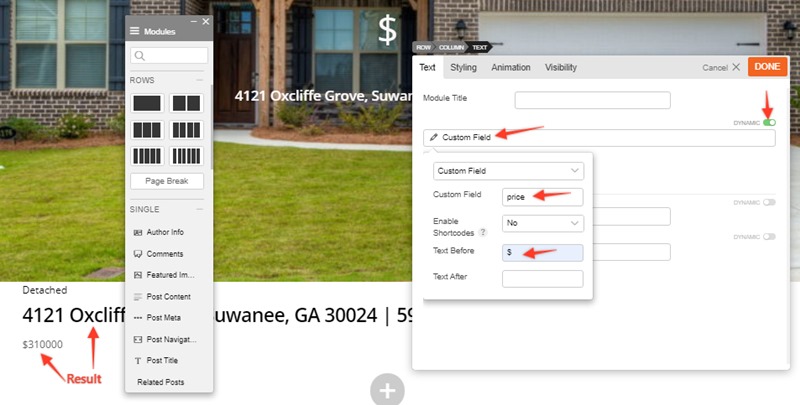
- On the Text module options, click on the "Dynamic" switch to enable it, and select "Custom Field " from the drop-down.
- Then type in the custom field name "price" (the name should match the field name you added via Pods).
- On "Text Before", enter a dollar sign ($). It will add a dollar sign in front of the field value.
- Underneath it, add two new rows with 2-column grid which will hold the other custom fields: size, bedrooms, bathrooms, and parking spots.
- To display the other custom fields (size, bedrooms, bathrooms, and parking spots), simply repeat the above steps. In other words, drop in a Text module for each field, enable the "Dynamic" option, and enter the field name of each custom field.
NOTE: This tutorial focuses on how to create the dynamic templates. If you find the layout/styling not unique, you can always use Builder to style the layout.
9. Creating the Property Single Post Template
In this section, we will create a single template (this template will be used on the property single view).
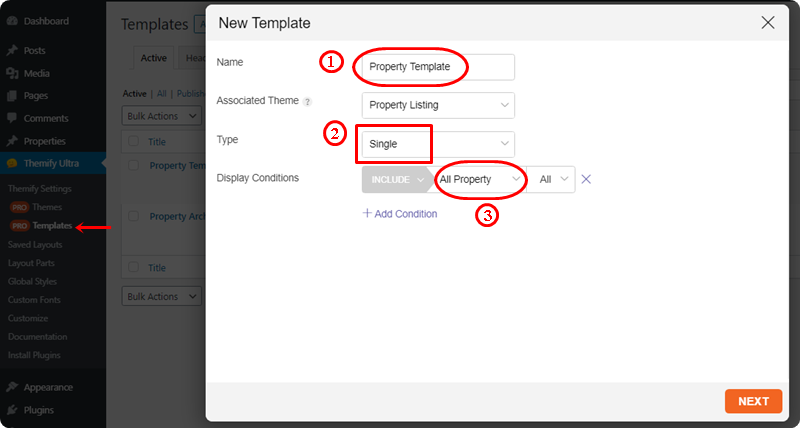
- To create a new template, go to WP Admin > Themify > Pro Templates, click "Add New".
- Name the new template (eg. you can call it "Property Single Template".
- Next, choose the "Associated Theme" as the one you created before.
- Then select the template type as "Single" from the drop-down list.
- Change the display condition to "All Property" and click "Next".
- It will then prompt you to import a predesigned template, again choose "Blank" to create from scratch and click on "Publish". It should redirect you to the Builder’s frontend page.
Displaying Featured Image as Background Image
To make the layout more interesting, we will display the featured image as background image with text elements on top of it.
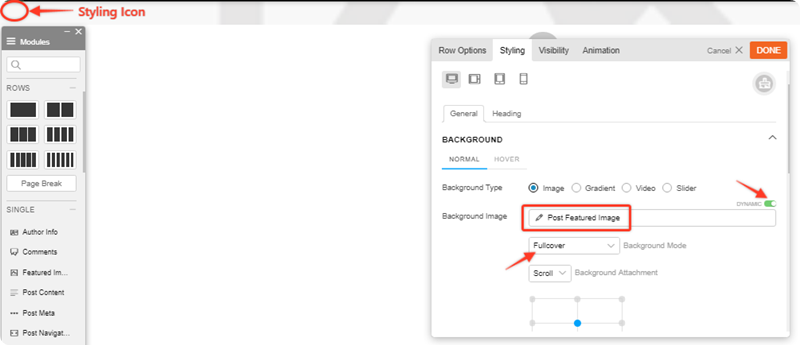
- To do this, hover on to the top row and click the Styling icon.
- Then expand "Background".
- Click the "Dynamic" switch to enable dynamic content.
- Under Background Image, choose "Post Featured Image".
- Select "Large" on the "Size" option.
- Then on the Background Mode, select "Fullcover".
Editing Single Template with Live Preview
At this point you can view a sample Property post on the Frontend to see if everything is working as expected. You should see the template is used to render the property post.
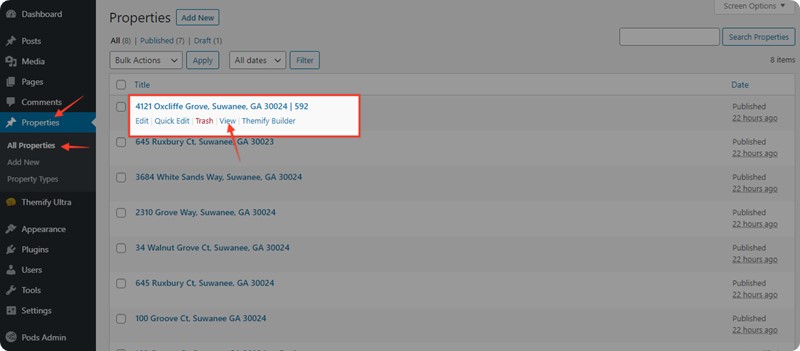
- To view a sample property post, go to WP Admin > Properties > All Properties.
- Hover the property post list and click "View" (it will redirect you to the post’s frontend).
- To edit the template, hover on the top content area and click "Edit Template".
- It should then turn on the Builder. You can continue designing the template with live preview.
Displaying the Property Price (Custom Field)
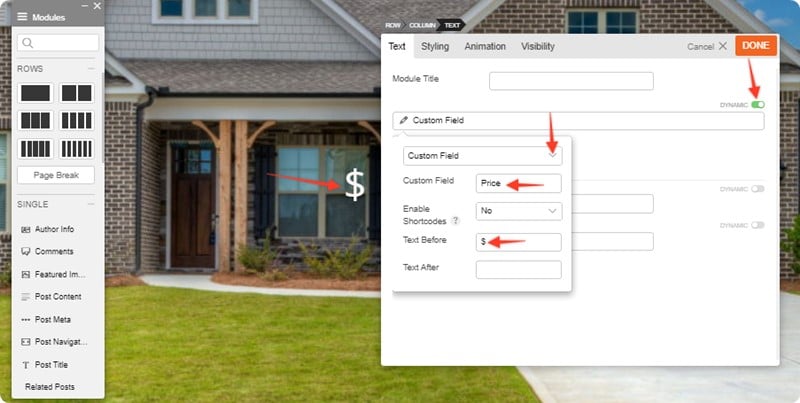
- On the row that has featured image background, drop a "Text" module for displaying the property price. On the Text module, enable "Dynamic" option.
- Select "Custom Field" type and enter "price" custom field name. Add a dollar sign in "Text Before".
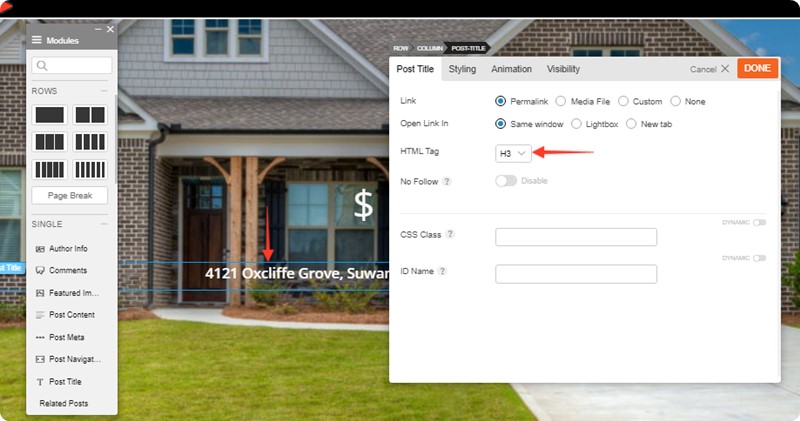
Displaying the Post Title
- Drop in a Post Title module. You can select any HTML Tag for the post title text.
Displaying the Taxonomy Link
- Add a new row below the top row that has the featured background image.
- Drop in a Post Meta module.
- Delete "Date and Comments".
- Click on "Terms" and select the Post Types as "Property", then click "Done" (this should display the property type link).
- Then drop in another Post Title module below the Post Meta module.
- Now we will display another property price below the Post Title. Add a Text module, enable "Dynamic", choose "Custom Field", enter custom field name "price" and add a dollar sign in "Text Before".
Then repeat the similar steps to display the remaining four custom fields (size, bedrooms, bathrooms, and parking spots) with an icon image to represent the data.
- Below the price field, drop a 4-column row.
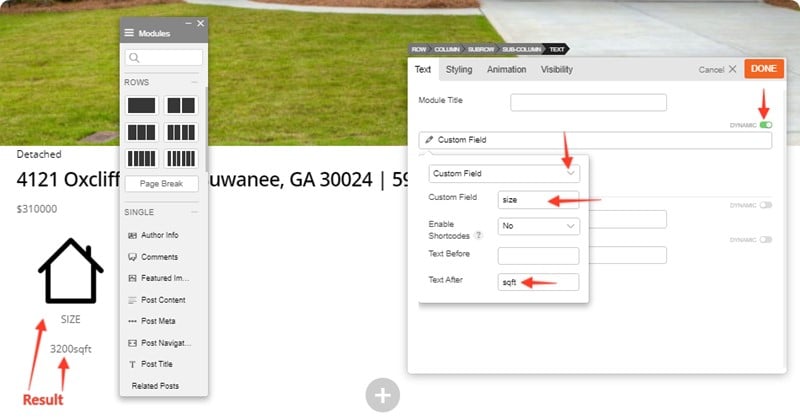
- In the first column, add a house icon using an "Image" module to represent the property size.
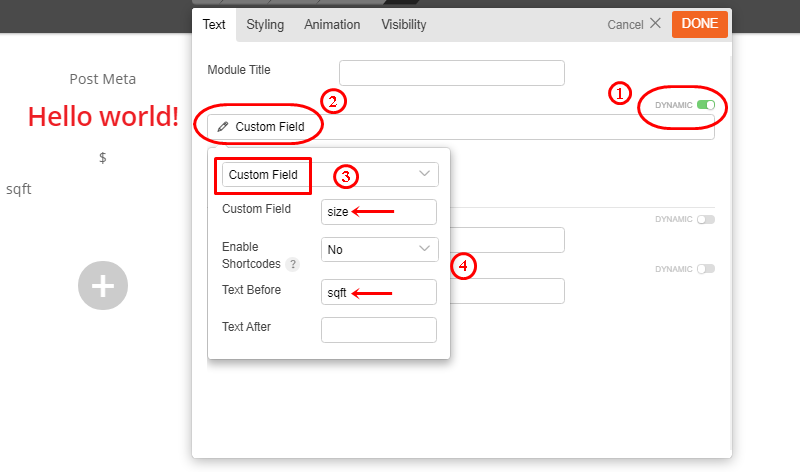
- Below it, add a "Text" module and enter "Size".
- Then add another "Text" module below it, enable Dynamic, enter "price" in "Custom Field", and add "sqft" in " Text After".
- Repeat the above steps for the other three custom fields (bedrooms, bathrooms, and parking spots).
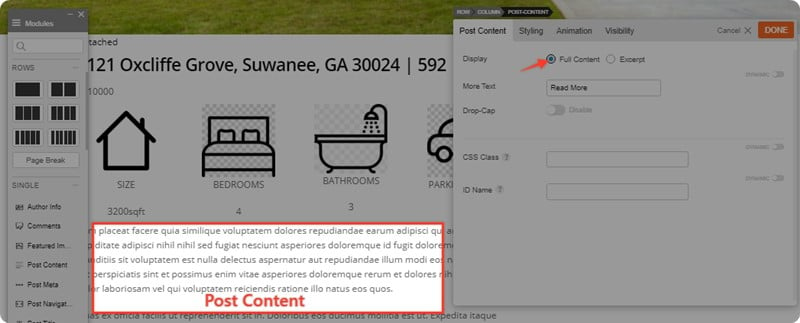
Adding Post Content
- Drop a Post Content module to display the property description.
Displaying Author’s Profile
We use the post's author information as the property listing agent profile.
- On the right column, drop in an "Author Info" module.
- Change the Layout to "Image Stack"
- To make the image circle, go to"Styling > Image > Corners", add 50px to all corners.
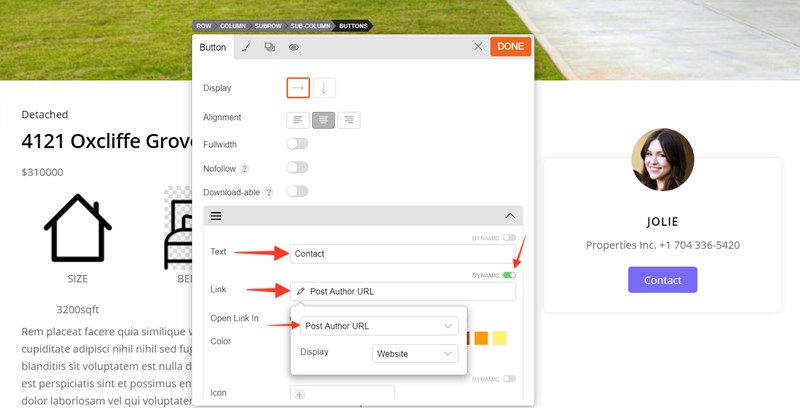
Adding Contact Button
Then add a contact button which will link to the author's site.
- Drop in a Button module.
- Enter "Contact" in the button text.
- On the button link, enable "Dynamic", then select "Post Author URL".
Wrap Up!
By following through this tutorial you should have a good understanding of creating custom post types, adding custom fields, and displaying them with Builder Pro using the dynamic content feature. This tutorial only demonstrates the basics of creating a dynamic custom post type. There are actually much more you can do with Builder Pro. In the upcoming tutorials, we will show how to create dynamic sites with PTB and ACF.
May 21, 2020 @ 1:24 pm
Great tutorial and video. Right now I use Themify PTB to build the Custom Post Types I need. Guess it works exactly the same as with Pods?
May 21, 2020 @ 2:53 pm
Thanks. Nice tutorial.
I only wonder, why to install & use pods,
& not to use Themify Post Type Builder.
May 21, 2020 @ 3:19 pm
We want to show the capability of Builder Pro that can work other custom post type plugins. We will write more tutorials on how use Builder Pro with PTB and ACF.
May 21, 2020 @ 7:06 pm
Please, i think is better option use themify plugins.
May 21, 2020 @ 7:36 pm
but like if you’re trying to build anything other than a basic site and need some more advanced settings Pods can do a lot more like “unique” validation for most text field instances, linking & creating custom REST endpoints, catching & displaying transients, and pods is FREE
May 21, 2020 @ 10:47 pm
Is there a difference between Builder and Builder Pro? Why not use the same name consistently if it is the same product? Otherwise it causes confusion, for example, does Builder Pro have more features than plain-ol’ Builder?
Also, if Builder is built into Themify themes, how come we can’t edit PTB single or archive templates in the front-end as demonstrated in this tutorial?
May 25, 2020 @ 12:52 am
Builder Pro is for designing templates and Builder is for designing content. They work hand in hand.
You can also use PTB to build the property post type and templates. We’ve picked Pods for this tutorial to demonstrate how Builder Pro can display custom fields from other plugins.
June 20, 2020 @ 10:21 pm
Looking forward on this one.
Especially the feature to use acf custom fields inside PTB and all its addons.
Anything on that?
June 22, 2020 @ 4:22 am
Builder Pro has all PTB fields integration. It does work with the basic ACF fields, but doesn’t work with some fields like gallery, etc. We will work on the ACF integration soon.
May 21, 2020 @ 3:02 pm
Thank for the tutorial Themify!!!
May 22, 2020 @ 4:42 am
Hello. Nice tutorial.
Any news on mission pagepeed?
Thank you.
May 25, 2020 @ 12:53 am
It is still in progress. Just taking a bit longer than expectation. Stay tuned.
May 26, 2020 @ 1:51 pm
Can you share the styling code?
May 26, 2020 @ 2:18 pm
I am following these instructions, but when It comes to the template pages, it’s not creating the archive page or the single page, it goes to a 404 page.
any insight would be appreciated. this tutorial is perfect for a project I am working on right now
May 27, 2020 @ 4:31 pm
I am also getting the same error. Help?
May 27, 2020 @ 6:32 pm
Frank, this issue seemed to go away for me. It may depend on you actually having a post created or flushing your permalinks/clearing your cache. I am not exactly sure how I fixed the issue lol.
June 1, 2020 @ 5:34 pm
You just need to flush your permalink. Go to WP Admin > Settings > Permalinks, just click Save button again (this will refresh it).
May 27, 2020 @ 4:49 pm
Is there a way to get the “Page Options” panel to show up for my single post template? I want a full height, transparent header for my template. The “Page Options” Panel shows up on my pages and posts but NOT my builder pro templates.
May 28, 2020 @ 7:35 am
I also had this issue, I had some dead links in my menu. When I cleared/deleted those, I was able to edit front end again. (for templates)
May 27, 2020 @ 10:21 pm
Also, not sure if this is a bug, but I noticed that when I clicked the pruple “edit template” button on my single post page the changes did NOT get inherited across all my posts in that template. Only when I actually edited the template directly from the Themify Pro Templates panel did the changes take place globally. Is this supposed to be happening?
June 1, 2020 @ 5:37 pm
This doesn’t sound right. There might be conflicts on the frontend preventing the Builder to save templates. Could you try to disable all other plugins except Builder Pro and re-check it? If you need further assistance, please contact our support team: https://themify.me/contact
June 11, 2020 @ 5:36 pm
Exactly what I was looking for. Thanks Themify for the tutorial!
June 15, 2020 @ 3:30 pm
Very detail, thank you
July 27, 2020 @ 9:38 pm
Hi !
Very nice plugin integration.
With Themify PTB, how ca we create a search form to search PTB elements (ex: find a property on the price and/or th location and/or the type etc ??
is there any expert tutorial on PTB ?
July 27, 2020 @ 9:42 pm
Sorry,
i’ve just found the PTB Search plugin !
it’s ok then !
Thank you !
August 18, 2020 @ 6:44 pm
got stuck at step 8, when i try to set up the template i dont see all property archive as an option as an option
Tried all the advise you gave on there and its not working Getting frustrated with this and leaving it for now
Happy if you can advise
I have pulled the website down once to restart and i still have the same problems
Regards
October 21, 2020 @ 8:35 pm
I am having the exact same problem and came down here for a solution. Any help would be awesome! I made mine just say archive, but then the front end would just bring me to a 404 error page.
July 26, 2021 @ 3:29 pm
Where is the “Advanced Archive Posts” – Module – This not any longer present ??
July 26, 2021 @ 4:24 pm
ok I see now its is “Advanced Posts” – Got it !
November 14, 2021 @ 3:35 pm
Hi, how can I display the listings in the homepage?
March 2, 2022 @ 6:34 pm
What if theme uses some other builder like Elementor and I still want to use themify builder with PTB ? Must I only use PTB?
March 7, 2022 @ 8:09 pm
PTB should be compatible with other builders such as Elemenator (as long you have the content enabled in the post type).
September 10, 2022 @ 5:47 am
I believe follow this method can also create different type of business directory right?
can this be applicable to create classified website?
September 12, 2022 @ 9:04 pm
Yes, you can create any directory listing sites using the same method.