
Over the past decade, blog owners on WordPress could only make money on their website by placing ads or by creating a site that specializes in affiliate marketing. Times have changed since then, and now these same blog owners are creating membership-style websites.
Instead of getting paid if someone buys one of the products you’re advertising, or by how many times they click that ad in between lines of your content, you can instead charge visitors money to view premium content. But membership sites are much more than just “paid content”. You can make your site shine with features such as online forums for members, multiple plans that grant access to additional content and information, and much more.
We’re excited to share this tutorial by our guest, Syed Balkhi, who’ll show you how to create a membership site from the ground up using MemberPress. His insight as a leading WordPress entrepreneur is sure to be extremely helpful. Every blog owner is a little different and may need to make some small tweaks to this formula, but this guide will get you started and on your way.
Interested? Keep reading!
Step 1: Picking a Plugin
After deciding to make your website a membership-based platform, you’ll have to determine which plugin you want to use on your website. Our preferred plugin for creating a membership site is MemberPress.
MemberPress is an excellent plugin for your blog because it’s easy to use, easy to install, and comes with a whole host of intuitive features that allow you to personalize your rules on-site.
Here are some of the key features:
- Create multi-tiered memberships
- Premium forum creation and support
- Super fast setup
- Set up drip campaigns with your content
- Works well with any WordPress theme
Now that we have our membership plugin established, let’s show you how to set it up on your WordPress site.
Step 2. Page Options Overview
After you’ve installed the MemberPress plugin and activate your account, turn back to your WordPress website so you can tweak some of the basic options. You can access the MemberPress options by clicking on the MemberPress button on the left side of your WordPress dashboard, then click Options from the drop-down menu.
You’ll end up on a page that looks like this:
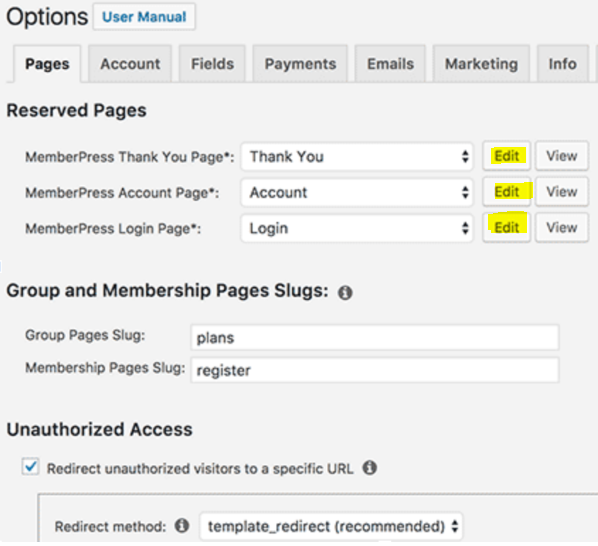
On the options page, you’ll have the ability to tweak all of the different settings for your membership site. The “Pages” tab offers a variety of options including the ability to create exclusive “Thank You”, “Login” and “Account” pages. You can edit and customize these pages to reflect your brand or service.
Below that, you can set up the default page that unauthorized users will land on if they try to access any of your membership content. This is a great opportunity to redirect them to a page that explains the benefits of signing up. and you could use this option to offer them a discount since they were curious enough to click the link to the exclusive content.
Step 3: Establish Payment Methods
The next step involves establishing payment methods so that readers can subscribe to your membership site. While still on the options page, navigate to the Payments tab. You’ll see a screen similar to this:
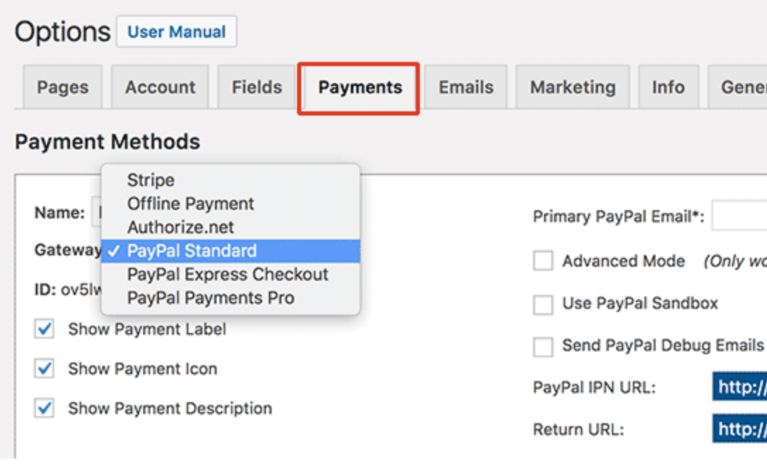
You can create multiple ways to accept payments from customers. MemberPress works with two of the biggest ways to accept money online -- Stripe for credit card payments and Paypal for everyone else.
Start by naming your payment method, then select the gateway you’d like to set up first. We used PayPal in this example since PayPal is one of the most common ways to purchase products or services online. After you’ve established your first payment method, you can add a second method by clicking the “Add” button at the bottom of the Payment Methods tab.
Step 4: Create Membership Tiers
At this point, you’ve installed MemberPress, tweaked the page settings, and set up your payment portals. Now it’s time to create your different membership tiers. In many cases, blogs will use a three-tier system like bronze, silver, and gold memberships.
Creating your own membership tiers is a breeze. Click on the MemberPress tab on the left side of the screen on the WordPress dashboard and click the very first option, which reads “Memberships.”
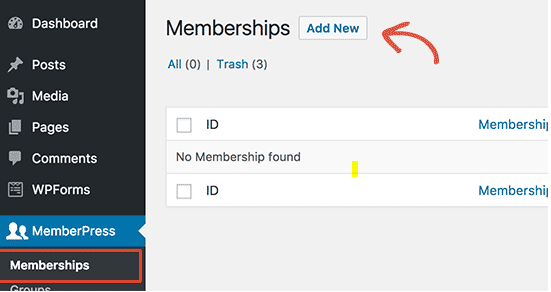
Your Memberships page should look a lot like the one above. You can create a new membership level by simply clicking Add New. Clicking the Add New button will bring you to the next page.
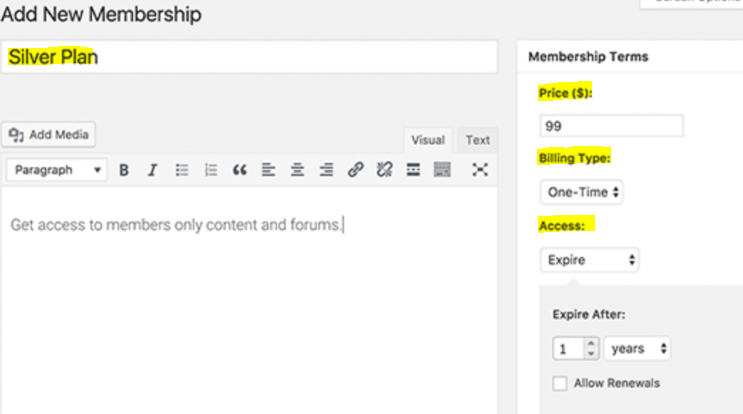
Start by naming your plan where the Silver Plan is highlighted. If you like standard bronze, silver, and gold format, you don’t have to change the title. However, some people like naming their tiers relative to their niche. For example, if you operate a blog that features gardening content, you may want to redesign your tiers as seed, sapling, and flower.
After you’ve named your tier, look at the right side of the page. Here you’ll be able to establish the price of the membership and the billing type. The price you charge is going to vary greatly depending on your niche and how much time you plan on devoting to your website. As for billing types, most membership websites charge annually or monthly.
Finally, establish what will happen to their access after their subscription expires. In this case, we set it to expire so that they cannot access the content without a subscription.
Step 5: Create Content Rules
The next step in this process is to decide which content you want to gate off from everyone except for subscribers. You can choose which content stays behind the paywall by clicking on the MemberPress button on your WordPress dashboard, then click Rules.
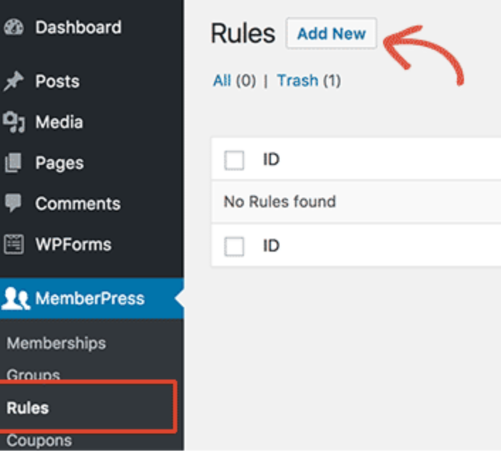
Click “Add New” to create a new rule for your content.
Here’s an example we used to gate content off from non-member customers easily. When you create a piece of content that you want to be available only to your members, add the tag “Paid” to the piece of content. To make sure that the content stays gated from everyone except for members, you need to create a rule that redirects anyone not signed in
After you click “Add New” you’ll land on this page:
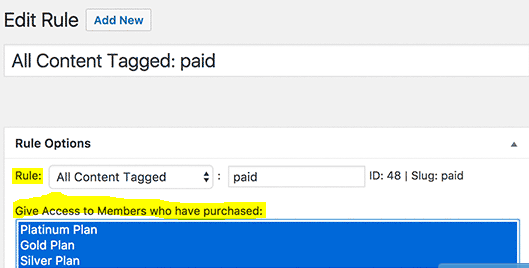
As you can see, we established a rule that If the content is tagged with the word paid, it’s only available to members who have purchased any of the three plans. You can tweak this further by creating high-level content only available to platinum and gold members, or give exclusive access to dripped content depending on the subscription level. The possibilities are endless, and you’ll have full access to creating all the rules you need to operate a membership site.
Step 6: Add a Login Page
Your membership website may be hard to navigate without a proper login page. It’s crucial that you add this aspect to your blog so users can check out your content without getting confused while attempting to login.
If you look back to your WordPress dashboard on the left side of the page, you’ll see an Appearance option. Click Appearance, then select Widgets from the drop-down menu. This will bring you to a page with all of the current widgets you have on your website.
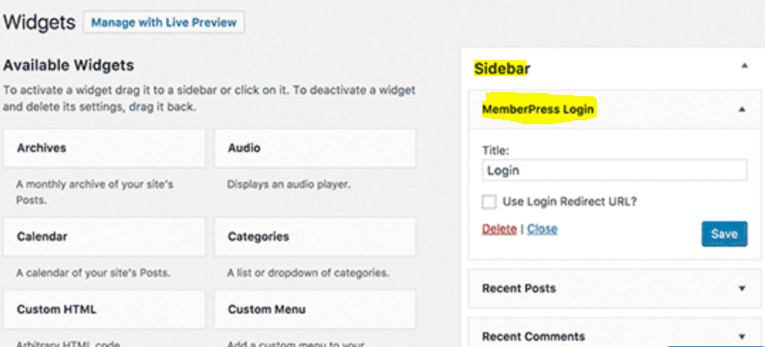
Click on the “MemberPress Login” widget and add it to your sidebar. Now, when a user creates an account, they will be able to sign in and view the premium content you’ve created. Click save to finalize the changes.
Test Your Work & Conclusion
Now that you’ve set up the basics of your membership site make sure you log out of the WordPress admin page and go to your website as if you were a new reader looking to subscribe. Run through the process to make sure that everything is working the way that you anticipated. You may need to make a few tweaks to get it just right.
As members sign up for your membership site, you’ll be able to track your data on the MemberPress plugin and with a Google Analytics tool like MonsterInsights. If you combine this data, you’ll be able to see what kind of content is getting traffic, and what content people are ignoring.
There is a ton of work that goes into creating a successful membership site with a range of excellent content. It’s going to take some time to make money off of your blog, but the sense of pride and freedom you get from making money off of your blog is unmatched. Make sure you’re always listening to customer feedback and evolving your content, so annual premium members become lifelong customers.
Thanks for reading! For more WordPress help, check out our tutorials that range from the basics, to even harder tasks such as coding best practices. If you are looking for more free membership plugins, check out the post at Wild Apricot.
About the Author
Syed Balkhi is the founder of WPBeginner, the largest free WordPress resource site. With over 10 years of experience, he’s one of the leading WordPress experts in the industry. You can learn more about Syed and his portfolio of companies on his website, or by following him on Twitter.
July 24, 2019 @ 9:08 pm
I need some help getting “workout day” and “workout calendar” in my dashboard that comes with memberpress. I am building out a new site for a client based on his old platform and these are the last two functions I am missing that he really needs. any help?