
We’re excited to be sharing a new tutorial from a guest, Dr. Arnold Robinson III. We’ve previously featured him in a Customer Story, and as a Digital Marketing professor and expert, he's a great resource we can all learn from. For this tutorial, we’ll be learning how to optimize your photos for SEO (Search Engine Optimization) purposes.
This is important because search engines, like Google, use the keywords you include on a blog post to find and rank your content on the internet. If you optimize your site for better SEO, you will be ranked higher, and receive more organic traffic from search engines. More traffic to your site means more visitors reading your content, and could result in more sales or advertisement profits.
Follow the tutorial below to boost the success of your site, and don’t forget to add an SSL certificate to rank higher in Google searches.
Before We Begin
The nice thing about Themify is that it gives you easy-to-implement layouts and skins that you can use to get your websites up and running. But once you get your layouts set, you will need to swap out the Themify provided images for your own.
There is a right way and a wrong way to upload images. If you upload images the wrong way then you can slow your website down and hurt your SEO efforts. If you upload SEO optimized images you can really help your website to rank higher in the search engines and increase the performance of your site.
Dimensions
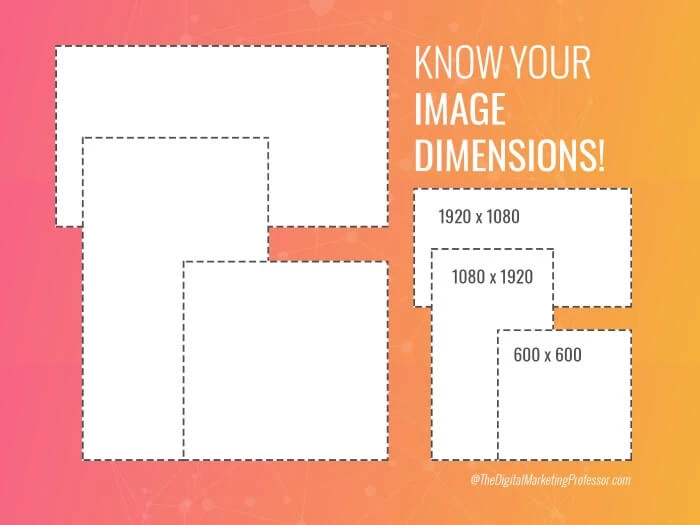
The first thing you need to do before you upload an image is to make sure you are using the correct dimensions. The dimension of an image is the actual size of the image and how big it will appear on your website. One common mistake I see is that people will upload these huge images into their websites when they only need the image for a tiny thumbnail.
These huge images have huge file sizes and anyone who visits your website will have to download that image in order for it to show. Large images can be 1,2,3MB or larger. What if your user is visiting your website on a 3G phone? It will take them forever to download just that one image before the website loads.
You have to know your dimensions. The only images that should be over 1000px on your website are hero images and header images. If you are serving the image at 400 x 400 on your website then that should be the size of the file you upload.
Lossless Compression
Since large images have the potential to really slow your website down, the next thing you need to do before uploading an image is to compress the image so that the file size of the image is reduced as much as possible. When you losslessly compress an image, the image will look exactly the same and be the exact same size, but will have a much smaller file size.
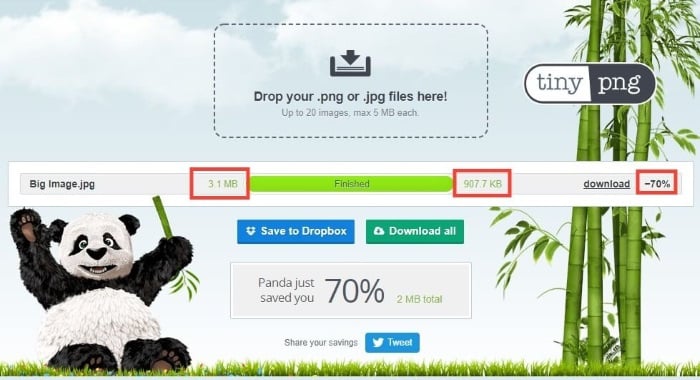
My go-to tool for lossless compression is TINYPNG. You can scan an image for free in TINYPNG and you will get the image back at 50% compression or more most of the time. I do not put an image on a website without first compressing it with TINYPNG. This tool is especially helpful with hero images larger than 1MB that can end up being 300kb or smaller.
In the image below you can see how I reduce a very large 3.1MB image down to less than 1MB with TinyPng. This is a 70% reduction in file size!
Naming Your File
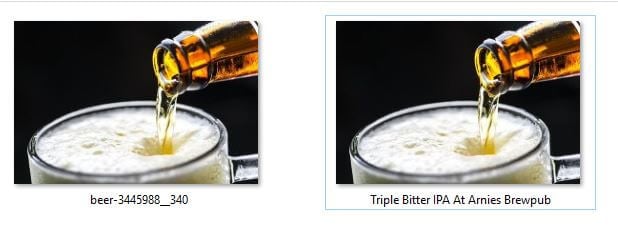
The last thing you should do before you upload an image is to give it a descriptive file name. Never Upload a file with a non descriptive name like beer-3445988__340.jpg. If you upload a picture of a beer at your Restaurant then you should name the image Triple Bitter IPA At Arnies Brewpub.jpg. (It is okay to have spaces in the image title. Your computer and WordPress will figure it out).
The advantages of naming your files are many. But it helps Google to know what your image is, It helps your image to come up in the Google image searches, and it helps to add keywords into your website which is good for both SEO and even quality scores from Google Ads.
Uploading the Image
When you upload your optimized and aptly named image file into WordPress you need to do one more step. You need to enter the label for the Alt Tag of your image. Alt tags are how webmasters let Google know what the image is.
Google used to not be able to read images and alt tags were critical. With machine learning Google is getting better at reading images but alt tags still act as a signal to Google that you are taking the time to put quality information onto your site.
If you took the time to enter a descriptive file name, then you can simply copy the title into your alt tag.

SEO Optimized Images!
Now you will have SEO optimized images that you can use for your website. It may seem a little tedious to do all these steps but once you get into the habit of it, it is usually only about 45 seconds per image. I never skip the optimization of images and my websites always do well in most search engines.
To summarize everything into one quick list, you need to:
1. Reduce your image to the correct dimensions that you will need for your website. If you don't know then try to get it as close as possible.
2. Compress your image with TINYPNG.
3. Give your image a descriptive name.
4. When uploading, make sure you give your image an Alt Tag.
Thanks for reading our guest tutorial post, and a big thank you to Dr. Arnold Robinson III for his informative insights! His website, The Digital Marketing Professor is also a great resource for other Themify, WordPress, and digital marketing related tutorials and tips.
If you need a little more WordPress help, our foundational tutorials are super useful and cover all the basics. Let us know what other topics you'd like us to cover in the comments below!
April 9, 2019 @ 4:37 am
Hello
Thank you so much for this topic
It was really useful
May 1, 2019 @ 4:48 pm
Hi
My photos based wordpress website hdwpsite.com is using themify ultra theme
Any advice for my website?
May 2, 2019 @ 5:24 pm
amazing article… best way to teach us…..
August 30, 2019 @ 9:30 am
Have you tried the squoosh app by google? Browser based and seamless value