Search Results for: top

Themify First Anniversary = Biggest Sale Ever!

first anniversary

We are very excited to announce that today marks our first anniversary. To celebrate this big day, we are running the biggest promotion ever starting from today till Sunday August 14th, 2011. Enter coupon code "happybirthday" to get 50% off any theme. On top of that, we are throwing in an all-theme Anniversary Pack for just $69. The Anniversary Package includes all current themes (18 themes in total) along with the Photoshop files. As a bonus, we will add the upcoming Tisa theme to the Anniversary Pack. A normal Developer Club is $150 plus $20 monthly recurring fee, but this Anniversary Pack is a one time flat $69. So don't miss out on this great opportunity to save! You can either use the 50% "happybirthday" discount code to get individual theme or buy the Anniversary Pack to get all themes (18 themes + 1 upcoming) for just $69. Note: the coupon code can not be applied to the Anniversary Pack. Hurry, the Anniversary Pack is a limited time offer up till August 14th!

Great Opportunity to Make Extra Cash!

If you are on our affiliate program, don't forget to spread out the words. If you haven't joined our affiliate program yet, don't miss this chance to make some extra money. We pay 30% commissions on every sale referred by affiliates.

Read More

Creating Theme Skins

Notes:

It is recommended to use child theme instead of skins because skin folders might be overwritten when reinstalling the theme. This tutorial is for documentation purpose. Please create a child theme instead if you intend to create a skin.

Adding Skins

The process of adding skins is very similar to creating custom WordPress themes. You need a style.css and a screenshot.png (optional).

Step 1

Create a new folder in the theme's skin folder at theme > skins.

Step 2

Create a new style.css in the skin folder. Then in the style.css, add the follow code at the top:


/*
Skin Name: My Custom Skin
*/

Step 3

Create a screenshot.png in the skin folder (optional). The skin should now be available within the framework under the Skins tab.

Removing Skins

To remove a skin, simply delete the folder.

Read More

Child Theme

WordPress child theme allows you change the functionality of the theme without having to edit the original/parent theme template files. If you need to modify any template file, we recommend to create a child theme instead of editing the theme template files. Since the child theme is stored separately, you don't need to redo the changes next time you upgrade the theme. Coding child themes requires some basic computer skills (ie. creating PHP files, uploading files, and modifying code).

How Child Theme Works

Basically once the child theme is activated, WordPress will look for the template files in the child theme folder first. If the file doesn't exist in the child theme, it will fallback to the parent theme folder. In other words, if there is a "header.php" in the child theme, WordPress will use that "header.php", else it will use the "header.php" file in the parent theme.

Child Theme Generator

If you are using a Themify theme, you can generate a child theme automatically. To generate a child theme: with a Themify theme activated, go to Themify > Update > Child Theme, click "Generate Child Theme".

The child theme generator will create a child theme with the following files:

  • functions.php = Use this file to add custom PHP functions
  • style.css = For adding custom CSS
  • child-theme-scripts.js = For adding custom Javascript

Child theme generator

Creating a Child Theme Manually

Step 1: Create a new child theme folder

  • To start a child theme: on your computer desktop, create a new folder (eg. "themify-ultra-child")

Step 2: Create the child theme style.css

  • In the child theme folder, create a new CSS file in the child theme folder and name it style.css.
  • Paste the sample code below in the style.css file and change the theme name and template name as instructed below.

/*
Theme Name: Themify Ultra Child
Description: Child theme for Themify Ultra
Author: Themify
Template: themify-ultra
*/

/* write custom css below */
  • Theme Name (required) = use the parent theme name + child to make it easy to identify (eg. "Themify Ultra Child")
  • Description  (optional)= you may enter any text here
  • Author  (optional) = your name
  • Template  (required) = name of the parent theme folder (in this case, it is "themify-ultra")
  • Then you may add any additional custom CSS as you want in the child theme style.css (optional).

Step 3) Installing/activating The child theme

  • Once you have the child theme done, zip it (eg. it should be compressed as "themify-ultra-child.zip")
  • Login to your WP Admin, then go to Appearance > Theme, install the child theme zip (the same way as installing a WordPress theme), and then activate it.
  • NOTE: Make sure the parent theme is installed (ie. if the parent theme is "Themify Ultra", make sure it is installed in your WordPress site).

Download Sample Child Theme

You may download a sample themify-ultra-child.zip theme as a child theme starter. If your parent theme is not Ultra, then extract the child theme zip and change the "Theme Name" and "Template" in the style.css file.

Child Theme functions.php File

If you need to add custom PHP functions, create a 'functions.php' file and store it in the child theme folder (only add functions.php file if you need it). You only need to create the functions.php file if you need to add or modify the theme functions such as enqueuing/dequeuing scripts. Below are some samples that you can do with the child theme's functions.php file.

Remove Default Theme Google Fonts and Add Custom Google Fonts

The following function will remove the Google Fonts added by Themify theme and then add your own custom Google Fonts. The code will add "Cormorant Garamound" font with variants 400, 400 italic, 700, 700 italic and "Raleway" font with variants 400 and 700. Note: do not add space in between the variant comma separator, else the variants won't load.


/** Disable all Google fonts loaded by Themify */
add_filter( 'themify_theme_google_fonts', '__return_empty_array', 99 );

/**
 * Add custom Google fonts to load
 *
 * @return array
 */
function custom_themify_google_fonts( $fonts ) {
	$fonts[] = 'Cormorant Garamond:400,400italic,700,700italic';
	$fonts[] = 'Raleway:400,700';
	return $fonts;
}
add_filter( 'themify_theme_google_fonts', 'custom_themify_google_fonts', 100 );

Remove Parent Theme CSS Files

Lets say you don't want to use any styling from the parent theme, so you can code your custom styling in child theme style.css, below is the snippet to dequeue parent style.css and header CSS files.

function custom_disable_parent_stylesheet() {
	if ( class_exists( 'Themify_Enqueue_Assets' ) ) {
		Themify_Enqueue_Assets::remove_css( 'theme-style' );
		Themify_Enqueue_Assets::remove_css( 'ultra-header' );
	}
}
add_action( 'wp_footer', 'custom_disable_parent_stylesheet', 19 );

Add admin.css File in Admin


function custom_child_admin_stylesheet() {
	wp_enqueue_style( 'child-admin-style', trailingslashit( get_stylesheet_directory_uri() ) . 'child-admin-style.css' );
}
add_action( 'admin_enqueue_scripts', 'custom_child_admin_stylesheet' );

Remove Themify Admin Sidebar Menu Links


function custom_menu_page_removing() {
	remove_submenu_page( 'themify', 'customize.php' ); // Customize
	remove_submenu_page( 'themify', 'themify_docs' ); // Documentation
	remove_submenu_page( 'themify', 'more_themes' ); // More Themes
	remove_submenu_page( 'themify', 'themify_recommended_plugins' ); // Recommended Plugins
}
add_action( 'admin_menu', 'custom_menu_page_removing', 100 );

Remove Themify Updates and News Widget on Admin Dashboard


function custom_remove_dashboard_widgets() {
    remove_meta_box('themify_news', 'dashboard', 'normal');   //Themify News 
    remove_meta_box('themify_updates', 'dashboard', 'normal');   //Themify Updates 
}
add_action('admin_init', 'custom_remove_dashboard_widgets');

Output Custom Meta <title> Tag

By default, WordPress uses the site/page/post/archive title for the <title> meta tag. You can use third party plugins such as Yoast SEO to customize the title meta tag output. But if you prefer not to use a plugin, below is a sample snippet to change title meta tag. NOTE: make sure you don't have any SEO plugin activated (eg. Yoast SEO), else the plugin might override the function.


function custom_document_title_parts( $title_parts ) {
	if ( is_home() || is_front_page() ) {
		$title_parts['title'] = 'My custom home title';
		$title_parts['tagline'] = 'My tagline';
	}
		return $title_parts;
}
add_filter( 'document_title_parts', 'custom_document_title_parts', 10000 );

Advanced/Optional: Overriding Parent Theme Template Files

Overriding template files is intended for developers who have PHP and WordPress coding knowledge. It is only required if you need to override the parent theme template files. If you are not sure how to do this, consult a developer.

To override the template files in the parent theme, open the original template file and save a copy to the child theme folder with same file name and folder structure. Basically, the file structure has to match with the parent theme.

For example:

  • let's say you want to edit the loop.php file in the parent theme and it is stored in the "includes" folder
  • open the loop.php file and save a copy in the "includes" folder of the child theme
  • edit and save the loop.php in the child theme

For another example:

  • let's say you want to edit the page.php
  • open the page.php file and save a copy in the child theme
  • edit and save the page.php in the child theme

Here are some of the template files that you can override:

  • header.php
  • footer.php
  • index.php
  • single.php
  • page.php
  • sidebar.php
  • includes/loop.php
  • includes/slider.php

Child Theme Relative Folder Path

The child theme style.css is dynamically compiled into the Themify concate.css file during live page rendering. If you are adding a relative image path in your child theme style.css, the image files must be stored in the 'child_theme_folder/images' folder, as shown in the CSS below. Our framework will automatically convert the relative image path to an absolute path in the concate.css file. The same applies to custom font files, which should be stored in the 'child_theme_folder/fonts' folder.


.selector {
	background-image: url("images/bg-image.jpg");
}

How Customize Data Works

Note Customize data is associated to the activated theme (ie. when you switch to another theme, the Customize options will be different). To carry the Customize data from one Themify theme to another Themify theme, use the Customize's Export and Import feature located on the Customize panel).

Also note that the activated child theme is considered as a separate theme. If you see your Customize data is gone after activating a child theme, don't panic. Simply export the Customize data with the parent theme activated, then switch to the child theme and import the Customize data.

Read More

Suco

Installing the Theme

To install themes with the WordPress theme uploader:

  • Download the "theme.zip" file from the Member Area
    • Note: some browsers (eg. Safari) auto extract zip files automatically. Right-click on the download link and select "Save Linked File As". This will allow you to download the theme as a zip file.
  • Login to your site's WP Admin.
  • Go to Appearance > Themes.
  • Click on the "Add New" button, then click on the "Upload Theme" button
  • Upload the theme.zip file (note: it is the theme.zip, not the theme-psd.zip that you just downloaded from the Member Area).
  • Activate the theme

how to properly install your theme

FYI: You can also install themes with FTP method. Read the Installing Themes tutorial for more info.

Demo Import

If you are starting a fresh site, importing the demo content will help you understand how the theme demo is built. The Demo Import feature will import the contents (posts, pages, comments, etc.), Themify panel settings, menus, and widgets setup from our demo to your site. You can erase the demo content afterward.

To import the demo setup:

  • Go to WP Admin > Themify > Settings > Demo Import and click "Import Demo" button.
  • Note that the featured images will be replaced with an image placeholder for copyright reasons.

To erase the demo setup:

  • On the Demo Import tab, click on the "Erase Demo" button which will then remove the demo content.

FYI: If the Demo Import does not work on your site, you can use the WP Admin > Tools > Import tool to import the demo content manually.

how to import demo content

Site Logo & Tagline

To display a logo image instead of the site name text:

  • Go to WP Admin > Appearance > Customize > Site Logo and Tagline.
  • Under "Site Logo", select "Logo Image" radio button.
  • Upload a logo image.
  • Specify the logo image width and height.

How to add your own site logo on your site

You can also change website Tagline from here:

  • Go to WP Admin > Appearance > Customize > Site Logo and Tagline.
  • Scroll down and under "Site Tagline" select "Text" radio button.
  • Enter your site Tagline.
  • Click "Save & Publish".

How to add a tagline on your site

Main Navigation Menu

To create a custom navigation menu:

  • Go to WP Admin > Appearance > Menus.
  • Click on "create a new menu" to create a new menu (eg. Main Menu).
  • Add the menu items from the left panels.
  • To create a dropdown menu: drag the menu item towards the right (the item(s) will be indented).
  • When you are done adding the menu items, click "Save Menu".
  • To assign menu locations:
    • Scroll down to the bottom where it says "Theme locations" and tick the menu location checkbox.
    • Main Navigation = main menu on the header
    • Footer Navigation = footer menu on the footer (Note: some themes might not have Footer Navigation).

TIPS: You can display menus on sidebar widgets, remove the main menu, create empty links, and lightbox links. Read Custom Menus for more detailed tutorial.

create custom menus for each page on your site

Step 1) To set up the social media links:

  • Go to WP Admin > Themify > Settings > Social Links tab.
  • The theme comes with some pre-filled social links. Simply enter your social profile URL in the Link input field. For example, enter 'https://twitter.com/themify' for the Twitter link.
  • You can choose to display either "Icon Font" or "Image".
    • If "Icon Font" is selected, click on "Insert Icon" to select an icon (over 320+ icons available).
    • If "Image" is selected, you can upload your own graphic icon by clicking on the Upload button.
  • To add more links, click on the Add Link button at the bottom.
  • To remove a link, click on the delete icon.
  • To arrange the display order, drag and drop the link container.

How to setup your social links

Step 2) Displaying the Social Links:

  • Once you have the Social Links setup, go to WP Admin > Appearance > Widgets. Drag and drop the Themify - Social Links from the Available Widgets panel to the Social Widget panel.
  • Optional: Customize Widget Title - such as "Follow Us". You can also "Show link name" and adjust icon size.

drag & drop the widget to where you'd like it to appear

Hiding the RSS Icon

To hide the default RSS icon in the header:

  • Go to WP Admin > Themify > Settings > Theme Settings.
  • Under the "Exclude RSS Link", tick the checkbox that says "Check here to exclude RSS icon/button in the header".

Hiding the Search Form

To hide the default search form in the header:

  • Go to WP Admin > Themify > Settings > Theme Settings.
  • Under the "Exclude Search Form", tick the checkbox that says "Check here to exclude search form in the header".

Call of Action Text

To display the call-of-action text as seen on the demo, go to Themify > Theme Settings and enter the html content:

<h3>Custom Call of Action Text</h3>
<p>Nullam rutrum quam ut massa ultricies Mauris varius fermentum velit sit amet varius. </p>
<p><a href="https://themify.me" class="button">Learn More</a></p>

Slider

To display the slider on the homepage:

  • Go to wp-admin, click on the "Add New" link under the Slider menu.
  • Choose the layout option:
    • default: display the feature image on left, title and content on the right
    • image-only: display the feature image only (no title or content)
    • content-only: display the content only (title and feature image will not be displayed)
    • gallery: display the feature image, title, and content in gallery styleslider panel
  • Upload a feature image.
  • Image width and height is optional. If the field is empty, default image size will apply.
  • Image link is optional.

Slider Options can be found at Themify > Theme Settings.

Homepage Highlights

To display the homepage highlights:

  • Go to wp-admin, click on the "Add New" link under the Highlights menu.
  • Icon image is optional.
  • Image width and height is also optional. If the field is empty, default setting will apply.

Custom Homepage

To create a custom Page and assign as the homepage:

  • Create a new Page (eg. Custom Homepage)
  • Go to wp-admin > Settings > Reading
  • Select a static page under the "Front page displays"
  • Then select "Custom Homepage" in the dropdown

custom homepage

To link the featured image with a lightbox popup such as image zoom, video or an iframe window, enter the URL in the Lightbox Link field under the Themify Custom Panel. The Themify Custom Panel can be found in the post edit page.

  • Sample image: https://themify.org/pinboard/files/2012/06/133618178.jpg
  • Sample video: http://youtu.be/Abjx1JJO1i8
  • Sample iframe: https://themify.me?iframe=true&width=100%&height=100%  (you need to add ?iframe=true at the end of the URL)

add image

The gallery can be inserted in any post or page. To insert a gallery, click on "Add Media" button

addmedia

It will open a lightbox for you to create and insert gallery. Read this tutorial for more details on how to use WordPress Gallery.

creategallery

Setting Default Post and Page Layouts

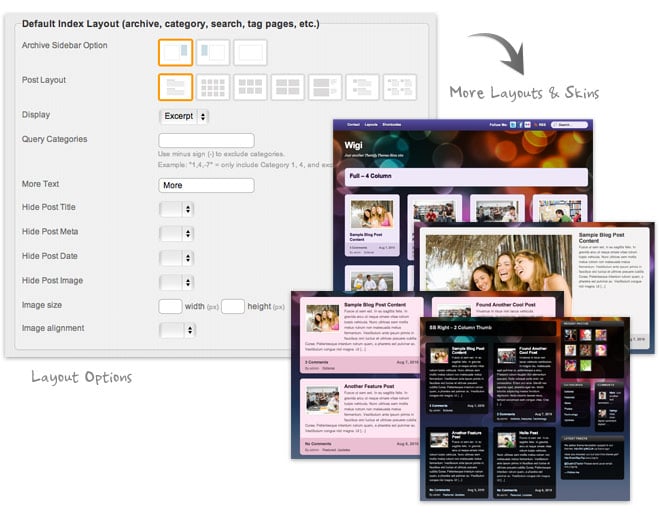
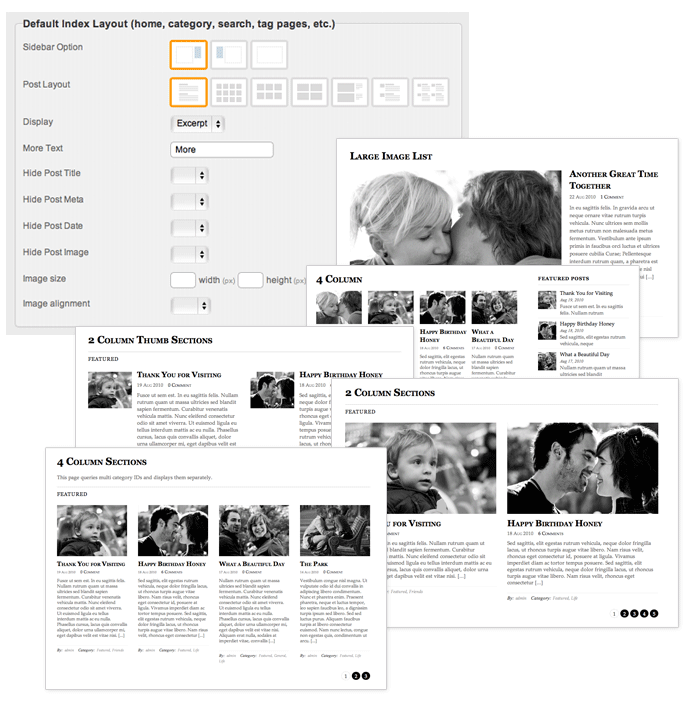
Generally, the theme works out of the box. All the sidebar options and image dimensions are pre-defined in the theme. If you need to change the default sidebar options, featured image dimensions, content/except display, post meta, etc., it can be done in the WP Admin > Themify > Settings > Default Layouts.

There are three default layout options under Themify > Settings > Default Layouts:

  • Archive Sidebar Option: refers to the default home page, category, search, archive, tag pages, etc.
  • Default Post Layout: is the post page direct URL (also known as "Single Post").
    • Note: Some themes may only have 4 layouts.
  • Default Static Page Layout: is the static page.

FYI: Read Default Layouts documentation for more info.

default post and page layout

Creating a Blog Page

To create a blog page:

  • First, create a new Page (go to WP Admin > Pages > Add New), name it "Blog" or any page title as you want.
  • View the page on the frontend, click "Turn On Builder".
  • Drop in a Post module and configure the options as you like.

Setting a Custom Front Page

You can set any page as the front (home) page. This means you can use the Builder to design the page and assign it as the front page. To set the Front Page:

  • Go to WP Admin > Settings > Reading.
  • On the Front page displays, select the "A static page (select below)" option and then select a "Front page".
  • Leave the "Posts page" default. If you want to create a custom Blog page, read this tutorial instead of setting the "Posts page".

how to set custom front page on your site

Adding Widgets

To add widgets to widgetized areas (eg. sidebar and footer widgets):

  • Go to WP Admin > Appearance > Widgets.
  • The big panel on the left side shows all available widgets. The small panels on the right are the widgetized areas.
  • To add a widget: drag and drop the widget from the left panel to the right panel.
  • To remove the widget: drag the widget back to the left panel (Available Widgets panel). If you want to keep the widget setting for future use, drag it to the Inactive Widgets instead of the Available Widgets panel. It will save your widget settings. To retrieve the widget, drag the widget from Inactive Widgets panel instead of the Available Widgets panel.

TIPS: You can also add widgets in Appearance > Customize panel.

how to add a custom menu on your sidebar

Theme Skins

To apply pre-designed color skins:

  • Go to WP Admin > Themify > Skins, select a skin by clicking on the thumbnail and click Save.

Styling The Theme

To style the theme frontend appearance:

  • Go to WP Admin > Appearance > Customize.
  • It will take you to the Customize panel with live preview where you can style the appearance of the theme design (ie. color, background, font, spacing, border, etc.).

FYI: Refer to Customize documentation for more info.

customization panel options

  • To set the Footer Widget column layout, go to WP Admin > Themify > Settings > Theme Settings.
    screenshot
  • To drop the widgets in the Footer Widgets, go to WP Admin > Appearance > Widgets.

To replace the footer credit links:

  • Go to WP Admin > Themify > Settings > Theme Settings and enter the footer text.
  • HTML tags are allowed in the Footer Text.
  • To have empty footer text, tick the hide footer text checkbox.

screenshot

Read More

New Elegant Tumblr-Like Theme: Elemin

New Elegant Tumblr-Like Theme: Elemin

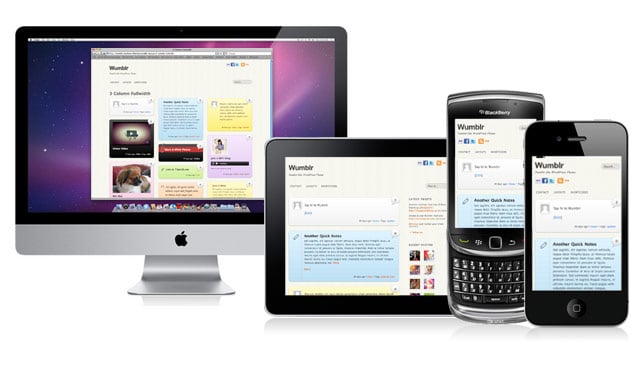
After ThemeMin, Elemin is the second miminal theme added to our collection. Elemin has great sense of typography, good white space balance, and minimal graphics. It is a piece of art crafted with modern technology — Google font, CSS3, Javascript and HTML5. WordPress post formats was incorporated which allows you to write about various post types such as photo, gallery, video, quote, etc. (very much like Tumblr). The design is completely fluid and responive. This means the layout automatically adapts based on the user's viewport. The layout never breaks no matter of what screen resolution it is being viewed on. It works on all desktop and most mobile devices such as iPhone, iPad, Android, and Blackberry. To see this in action, visit our demo site and resize your browser window or check it with a mobile phone.

Get it now: use the coupon code "elemin" for a 30% discount off this theme until June 7, 2011.

Read More

Elemin

Installing the Theme

To install themes with the WordPress theme uploader:

  • Download the "theme.zip" file from the Member Area
    • Note: some browsers (eg. Safari) auto extract zip files automatically. Right-click on the download link and select "Save Linked File As". This will allow you to download the theme as a zip file.
  • Login to your site's WP Admin.
  • Go to Appearance > Themes.
  • Click on the "Add New" button, then click on the "Upload Theme" button
  • Upload the theme.zip file (note: it is the theme.zip, not the theme-psd.zip that you just downloaded from the Member Area).
  • Activate the theme

how to properly install your theme

FYI: You can also install themes with FTP method. Read the Installing Themes tutorial for more info.

Demo Import

If you are starting a fresh site, importing the demo content will help you understand how the theme demo is built. The Demo Import feature will import the contents (posts, pages, comments, etc.), Themify panel settings, menus, and widgets setup from our demo to your site. You can erase the demo content afterward.

To import the demo setup:

  • Go to WP Admin > Themify > Settings > Demo Import and click "Import Demo" button.
  • Note that the featured images will be replaced with an image placeholder for copyright reasons.

To erase the demo setup:

  • On the Demo Import tab, click on the "Erase Demo" button which will then remove the demo content.

FYI: If the Demo Import does not work on your site, you can use the WP Admin > Tools > Import tool to import the demo content manually.

how to import demo content

Site Logo & Tagline

To display a logo image instead of the site name text:

  • Go to WP Admin > Appearance > Customize > Site Logo and Tagline.
  • Under "Site Logo", select "Logo Image" radio button.
  • Upload a logo image.
  • Specify the logo image width and height.

How to add your own site logo on your site

You can also change website Tagline from here:

  • Go to WP Admin > Appearance > Customize > Site Logo and Tagline.
  • Scroll down and under "Site Tagline" select "Text" radio button.
  • Enter your site Tagline.
  • Click "Save & Publish".

How to add a tagline on your site

Main Navigation Menu

To create a custom navigation menu:

  • Go to WP Admin > Appearance > Menus.
  • Click on "create a new menu" to create a new menu (eg. Main Menu).
  • Add the menu items from the left panels.
  • To create a dropdown menu: drag the menu item towards the right (the item(s) will be indented).
  • When you are done adding the menu items, click "Save Menu".
  • To assign menu locations:
    • Scroll down to the bottom where it says "Theme locations" and tick the menu location checkbox.
    • Main Navigation = main menu on the header
    • Footer Navigation = footer menu on the footer (Note: some themes might not have Footer Navigation).

TIPS: You can display menus on sidebar widgets, remove the main menu, create empty links, and lightbox links. Read Custom Menus for more detailed tutorial.

create custom menus for each page on your site

Step 1) To set up the social media links:

  • Go to WP Admin > Themify > Settings > Social Links tab.
  • The theme comes with some pre-filled social links. Simply enter your social profile URL in the Link input field. For example, enter 'https://twitter.com/themify' for the Twitter link.
  • You can choose to display either "Icon Font" or "Image".
    • If "Icon Font" is selected, click on "Insert Icon" to select an icon (over 320+ icons available).
    • If "Image" is selected, you can upload your own graphic icon by clicking on the Upload button.
  • To add more links, click on the Add Link button at the bottom.
  • To remove a link, click on the delete icon.
  • To arrange the display order, drag and drop the link container.

How to setup your social links

Step 2) Displaying the Social Links:

  • Once you have the Social Links setup, go to WP Admin > Appearance > Widgets. Drag and drop the Themify - Social Links from the Available Widgets panel to the Social Widget panel.
  • Optional: Customize Widget Title - such as "Follow Us". You can also "Show link name" and adjust icon size.

drag & drop the widget to where you'd like it to appear

Hiding the RSS Icon

To hide the default RSS icon in the header:

  • Go to WP Admin > Themify > Settings > Theme Settings.
  • Under the "Exclude RSS Link", tick the checkbox that says "Check here to exclude RSS icon/button in the header".

Hiding the Search Form

To hide the default search form in the header:

  • Go to WP Admin > Themify > Settings > Theme Settings.
  • Under the "Exclude Search Form", tick the checkbox that says "Check here to exclude search form in the header".

WordPress Post Formats (Tumblr-like)

This themes comes with the following post format supports: standard (default), asidegallerylinkimagequotestatusvideoaudio and chat. To assign the post format to a post, select the radio button in the "Format" panel.

post formats

When writing or editing a post, you should see the Themify Custom Panel (see image above). The following fields are required for the different post formats:

  • Video: Video URL (youtube, vimeo embed url). Examples: "http://vimeo.com/22391248" or "//www.youtube.com/watch?v=Abjx1JJO1i8"
  • Image: Post Image, Content (optional)
  • Gallery: gallery shortcode in Content (eg.)
  • Quote: Content, Quote Author (optional), Quote Author Link (optional)
  • Audio: Audio URL (eg. https://themify.me/wp-content/audio/song.mp3), Post Image (optional)
  • Link: Link URL, Content (optional)

To link the featured image with a lightbox popup such as image zoom, video or an iframe window, enter the URL in the Lightbox Link field under the Themify Custom Panel. The Themify Custom Panel can be found in the post edit page.

  • Sample image: https://themify.org/pinboard/files/2012/06/133618178.jpg
  • Sample video: http://youtu.be/Abjx1JJO1i8
  • Sample iframe: https://themify.me?iframe=true&width=100%&height=100%  (you need to add ?iframe=true at the end of the URL)

add image

The gallery can be inserted in any post or page. To insert a gallery, click on "Add Media" button

addmedia

It will open a lightbox for you to create and insert gallery. Read this tutorial for more details on how to use WordPress Gallery.

creategallery

Custom Page Layout

To display posts from specific category(ies) using pre-designed layouts:

  • Create a new WordPress page.
  • Under the Query Category dropdown menu, select the category that you want to display or enter multiple category IDs (separated with commas) in the text field.
  • Posts per page = the number of posts to be displayed per page.
  • Select the layout option.
  • Image width & height is optional.

query posts

Standard Page: to remove the query post options, simply clear the Query Category field or select blank in the dropdown.

Custom Homepage

You can assign any Page as homepage:

  • Create a new Page (eg. Custom Homepage) with the Query Category option as mentioned above
  • Go to wp-admin > Settings > Reading
  • Select a static page under the "Front page displays"
  • Then select "Custom Homepage" in the dropdown

custom homepage

Setting Default Post and Page Layouts

Generally, the theme works out of the box. All the sidebar options and image dimensions are pre-defined in the theme. If you need to change the default sidebar options, featured image dimensions, content/except display, post meta, etc., it can be done in the WP Admin > Themify > Settings > Default Layouts.

There are three default layout options under Themify > Settings > Default Layouts:

  • Archive Sidebar Option: refers to the default home page, category, search, archive, tag pages, etc.
  • Default Post Layout: is the post page direct URL (also known as "Single Post").
    • Note: Some themes may only have 4 layouts.
  • Default Static Page Layout: is the static page.

FYI: Read Default Layouts documentation for more info.

default post and page layout

Creating a Blog Page

To create a blog page:

  • First, create a new Page (go to WP Admin > Pages > Add New), name it "Blog" or any page title as you want.
  • View the page on the frontend, click "Turn On Builder".
  • Drop in a Post module and configure the options as you like.

Setting a Custom Front Page

You can set any page as the front (home) page. This means you can use the Builder to design the page and assign it as the front page. To set the Front Page:

  • Go to WP Admin > Settings > Reading.
  • On the Front page displays, select the "A static page (select below)" option and then select a "Front page".
  • Leave the "Posts page" default. If you want to create a custom Blog page, read this tutorial instead of setting the "Posts page".

how to set custom front page on your site

Adding Widgets

To add widgets to widgetized areas (eg. sidebar and footer widgets):

  • Go to WP Admin > Appearance > Widgets.
  • The big panel on the left side shows all available widgets. The small panels on the right are the widgetized areas.
  • To add a widget: drag and drop the widget from the left panel to the right panel.
  • To remove the widget: drag the widget back to the left panel (Available Widgets panel). If you want to keep the widget setting for future use, drag it to the Inactive Widgets instead of the Available Widgets panel. It will save your widget settings. To retrieve the widget, drag the widget from Inactive Widgets panel instead of the Available Widgets panel.

TIPS: You can also add widgets in Appearance > Customize panel.

how to add a custom menu on your sidebar

Theme Skins

To apply pre-designed color skins:

  • Go to WP Admin > Themify > Skins, select a skin by clicking on the thumbnail and click Save.

Styling The Theme

To style the theme frontend appearance:

  • Go to WP Admin > Appearance > Customize.
  • It will take you to the Customize panel with live preview where you can style the appearance of the theme design (ie. color, background, font, spacing, border, etc.).

FYI: Refer to Customize documentation for more info.

customization panel options

  • To set the Footer Widget column layout, go to WP Admin > Themify > Settings > Theme Settings.
    screenshot
  • To drop the widgets in the Footer Widgets, go to WP Admin > Appearance > Widgets.

To replace the footer credit links:

  • Go to WP Admin > Themify > Settings > Theme Settings and enter the footer text.
  • HTML tags are allowed in the Footer Text.
  • To have empty footer text, tick the hide footer text checkbox.

screenshot

FAQs

1. How to remove left padding on the post?
Add the following code in wp-admin > Appearance > Customize > Custom CSS:


.loops-wrapper.list-post .post,
.single .list-post .post {
	padding-left: 0 !important;
	width: 100% !important;
	max-width: 100% !important;
}
.loops-wrapper.list-post .post-meta,
.single .list-post .post-meta {
	width: 100%;
	text-align: left;
	position: static;
}
.loops-wrapper.list-post .post-meta span,
.single .list-post .post-meta span {
	display: inline;
	margin: 0 5px 0 0;
}
.loops-wrapper.list-post .post-icon,
.single .list-post .post-icon {
	width: 27px;
	height: 30px;
	display: block;
	float: left;
	margin: 2px 14px 5px 0;
	border: none;
	position: static;
}

Read More