Tutorials

How To Create a Tile-like Image Gallery with the Themify WordPress Builder

How To Create a Tile-like Image Gallery with the Themify WordPress Builder

Tired of creating a plain looking image gallery where you can't adjust the gutter widths, or control the overall layout of your images? Want to display your entire image without worrying about your images being cut because it doesn't fit with the pre-built gallery containers? You like collages and want place one on your WordPress site? The Themify Builder plugin let's you do all these easily with it's image module and adjustable gutter width feature. Control the placement, size, and order of how your images will appear on your site using the Builder plugin. Check out the tutorial below and see how you can add your own tile-like image gallery on your WordPress site.

Here's a sample of a tile-like image gallery, using only the image module and Builder plugin.

tile-like-image-gallery

This tutorial focuses on how you can recreate the above tile-like image gallery on your site. To start off, we broke down this tutorial by breaking it into 3 rows. We then did a step-by-step guide on how we made each row. (more…)

Read More

How To Build an Affiliate Site with the Themify WordPress Builder

How To Build an Affiliate Site with the Themify WordPress Builder

Affiliate programs has become one of the most popular strategies for online merchants, as it benefits both users and merchants. First, it creates awareness for merchants by allowing users/influencers to market their brand on their site. Second, it rewards users/influencers by giving them the opportunity to earn revenue through their site. The main concept of this program is to allow site owners to receive commission every time an affiliate link from their site is clicked, and performs a desired action by the merchant. These actions usually involve purchasing a product or filling out a contact form. The rise of merchants adopting this new concept has led to the birth of affiliate sites. Affiliate site owners create sites that are solely focused on marketing various affiliated linked products/services.
This tutorial will show you how you can easily build and customize your affiliate site with the Themify Builder. It will give you a step-by-step guide on how you can (1) upload any image with your affiliate product/services, (2) highlight how you can create custom action buttons that can be linked with your affiliate link, and (2) add an excerpt and (3) an external link to both the featured image and button.

Above is a sample of how your affiliate site can look with the Builder. (more…)

Read More

Corporate Theme Video Tutorial

We've released a new video tutorial. We used our latest theme, Corporate, as an example to show how easy it is to customize your site using our Builder.

The video highlights:

  • How to make a fullwidth page
  • How to insert our modules (ie. Testimonials, Portfolios, WooCommerce, etc.)
  • How to edit text and background
  • How to add animated background colors
  • How to embed videos
  • How to edit rows
  • How to set full cover video background

Read More

Setting your WordPress Permalinks

We often get asked how to set up certain WordPress settings here at Themify. We thought it would be a good idea to provide some tutorials on how to get started with some of WordPress' features outside of themes. Here is an in-depth tutorial on how to set your WordPress permalinks. To note: A permalink is a link or URL that points to a specific post or page entry.

WordPress Default URLs

The default structure of a permalink uses the post ID as a unique identifier in the url: http://example.com/?p=23

If you're happy with this then you're good to go. But it you're like most people and you want to spice things up a bit more, keep reading on.

Customizing your URLs

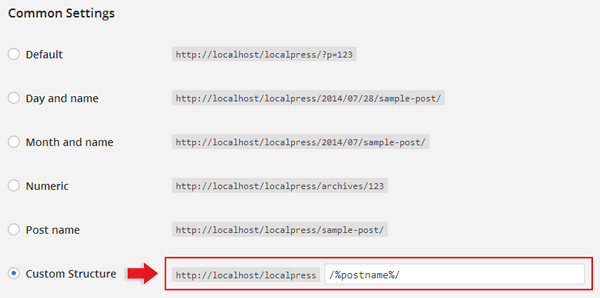
To change the default structure to something thats a bit more friendlier and more readable, go to Settings > Permalinks. There you should see a screen that looks something like the image below. In this example we've already chosen to use a "Custom Structure" for our links but you can choose one of the other defaults available if you want.
permalink

Available Permalink Tags

If you've chosen to use a "Custom Structure" then there are some useful tags available to you:

  • %year% = the year of the post (eg. 2010)
  • %monthnum% = month of the year (eg. 08)
  • %day% = day of the month (eg. 25)
  • %hour% = hour of the day (eg. 16)
  • %minute%  = minute of the hour (eg. 29)
  • %second%  = second of the minute (eg. 12)
  • %postname%  = post slug (post title)
  • %post_id% = the ID of the post
  • %category% = category slug of where the post is stored
  • %author% = author name

You can use these tags listed to customize your permalink like we have in the image example above. Make sure to end your custom URL structure with either %post_id% or %postname% so WordPress has a unique identifier to point to. Here are some good examples of common, custom, permalink structures:

  • /%category%/%postname% = yoursite.com/category/post-title
  • /%post_id%/%postname% = yoursite.com/23/post-title
  • /%year%/%postname% = yoursite.com/2010/post-title

Adding to your URLs

You can also add a string, including file extensions, to the end of the url as seen in the examples below:

  • /%category%/%postname%/ = yoursite.com/category/post-title/ (forward slash added)
  • /%category%/%postname%.html = yoursite.com/category/post-title.html
  • /%category%/%postname%.php = yoursite.com/category/post-title.php

You can, technically, add anything to the end of the URL and WordPress will interpret it properly. This is useful if you are migrating from a static html site and you want to keep the old URL structure.

Categories & Tags

By default WordPress uses "category" and "tag" as the base name for the category and tag archives respectively. You can rename these under the permalink settings as well. A good example of why you might change these base names would be if your blog was all about cars. It would look a lot nicer if you changed the category base name to "car" and the tag base to "model". This way your category URL structure will look something like yoursite.com/car/category-slug and the tag URL structure would be yoursite.com/model/tag-slug. Here's what those settings would look like:

category + tag base name

.htaccess File

What happens when you've set this all up but its not working? In most cases, you are probably missing the .htaccess file in the root of your WordPress install. Open up your FTP client, connect to your server and make sure that there's a .htaccess file and that it contains the following code:

# BEGIN WordPress
<IfModule mod_rewrite.c>
RewriteEngine On
RewriteBase /
RewriteCond %{REQUEST_FILENAME} !-f
RewriteCond %{REQUEST_FILENAME} !-d
RewriteRule . /index.php [L]
</IfModule>
# END WordPress

Reference: for more information about WordPress permalinks, visit WordPress codex.
Read More

Integrating Google Fonts with your Themify theme

Are you bored of the typical web safe fonts? Well, here is a quick tutorial to show you how to integrate Google Web Fonts to your Themify themes. The benefits of using Google Fonts: it is light weight and supported in most browsers: Chrome, Firefox, Internet Explorer, Safari, and Opera.

1. Find the font

2. Copy the embed code

  • Click on the "Use this font" tab
  • Copy the embed code (eg. <link href='http://fonts.googleapis.com/css?family=Kreon' rel='stylesheet' type='text/css'>)

embed code

3. Paste the embed code

  • Go to your Themify theme's setting panel in the WordPress admin
  • Paste the embed code in the "Header Code" text box

header code

4. Specify the elements

  • Click on the "Styling" tab
  • Then click on the "Custom CSS" link in the sub menu
  • Paste the following code in the Custom CSS text box:
    h1, h2, h3, h4, h5, h6, #site-logo, .post-title, .widgettitle {
    	font-family: 'Kreon', arial, serif;
    }
  • The code above will apply the "Kreon" font family to all headings (h1 - h6), site logo, post title, and widget title
  • You can change what elements get styled with the 'Kreon' font by changing the CSS selector like so:
    body {
    	font-family: 'Kreon', arial, serif;
    }

custom css

Read More