Welcome back to a new edition of our Customer Stories. To kick off the new year, it’s time to refocus your website’s eCommerce and marketing strategies to be more profitable and successful. To provide us insight into this vast world is business maven, Tanner Rankin, who’s appeared on the likes of Forbes, MSNBC, and Entrepreneur. Read on to see how Tanner uses WordPress themes to stay current in the ever-changing eCommerce world.
About Me
My name’s Tanner Rankin and I am a top-rated eCommerce and Amazon consultant, as well as an eCommerce website designer. For 10 years, as an author, speaker, and founder of The Source Approach, I’ve helped brands, startups, and retailers get to where they want to go quicker and easier through eCommerce & Amazon marketing. I focus on lending a hand to help businesses and my own companies grow in the eCommerce and SaaS (Software as a Service) spaces.
Many of you may have heard the term before but what exactly is affiliate marketing and how do you make money from it? To put it simply, affiliate marketing is the process of earning a commission by promoting someone else's products. For example, if you promote a link to purchase another company's product through your website, and someone purchases the item through that link, you get a percentage of the sale. Pretty simple, right? The best part is that anyone can do it!
In this edition of our tutorial series, we will go over how you can create an Amazon affiliate website using WordPress and Woocommerce. (more…)
Installing Builder Addons is exactly the same as installing WordPress plugins.
To install the addon:
Firstly, download the addon zip file from the link provided in your Themify Member Area.
NOTE: some browsers (eg. Safari) auto extract zip files automatically. Right-click on the download link and select "Save Linked File As" and it will allow you to download as a zip file.
Login to your site's admin area.
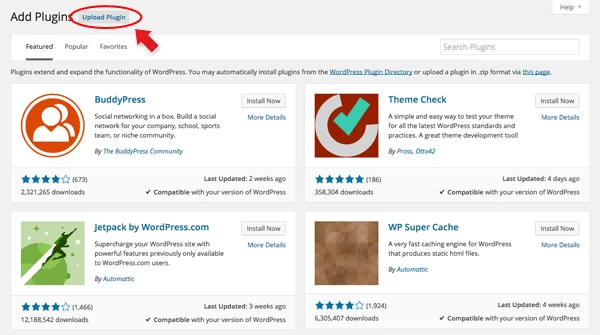
Navigate to WP Admin > Plugins > Add New.
Now, click the "Upload Plugin" link.
Select "Browse" and navigate to the plugin zip file which you downloaded in the first step and then select the "Install Now" button.
This will initiate the plugin installation process, and once finished, you can then activate the plugin.
Importing the addon demo layout
Each addon zip file contains a sample Builder data file which you can import to your site. It helps you to understand how the addon demo is created.
To import the addon demo data:
First, extract addon zip file to your local computer
You should have a folder of the addon. Inside there is a folder named "sample", and inside that folder there is a Builder data file in a zip format (eg. "addon_name_sample-builder-layout.zip").
To import the Builder layout, login to admin and then go to the page frontend where you want to import the Builder layout. From the top admin bar > select Themify Builder > Import / Export > Import, upload the sample zip file.
Using the Mosaic Addon
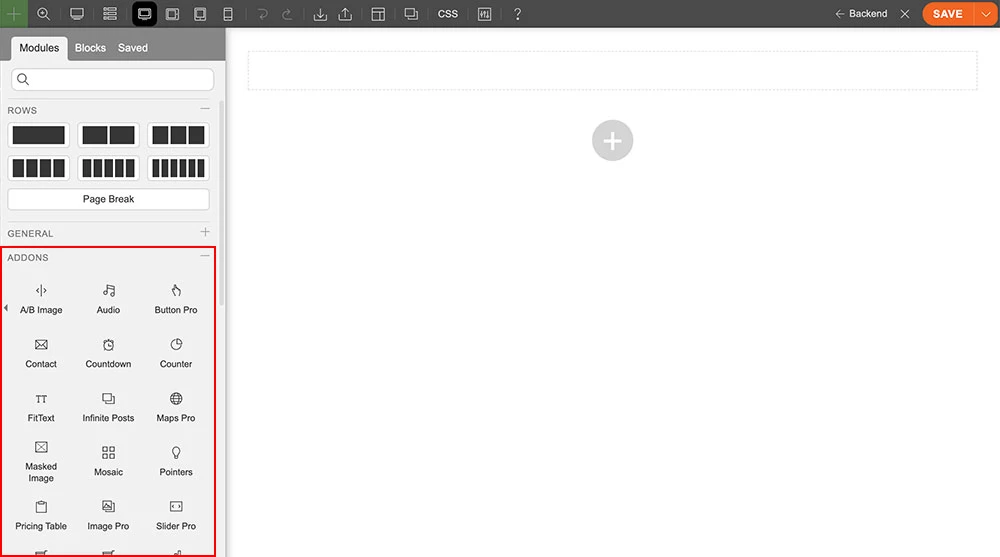
Once the Mosaic addon is installed, you will find the Mosaic addon module in the Themify module panel. The module is available in both the backend and frontend edit mode (just like all standard modules).
In the backend: you can find the Mosaic module in the Themify Custom Panel.
On the frontend: you can see the modules after turning on the Builder in the top admin bar > Themify Builder > Turn On Builder.
Drag and drop a Mosaic module in a row.
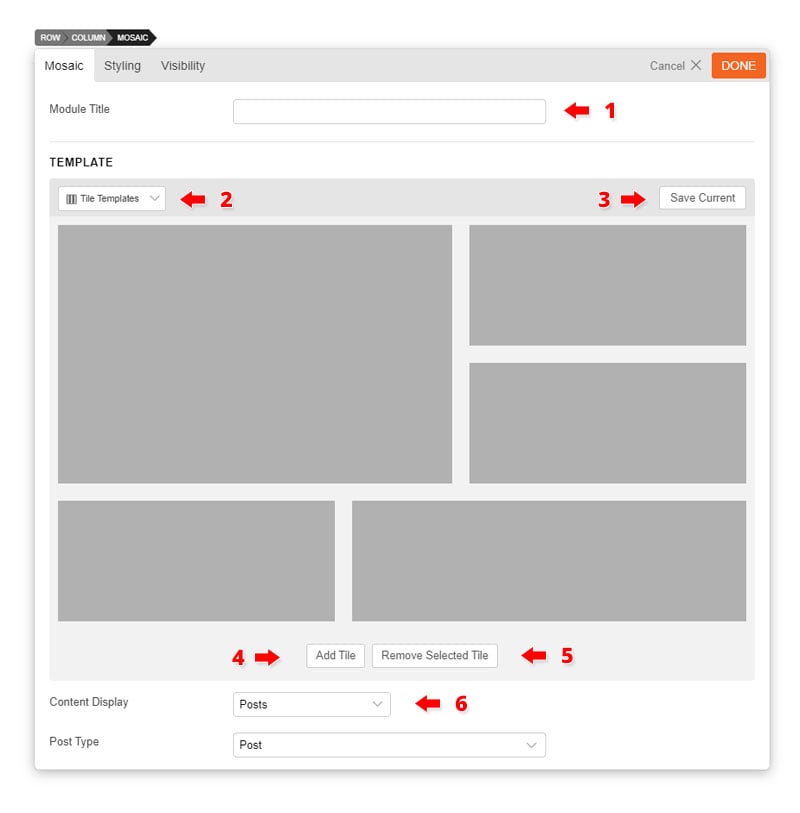
Mosaic Options:
1) Module Title = (Optional) Insert the module title that will appear at the top of the module.
2) Tile Templates = You can load pre-made and saved tile templates using this dropdown.
3) Save Current = Save your current tile template so you can load it onto another Mosaic module or reuse it next time.
4) Add Tile = On the tile template area, you can click and resize each tile on the template to create a custom mosaic layout. Click 'Add Tile' to add another tile onto the template.
5) Removed Selected Tile = To remove a tile, first select the tile on the template, then click 'Remove Selected Tile'.
6) Display = Select the content type to display. Once a content type is selected, it will show the options related to the type you've selected.
Posts = Display default WordPress posts.
Text = Display static text and images.
Gallery = Display an image gallery from your WordPress media library.
WooCommerce Products = Display products from the WooCommerce plugin.
Post Type Builder = Display custom post types created with the Post Type Builder plugin.
Themify Event Posts = Display event posts from the Themify Event Post plugin.
NextGen Gallery = Display galleries created by the NextGen Gallery plugin.
RSS Feeds = Display posts from RSS feeds.
Directory Listing = Auto display files from a given folder on your site (ie. you can upload a bunch of image files in a folder and it will auto load all images onto the mosaic layout). It auto recognizes image and mp3 files and apply special layout to it. The image files will show a thumbnail and mp3 files will have an audio player (the album info are pulled from the mp3's ID3 tag).
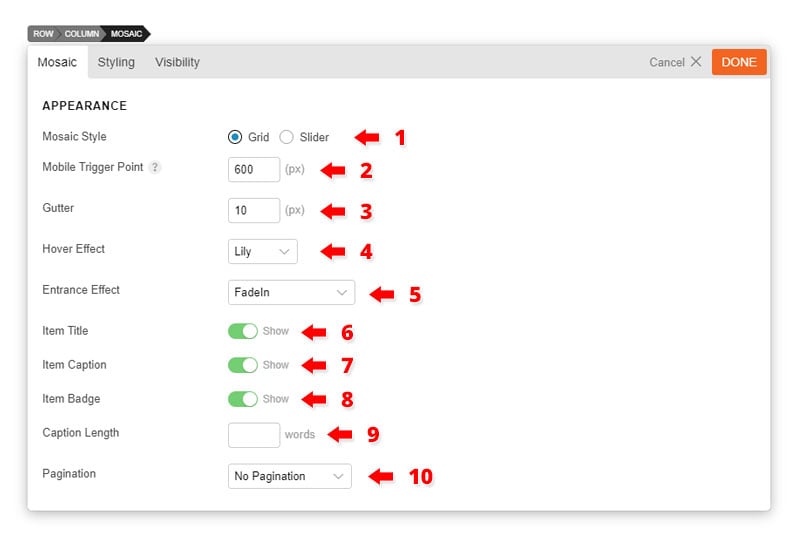
Mosaic Appearance Options:
1) Mosaic Style = Displays mosaic in grid or slider style.
2) Mobile Trigger Point = Enter the breakpoint to switch your mosaic to mobile layout (all tiles will display as fullwidth stacking).
3) Gutter = This is the spacing between each tile.
4) Hover Effect = Choose between a variety of effects that display when hovered over a tile.
5) Entrance Effect = By default, all tiles are hidden until they are fully loaded. When loading is done, the entrance effect will animate.
6)Item Title = Choose to display or hide item title.
7)Item Caption = Choose to display or hide item caption.
8)Item Badge = Choose to display or hide item badge.
9)Caption Length = set how many words you want to display.
10) Pagination = By default, Mosaic will query the posts/content as per the number of tiles you have on the template. If there are more posts then the number of tiles on the template, it will appear on page 2, 3, etc. Below are the pagination options.
No Pagination = It will not show any pagination.
Infinite Scroll = It will load more posts when user scrolls down to the footer.
Pagination Links = It will show the number pagination.
Load More Button = It will load more posts when Load More button is clicked.
After months of developing, testing, and perfecting - we're excited to share with you all the new and greatly improved Themify Builder 4.0! We don't normally jump a version with our updates, but this is our best update to date and we are releasing it as Builder V4. We've revamped the Builder interface on both the frontend and backend. Not only does it have a super polished interface, but it also includes many improvements that enhance your user experience and increase productivity. Read on below to see the details.
This week, instead of the usual Customer Story, we’d like to feature the story of a regular contributor to the Themify Community. His name is Hogan Chua and he’s an avid YouTube tutorial creator, with his most popular video at over a million views. We’d like to thank him for giving our small but hardworking company a boost, and we hope you enjoy a behind-the-scenes look at how he developed his website and his informative YouTube channel!