In this tutorial, we are going to show you in 3 steps how to easily map domains to any WordPress page. It is extremely useful when you run many single-page sites and don’t want to install a separate WordPress for each site.
Let’s say you are an eBook author and you are marketing each eBook on a separate site. Typically you would install a WordPress on each domain. This can be time consuming as you would need to create a database for each site. With domain mapping, you can map any domain you own to a WordPress page (eg. you can map ‘ebook1.com’ to your page ‘/ebook1’). So you only need to install WordPress once, and continue to create unlimited pages for all of your sites.
Google Maps has recently discontinued their free map embedding service and is now moving to a payment structure. Effective July 16, 2018, Google Maps will start charging people for embedding google maps on their site, using a pay-per-view service. To understand this new pricing model, we encourage you to view their pricing announcement.
As their new payment structure rolls out, they are offering a free $200 credit each month toward your usage. Signing up for an account does require billing information and a credit card, however it is not known how long this credit will be offered.
However, if you are a nonprofit, crisis response, startup, or new media organization, you could apply to receive additional grants pending eligibility.
How to fix the "Opps! Something went wrong." error
If you ever see "Oops! Something went wrong" error on your map, it is likely related to the Google Map API key.
To fix this, make sure you have the following done:
Generate a Google Map API key and insert it in the setting page (if you are using Themify theme, the Google Map API setting is at Themify panel > Settings > Google Map).
Attach a credit card on your Google account for billing purpose (even if Google offers $200 credit every month, but they still require a credit card in the account profile).
Try to re-generate a new API key if the above are done.
For any additional details, we recommend reading their pricing platform thoroughly. Feel free to leave us a question below as well.
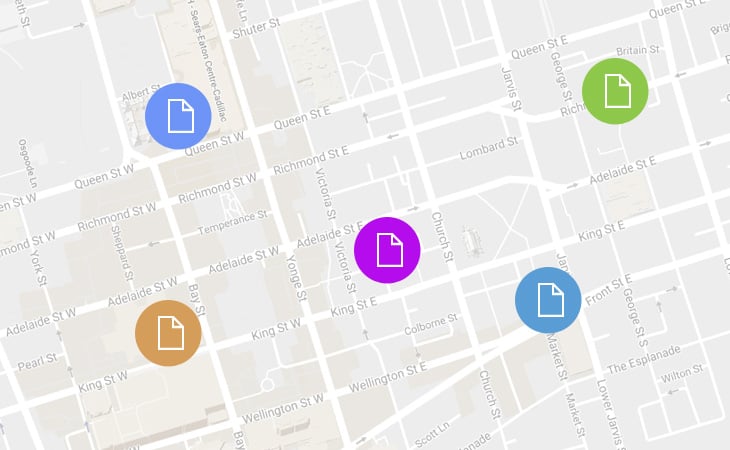
A new addition to our PTB Addon line-up introducing the PTB Map View, an addon that allows you to display posts on a map by querying the location field from a custom post type. It works hand-in-hand with the Post Type Builder and PTB Extra Fields addon. (more…)
The Map View addon is a WordPress plugin that works together with the Post Type Builder (PTB) and Extra Field addon, allowing you to link map field location inputted on each post and places all of it on a single map.
Requirements:
Before installing the Map View, make sure to have the following things below set up:
PTB and Extra Field addon installed and activated.
A custom post type needs to have a map field (that is inserted in Meta Box Builder).
A post should have a map field where an address is entered.
Once all these requirements are met, you can then install the Map View addon.
Installing the Plugin
To install the plugin:
First, you will need to download the plugin zip file from the Member Area on the Themify site.
Note: Some browsers (e.g. Safari) may auto-extract zip files. Right-clicking on the download link and selecting "Save Linked File As" will allow you to download the ZIP version.
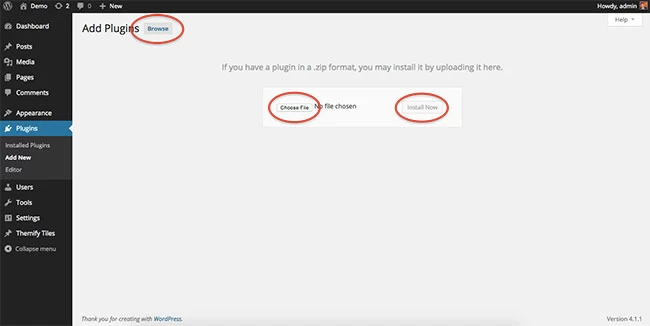
Then go to your WP Admin > Plugins > Add New > Upload Plugin.
Now upload the plugin zip file and click "Install Now".
After the plugin is installed, click "Activate Plugin" to activate the plugin.
FYI: If you can't install the plugin using WordPress plugin installer, you may also use a FTP software to install the plugin. To install plugins with an FTP method: extract the plugin zip on your local computer then upload the plugin folder to your FTP server where you installed WordPress > wp-content > plugins folder. Then login to your WP Admin > Plugins to activate the plugin.
How It Works:
After installing and activating the Map View addon (make sure you have the requirements done), edit any page and you'll see a map icon button on the WordPress content editor.
Click on the icon and select a custom post type that you'd like to display on the map.
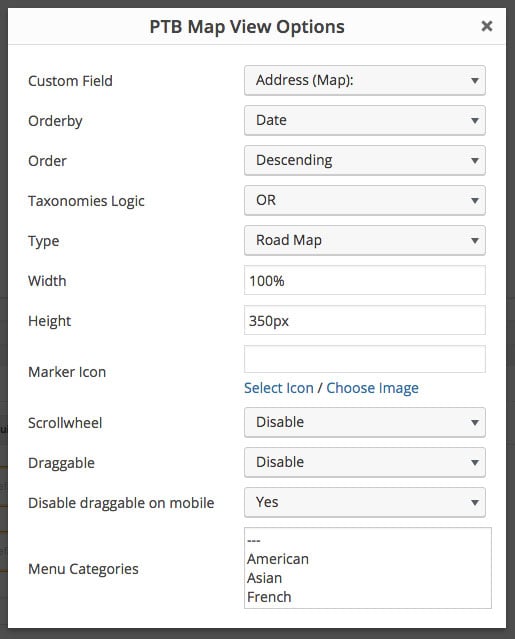
A lightbox will appear where you can configure the map with the following options:
Custom Field: Select a map field.
Orderby: How the posts should be ordered/sorted (default is ordered by post publish date).
Order: Whether to display in descending or ascending order.
Taxonomies Logic: Set taxonomies logic to "OR" or "And".
Type: Select the type of map that you would like your map to appear as. There are 4 options of map types.
Width: Input the width in either % or px of your map.
Height: Select the height in px of your map.
Marker Icon: Select to choose either from the icon pack or add your custom image.
Scrollwheel: Enable or disable the ability for users to be able to zoom in and out of your map by scrolling either up or down.
Draggable: Enable or disable the ability to allow users to drag your map by clicking on it.
Disable draggable on mobile: Enable only with desktops the ability to allow users to drag your map.
Categories: Select the category that only you want to appear on the map. Not selecting anything will show all the posts.
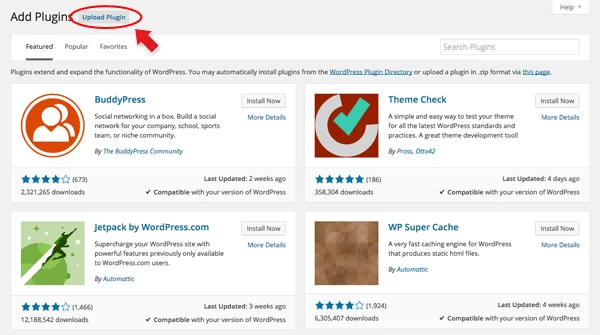
Installing Builder Addons is exactly the same as installing WordPress plugins.
To install the addon:
Firstly, download the addon zip file from the link provided in your Themify Member Area.
NOTE: some browsers (eg. Safari) auto extract zip files automatically. Right-click on the download link and select "Save Linked File As" and it will allow you to download as a zip file.
Login to your site's admin area.
Navigate to WP Admin > Plugins > Add New.
Now, click the "Upload Plugin" link.
Select "Browse" and navigate to the plugin zip file which you downloaded in the first step and then select the "Install Now" button.
This will initiate the plugin installation process, and once finished, you can then activate the plugin.
Importing the addon demo layout
Each addon zip file contains a sample Builder data file which you can import to your site. It helps you to understand how the addon demo is created.
To import the addon demo data:
First, extract addon zip file to your local computer
You should have a folder of the addon. Inside there is a folder named "sample", and inside that folder there is a Builder data file in a zip format (eg. "addon_name_sample-builder-layout.zip").
To import the Builder layout, login to admin and then go to the page frontend where you want to import the Builder layout. From the top admin bar > select Themify Builder > Import / Export > Import, upload the sample zip file.
Using the Map Pro Addon
Note: Google limits the number of maps and markers on each page. You only add 9 markers and 5 maps on each page.
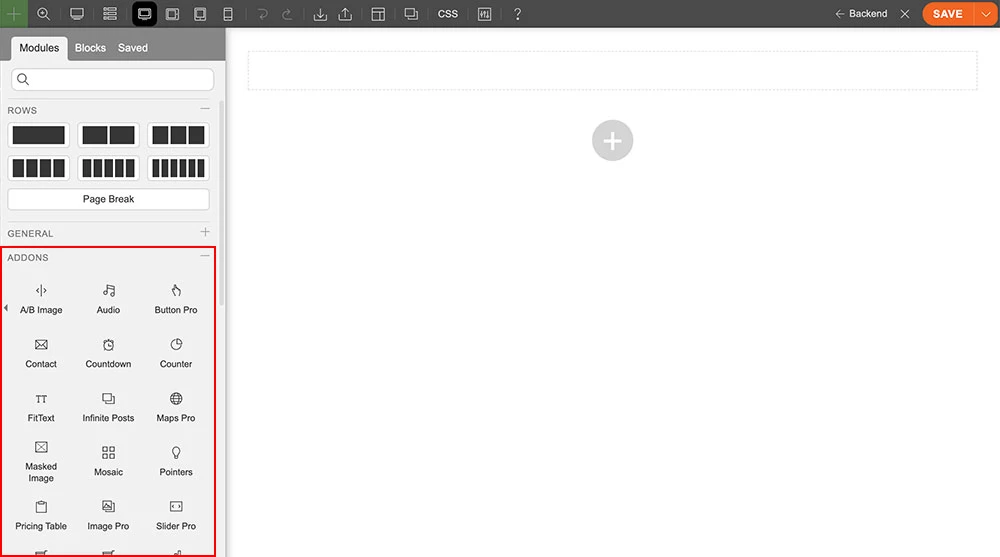
Once addon is installed, you will find the Map Pro addon module in the Themify module panel. The module is available in both backend and frontend edit mode (just like all standard modules).
In the backend: you can find the Map Pro module in the Themify Custom Panel.
On the frontend: you can see the modules after turning on the Builder from top admin bar > Themify Builder > Turn On Builder.
Drag and drop a Map Pro module in a row
Map Pro Options
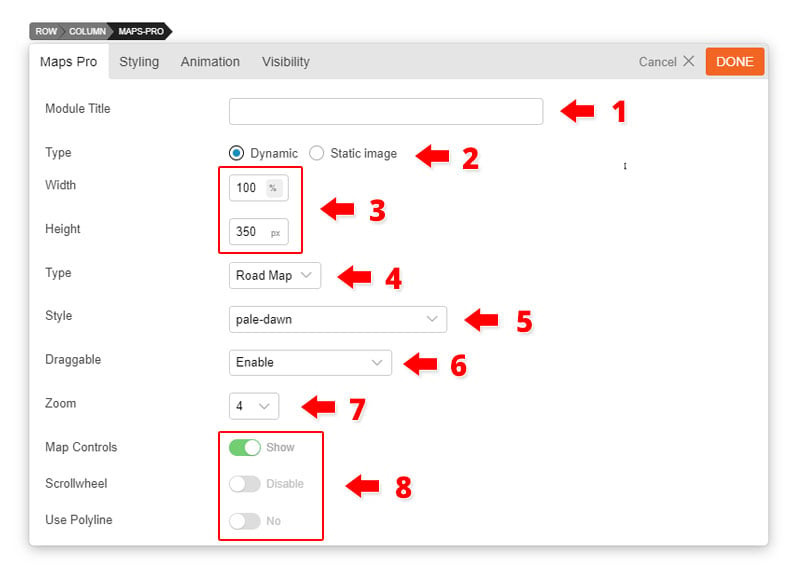
1) Module Title = Insert the module title that will appear at the top of the module. It will appear left-aligned, in H3 format.
2) Map Type = Choose map display types you like, dynamic or static image.
3) Map Dimension = Adjust the width and height of the maps as you like.
4) Type = Choose from 4 different types of maps (Road Map, Satellite, Hybrid, Terrain)
5) Style = Choose from over 40 styles to customize the look of your map.
6) Draggable = Enable, disable, or enable only with desktops the ability to allow users to drag your map by clicking on it.
7) Zoom = Choose how you much you want to zoom in the map, as it initially loads and appears on your site.
8) Map Controls
Disable Map Control = This allows you to enable or disable the map controls that appear on the left side of the map.
Scrollwheel = Enable or disable the ability for users to be able to zoom and out of your map by scrolling either up or down.
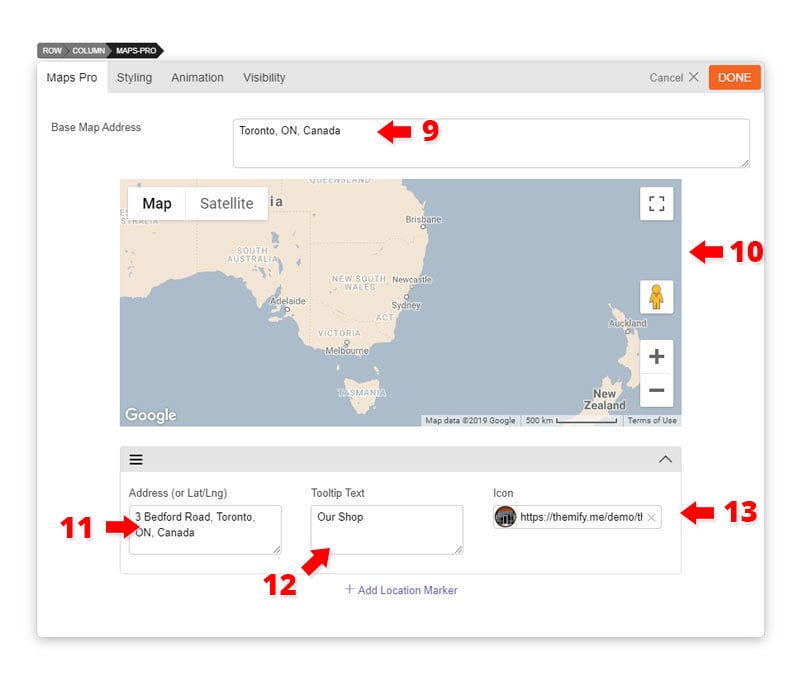
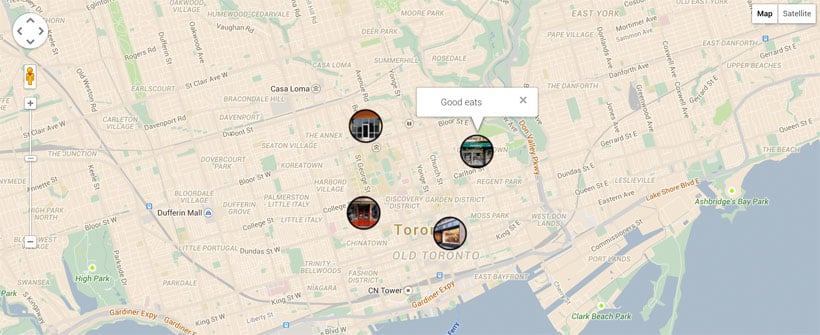
9) Base Map Address = Input the area where you want your map to focus on (i.e. Toronto).
10) This box give you a live preview on how your map will appear once you add the marker, choose the type, style, and zoom level.
11) Marker options: Add any address you would like the marker to appear
12) Tooltip text = add any text you would like to appear when the marker is clicked.
Change the way you display maps on your site with our newest addon: Maps Pro. It's designed to give you the ability to insert multiple location markers anywhere on your map, and set various custom map styles. Each marker can be customized with its own address, custom icon/image, and text that will appear on the tooltip pop-up. The backend preview mode allows you to insert a base map address which allows you to specify the area where you want your map to focus on. This creates a preview that'll show where your markers will appear on the map, and how the type and style will look like once it's saved. The Maps Pro addon gives you more control on how you can customize the look and feel of maps on your site.