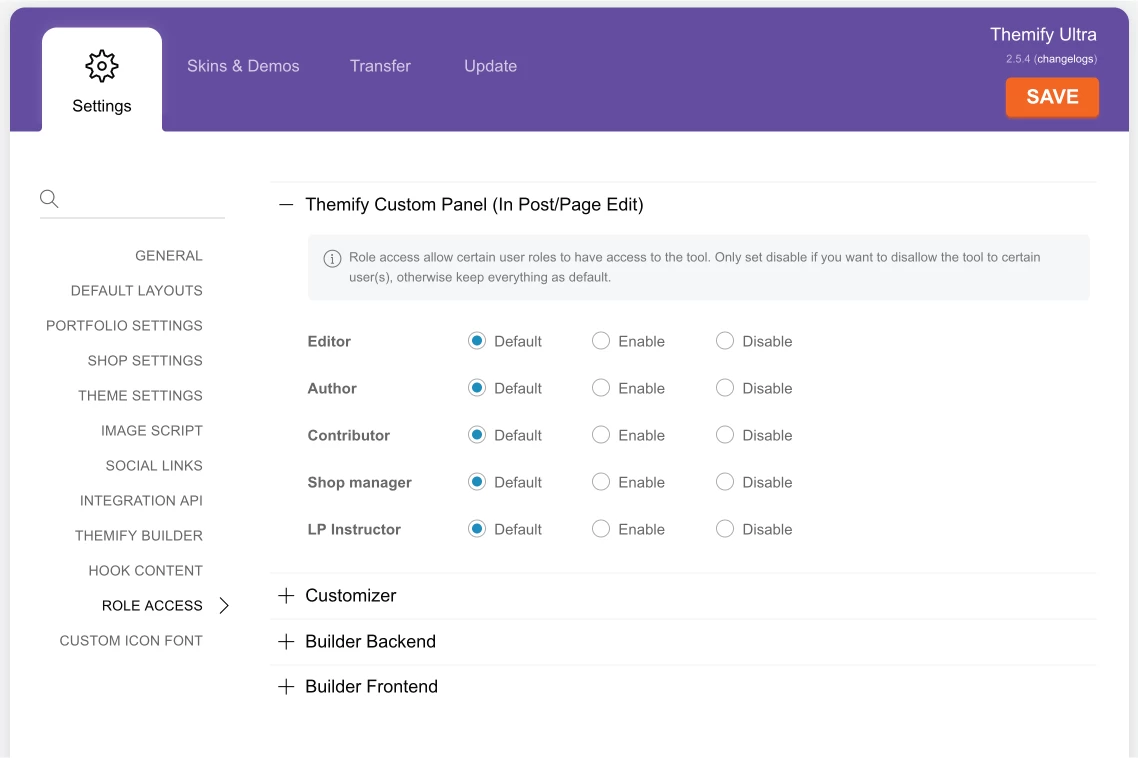
All the Themify themes include a Themify Custom Panel (for post/page options), Customizer (for theme styling), and Builder (for post/page layout). Sometimes, you might want to restrict certain uers to have access to them.
You can do that at Themify > Settings > Role Access.
Since Themify Framework version 1.3.5, we rolled a new gallery system to all themes that includes both lightbox and fullscreen swipe solutions to display gallery images and also images linked to their file in the content.
The gallery receives several parameters for its initialization, and all of them are accessible and can be modified using a WordPress filter, 'themify_gallery_plugins_args'. Not only you can modify the existing parameters, but you can also add others, useful for example for the fullscreen gallery.
Basic filter usage
In this example we will show the image title in lightbox. By default this is turned off.
1. Create a file named custom-functions.php in your theme root folder
3. Save the file. If you were editing it locally, upload it by FTP to the theme folder in your server.
Modifiable existing parameters
These are the parameters that can be modified and their corresponding default values:
'theme' => 'pp_default'
Sets the lightbox theme. Can be set to
'social_tools' => false
Shows basic social buttons in lightbox view
'allow_resize' => true
Allows image resizing in lightbox view when viewport is smaller than image
'show_title' => false
Shows lightbox title
'overlay_gallery' => false
Shows mini gallery over the lightbox
'screenWidthNoLightbox' => 600
Screen width after the one lightbox is no longer triggered
Adding new parameters
This is an example for the fullscreen gallery. We will disable the zoom when user double clicks or double taps the image, change the slideshow delay, and the transition speed.
The fullscreen gallery supports all the parameters for Photoswipe.
Extending look up areas
As an advanced example, let's see how we can tell the gallery system to look up in areas other than the default ones. Note that we're appending these selectors, otherwise the original ones won't work anymore:
<?php
function custom_themify_gallery_areas($args) {
	// The links that will be lightboxed, by default, this is only .lightbox
	$args['lightboxSelector'] .= ', .extra-lightbox';

	// Add images support in highlights, for example on Bizco or Folo themes
	$file_extensions = array('jpg', 'gif', 'png', 'JPG', 'GIF', 'PNG');
	$content_images = '';
	foreach ($file_extensions as $ext) {
		$content_images .= ', .home-highlights-content a[href$='.$ext.']';
	}
	$args['lightboxContentImagesSelector'] .= $content_images;

	// Add a custom post type as another area for linked images
	$args['contentImagesAreas'] .= ', .type-somecustomposttype';

	return $args;
};
add_filter('themify_gallery_plugins_args', 'custom_themify_gallery_areas');
?>
Since framework 1.3.2, the image function includes a filter, themify_image_script_src, to modify the URL passed to img.php, the Image Script that crops and resizes the images on the fly in Themify themes.
To make use of the filter, follow these steps:
1. Create a file named custom-functions.php in your theme root folder
2. Edit it, and paste the following sample code
<?php

/**
 * Modify URL passed to image script
 * @param string $src Original image URL
 * @return string $src Modified image URL
 */
function custom_theme_themify_image_script_src($src){
  // Do something with URL stored in $src here
  return $src;
}
add_filter('themify_image_script_src', 'custom_theme_themify_image_script_src');

?>
3. Modify as needed and save the file. If you were editing it locally, upload it by FTP to the theme folder in your server.
Sample Usage
For example, you can use this filter to remove the http:// or https:// scheme
Copy the theme-config.php file from parent theme to your child theme's folder.
Start adding or removing tabs and modules
Method 2: Using the Filter
You can use the themify_theme_config_setupfilter to modify the theme config. For that add this to your child theme's "functions.php" file and then edit the code as desired:
<?php
function theme_themify_theme_config_setup( $arg ) {
	// Unset or add new variable here

	return $arg;
};
add_filter('themify_theme_config_setup', 'theme_themify_theme_config_setup');

?>
<?php
function theme_themify_theme_config_setup( $arg ) {
	// Unset or add new variable here

	return $arg;
};
add_filter('themify_theme_config_setup', 'theme_themify_theme_config_setup');

?>
By default, most Themify themes use the Date and Time settings in your WordPress > Settings. To change the date and time format used in the theme, you would go to WP Admin > Settings and select or enter your preferred format. Some themes such as Corporate, Music, ThemeMin, Pinshop, etc. have special post date styling (the circle post date design), so these themes do not use the Date and Time from your WP Settings because they require special HTML markups to output the custom design. To modify the post date in those themes, you can either create a child theme and modify the loop.php template (where the post date function is located) or add a custom function as provided below.
Modify Post Date Format With Custom Functions
Note: in most themes, the post and comment date/time format is pulled from your WP Settings (read above). The tutorial below is for the themes that have special post date design such as Corporate, Music, ThemeMin, Pinshop, etc.
To modify the format of the date outputted in a post with a custom PHP function, we can use the themify_loop_date filter:
1. create a file named custom-functions.php in the theme root folder
2. open it and paste the following:
<?php
function custom_themify_loop_date($date_fmt) {
return 'l, F j, Y';
};
add_filter('themify_loop_date', 'custom_themify_loop_date');
?>
3. save it (if you were editing it locally, upload it to your site by FTP) and check your site.
The code sample above will create a date like this:
Tuesday, April 16, 2013
Here's another example for a shorter date
<?php
function custom_themify_loop_date($date_fmt) {
return 'm/d/y';
};
add_filter('themify_loop_date', 'custom_themify_loop_date');
?>
This will create a date like
04/16/13
Note that some themes like iTheme2 separate the date elements and arrange it differently in the design, as is the case with iTheme2, where the date is used to create a calendar icon next to the post name. In themes like these, this filter is not available and you'll have to modify the file containing the date, creating later a child theme to preserve your changes.
You can find more about formatting date on the WordPress Codex.