The following tutorial will guide you through the process of adding a second sidebar to your Themify theme.
This tutorial uses the “Basic” theme as a reference, but the steps can be followed with any of our themes.
Step 1: Create a child theme
To prevent theme updates from overwriting your template changes, create and activate a child theme as documented here.
You will now have a child theme setup with a ‘style.css’ file.
Step 2: Register the new sidebar
Create a new file named ‘functions.php’ in the child theme’s directory. Note: if you already have a child theme and a functions.php file in the child theme, just add/merge the code below.
Add the following code to the child theme’s ‘functions.php’ file which you just created:
These steps will need to be performed with the following files; ‘index.php’, ‘page.php’, and ‘single.php’
This will add a sidebar on the index pages (home, archive, category, tag, search pages, etc.), single post page, and static pages.
Open the file (e.g. ‘index.php’) and find the following line:
The new sidebar code can be added/excluded in the template. For example, if you don't need the second sidebar on the static pages, exclude it in page.php template file.
Step 4: Style the new sidebar
Open the ‘style.css’ file in your child theme and add the following CSS below the existing content.
Now save the file and make sure you have activated your child theme.
Step 5: Final steps
You will now have a widget area labelled “Sidebar 2” under WP Admin > Appearance > Widgets,
you can now place widgets here and they will show in a narrow sidebar to the left of your content.
If you select the content display to excerpt and you don't have any text in the excerpt field, WordPress automatically displays the first 55 words from the post content and add [...] at the end. Note that more link and HTML tags such as <img>, headings (h1, h2, h3..), link, etc. are stripped in the excerpt output.
This tutorial shows you how to change the default excerpt length and add the more link at the end of the excerpt using Themify themes.
Create a custom-functions.php file in the theme folder if you don't have any and paste in the code below. If you already have a custom-functions.php file, simply add the functions.
The first function where it specifies 'return 20' is to change the excerpt length to 20 words. You may change the 'return' value to any number as you like.
The second function is to add a Read More link at the end of the excerpt. You may change the text 'Read More' to any wording as you like.
<?php

// custom excerpt length
function themify_custom_excerpt_length( $length ) {
   return 20;
}
add_filter( 'excerpt_length', 'themify_custom_excerpt_length', 999 );

// add more link to excerpt
function themify_custom_excerpt_more($more) {
   global $post;
   return ''. __('Read More', 'themify') .'';
}
add_filter('excerpt_more', 'themify_custom_excerpt_more');

?>
Custom Excerpt in Child Theme
If you are creating a Themify child theme, use this function instead of above:
<?php

// Call actions and filters in after_setup_theme hook
add_action( 'after_setup_theme', 'custom_themify_parent_theme_setup' );
function custom_themify_parent_theme_setup() {
   // add more link to excerpt
   function themify_custom_excerpt_more($more) {
      global $post;
      return ''. __('Read More', 'themify') .'';
   }
   add_filter('excerpt_more', 'themify_custom_excerpt_more');
}

?>
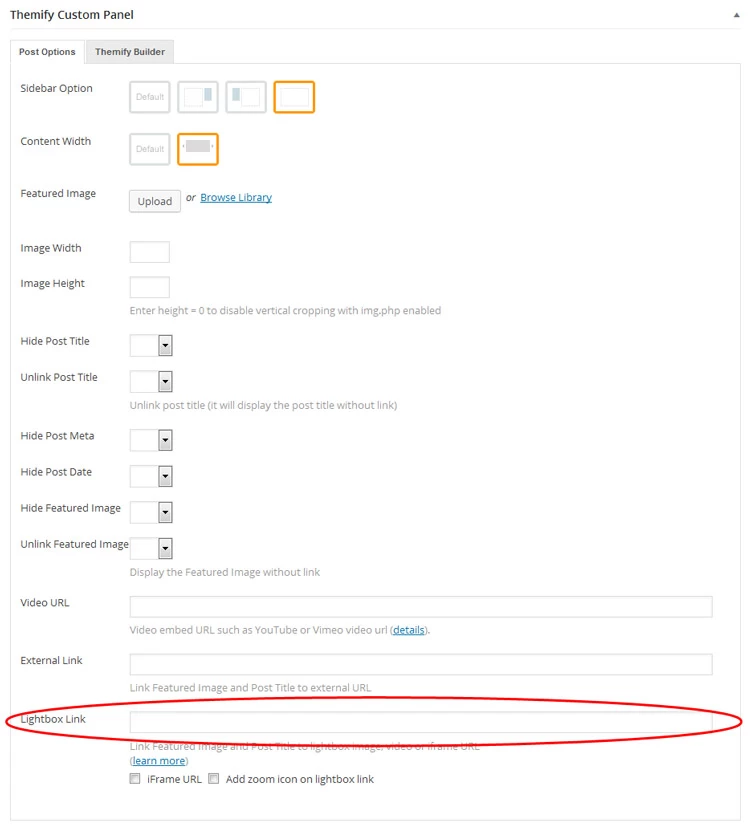
Some of the themes come with popup lightbox feature which allows you to display media content (image, video and iframe window) in a lightbox. The lightbox media content is linked to the post featured image. To link the featured image with a lightbox popup, enter the URL in the Lightbox Link field under the Themify Custom Panel. The Themify Custom Panel can be found in the post edit page.
Sample video: http://youtu.be/Abjx1JJO1i8 or http://vimeo.com/43797471
Sample iframe: https://themify.me and check 'iFrame URL' checkbox
Customizing the size of the lightbox
Lightboxes by default take all of the available screen space (100% width and height). To customize the size of the lightbox window you can add "width" and "height" parameters to the URL in Lightbox Link option. For example, say you want to open "http://themify.me/" URL in lightbox window and you want to adjust the width, you can use the URL:
https://themify.me?width=80%
To change both width and height:
https://themify.me?width=80%&height=80%
This feature works in Builder modules which have the Lightbox Link option as well, like Image module or the Button addon.
Our themes and Builder use the WP_Image_Editor class to generate post's featured images and Builder images at the sizes specified in the option panel. These are generated once when the page is first loaded. Any subsequent page load will use the image size that was generated and is now saved in disk.
External Images
NOTE: The images from external sites can not be generated/cropped (ie. images that are hosted at a different site/server will not be generated or cropped). The original image source will be used if images are from external sites.
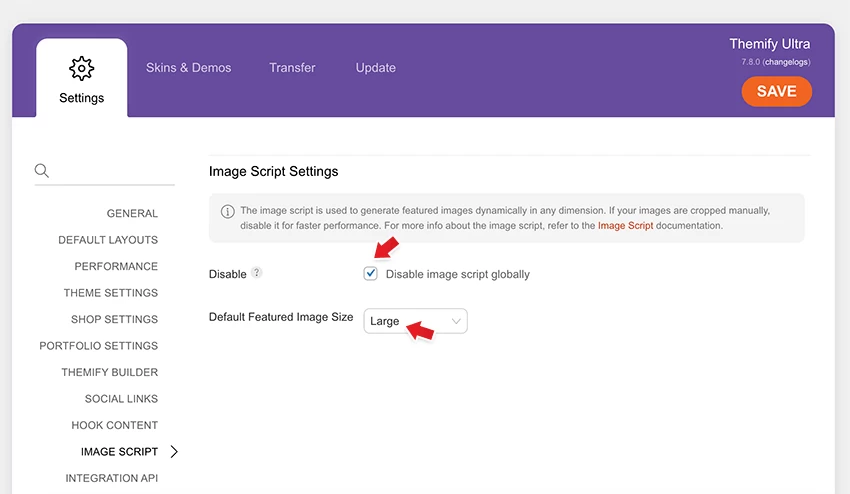
Disabling Image Script
To disable the Image Script, go to Themify > Settings > Image Script tab. Once the image script is disabled, a dropdown will be available for you to choose which image size to use as default.
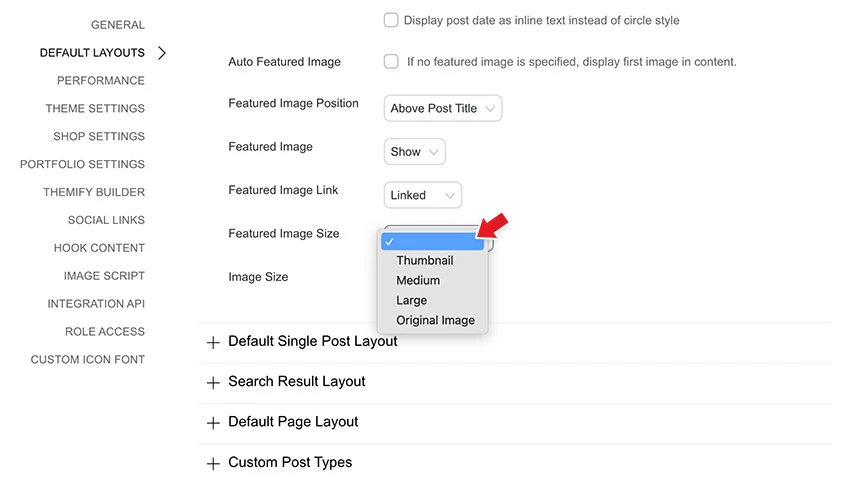
The featured image size can be selected separately in: default index layout and default single post layout (located in Themify > Settings > Default Layouts), as well as in each post editing screen (located in the Themify Custom Panel). The image sizes (Thumbnail, Medium, Large) can be set at wp-admin > Settings > Media. In other words, you can specify 250 x 250px medium size to be used in the index pages and 560 x 300px large size for single post page.
Notes:
Once the Image Script is disabled, the “Image Width” and “Image Height” input value will be used as ‘width’ and ‘height’ attribute in the <img> tag (they are not the actual dimension of the image). The actual dimension of the image will depend on your original source image.
If the Image Script is disabled and you need to have consistent image height, you would need to crop the image manually with an image software before uploading (ie. use Photoshop to crop the image).
With the Image Script disabled, if you find entering “Image Width” and “Image Height” is not taking in effect:
– this is because our themes are responsive, we specify the image element to have max-width:100%and height:auto (so the images will respond proportionally on all devices)
– you can override this by adding this Javascript code in Themify > Settings > General -> Footer Code (the code below will take the image height attribute as you entered which might cause the image to look stretched):
When you adjust thumbnail dimensions under WP > Settings > Media, the new sizes are not applied to the images you have previously uploaded to your site. To make the changes affect the standard image sizes Thumbnail, Medium and Large on your site, you need to install and run this plugin: Regenerate Thumbnails. The custom image sizes are regenerated on the fly when the dimension changes.
This tutorial will show you how to add custom fonts in Themify themes. The custom font feature is added in Themify framework 4.6.9, so make sure you are using a newer verison before following this tutorial.
Why Use a Custom Font?
Themify themes include a complete library of all Google Fonts (940+ fonts). But if you can't find the Google Font that you like, then you would need to upload your custom fonts. Or if you can't use Google Fonts due to privacy laws, then you can upload the custom fonts on your own server.
To add your own custom fonts:
Download a free font of your choice (take a look at our list of free font sites below). If your font is downloaded as a zip file, extract it, and keep in mind where the .ttf file is – we will use this later.
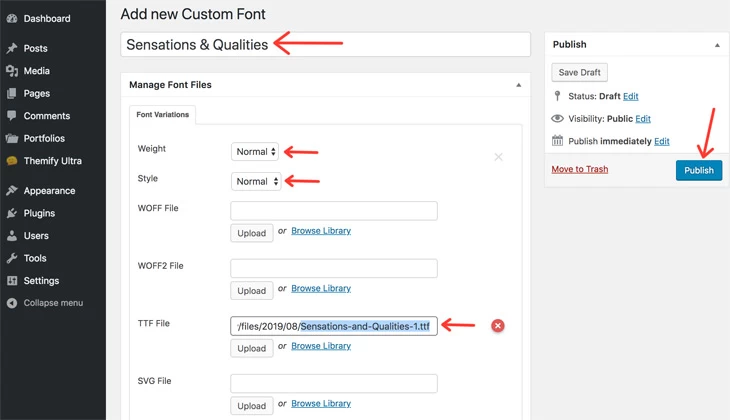
Go to WP Admin >Themify > Custom Fonts > Add New:
Enter the font name (it’s best to use the actual name of the font to keep things organized)
Weight: select normal (you can always change this later)
Style: select normal (you can always change this later)
TTF File: upload your font’s .ttf file
NOTE: When you are uploading the .ttf font file and see an "X" icon, it means your WordPress site doesn't allow the file extension upload. Install the File Upload Types plugin and then add the .ttf file extension upload support.
Click ‘Publish’
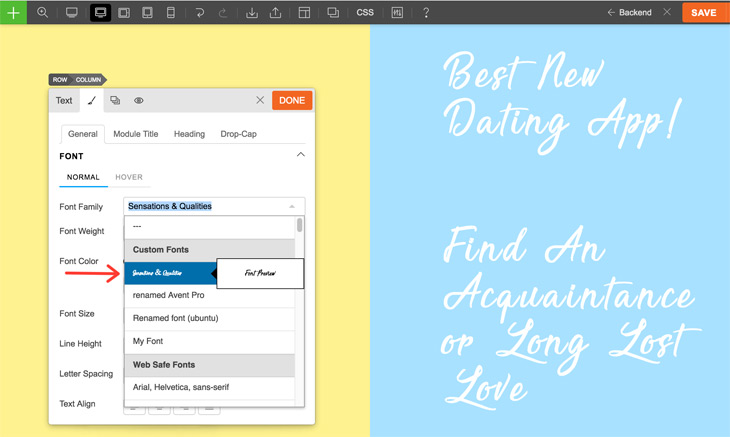
Now when you go to the Customize panel, or turn on the Builder and go to any text element’s styling menu, you’ll see your new custom font from the selection of Fonts.
Where to Download Fonts?
You can download free fonts from the list of sites below. Please double check the font license before uploading it to your site.
This tutorial will show you how to load additional stylesheets and scripts using the wp_enqueue_style and wp_enqueue_script function.
Create a child theme if it doesn't exist yet (creating a child theme will prevent theme updates overwrite your work)
In the child theme functions.php, add the enqueue functions as you want
To enqueue a stylesheet, use wp_enqueue_style plus the handler name and file location (get_template_directory_uri in the sample code below will output the theme folder path)
To enqueue a Javascript, use wp_enqueue_script plus the handler name and file location
The example below will add script.js and custom.css from the child theme folder