16 Apr 2014
Theme Code Snippets
All themes
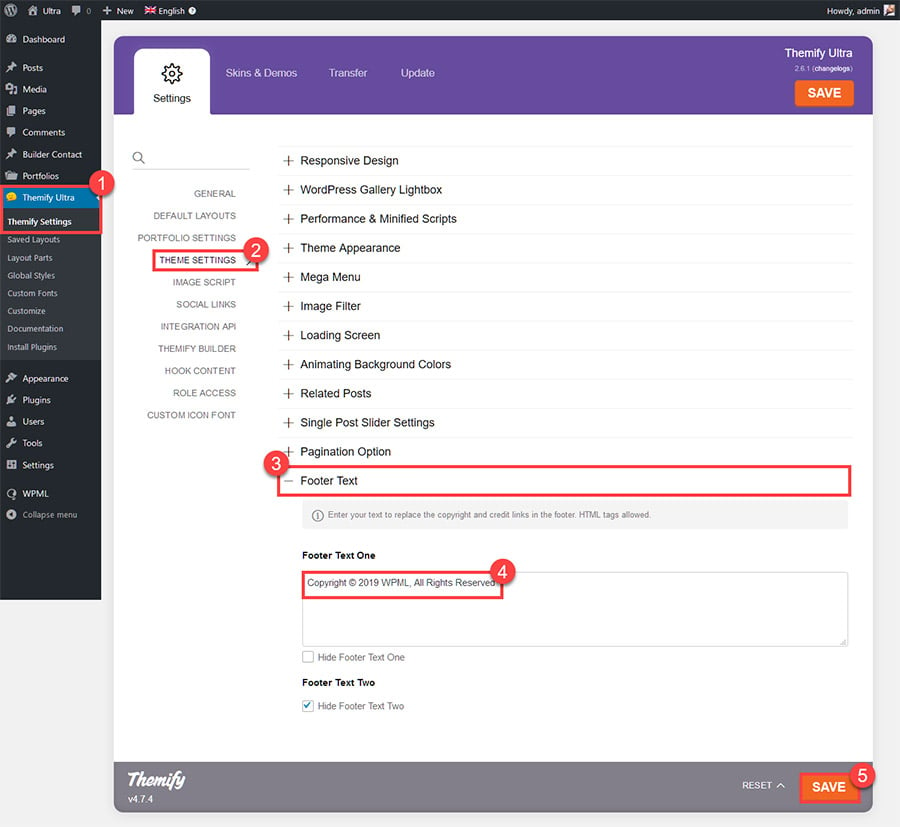
Color pulse effect in footer
This creates a background transition effect in the footerwrap from one color to another.
#footerwrap{
	background: none;
	background-color: #45CEEF;
	-webkit-animation: colorpulse 40s infinite alternate;
	animation: colorpulse 40s infinite alternate;
}
@-webkit-keyframes colorpulse {
	0%   { background-color: #45CEEF; }
	25%  { background-color: #FFF5A5; }
	50%  { background-color: #FFD4DA; }
	75%  { background-color: #99D2E4; }
	100% { background-color: #D8CAB4; }
}
@keyframes colorpulse {
	0%   { background-color: #45CEEF; }
	25%  { background-color: #FFF5A5; }
	50%  { background-color: #FFD4DA; }
	75%  { background-color: #99D2E4; }
	100% { background-color: #D8CAB4; }
}
Use a different image size for attachment pages
WordPress by default uses the Medium image size for images displayed in attachment pages. To change that you can use this snippet.
<?php

function custom_attachment_size( $content ) {
	if( is_attachment() ) {
		global $post;
		$content = wp_get_attachment_image( $post->ID, 'large' );
	}
	return $content;
}
add_filter( 'the_content', 'custom_attachment_size' );
Disable URL field in the comments form
In the comments form there's a text field where visitors can leave the URL to their website. If you want to hide that, use this snippet:
<?php

function custom_comment_form_fields( $fields ) {
    unset( $fields['url'] );
    return $fields;
}
add_filter( 'comment_form_default_fields', 'custom_comment_form_fields' );
Issue with custom fonts on Firefox
Firefox has strict requirements where the font resides in relation to the website, sometimes this causes issues where the custom fonts on your site are not loaded. To fix that, you need to add the following code in the .htaccess file located in the root of your WordPress installation.
<FilesMatch "\.(ttf|otf|woff)$">
<IfModule mod_headers.c>
        Header set Access-Control-Allow-Origin "*"
</IfModule>
</FilesMatch>
Issue with audio playback
If you're having trouble rewinding or forwarding the audio files on your site, it could mean that the Range headers for the audio file are not setup properly. Click here for more information. You can ask your web hosting provider to fix this issue for you.
Hide header and footer inside lightbox window
In various modules in Builder (eg. Button module), you have the option to open an URL in a lightbox window. If the source URL is using a Themify theme, it will add a class lightboxed to the body tag (in the iframe tag). You can add custom CSS to target the page in the lightbox. For an example, you can hide the header and footer with this custom CSS:
.lightboxed #headerwrap,
.lightboxed #footerwrap {
    display: none;
}
Theme Settings Cache
The Themify themes cache all the theme settings in a file, which is, by default located in <theme>/themify/.data directory. This reduces the number of database queries thereby increasing the performance of your website. If your server is setup to sync files for backup, this feature may cause your settings to not be saved as expected. In such a case the caching can be easily turned off by adding this snippet into the wp-config.php file:
<?php

define( 'THEMIFY_SKIP_DATA_CACHE', true );
The location where the theme stores the settings cache can also be changed the same say, to do that:
<?php

define( 'THEMIFY_SETTING_CACHE_DIR', __DIR__ . '/wp-content/uploads/tf_datacache/' ); /* Note that the trailing slash at the end is required. */
This changes the path to the "tf_datacache" folder inside wp-content/uploads. You can then assign permissions or change the rules for file sync for that folder depending on your needs and your setup.
Builder
Change module title tags
Builder by default uses h3 tags for module titles, to change that you can use:
<?php

function custom_themify_builder_module_args( $args ) {
    $args['before_title'] = '<h3 class="module-title">';
    $args['after_title'] = '</h3>';
    return $args;
}
add_filter( 'themify_builder_module_args', 'custom_themify_builder_module_args' );
Disable front-end editor
If you want to disable the frontend Builder (without disabling the Builder entirely) you can use the following code in the child theme functions.php file:
<?php

add_filter( 'themify_builder_is_frontend_editor', '__return_false' );
Ultra
Display post title above post date
The post title by default is displayed below the post date. If you want to swap their position, add the following custom CSS:
.post .post-content-inner {
   display: table;
}
.post .post-title {
   display: table-header-group;
}
Split
Change split scroll threshold
By default when screen size gets smaller than 600px, the split scrolling effect is disabled. To change this, you would add this code in a child theme functions.php:
<?php

function custom_split_scroll_threshold( $args ) {
    $args['splitScrollThreshold'] = 890;
    return $args;
}
add_filter( 'themify_script_vars', 'custom_split_scroll_threshold' );
Event
Change the display of map in events page
To change the settings of the map displayed on the event post, the "themify_event_map_args" filter can be used. For example, to disable the mouse wheel zoom on the map, you can use:
<?php

function custom_themify_event_map_args( $args ) {
    $args['scroll_wheel'] = 'no';
    return $args;
}
add_filter( 'themify_event_map_args', 'custom_themify_event_map_args' );
The list of options can be found here: https://themify.me/docs/shortcodes#map
Music
Custom sizes for gallery images
To change the size of the images displayed on the single gallery, you can use:
<?php

function custom_themify_single_gallery_image_size( $size, $featured ) {
	if ( $featured && '' != $featured ) {
		return array(
			'width' => 350,
			'height' => 400
		);
	} else {
		return array(
			'width' => 350,
			'height' => 200
		);
	}
}
add_filter( 'themify_single_gallery_image_size', 'custom_themify_single_gallery_image_size', 10, 2 );
Disable album lightbox
To disable the lightbox that shows up when clicking on the albums, you can use:
<?php

function custom_disable_album_lightbox( $args ) {
    $args['albumLightbox'] = 0;
    return $args;
}
add_filter( 'themify_script_vars', 'custom_disable_album_lightbox' );
Disable the map on events page
To disable the map displayed on the single event:
.single-event .shortcode.map {
    display: none;
}
.single-event #content {
    padding-right: 420px;
    margin-top: 150px;
}
.single-event .event-single-wrap {
    overflow: visible;
}
.single-event .event-map {
    height: auto;
}
Open video posts in lightbox
By default when you click the video post title, it goes to the video single view. You can change the post title link to open video in lightbox by adding the following code in Themify > Settings > General > Footer Code:
<script>
jQuery(function($) {
	$( '.video-multiple .post-title a, .loops-wrapper.video .post-title a' ).click( function(){
		$( this ).closest( '.post' ).find( '.lightbox' ).trigger( 'click' );
		return false;
	} );
} );
</script>
Open album posts in lightbox
Similar as above, to change album post title to open album in lightbox, add the following code in Themify > Settings > General > Footer Code:
<script>
jQuery(function($) {
	$( '.album-multiple .post-title a, .loops-wrapper.album .post-title a' ).click( function(){
		$( this ).closest( '.post' ).find( '.themify-lightbox' ).trigger( 'click' );
		return false;
	} );
} );
</script>
Show past events in event category taxonomy archive
By default only the upcoming events are displayed in the Event category taxonomy pages. To disable this behavior and show all events, you can use:
<?php

function custom_event_category_sort() {
    if( is_tax( 'event-category' ) )
        add_filter( 'themify_theme_event_sorting', '__return_empty_array' );
}
add_action( 'template_redirect', 'custom_event_category_sort' );
Switch map and featured image in single event pages
In single event pages, the map is displayed on the right side while the map goes in the background. To switch the position of the map and the featured image, you can use:
.single-event .event-map {
    height: 200px;
    position: absolute;
    overflow: hidden;
    top: 0;
    right: 0;
    margin-top: 40px;
    margin-right: 40px;
    background: #1a1c1c;
    width: 350px;
    z-index: 2;
}
.single-event .event-single-details {
    position: static;
    max-width: inherit;
}
.single-event .event-single-details .post-image {
    position: absolute;
    top: 0;
    left: 0;
    right: 0;
    z-index: 1;
}
.single-event .event-single-details .event-info-wrap {
    position: relative;
    z-index: 3;
    max-width: 350px;
    float: right;
    margin-top: 200px;
    background: #000;
}
Parallax
Unlink portfolio images
This snippet is useful if you don't want the portfolio images to be linked to the portfolio single.
<?php

function custom_unlink_portfolio_images() {
	global $post, $themify;

	if( $post->post_type == 'portfolio' && is_singular( 'portfolio' ) ) {
		$themify->unlink_image = 'yes';
	}
}
add_action( 'themify_post_before', 'custom_unlink_portfolio_images' );
Move menu bar to the top of the page
This custom CSS forces the menu bar to be displayed at the top.
#nav-bar {
	top: 0;
	bottom: auto;
	position: fixed;
}
.admin-bar #nav-bar {
	top: 32px;
}
.home #main-nav ul {
	bottom: auto;
}
.home #main-nav ul:before {
	bottom: auto;
	top: -8px;
	border-top: none;
	border-bottom: 8px solid #fff;
}
@media screen and (max-width: 760px) {
	#main-nav {
		top: 100%;
		bottom: auto;
	}
}
Display site logo on sticky header
By default site logo is hidden on sticky header. To show it on sticky header, add this custom CSS:
#headerwrap.fixed-header .header-bar{
  display:block
}
#headerwrap.fixed-header #site-logo {
    position: fixed;
    top: 30px;
    left: 20px;
    font-size:30px;
    z-index: 10000;
}
Left-align header elements in Parallax
To move the site logo, site description and social icons in the header to the left side of the header, add this custom CSS:
#header {
  text-align:left;
}
.header-bar,.sidemenu {
  padding-left:10%
}
Flatshop
Remove product lightbox
This will remove the lightbox displayed when you click the More Info button for products.
<?php

function themify_loop_add_to_cart_link( $format = '', $product = null ) {
	$url = $product->add_to_cart_url();
	if ( function_exists( 'themify_is_touch' ) ) {
		$isPhone = themify_is_touch( 'phone' );
	} else {
		if ( ! class_exists( 'Themify_Mobile_Detect' ) ) {
			require_once THEMIFY_DIR . '/class-themify-mobile-detect.php';
		}
		$detect = new Themify_Mobile_Detect;
		$isPhone = $detect->isMobile() && !$detect->isTablet();
	}
	if( ( 'variable' == $product->get_type() || 'grouped' == $product->get_type() ) && !$isPhone ) {
		$url = add_query_arg( array('post_in_lightbox' => '1'), $url );
		$replacement = 'class="variable-link '; // add space at the end
		$format = preg_replace( '/(class=")/', $replacement, $format, 1 );
		$format = preg_replace( '/href="(.*?)"/', 'href="'.$url.'"', $format, 1 );
	}
	if ( $product->is_purchasable() ) {
		$format = preg_replace( '/add_to_cart_button/', 'add_to_cart_button theme_add_to_cart_button', $format, 1 );
	}
	return $format;
}
Hide the cart icon when it's empty
Hide the cart icon in the header when there is no product in the cart.
<script>
jQuery(function($){
	$('body').on( 'added_to_cart', function(){
		$('#cart-icon').show();
	} );
	if( $('#shopdock .product').length > 0 ) {
		$('#cart-icon').show();
	}
});
</script>
Pinboard
Fluid layout for all pages
On the Pinboard homepage, Pinboard stretches fullwidth of the screen. If you want to have the same fullwidth layout on all pages, use this custom CSS:
.pagewidth {
    width: 94%;
}
@media (min-width: 771px) {
    #content {
        width: 75%;
    }
    #sidebar {
        width: 22%;
    }
}
Metro
Registering a new tile size
Metro theme by default has 3 size options for the Tile post type: Small, Medium and Large. This snippet helps you register a new tile size.
<?php

function register_custom_tile_size( $args ) {
	$args[4]['options'][0]['meta'][] = array( 'value' => 'custom', 'img' => 'images/layout-icons/tile-custom.png', 'title' => __( 'Custom', 'themify' ) );
	return $args;
}
add_filter( 'themify_do_metaboxes', 'register_custom_tile_size' );
Now to set the dimensions of this new tile using custom CSS codes:
.tile.custom,
.tile-post.image.custom .tile-flip {
    width: 200px;
    height: 200px;
}
Register new tile colors
Add more color options for Tile post type.
<?php

function custom_themify_theme_meta_boxes($arg) {
	array_push($arg[4]['options'][1]['meta'], array('value' => 'cyan', 'img' => 'images/layout-icons/color-cyan.png'));
	array_push($arg[4]['options'][1]['meta'], array('value' => 'silvergrape', 'img' => 'images/layout-icons/color-silvergrape.png'));
	return $arg;
};
add_filter( 'themify_do_metaboxes', 'custom_themify_theme_meta_boxes' );
Elemin
Move post meta to bottom
The theme by default displays the post meta info (author, comment counts, etc.) on the side of the post. This snippet will them to the bottom of the post:
.loops-wrapper.list-post .post-meta,
.single .list-post .post-meta {
	top: 100%;
	width: 100%;
	text-align: left;
}
.loops-wrapper.list-post .post-meta span,
.single .list-post .post-meta span,
.post-meta .post-date {
	display: inline-block;
	margin-right: 10px;
}
.loops-wrapper.list-post .post,
.single .list-post .post {
	padding-left: 0;
}
span.post-icon {
	display: none !important;
}