14
Mar
2016
Product Releases /
Non-stop awesomeness at Themify! After the major framework release, we are now presenting a Shopify plugin and a free premium theme!
Why Shopify Plugin?
Being an open source company, Themify is open to other platforms as well. Today we're proud to release the free Shopify Buy Button plugin. You may wonder why use Shopify when there are numbers of free ecommerce plugins for WordPress (eg. WooCommerce)? When you run an ecommerce shop, there are more technical measures that need to be taken care of like security and protection—protecting your shop from hackers and customer credit cards info for instances. All these require great knowledge of setting up SSL, finding a secure theme, plugins, and so on.

(more…)
Read More
14
Mar
2016
/
Installing the Plugin
To install the plugin:
- Download the free plugin zip from our Plugins page.
- Note: Some browsers (e.g. Safari) may auto-extract ZIP files. Right-clicking on the download link and selecting "Save Linked File As" will allow you to download the ZIP version.
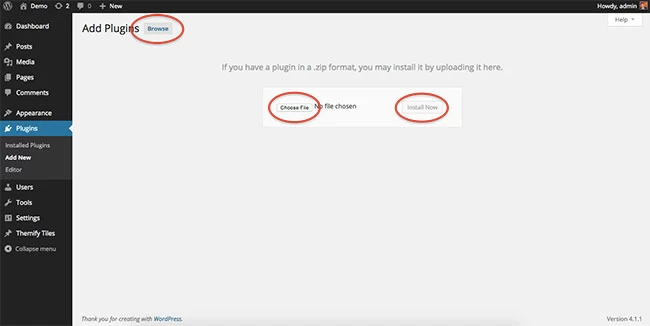
- Then go to your WP Admin > Plugins > Add New > Upload Plugin
- Now upload the plugin zip file and click "Install Now".
- After the plugin is installed, click "Activate Plugin" to activate the plugin.
FYI: If you can't install the plugin using WordPress plugin installer, you may also use a FTP software to install the plugin. To install plugins with an FTP method: extract the plugin zip on your local computer then upload the plugin folder to your FTP server where you installed WordPress > wp-content > plugins folder. After, login to your WP Admin > Plugins to activate the plugin.
With the Shopify Buy Button plugin you'll be able to embed your Shopify products/collections on any WordPress site. This allows your customers to purchase your Shopify products directly from your site. How it works, is that the plugin will generate a shortcode that will allow you to display Shopify products via WordPress text editor or sidebar Text widget.
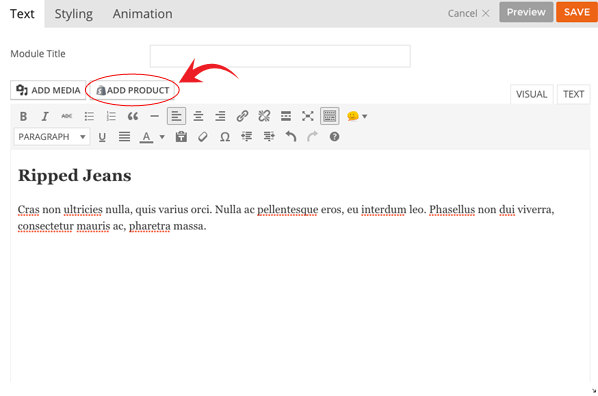
1. Add on a Page/Post
To start, add a new post or page where you want to display the Shopify products. Above the WordPress editor, you will see an "Add Product" button with the Shopify icon that appears beside the "Add Media" button. Click on the "Add Product" button.
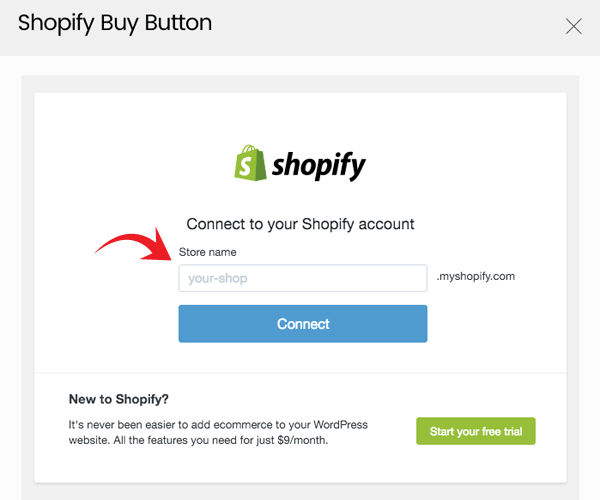
2. Enter Your Shopify Store Name
After clicking on the "Add Product" button, you'll be prompted to input your Shopify Store name account. Enter your account name here to connect to your Shopify store.
3. Login Your Shopify Account
Entering your store name will open a new browser tab to the Shopify login form. Enter your email and password to login.

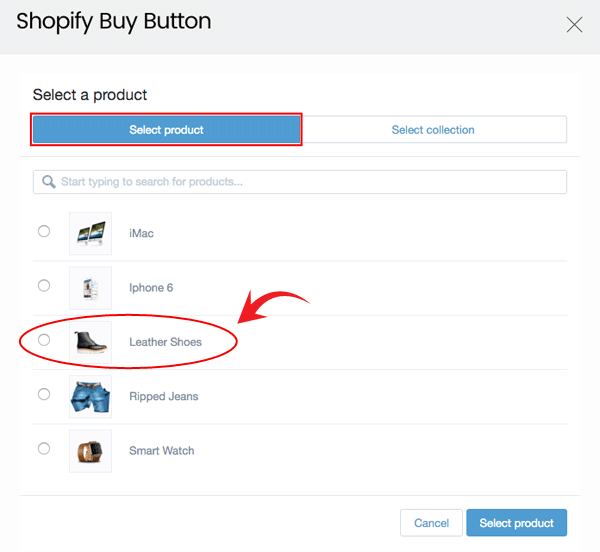
4. Select Products/Collections
After entering your email and password, you'll be redirected back to your WordPress site. From there you can select the products/collection which you want to embed.
5. Buy Button Appearance (Optional)
Once you finish selecting a product/collection, you'll proceed to the buy button styling panel. Here you'll be able to set the parameter on how you want your product showcased. You can also leave this section blank, doing so will use the default appearance which you can set in the Appearance option page. If you are OK with the default appearance options, click "Insert Shortcode" to generate the shortcode. Now you can copy & paste this shortcode to any post, page, or Text widget in your sidebar.
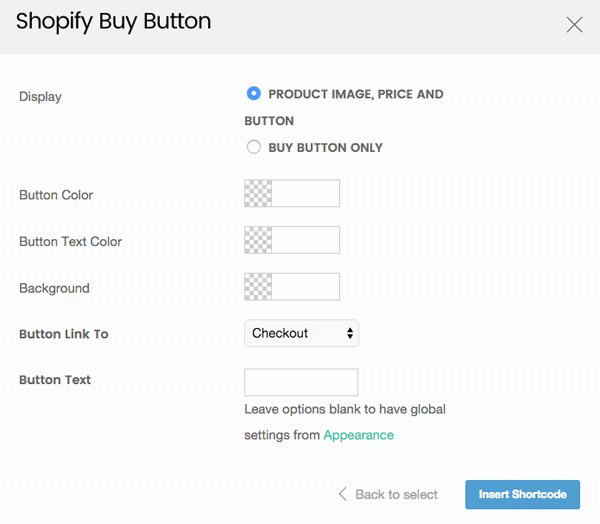
- Display: Display product, image, price and button (this will pull the product details from your Shopify store), or showcase the buy button only
- Button Color: Button background color
- Button Text Color: Text color of the button
- Background: Background color of the cart panel
- Button Link To:
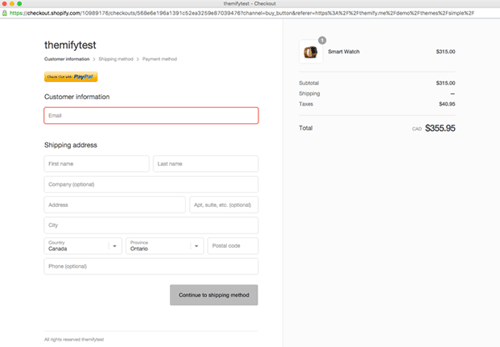
- Checkout: Allow user to checkout directly after they click on the button. A custom PayPal page will appear allowing them to proceed with their purchase immediately.
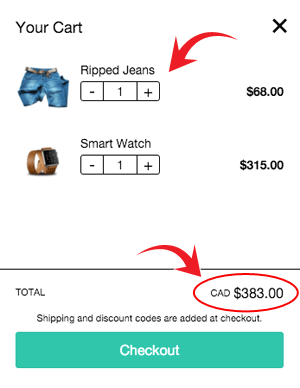
- Cart: Will add to cart. Allowing user to continue shopping. The cart will allow them to increase or decrease the quantity of their selected items, as well as, give them a subtotal of the amount of their purchase.
- Product Modal: A lightbox will appear that'll allow users to view the product details and buy button.
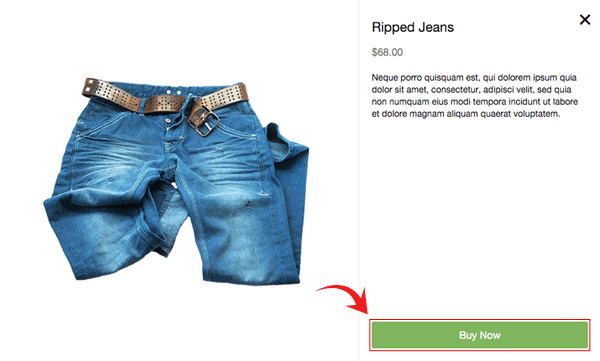
- Button Text: Text that will appear on the button
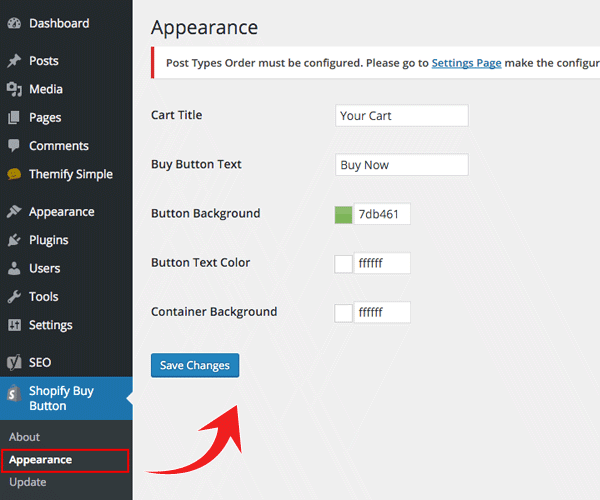
Appearance Option Page
To set the default appearance, go to WP Admin > Shopify Buy Button > Appearance. Input the parameters you'd like that'll set the default appearance (when the Shopify Buy Button shortcode parameters are empty, it will use these default options).
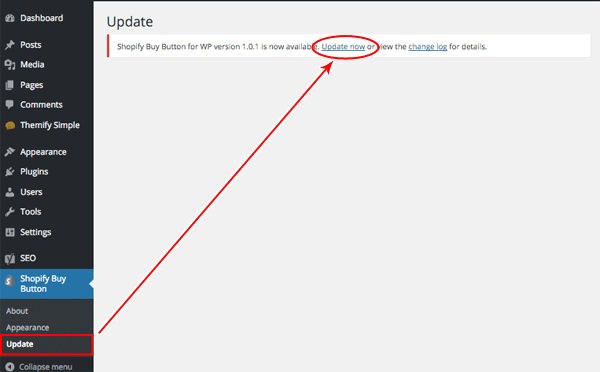
Update Plugin
If an update is available, you will see a notification at the top of the admin dashboard. Click on the update link this will take you to the update page where you can auto update the plugin and view changelogs. You can also find updates manually by going to the wp-admin > Shopify Buy Button > Update.
Reinstall Plugin
In the event there are issues/bugs with the plugin or you can't auto update the plugin, try to reinstall it with the latest version. Since WP 5.9, you can reinstall plugins by re-uploading the plugin zip. Reinstalling the plugin shouldn't affect the content/data because they are saved separately in the database. To be safe, you should backup your WordPress site before reinstalling it.
To reinstall a plugin:
- Download the latest plugin zip
- Go your site WP Admin > Plugins > Add new
- Then upload the new plugin zip and WordPress will ask if you want to replace the current version, click "Replace current with uploaded"
Read More
14
Mar
2016
/
Installing the Theme
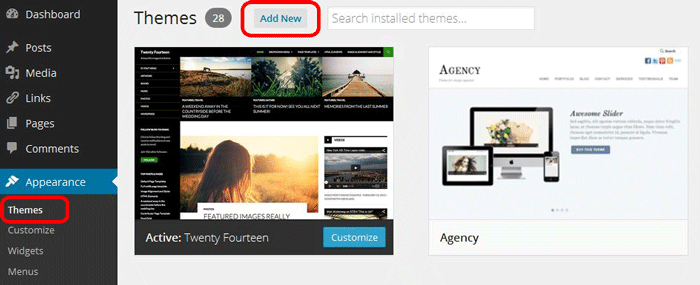
To install themes with the WordPress theme uploader:
- Download the "theme.zip" file from the Member Area
- Note: some browsers (eg. Safari) auto extract zip files automatically. Right-click on the download link and select "Save Linked File As". This will allow you to download the theme as a zip file.
- Login to your site's WP Admin.
- Go to Appearance > Themes.
- Click on the "Add New" button, then click on the "Upload Theme" button
- Upload the theme.zip file (note: it is the theme.zip, not the theme-psd.zip that you just downloaded from the Member Area).
- Activate the theme
FYI: You can also install themes with FTP method. Read the Installing Themes tutorial for more info.
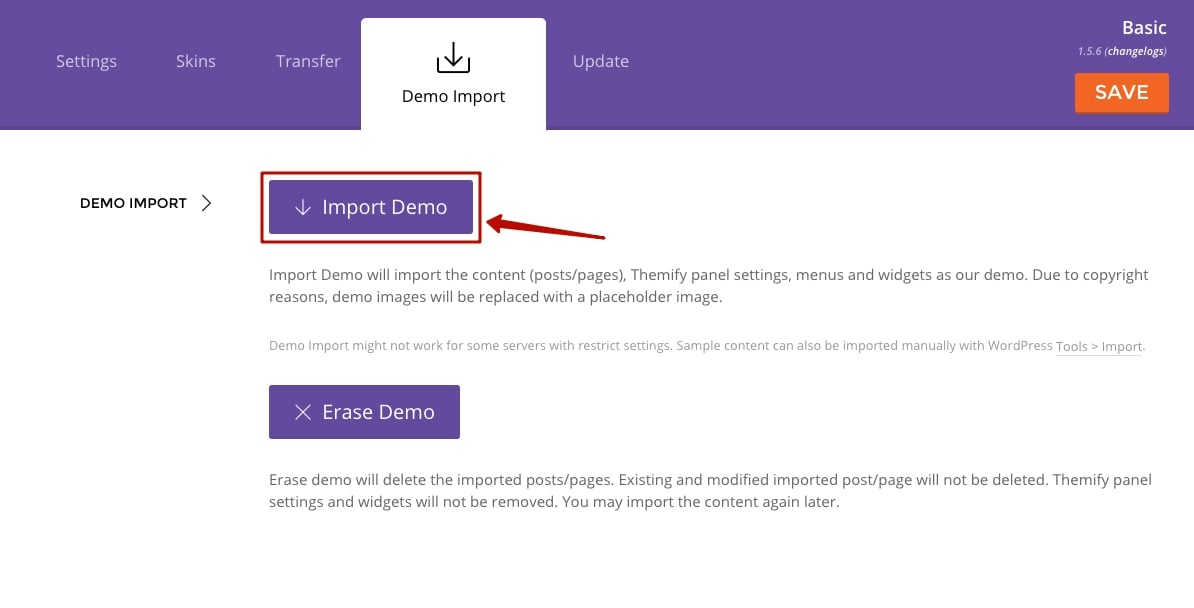
Demo Import
If you are starting a fresh site, importing the demo content will help you understand how the theme demo is built. The Demo Import feature will import the contents (posts, pages, comments, etc.), Themify panel settings, menus, and widgets setup from our demo to your site. You can erase the demo content afterward.
To import the demo setup:
- Go to WP Admin > Themify > Settings > Demo Import and click "Import Demo" button.
- Note that the featured images will be replaced with an image placeholder for copyright reasons.
To erase the demo setup:
- On the Demo Import tab, click on the "Erase Demo" button which will then remove the demo content.
FYI: If the Demo Import does not work on your site, you can use the WP Admin > Tools > Import tool to import the demo content manually.
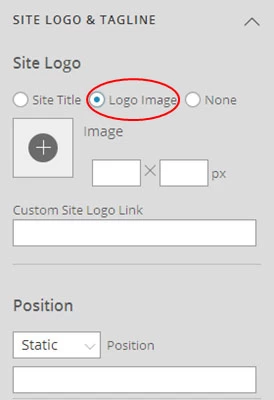
Site Logo & Tagline
To display a logo image instead of the site name text:
- Go to WP Admin > Appearance > Customize > Site Logo and Tagline.
- Under "Site Logo", select "Logo Image" radio button.
- Upload a logo image.
- Specify the logo image width and height.
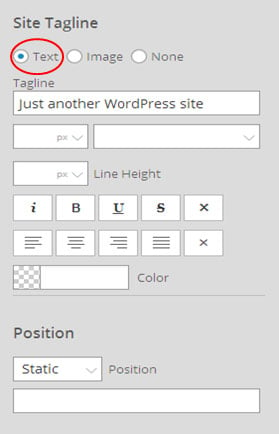
You can also change website Tagline from here:
- Go to WP Admin > Appearance > Customize > Site Logo and Tagline.
- Scroll down and under "Site Tagline" select "Text" radio button.
- Enter your site Tagline.
- Click "Save & Publish".
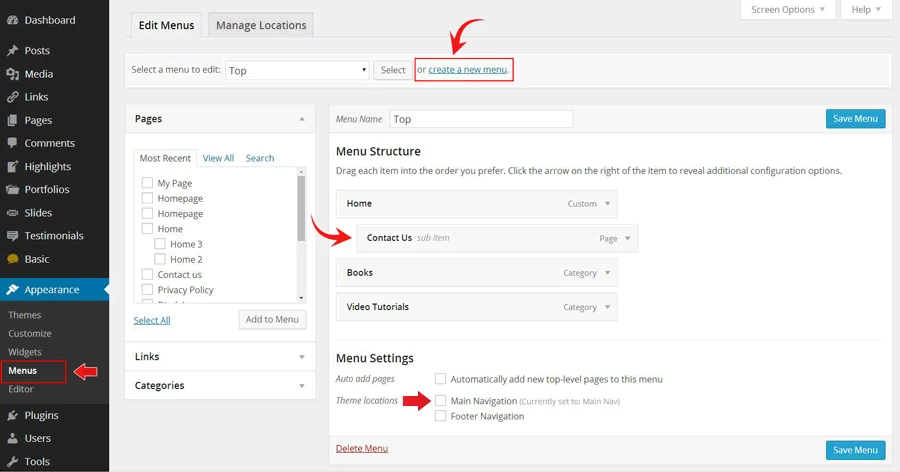
To create a custom navigation menu:
- Go to WP Admin > Appearance > Menus.
- Click on "create a new menu" to create a new menu (eg. Main Menu).
- Add the menu items from the left panels.
- To create a dropdown menu: drag the menu item towards the right (the item(s) will be indented).
- When you are done adding the menu items, click "Save Menu".
- To assign menu locations:
- Scroll down to the bottom where it says "Theme locations" and tick the menu location checkbox.
- Main Navigation = main menu on the header
- Footer Navigation = footer menu on the footer (Note: some themes might not have Footer Navigation).
TIPS: You can display menus on sidebar widgets, remove the main menu, create empty links, and lightbox links. Read Custom Menus for more detailed tutorial.
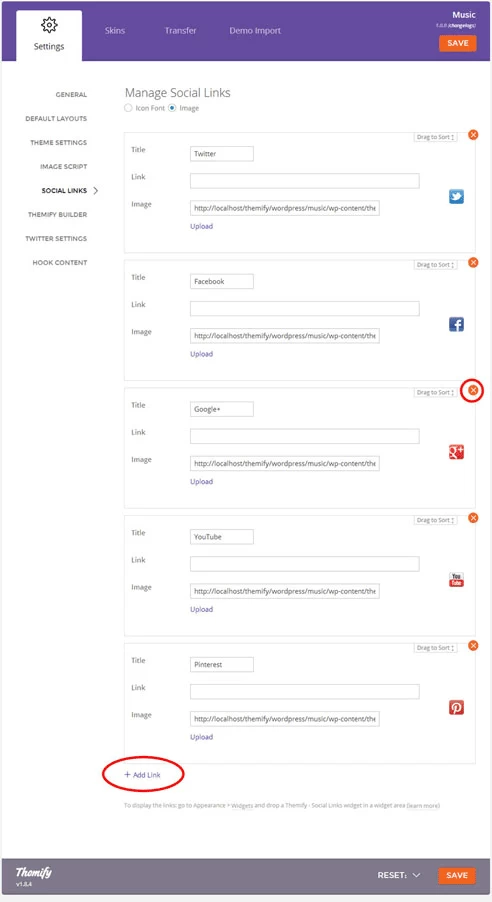
Setting Up the Social Links
Step 1) To set up the social media links:
- Go to WP Admin > Themify > Settings > Social Links tab.
- The theme comes with some pre-filled social links. Simply enter your social profile URL in the Link input field. For example, enter 'https://twitter.com/themify' for the Twitter link.
- You can choose to display either "Icon Font" or "Image".
- If "Icon Font" is selected, click on "Insert Icon" to select an icon (over 320+ icons available).
- If "Image" is selected, you can upload your own graphic icon by clicking on the Upload button.
- To add more links, click on the Add Link button at the bottom.
- To remove a link, click on the delete icon.
- To arrange the display order, drag and drop the link container.
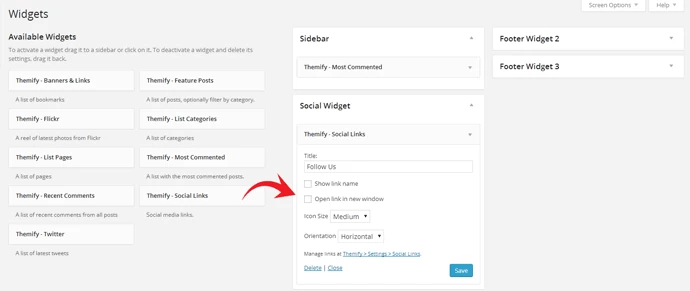
Step 2) Displaying the Social Links:
- Once you have the Social Links setup, go to WP Admin > Appearance > Widgets. Drag and drop the Themify - Social Links from the Available Widgets panel to the Social Widget panel.
- Optional: Customize Widget Title - such as "Follow Us". You can also "Show link name" and adjust icon size.
To hide the default RSS icon in the header:
- Go to WP Admin > Themify > Settings > Theme Settings.
- Under the "Exclude RSS Link", tick the checkbox that says "Check here to exclude RSS icon/button in the header".
To hide the default search form in the header:
- Go to WP Admin > Themify > Settings > Theme Settings.
- Under the "Exclude Search Form", tick the checkbox that says "Check here to exclude search form in the header".
Shopify eCommerce
Designed to work with the "Shopify Buy Button" plugin by Themify. It allows Shopify users to build an ecommerce site, and link their Shopify Store with WordPress. You can set up your Shopify eCommerce site by following the instructions below.
Install Shopify Buy Button plugin
- Download the plugin file from your member area on the Themify site
- Note: Some browsers (e.g. Safari) may auto-extract ZIP files. Right-clicking on the download link and selecting "Save Linked File As" will allow you to download the ZIP version
- Install the plugin (Shopify Buy Button doc)
- After you activate the plugin, you'll see a shortcode generator appear on all the text editors on your site

- You can then follow the prompts, and input the information of your Shopify store. For a more detailed guide on how to set-up and use the Shopify Buy Button plugin, please refer to the Shopify plugin documentation.
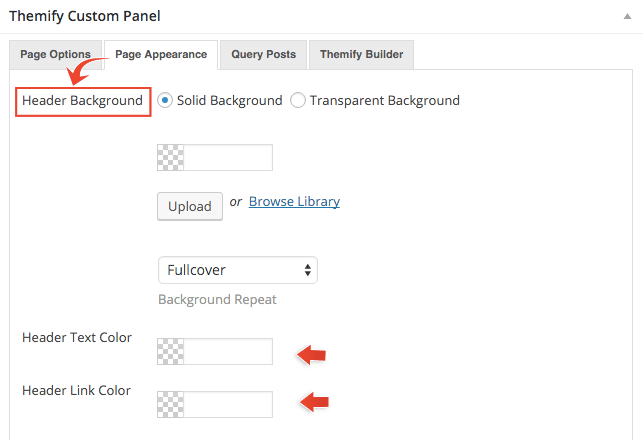
You can customize different header background in each individual post/page. These options can be accessed when you edit a page/post > scroll down to the Themify Custom Panel > Click on the Page Appearance tab.
Below are the following Header Background options:
- Solid Background = Allows you to pick a background color and upload background image for the header
- Transparent Background = Header background will be transparent (Note: The content container will push to the top of the page to achieve transparent header effect)
- Header Text Color = Color that'll be applied on any text on the header (Note: The color selected will also be applied on the menu icons)
- Header Link Color = Color that'll be applied on any links on the header (Note: The color selected will also be applied on the menu icons)
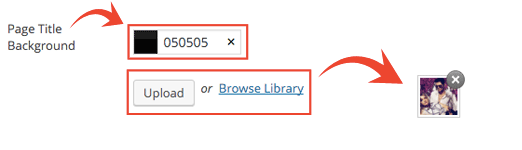
The theme comes with a unique page title header styling, allowing you to customize the header image, text, and overlay color. This can be applied to both categories and pages on your site.

To set up page unique header:
Edit page > Scroll down to your Themify Custom Panel > Click on the Page Options tab
- Page Sub Heading = Sub text that'll appear underneath the page title

Edit page > Scroll down to your Themify Custom Panel > Click on the Page Appearance tab
- Page Title Background = Set color overlay that'll appear on your unique page header, also add an image that you'd like to appear as a background image on your header
To set up category unique header:
WP Admin > Posts > Categories > Edit a category
- Description = The content added here will appear as a sub heading to the categories title
- Background = Set color overlay that'll appear on your unique page header, also add an image that you'd like to appear as a background image on your header

Setting Default Post and Page Layouts
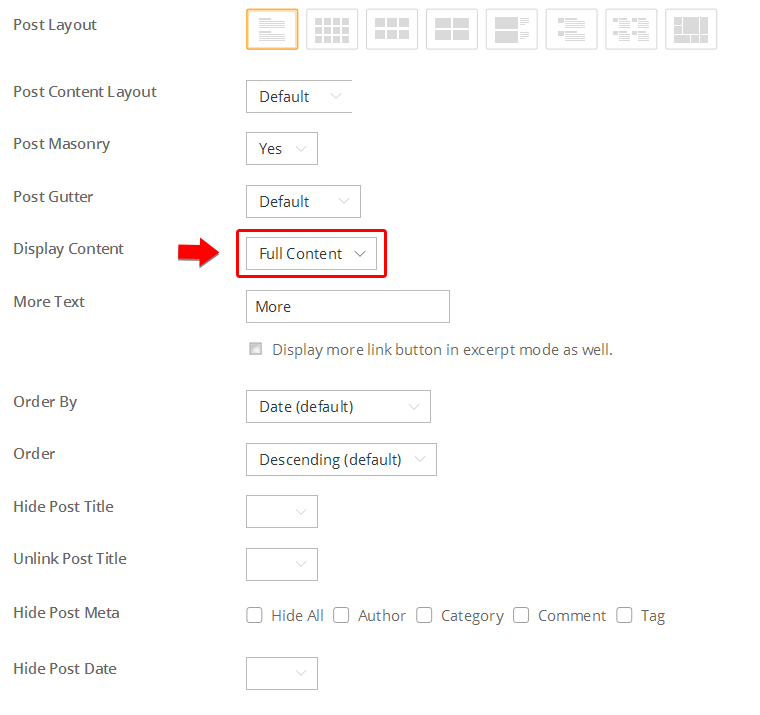
Generally, the theme works out of the box. All the sidebar options and image dimensions are pre-defined in the theme. If you need to change the default sidebar options, featured image dimensions, content/except display, post meta, etc., it can be done in the WP Admin > Themify > Settings > Default Layouts.
There are three default layout options under Themify > Settings > Default Layouts:
- Archive Sidebar Option: refers to the default home page, category, search, archive, tag pages, etc.
- Default Post Layout: is the post page direct URL (also known as "Single Post").
- Note: Some themes may only have 4 layouts.
- Default Static Page Layout: is the static page.
FYI: Read Default Layouts documentation for more info.
Creating a Blog Page
To create a blog page:
- First, create a new Page (go to WP Admin > Pages > Add New), name it "Blog" or any page title as you want.
- View the page on the frontend, click "Turn On Builder".
- Drop in a Post module and configure the options as you like.
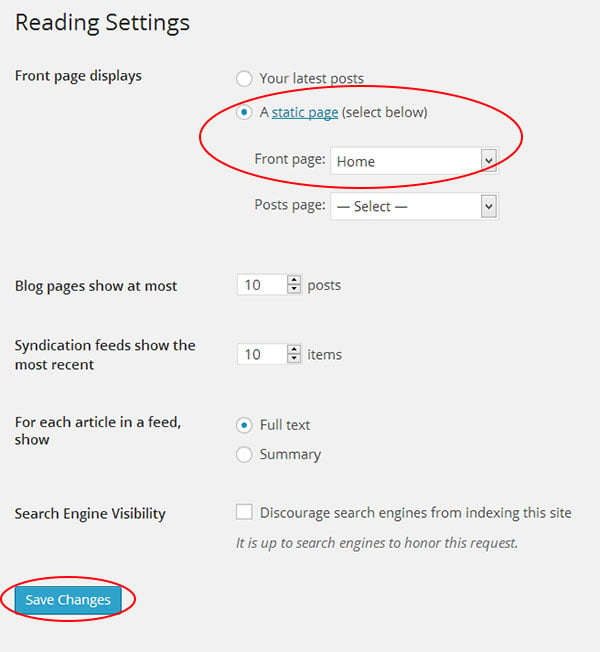
Setting a Custom Front Page
You can set any page as the front (home) page. This means you can use the Builder to design the page and assign it as the front page. To set the Front Page:
- Go to WP Admin > Settings > Reading.
- On the Front page displays, select the "A static page (select below)" option and then select a "Front page".
- Leave the "Posts page" default. If you want to create a custom Blog page, read this tutorial instead of setting the "Posts page".
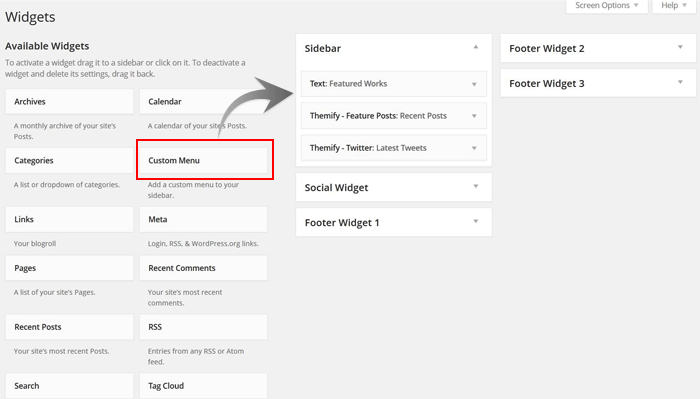
To add widgets to widgetized areas (eg. sidebar and footer widgets):
- Go to WP Admin > Appearance > Widgets.
- The big panel on the left side shows all available widgets. The small panels on the right are the widgetized areas.
- To add a widget: drag and drop the widget from the left panel to the right panel.
- To remove the widget: drag the widget back to the left panel (Available Widgets panel). If you want to keep the widget setting for future use, drag it to the Inactive Widgets instead of the Available Widgets panel. It will save your widget settings. To retrieve the widget, drag the widget from Inactive Widgets panel instead of the Available Widgets panel.
TIPS: You can also add widgets in Appearance > Customize panel.
Theme Skins
To apply pre-designed color skins:
- Go to WP Admin > Themify > Skins, select a skin by clicking on the thumbnail and click Save.
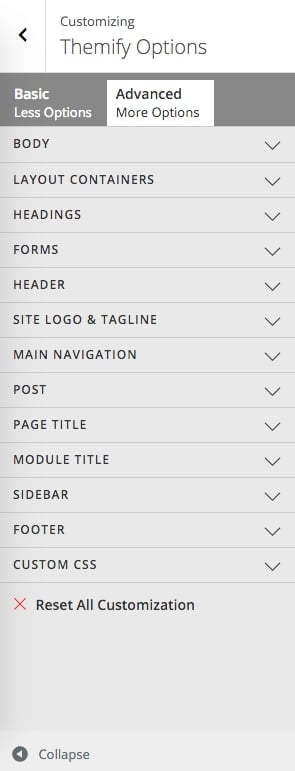
Styling The Theme
To style the theme frontend appearance:
- Go to WP Admin > Appearance > Customize.
- It will take you to the Customize panel with live preview where you can style the appearance of the theme design (ie. color, background, font, spacing, border, etc.).
FYI: Refer to Customize documentation for more info.
- To set the Footer Widget column layout, go to WP Admin > Themify > Settings > Theme Settings.

- To drop the widgets in the Footer Widgets, go to WP Admin > Appearance > Widgets.
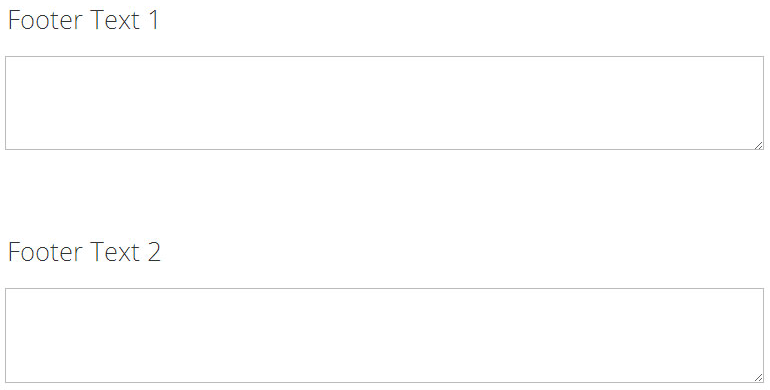
To replace the footer credit links:
- Go to WP Admin > Themify > Settings > Theme Settings and enter the footer text.
- HTML tags are allowed in the Footer Text.
- To have empty footer text, tick the hide footer text checkbox.
Read More
12
Mar
2016
Development /
You're going to love Themify even more with this new major update! Now available when you update to the latest version, we've packed 5 amazing new enhancements/features that'll make it easier for you to create an awesome WordPress site. Don't miss out, and check out these new features below.
Schema Markup - More SEO Friendly!
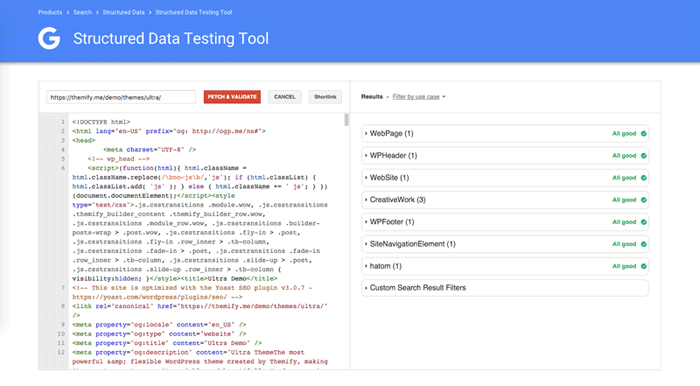
We've updated all themes to comply the Structured Data guideline set by Google. What this does is that it annotates your content allowing search engines to better index your content. This data format allows users to view your articles, posts, or pages on search engines with more detail. Showcasing the author, post date, address, reviews (if you have any) and so much more. This basically gives users more information (i.e. ratings) before clicking your link on a search engine. It also help search engines to index your content better.
(more…)
Read More
29
Feb
2016
Product Releases /
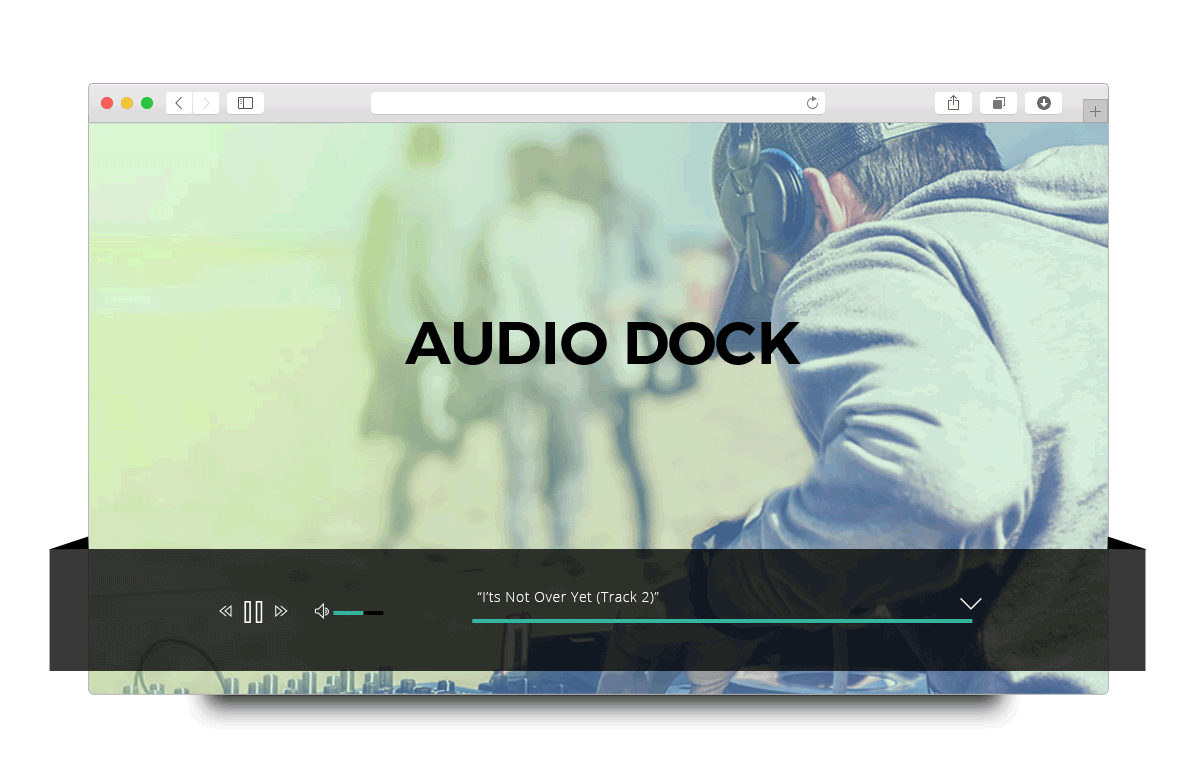
Due to popular demand, we've taken the audio dock from our popular Music theme and made it into a free plugin. Now you can play any music on any WordPress site with the Themify Audio Dock plugin. It comes with the ability for you to add an unlimited number of tracks, input custom track titles, and select custom colors for both the dock and track. It's great for musicians looking to showcase their album while users browse through their site. Or for anyone looking to set the mood by autoplaying a track while users view a page on your site. Add some pizzazz to your site and get the free Themify Audio Dock plugin now!
Demo Download Plugin
Read More