Note: Some browsers (e.g. Safari) may auto-extract ZIP files. Right-clicking on the download link and selecting "Save Linked File As" will allow you to download the ZIP version.
Then go to your WP Admin > Plugins > Add New > Upload Plugin
Now upload the plugin zip file and click "Install Now".
After the plugin is installed, click "Activate Plugin" to activate the plugin.
FYI: If you can't install the plugin using WordPress plugin installer, you may also use a FTP software to install the plugin. To install plugins with an FTP method: extract the plugin zip on your local computer then upload the plugin folder to your FTP server where you installed WordPress > wp-content > plugins folder. After, login to your WP Admin > Plugins to activate the plugin.
Using the Audio Dock Plugin
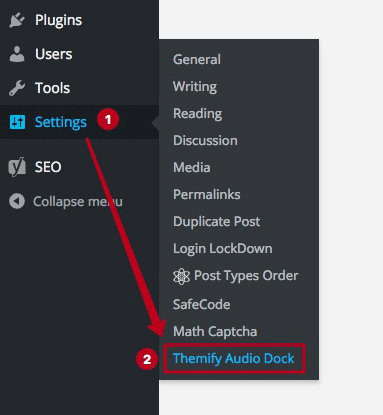
For the Audio Dock to appear on your site you'll first need to insert a track on the Themify Audio Dock settings area. On the Themify Audio Dock settings area you'll find all the options available for the plugin, such as adding tracks, changing the track and bar color, and setting to auto play.
To access the settings area, please go to the WP Admin > Settings > Themify Audio Dock
Adding an Audio Track
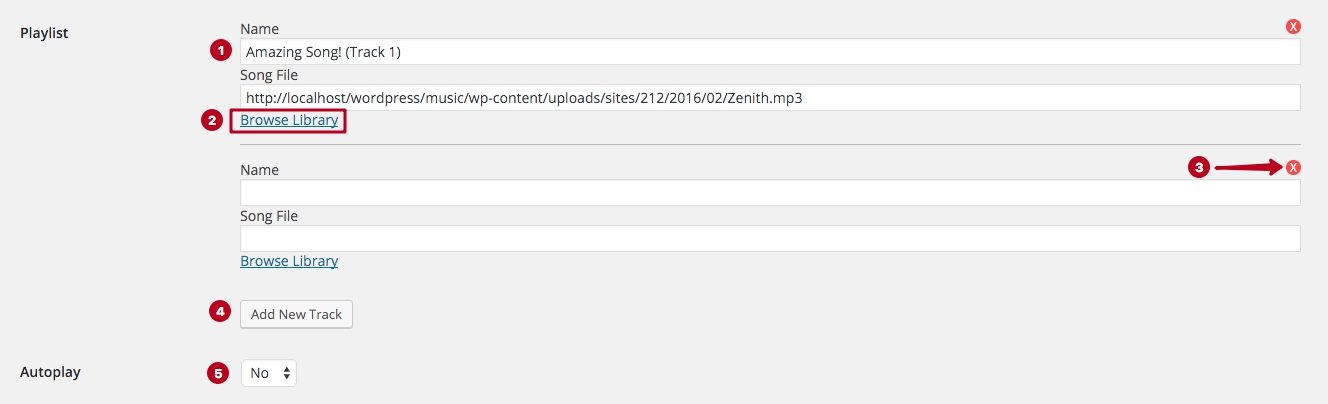
You can add an unlimited number of audio tracks to your playlist. Just note that only one track will play at a time, but users will be to toggle with the player and choose which track they'd like to listen to. Below are the options:
1) Name: Input custom title
2) Song File: Browse your media library and input any audio file you'd like
3) Delete Icon: Click to remove any audio track you don't want to add on your playlist
4) Add New Track: Click to add more tracks on your playlist
5) Autoplay: Set the audio player to play automatically as soon as users visits your page (Note: The track will refresh each time the page is refreshed)
Styling the Audio Dock
You can style the Audio Dock to match your site color by changing both the bar and track colors. The color picker will allow you to add any color you'd like and even adjust the opacity of the dock, allowing it to blend on your site as users browse.
Update Plugin
If an update is available, you will see a notification at the top of the admin dashboard. Click on the update link will take you to the update page where you can auto update the plugin and view changelogs. You can also find updates manually by going to the wp-admin > Shopify Buy Button > Update.
Reinstall Plugin
In the event there are issues/bugs with the plugin or you can't auto update the plugin, try to reinstall it with the latest version. Since WP 5.9, you can reinstall plugins by re-uploading the plugin zip. Reinstalling the plugin shouldn't affect the content/data because they are saved separately in the database. To be safe, you should backup your WordPress site before reinstalling it.
To reinstall a plugin:
Download the latest plugin zip
Go your site WP Admin > Plugins > Add new
Then upload the new plugin zip and WordPress will ask if you want to replace the current version, click "Replace current with uploaded"
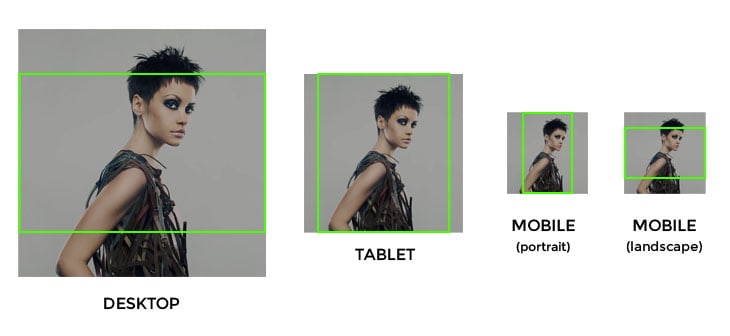
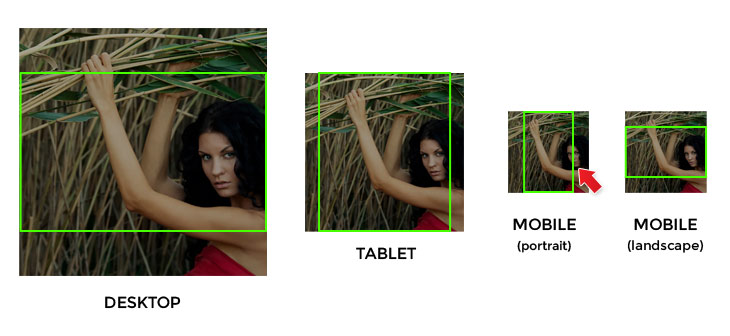
The image below illustrates how background image displays on different devices/resolution. By default, the parallax and fullcover background image is displayed in the center so you can see that the image is fine because the subject (which is the girl model in this example) is in the center of the image. For fullscreen background image, we recommend to have 1400px x 800px which works with most desktop, tablet, and mobile resolutions.
Bad BG Image
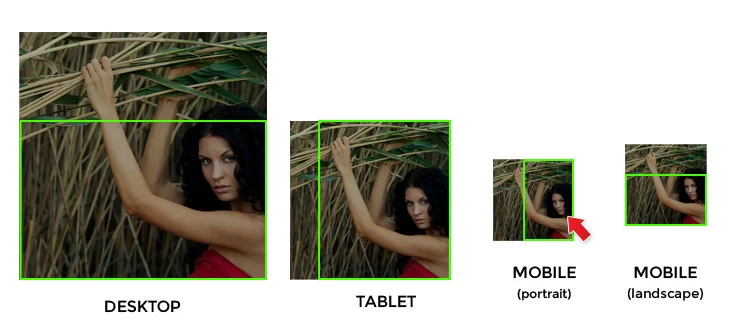
However, if the image subject is on the side like the example below. You will see how the face of the model is being covered on certain resolutions because the image is positioned in the center.
How to Fix Bad BG Image
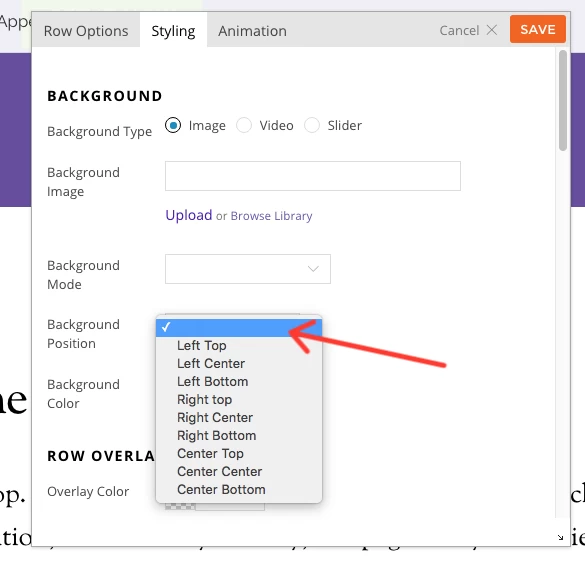
To resolve this problem, we've added the “Background Position” option in the Builder row background options. To access this, you'll need to turn on the Builder > Click on the Styling (Paintbrush Icon). There you will find the "Background Position" option where you can select where you would like to position or center the image as it's viewed in various devices.
By selecting the background position (for this example, we will select "right bottom"), you can keep the image subject in the visible area.
If we ask to test theme installation, then follow all steps listed under "Theme Installation Test".
If we ask to test Builder frontend, then do all steps under "Builder Frontend Test".
If we ask to test live demo of Parallax theme, then do the steps under "Live Demo Test" of Parallax theme
If we ask to do a complete test, then do all steps listed in this guideline from top to bottom.
Theme Installation Test
Download theme zip
If it is a new theme, zip it manually from latest 'Production' repository
Install the theme on your localhost
On Themify panel, import Demo Content and check if the frontend looks like the theme demo
Builder Frontend Test
Create a new post/page
Switch Builder to frontend
Test all Builder features, specially the following:
Row styling - Fullwidth and fullheight
Row backgrounds - video, slider, color, and hover
Duplicate row
Drag & drop Builder modules
Test 3-5 preset modules (i.e. Image, Text, Slider)
Copy and Paste Builder modules
Import/Export Builder modules
Test various column layouts
Column styling - video, slider, image, color backgrounds, and hover opacity
Test undo/redo feature
Test equal column height (Note: This is done by adding a column background first then resize browser size, columns should remain the same height at all times)
Test column alignment (try bottom and middle column alignment)
Test Revisions (try to save a revision, make some changes, then load a revision and make some changes)
Import "All Builder Addon 1" & "All Builder Addon 2 " to test if all Builder addons are compatible with the new theme update (If you don't have addons on your site, activate all Builder addons on the test site)
With Builder Cache enabled, preview in log out mode in various browsers (ie. Safari, Chrome incognito window, and Firefox). Then with Builder Cache disabled, re-check the test site.
Builder Backend Test
Create a new post/page
Scroll down to the Themify Custom Panel > Themify Builder Tab
Test all Builder features, specially the following:
Row styling - Fullwidth and fullheight
Row backgrounds - video, slider, color, and hover
Duplicate row
Drag & drop Builder modules
Test 3-5 preset modules (i.e. Image, Text, Slider)
Copy and Paste Builder modules
Import/Export Builder modules
Test various column layouts
Column styling - video, slider, image, color backgrounds, and hover opacity
Test undo/redo feature
Test equal column height (Note: This is done by adding a column background first then resize browser size, columns should remain the same height at all times)
Preview in log out mode in various browsers (ie. Safari, Chrome incognito window, and mozilla)
Framework Test
When testing the framework make sure to prepare 3-4 popular Themify themes to test with. All themes should be the latest from Git, with the new framework inside each theme. Testing should first be done locally via user local host. Recommended themes:
Ultra
Fullpane
Split
Music
Parallax
Themify panel (check every single tab on the Themify panel)
Try to set different Default Layouts
Try to import Demo Content and erase it after
Try to export and import Themify panel data at Themify > Transfer.
Customize
Try to customize various elements (body, post, site logo, tagline, menu, sidebar, footer) with different controls (background color, background image, Google Fonts, color, etc.).
Check the result with logout mode (ie. private browsing or a different browser)
Then switch to Advanced tab and repeat the above step. Again, check with logout mode.
Add new Post
Try all options in Themify Custom Panel (sidebar, content width, hide page title, custom menu, etc.)
Check the sub tabs on the Themify Custom Panel and check the options
Add new Page
Repeat similar test as adding new Post
Existing Site Test
Setup a localhost using the previous version with Demo Content imported
Duplicate theme folder to your desktop and rename the folder to something else (eg. 'themify-ultra' should rename to 'themify-ultra-new')
Connect to Themify's FTP server
Upload the new theme folder to '/demo/themes/wp-content/themes' folder where the live demo is installed
Then temporarily rename the current theme folder to something else (eg. 'themify-ultra' should rename to 'themify-ultra-old')
Then quickly rename the new theme folder to original theme name (eg. 'themify-ultra-new' should rename to 'themify-ultra')
Check demo frontend in logout mode. If something breaks, quickly restore the theme to the old version by renaming them (eg. rename 'themify-ultra-old' back to 'themify-ultra')
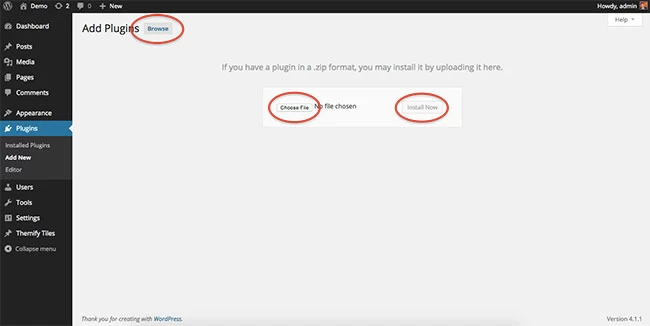
To install the plugin, you can use the standard plugin upload function provided by WordPress by following these steps:
First, you will need to download the plugin files from the member area on the Themify site.
Note: Some browsers (e.g. Safari) may auto-extract ZIP files. Right-clicking on the download link and selecting "Save Linked File As" will allow you to download the ZIP version.
Once you have the ZIP file correctly saved, login to your site's admin dashboard and go to Plugins.
On this screen, you will want to select the "Add New" button, which will then take you to the plugin installation page.
On this page, you will need to select the "Upload" tab.
Now, select the "Browse" button and use the file window to navigate to where you saved the plugin ZIP file and select it.
Following this, select the "Install Now" button.
Activating the Plugin
Once the plugin is installed, you will then need to activate it before you have access to the features of the plugin.
To do this, please follow these steps:
First, go back to the main Plugins page.
Here you should see the Themify plugin in the list of installed plugins.
Select "Activate" underneath the plugin's name.
The plugin will now activate and you should see a message stating the successful activation, along with the new menu options for the Themify plugin on your dashboard.
Using the WooCommerce Shopdock Plugin
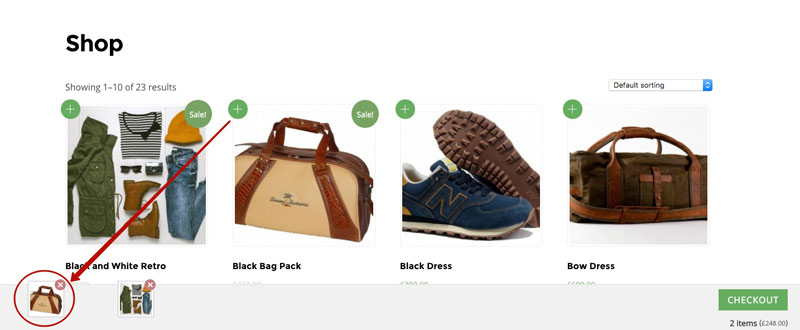
The WooCommerce ShopDock plugin is functional as soon as you activate the plugin. A (+) button will appear on one of the top corners of your products, and clicking these buttons will instantly add 1 of that product to the cart. The cart will appear from the bottom of the page, showing what is currently in your cart as well as a button to go to the checkout.
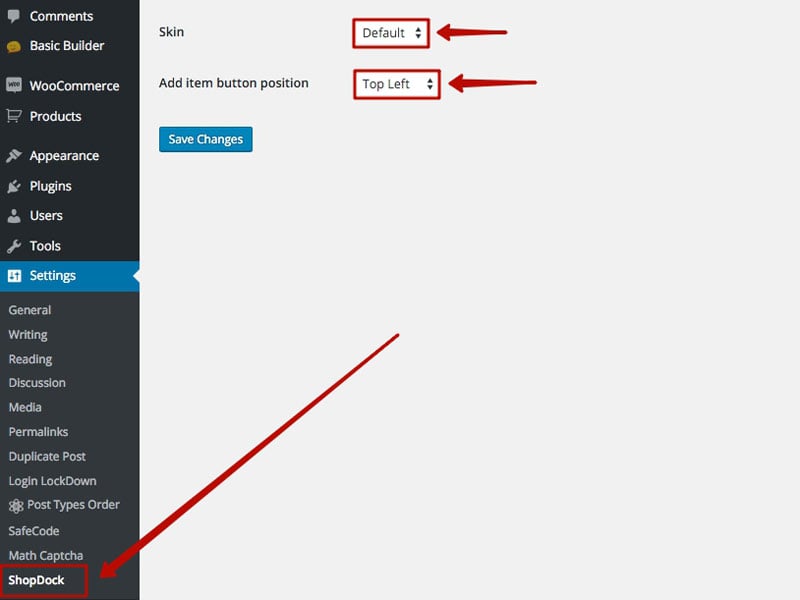
Change Skins
By default, the ShopDock plugin uses the default WooCommerce theme skin, and places the (+) button on the top left of products.
You can change this default behaviour by going to your WP Admin > Settings > Shopdock. Once inside the settings, you can choose change the skin color and (+) button position.
Update Plugin
You will receive notifications of updates to the plugin whenever you are on admin dashboard page for the plugin, these notifications will provide a link that will redirect you to the Update plugin page for the WooCommerce Shopdock plugin on your dashboard.
You can find a list of updates and the changes made in each in the Builder changelogs which are also linked in the notification.
You can also manually update by downloading the latest ZIP file from your Themify member area and either deleting the plugin on your site and following the installation instructions above again, or by uploading the contents of the new ZIP via FTP and overwriting the existing plugin folder.
Reinstall Plugin
If the auto plugin update does not work, you may reinstall the Themify plugin by following the steps below. Reinstalling the plugin shouldn't affect the content/data because they are saved separately in the database. To be safe: you should backup your WordPress content (posts, pages, menus, etc.) before reinstalling it. To backup your WordPress content, go to wp-admin > Tools > Export and export all content to a zip file. You may use wp-admin > Tools > Import to import these content in the future if necessary.
Login to Member Area to download the latest themify-builder.zip (keep it as .zip file, do not extract it)
Login to your site wp-admin
Go to Plugins (where WordPress lists all the plugins on your site)
Deactivate the Themify plugin (plugin can not be deleted if it is active)
Now click on the "Delete" button to remove the Themify plugin (the "Delete" link is located under the Themify plugin name)
Remain on the Plugins page, click on the "Add new" button (located at the top of the page), click on the "Upload Plugin" link, upload the latest themify-[plugin-name].zip and activate it (basically the same procedure as you would install a new plugin)
Installing Builder Addons is exactly the same as installing WordPress plugins.
To install the addon:
Firstly, download the addon zip file from the link provided in your Themify Member Area.
NOTE: some browsers (eg. Safari) auto extract zip files automatically. Right-click on the download link and select "Save Linked File As" and it will allow you to download as a zip file.
Login to your site's admin area.
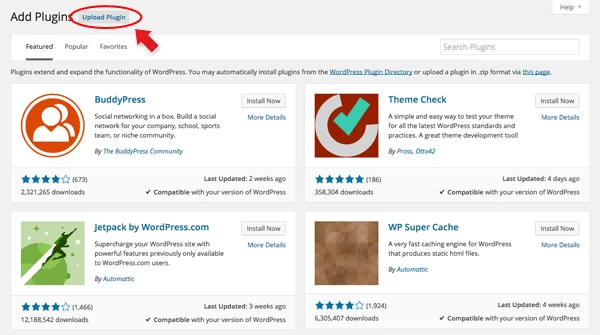
Navigate to WP Admin > Plugins > Add New.
Now, click the "Upload Plugin" link.
Select "Browse" and navigate to the plugin zip file which you downloaded in the first step and then select the "Install Now" button.
This will initiate the plugin installation process, and once finished, you can then activate the plugin.
Importing the addon demo layout
Each addon zip file contains a sample Builder data file which you can import to your site. It helps you to understand how the addon demo is created.
To import the addon demo data:
First, extract addon zip file to your local computer
You should have a folder of the addon. Inside there is a folder named "sample", and inside that folder there is a Builder data file in a zip format (eg. "addon_name_sample-builder-layout.zip").
To import the Builder layout, login to admin and then go to the page frontend where you want to import the Builder layout. From the top admin bar > select Themify Builder > Import / Export > Import, upload the sample zip file.
Using the Image Pro Addon
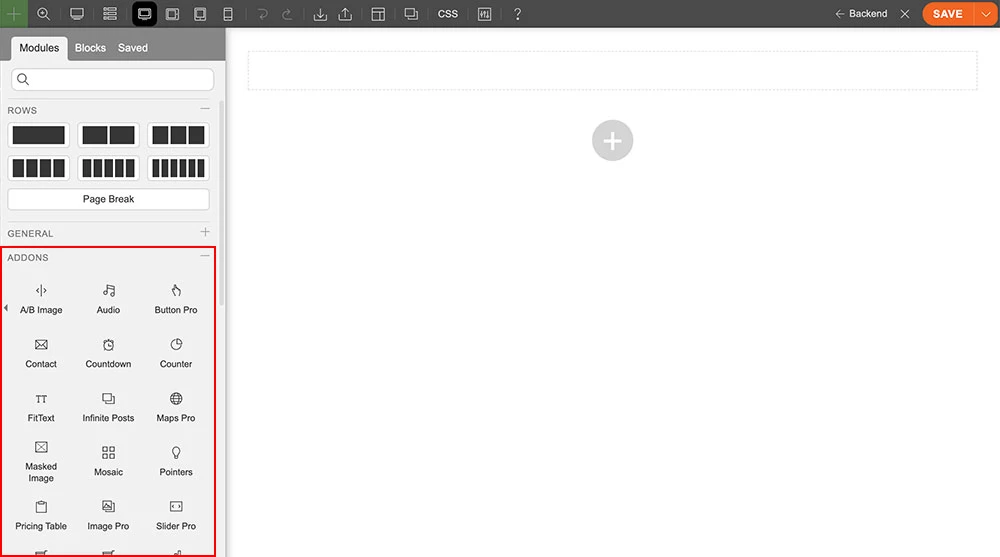
Once addon is installed, you will find the Image Pro addon module in the Themify module panel. The module is available in both backend and frontend edit mode (just like all standard modules).
In the backend: you can find the Image Pro module in the Themify Custom Panel.
On the frontend: you can see the modules after turning on the Builder from top admin bar > Themify Builder > Turn On Builder.
Drag and drop a Image Pro module in a row.
Image Pro Options:
Module Title = (Optional) Input any module title you would like that will appear at the top of the module.
Image
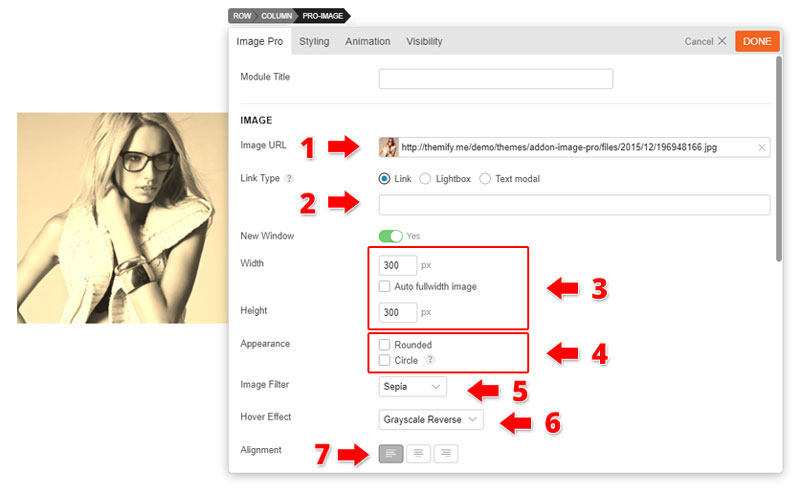
1) Image URL = Upload or select any image from your library.
2) Width and Height = Set the desired pixel width and height of the image.
Selecting the Fullwidth option will allow the image to span across the available width of the container.
3) Image Appearance = Select rounded for images to have rounded edge, or circle. The circle image appearance works best for images with square image formats.
4) Image Filter = Choose from grayscale, grayscale reverse, sepia, or blur
5) Image Hover Effect = Choose from zoom in, zoom out, rotate, shine, or glow.
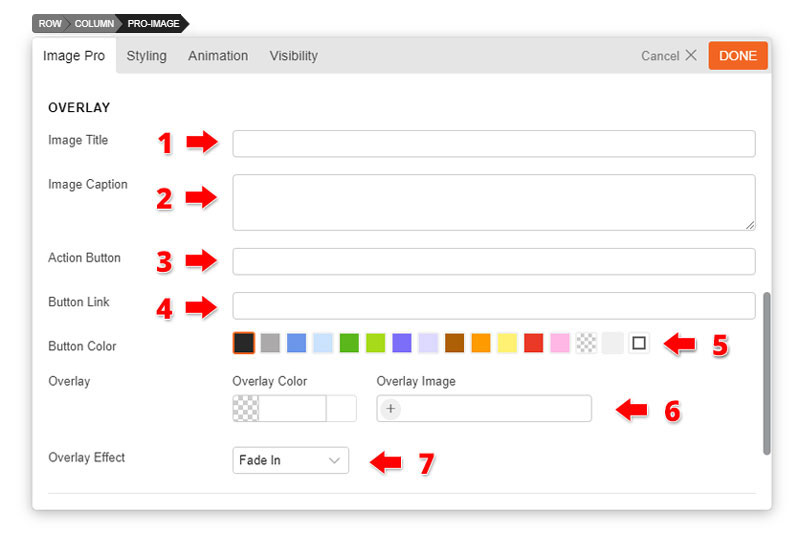
Overlay
1) Image Title = (Optional) Input title text that will appear when user hover over the image. Note: For partial overlay this will appear at the bottom of the image.
2) Image Caption = (Optional) Input caption text that will appear when user hover over the image.
3) Action Button = (Optional) Input any text you would like to appear inside the action button.
4) Link = Input link where you would like users to be redirected to
Link Type = Select how you would like to users to be redirected when they click on the button
5) Button Color = Select pre-set button color options.
6) Overlay = Choose to use color, image, or both types of overlay
Overlay Color = Use the color to select any type of color. You can also adjust opacity by toggling with the opacity bar beside the color picker.
Overlay Image = Upload or select any image from your library
7) Overlay Effect = Choose from 12 overlay effect that'll appear as user hover over your image.
We're going crazy again this Black Friday & Cyber Monday with a massive 40% discount on all Club memberships (excluding the Lifetime Master Club membership), plugins, Builder Addons, and WordPress themes. This amazing deal can also be used for membership upgrades, and renewals. Simply use this coupon code: BLACKFRIDAY to redeem the 40% discount.