The third post for our 'Customer Stories' series covers, Sander Spolspoel, a Senior Motion Graphic Designer for Sworl who was able to use Themify's builder feature to easily create and design his new website.
Hi! My name is Sander Spolspoel. I am a Senior Motion Graphic Designer for Sworl, a website that helps companies communicate their stories through animations. We build scenarios that translates products and services into narratives, craft a graphic style, pick a voice-over, and bring it all together in an animation. (more…)
Note: since framework v1.8.3, the Styling panel has been replaced with the Customize panel. You may access the old Styling documentation here
Welcome to the Customize Panel Documentation, this guide contains everything that you need to know about Themify Customize Panel. It covers the entire set of features available under the Customize Panel and will guide you on how to use them, effectively.
The video covers a brief introduction and demos of all of the features available in the Themify Customize panel.
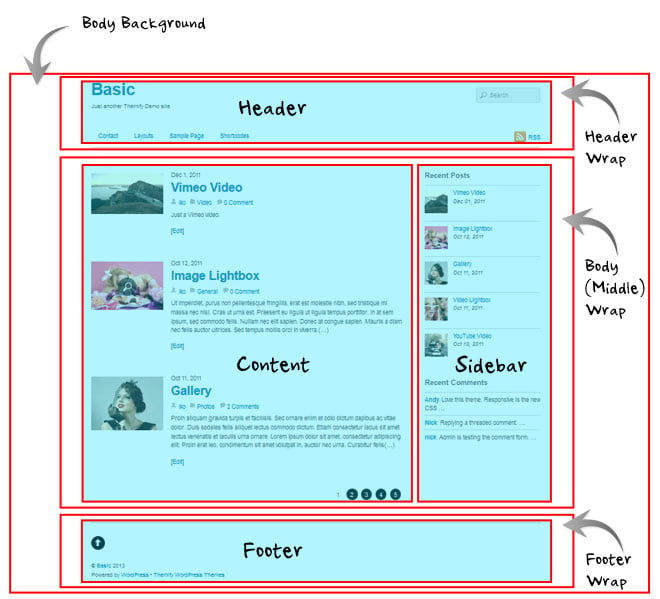
We had used the Basic theme as a base for this documentation, other themes may have different elements, however most will have the following settings available.
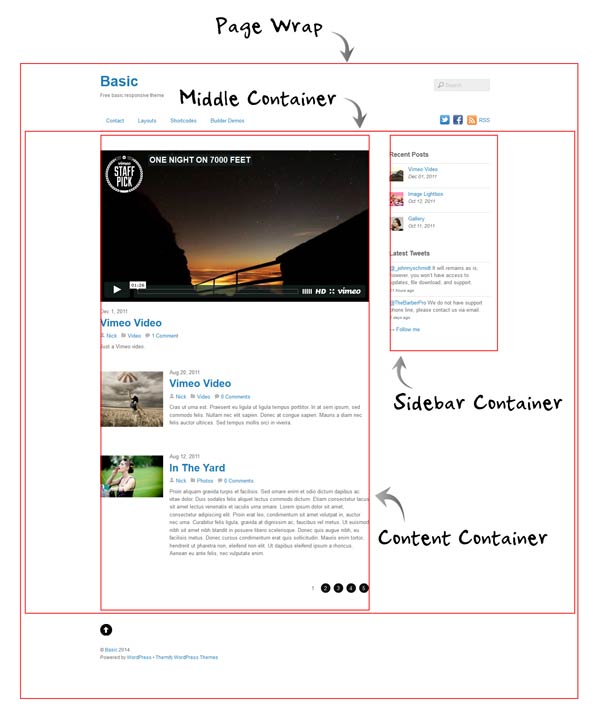
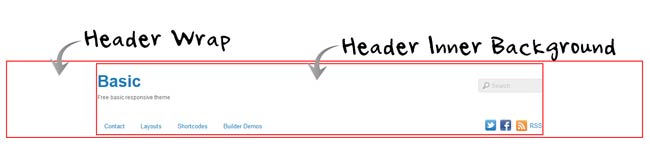
Structure
Themes are structured with specific areas which you can customize in the Customize Panel, here is the structure of a standard Themify theme:
How to access Customize Panel
You can acess the Themify Customize Panel from the back-end, as well as from the front-end of your site.
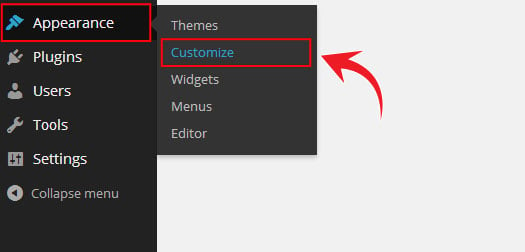
1. Back-end
Go to WordPress Admin > Appearance > Customize
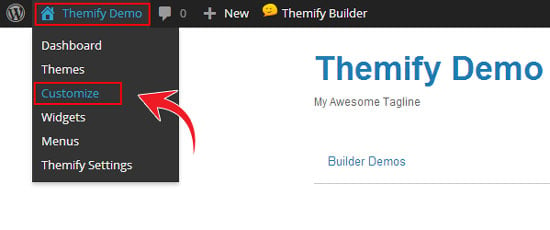
2. Front-end
Navigate to the Top Admin Toolbar > Customize
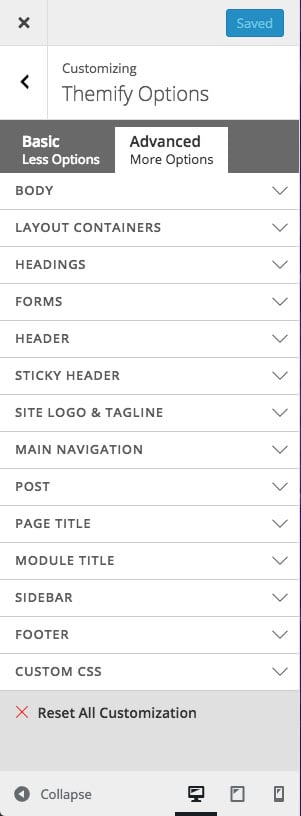
Customize Panel
In the Customize panel you will see the following tabs:
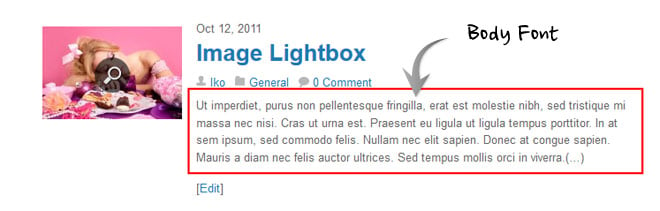
The Body tab of the Customize panel is for altering the main body font of the theme, this is the main font style that all other text elements will inherit from. Some of these settings will be overridden in the other styling settings, such as post titles, etc.
The above is an example of the body font, however all text elements may inherit attributes set in the Body tab.
There are multiple sections under the Body tab:
Body
These are the properties applied to the entire body section of your site.
Body Font
These are the properties applied to the body font as standard.
Body Link
These are the properties applied to the body font when a link is shown.
Body Link Hover
These are the properties applied to the body font when a link is hovered over by the user.
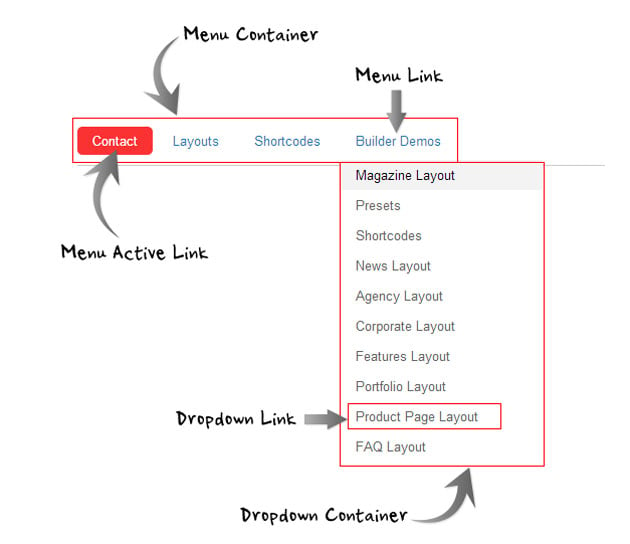
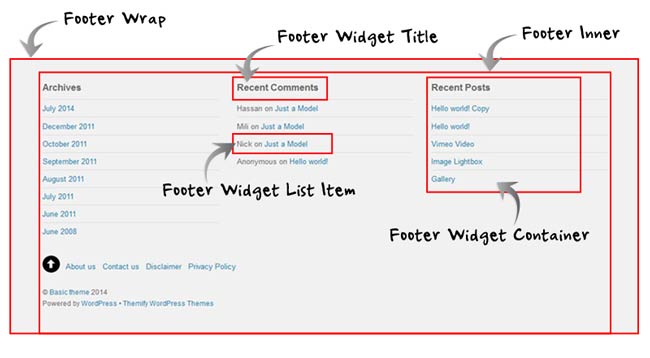
The Layout containers tab is to customize the various containers or sections of the theme such as page wrap, page width, middle, content, and sidebar containers.
Page Wrap
These are the properties applied to the page wrap container of the theme.
Page Width
These are the properties applied to the page width container of the theme.
Middle Container
These are the properties applied to the middle container of the theme.
Content
These are the properties applied to the content container of the theme.
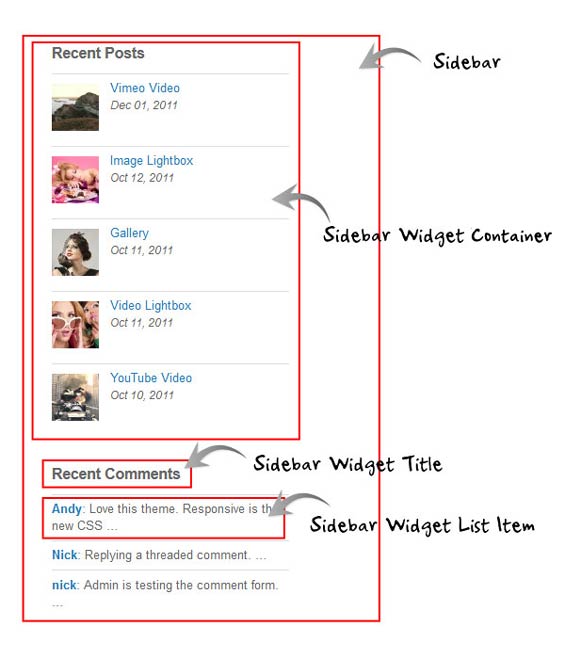
Sidebar
These are the properties applied to the sidebar container of the theme.
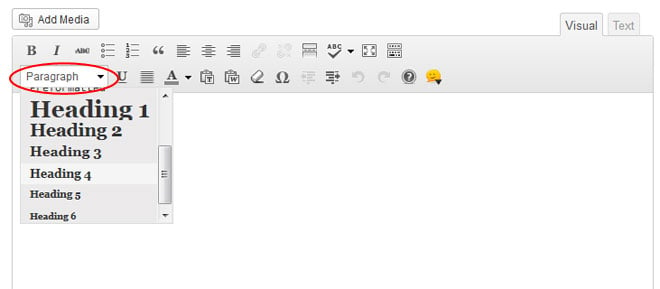
The Headings tab of the Customize panel is for applying styling to the heading tags (H1 to H6) in your content. Note that styling the heading tags might also affect the heading tags used in the templates (eg. the post title also uses H2 or H1 tag).
The Site Logo & Tagline tab of the Customize panel is to setting and customize the site logo, site title, and the site tagline. Site Logo Image To display a logo image instead of text:
Go to Appearance > Customize > Themify Options > Site Logo
Under "Site Logo", select "Logo Image" radio button
Click on the plus (+) sign button, and upload a logo image
You can also use custom site logo link (optional)
Specify the image width and height
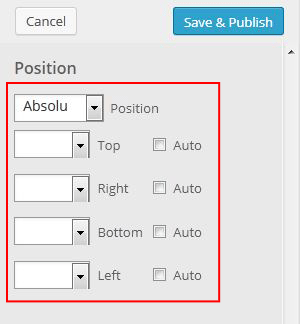
To reposition the logo accordingly, choose the appropriate position from the Position dropdown, enter the values in "top," "right," "bottom," and "left" position.
Site Description (Tagline) To remove or edit the site description using Theme customizer
Go to Appearance > Customize > Themify Options > Site Tagline
Edit or remove the text in the Tagline field
You can customized your site's tagline using customized fonts, text effects, alignments, and colors from the available dropdown options.
To reposition the site description:
Choose the appropriate position from the Position dropdown, enter the values accordingly in "top," "right," "bottom," and "left" position.
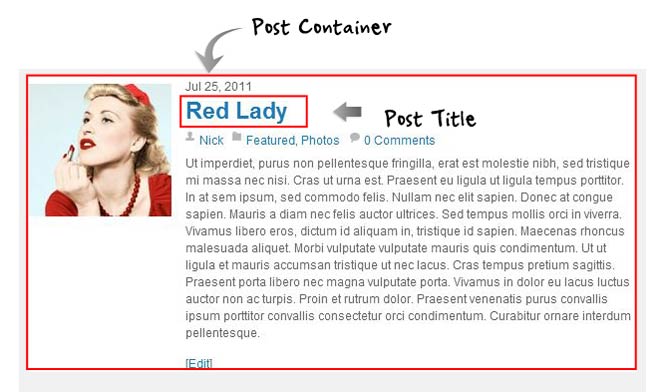
The Post tab of the Customize panel is for customizing the blog post layout container, titles of the blog posts, post meta, post date, more link, post nav, and grid post titles on your site.
Post Container
These are the properties applied to the post container of the posts on your site.
Post Title
These are the properties applied to the titles of the posts on your site.
Post Title Hover
These are the properties applied to the post title when it is hovered over the user.
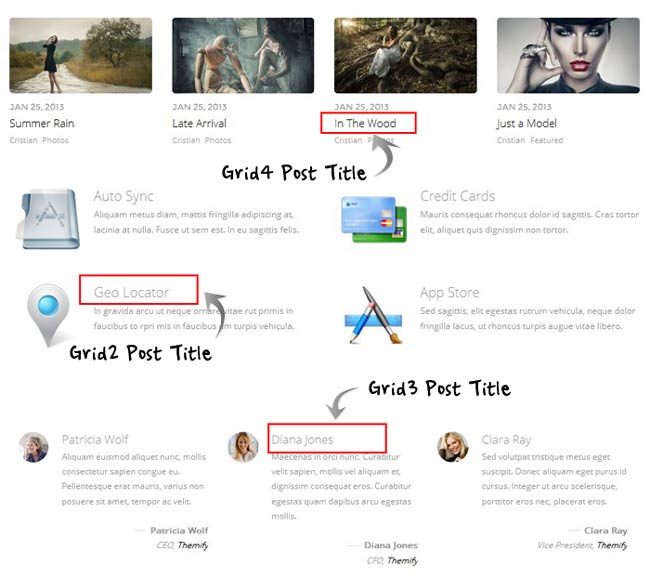
Grid4 Post Title
These are the properties applied to the fonts used in the Grid4 post title.
Grid3 Post Title
These are the properties applied to the fonts used in the Grid3 post title.
Grid2 Post Title
These are the properties applied to the fonts used in the Grid2 post title.
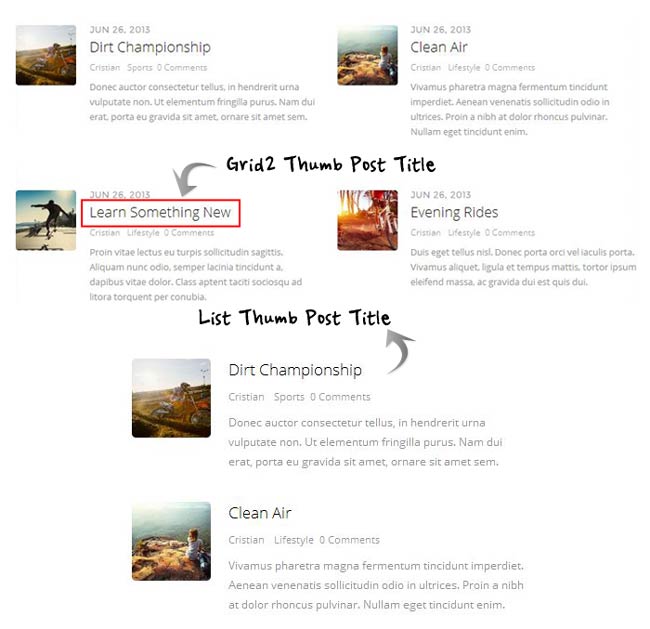
Grid2 Thumb Post Title
These are the properties applied to the fonts used in the Grid2 Thumb post title.
List Thumb Post Title
These are the properties applied to the fonts used in the List Thumb post title.
Post Meta
These are the properties applied to the fonts used in the post meta elements.
Post Meta Link
These are the properties applied to the post meta elements when a link is shown.
Post Meta Hover
These are the properties applied to post meta elements when a link is hovered over by the user.
Post Date
These are the properties applied to the post date elements.
More Link
These are the properties applied to the more link which can be shown on blog posts when using "Full Content" display mode or a custom excerpt.
More Link Hover
These are the properties applied to the more link when it is hovered over by the user.
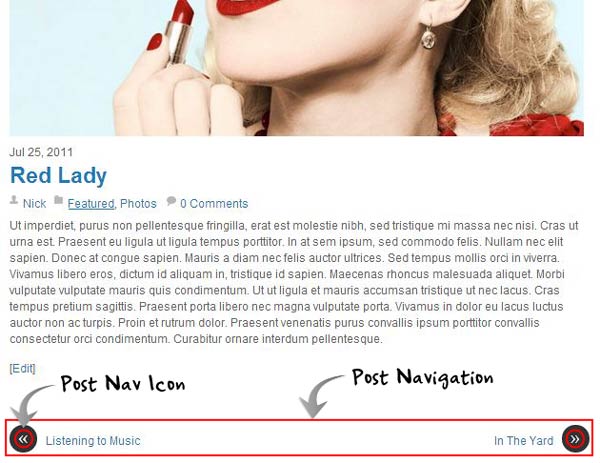
Post Navigation
These are the properties applied to the base post navigation area.
Post Navigation Link
These are the properties applied to the links within the post navigation element.
Post Navigation Hover
These are the properties applied to the links within the post navigation element when they are hovered over by the user.
Post Nav Link Icon
These are the properties applied to the Post Nav Icon within the post navigation element.
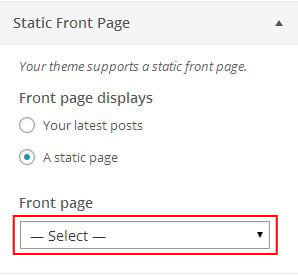
This feature allows you to configure the front page on your site, either choose to show your latest post or a static page which, can be selected from the dropdown box.
Widgets
Using the Customize Panel, you can also add, remove or arrange the widgets on all of the widgetized area of your site.
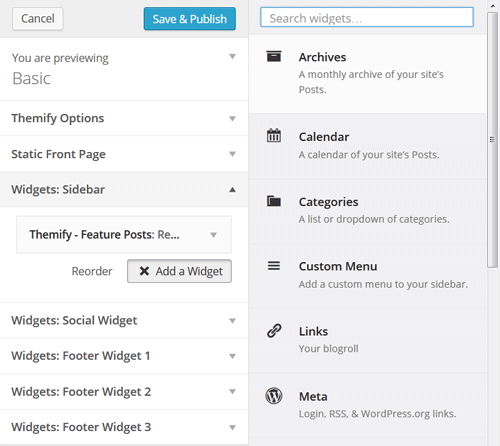
To add widgets using Customize with live preview
Go to Appearance > Customize
Choose the widget area, where you want to add/remove widget.
Now click on "Add a Widget" button.
A list of all the available widgets will appear, now select the desired widget.
The selected widget will be added to the widget area.
Give the title to your widget, and your widget will go live on your site.
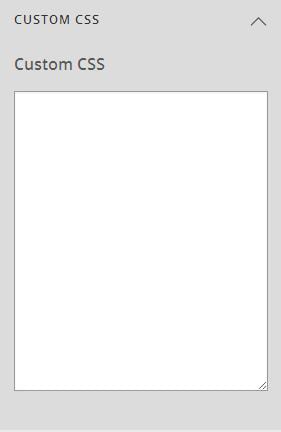
Custom CSS
The Custom CSS tab of the Customize panel is for adding custom CSS code to the theme.
In the text area provided you can add any CSS code you wish to apply to the theme, and this will be added after any other styling of the theme.
Reset All Customization
The Reset All Customization tab allows you to reset the entire customization that you made using Customization Panel on your site including the changes in the styling done using any Custom CSS codes.
Note : Be cautious while using Reset All Customization, the changes done using this feature are irreversible.
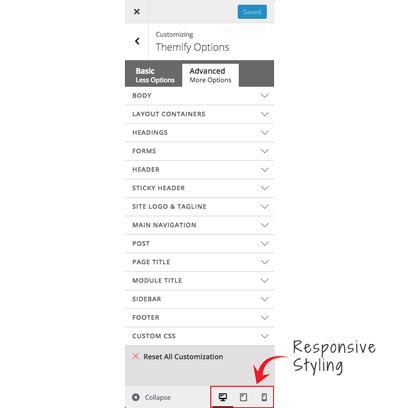
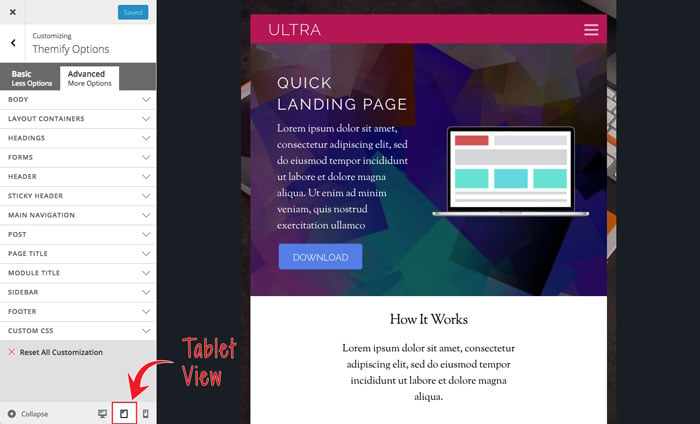
Responsive Styling
This features allows you to style how your site looks on tablet, mobile, or desktop. This feature is found at the bottom of the Customize Panel. You can toggle on what you edit by clicking on the icons.
Notes: When you edit the styling in both tablet or mobile view, you'll notice that some of the options will not be accessible. This is because some of the theme elements are not applicable, or cannot be customized, on the tablet or mobile.
Customize Properties
There are various styling properties available to be customized, and these will vary from tab to tab, however they all fit into the following categories:
Background Image: The background-image property sets an image for the background of an element. Background images can be set by one of the following methods: selecting one of the already present backgrounds from the list of thumbnails, manually entering an image URL, or uploading an image. Checking "No Background image" will remove the background image. Background Color: The background-color property sets a color for the background of an element. You can set a background color here as well by manually enter a color code, or alternatively click the box next to the field and a color picker will appear. Background Repeat: The background-repeat property sets if/how a background image will be repeated.
Repeat = The background image will be repeated both vertically and horizontally.
Repeat X = The background image will be repeated only horizontally
Repeat Y = The background image will be repeated only vertically
Do not repeat = No repeat
Background Position: You can set the position of the background image, this will determine where the background image begins - for example, setting it to right center would start the background image from the right of the element vertically centered.
Fonts
Font Size: You can set the size of the font in the text element, and select the type of units to use from the dropdown (pixels, em, %) Font Family: The font-family property sets the font for an element. Use the dropdown menu to select a font family for the text element from a list of standard fonts. Line Height: You can set the height of each line in the text element, and select the type of units to use from the dropdown (pixels, em, %) Text Decoration: The text-decoration property specifies the decoration added to text.
Underline = Defines a line below the text
Overline = Defines a line above the text
Strike through = Defines a line through the text
None = No decoration
Color: The color property sets the color of text for an element. You can specify the color by entering a color code manually or clicking the box next to the field to open a color picker. Tip: You can also set the opacity of the color in the color picker, by adjusting the drag selector up/down to the desired value in the opacity slider. Font Weight: The font-weight property sets whether text is normal or bold. Font Style: The font-style property sets whether text is normal or italic. Font Variant: The font-variant property specifies whether or not a text should be displayed in a small-caps font. Text Alignment: The text alignment property controls the alignment of text.
Left = Aligns the text content to the left
Center = Aligns the text content to the center
Right = Aligns the text content to the right
Justify = Automatically aligns the text content between both left and right.
Text Transform: The text-transform property controls the capitalization of text.
Capitalize = Capitalizes the first letter of each word
Uppercase = Makes all words uppercase
Lowercase = Makes all words lowercase
None = No transform
Borders & Spacing
Border: Use the fields to set the color, size and style of the border on each side of an element, you can set color by entering a color code manually or clicking the box next to the field to open a color picker. Select "Apply to all" to reduce options to one setting for all sides. Margin: Margin defines the space around elements. Use the fields to set the margin amount for each side of an element. Select "Apply to all" to reduce options to one setting for all sides. Padding: Padding defines the space between the element border and the element content. Use the fields to set the padding amount for each side of an element. Select "Apply to all" to reduce options to one setting for all sides.
Width & Height
Width: You can set the width of an element, and select the type of units to use from the dropdown (pixels, em, %) Height: You can set the height of an element, and select the type of units to use from the dropdown (pixels, em, %)
Positioning
Position: You can set the position of an element.
Static = Positions the element where it is placed within the normal flow of the layout.
Fixed = Positions the element at a set position, as set below in pixels from a side of the element (top/bottom, left/right), and it will remain here even when the page is scrolled.
Relative = Positions the element at a position relative to its normal position.
Absolute = Positions the element at a position, as set below in pixels from a side of the element (top/bottom, left/right), relative to the first non-static parent element.
Display
Display (Site Logo): The display property under site logo will allow you to select between two modes:
Site Title = This will output the site's title in the site logo element.
Image = This will output an image in the site logo element. You can select "Upload" to upload an image or enter the URL manually, and also set the dimensions of your logo here.
I switched theme (or added a child theme), all my Customize settings are gone?
Note Customize data is associated to the activated theme (ie. when you switch to another theme, the Customize options will be different). To carry the Customize data from one Themify theme to another Themify theme, use the Customize's Export and Import feature located on the Customize panel).
Also note that the activated child theme is considered as a separate theme. If you see your Customize data is gone after activating a child theme, don't panic. Simply export the Customize data with the parent theme activated, then switch to the child theme and import the Customize data.
Firefox has strict requirements where the font resides in relation to the website, sometimes this causes issues where the custom fonts on your site are not loaded. To fix that, you need to add the following code in the .htaccess file located in the root of your WordPress installation.
<FilesMatch "\.(ttf|otf|woff)$">
<IfModule mod_headers.c>
        Header set Access-Control-Allow-Origin "*"
</IfModule>
</FilesMatch>
Issue with audio playback
If you're having trouble rewinding or forwarding the audio files on your site, it could mean that the Range headers for the audio file are not setup properly. Click here for more information. You can ask your web hosting provider to fix this issue for you.
Hide header and footer inside lightbox window
In various modules in Builder (eg. Button module), you have the option to open an URL in a lightbox window. If the source URL is using a Themify theme, it will add a class lightboxed to the body tag (in the iframe tag). You can add custom CSS to target the page in the lightbox. For an example, you can hide the header and footer with this custom CSS:
The Themify themes cache all the theme settings in a file, which is, by default located in <theme>/themify/.data directory. This reduces the number of database queries thereby increasing the performance of your website. If your server is setup to sync files for backup, this feature may cause your settings to not be saved as expected. In such a case the caching can be easily turned off by adding this snippet into the wp-config.php file:
<?php

define( 'THEMIFY_SKIP_DATA_CACHE', true );
The location where the theme stores the settings cache can also be changed the same say, to do that:
<?php

define( 'THEMIFY_SETTING_CACHE_DIR', __DIR__ . '/wp-content/uploads/tf_datacache/' ); /* Note that the trailing slash at the end is required. */
This changes the path to the "tf_datacache" folder inside wp-content/uploads. You can then assign permissions or change the rules for file sync for that folder depending on your needs and your setup.
Builder
Change module title tags
Builder by default uses h3 tags for module titles, to change that you can use:
If you want to disable the frontend Builder (without disabling the Builder entirely) you can use the following code in the child theme functions.php file:
By default when screen size gets smaller than 600px, the split scrolling effect is disabled. To change this, you would add this code in a child theme functions.php:
To change the settings of the map displayed on the event post, the "themify_event_map_args" filter can be used. For example, to disable the mouse wheel zoom on the map, you can use:
By default when you click the video post title, it goes to the video single view. You can change the post title link to open video in lightbox by adding the following code in Themify > Settings > General > Footer Code:
<script>
jQuery(function($) {
	$( '.video-multiple .post-title a, .loops-wrapper.video .post-title a' ).click( function(){
		$( this ).closest( '.post' ).find( '.lightbox' ).trigger( 'click' );
		return false;
	} );
} );
</script>
Open album posts in lightbox
Similar as above, to change album post title to open album in lightbox, add the following code in Themify > Settings > General > Footer Code:
<script>
jQuery(function($) {
	$( '.album-multiple .post-title a, .loops-wrapper.album .post-title a' ).click( function(){
		$( this ).closest( '.post' ).find( '.themify-lightbox' ).trigger( 'click' );
		return false;
	} );
} );
</script>
Show past events in event category taxonomy archive
By default only the upcoming events are displayed in the Event category taxonomy pages. To disable this behavior and show all events, you can use:
Switch map and featured image in single event pages
In single event pages, the map is displayed on the right side while the map goes in the background. To switch the position of the map and the featured image, you can use:
The theme by default displays the post meta info (author, comment counts, etc.) on the side of the post. This snippet will them to the bottom of the post:
Today we're happy to announce our latest theme, Magazine, which is designed to work with the Themify Builder. Using the drag and drop capability of the Builder, this theme allows you to build any kind of layouts quickly without any template editing. You can build complex grid layouts like Guardian, CNN, MSN, BBC, etc. in minutes. Magazine is a responsive 3-column theme packed with many features and options: 42 pre-built layout options, mobile slide navigation, mega menus, widgetized areas for banner ads, Awesome icon font, breaking news ticker, social share buttons, related posts, footer menu, social links, and more.
Limited time offer: use the coupon code "magazine" to save 30% off Magazine theme until Aug 31, 2013.
Read the Starter Guide first if you are new witth Themify. You must be familiar and able to do the following (try out Ultra theme with the following features):
Query Posts - Query posts / custom post types on any static page (eg. use it to create Blog / Portfolio pages)
Hook Content - Add content via theme hooks without any coding or modifying any template file
Shortcodes - Shortcodes like Twitter, Map, Slider, etc.
Child Themes - For theme template modification (eg. loop.php), custom style.css, custom functions.php, etc.
Theme Training
It is recommended to setup a dedicated WordPress multisite on your localhost with the following themes with Demo Content Imported (ie. each theme demo should be a microsite with exact content and setup like our official theme demos). This will allow you to quickly debug issues on your localhost.
Themes to setup and demo import:
Ultra
Shoppe
Music
Parallax
Split
Fullpane
Important Notes About Themify Themes
Theme/Framework:
All Themify themes are powered by the same framework which is the 'themify' folder inside the theme folder.
All styling/customization entered in Customizer are output in themify-customizer.css file and the ver number indicates the date when the file is generated (eg. themify-customizer.css?ver=16.01.18.23.45.06 means file created on 2016 Jan 18 @ 23:45:06).
Themify Builder
The Builder is included in the framework. If a Themify theme is used, user doesn't need the Builder plugin version.
Builder content/layout styling:
The styling entered in the Builder content are output in the generated.css file (view page source and look for generated.css file).
NOTE: In login mode (ie. user is logged in), the Builder content styling will output on the same page as inline CSS.
Script Minification:
Note that users can set script minification and Builder Cache in Themify > Settings > Theme Settings (default is enabled). To check if it is enabled, view the page source and look for the theme/builder JS or CSS files (eg. instead of style.css, the minified version would be style.min.css)
Builder Cache:
If user's server has PHP 5.4+, then Builder cache will be enabled by default. If user's server does not support caching, it will state cache not support.
NOTE: Builder cached files are only served/displayed on logout mode (public viewing). If user is logged in, Builder cached files are not in use.
To check if Builder cached files are only enabled: view the site with logout mode, and look at the page source code. If Builder cache is enabled, you will see a minified CSS file (in the source code, look for: id='themify_cache_header-css').
Debug Procedure
When reviewing issues, follow this standard protocol:
Understand the problem first (be sure to understand what user says/wants before replying anything)
Ask for user's site URL and screenshots if necessary
Verify the problem with user if it is unclear
Make sure user's theme & framework version is using the latest
Theme version can be found in page source where the theme style.css is included (eg. style.css?ver=1.0.9).
Framework version is output on the themify.framework.css file (eg. themify.framework.css?ver=1.7.5). If you can't find this version number, Builder cache is enabled, then look for the 'themify_cache_header-css' CSS file.
Check online or you localhost demo, if something is not working as advertised, it is a bug. Log the issue on Github Issues and then reply the user that the issue has been logged.
Check if issue has been fixed on Github's closed issues.
If console errors are found in inspector due to plugins, ask to deactivate all plugins.
Try to disable all plugins and see if it is caused by the plugins. If the issue is caused by a plugin, it is not a bug, it is a plugin conflict.
In case of plugin conflicts, check if the issue occurs on non-Themify themes.
If the issue appears on third party themes as well, then it is a plugin bug. We don't have to support it.
If the issue doesn't appear on third party themes, it could be our theme issues, log it.
Ask for wp-admin and FTP if necessary.
If the problem can not be resolved by viewing the frontend, ask user to provide wp-admin in the forum reply's "Private Message" (note: private message is only visible to Themify team with moderator role)
Only ask for FTP access if necessary (ie. if it can not be resolved in wp-admin, then ask for FTP)
Try to activate a non-Themify to see if the issue appears on other themes.
If the issue appears on other themes, then it is not a theme issue. It could be server or WordPress issue.
If child theme is used, try to deactivate the child theme.
Finding Solution
When finding solution for issues, follow this standard protocol:
Always suggest the easy solution first:
Check if the issue can be resolved in settings, theme options, and Themify features like: shortcodes, hook content, etc. (refer to our docs for existing tutorials if you are not sure)
Check if the issue can be resolved in Customizer. If Customizer can not resolve it, suggest Custom CSS code (eg. use display:none to hide elements). Custom CSS should be entered in Appearance > Customize > Custom CSS.
Suggest simple jQuery/JS function if it can resolve the issue (eg. use jQuery to append or change elements)
Suggest custom PHP Functions only if necessary. PHP functions should be added in child theme functions.php or custom-functions.php.
If the issue can not be resolved from above steps, then see if it is possible to use a plugin (find a working plugin and suggest it to the user).
NEVER suggest users to edit the framework core files:
Do not suggest to edit the core theme/stylesheet/framework file
Always suggest to create a child theme if template modifications is necessary
Writing Replies
When writing/handling a reply:
Be polite and greet the user first (eg. Hi John, ..)
When writing step-by-step tutorial, use the > sign to represent each step and use => to represent sub-section
(eg. Go to WP Admin > Themify > Settings > General => Header Code)
Add screenshots if necessary to help user to understand your tips (upload screenshots to Snag.gy)
Wrap code with ` character`
Be brief about the steps. Here is a sample reply: - Go to Themify > Settings > General => Header Code
- Add the following code:
`
code
code
`
- Save the panel
If the theme works on your local or our demos, attach a screenshot to prove it.
Close the thread if the issue is resolved
For all business related issues (eg. refund, exchange, complains), ask user to email [email protected]
IMPORTANT: Team members are not allowed to upsell or self promote personal services to any Themify customer.
Common Problems
Theme/framework not using latest version
To check user's theme/framework version: view site page source. In <body> class, you will find the theme name and framework version.
You would compare that with our changelogs. All product changelogs have the same URL structure (basically, it uses the product folder name like this: /changelogs/themify-ultra.txt
On Themify Custom Panel > Content Width, if "fullwidth" content width is not selected, it uses Javascript to force the row width container to be fullwidth. Sometimes this fullwidth row JS might fails. To verify if it is being selected, view page source and check <body> class. If fullwidth content width is selected, it would have 'full_width' body class, else it would have 'defaulf_width'.
Another common related issue to the "Content Width" option is the #content padding. By theme default, the #content container has padding top and bottom. If users want to remove the padding on the #content container, select "Content Width = Fullwidth" would do (don't need to add custom CSS).
Builder Cache issues
Many layout and Javascript issues are related with Builder Cache - suggest to disable Builder Cache if it is enabled (to find if Builder Cache is enabled, in page source code, look for: id='themify_cache_header-css')
Server errors on frontend (ie. crashes, error 500, memory exhausted, etc.)
Try to disable Image Script at Themify > Settings > Image Script
Server errors on theme activation
Try to disable Google Fonts, manually add custom-functions.php in theme folder, zip it and reinstall the theme
If user can not auto update themes/plugins and they confirm the Themify credentials are entered correctly, then the issue is because their membership has expired. Ask them to contact [email protected].
We provide support to any issue related with our themes and general WP admin stuffs (like how to create menus, how to add widgets, where to set front page, etc.). We also provide Custom CSS, JS, and PHP code to do basic customization. But we do not fix third party plugins and advanced customization.
We support:
General WP and Themify usage.
Customizer and simple Custom CSS tweaks.
Issues caused by Customizer (eg. user enters wrong value in Customizer).
How to resolve issues with third party tutorials and plugins.
We do not support:
Plugin bugs/issues
If the plugin doesn't work with other themes, it is not supported.
Heavy customization
If the request takes longer than 5 mins to perform, it is not supported.
If the request requires heavy template modification (including js/css/php), it is not supported.
Modified themes/framework
If the issue is due to modification by the user and it can not be fixed quickly, it is not supported.
Modification bugs created by the user are not supported (unless it can be fixed quickly).
Tips: Body Classes
You can use <body> classes to target specific elements and pages.
Default WordPress body classes:
home blog = default homepage
archive category = archive/category pages
single single-post_type_name = single post pages
page page-id-## = single static pages
search search-result = search results page
Themify layout body classes:
full_width = when "Content Width" in Themify Custom Panel selected fullwidth icon
sidebar1, sidebar-right or sidebar-none = reflect the "Sidebar Option" that can be set in Themify panel > Settings > Default Layouts or individual post/page Themify Custom Panel.
list-post, grid4, grid3, grid2, list-thumb-image, grid2-thumb, list-large-image = reflect the post layout selected in Themify panel > Default Layouts or Themify Custom Panel > Query Posts.
Builder body classes:
has-builder = when there is Builder content on the page (this body class is added by Javascript, so must use inspector to see it)
frontend = added by Builder to indicate frontend
themify_builder_active = when the frontend Builder is ON
Brower/devices body classes:
ie, not-ie, webkit, gecko = browser that is used viewing the page
iphone = mobile devices
touch or no-touch = whether user display is touch screen or not
Tips: Chrome Inspector - Console
Go to the page where you're having this issue,
press F12 to open Chrome Dev Tools,
press Esc to open the Console or click on the button on Dev Tools top bar to open it,
paste here any message in the console that is written in red.
Now click on the Network tab, and then in the XHR button at the bottom
paste here any message you might find here, and if it's empty, repeat the operation that fails while it's open to see if we can capture some error message.
Support Team Workflow
All support threads are replied first come first serve basis (meaning the old threads should be replied first).
To start:, on the forum page, there is a list of "Latest Discussions", click on the pagination at the bottom (page by page) to find pending threads to reply (if you see the poster's name has "@ Themify", that means it has replied by one our staffs). Open the pending threads on a new tab to reply (this will help you to keep track which page you are working on).
If you are not sure how to reply certain threads, skip it first and re-visit it later when all pending threads are done.
For work efficiency, keep the forum page on a browser window and open each pending thread in a new tab.
If multiple staffs are working on the forum at the same time, each staff should work on a separate page and communicate each other via chat (eg. Staff_A can work on page5 while Staff_B works on page6). When you are done with the page, notify the other staff(s) and reload the forum pages again to work on. This will prevent double replying the same threads by different staffs.
Experienced support staffs who can handle the threads faster should work on the older forum pages (this way we can reduce the response time for the users).
Support Mails
Sometimes users might send questions to [email protected]. Asking support mails is the same as the forum: first come first reply. If you don't know how to reply, mark the email as "unread" (this is important - you need to keep it unread so the next support guy can reply).
To check support mail, go to https://gmail.com or use a desktop email app to check support emails
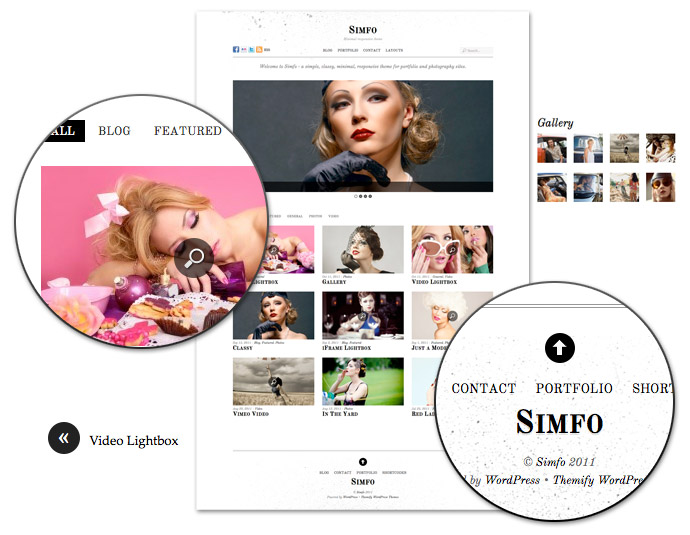
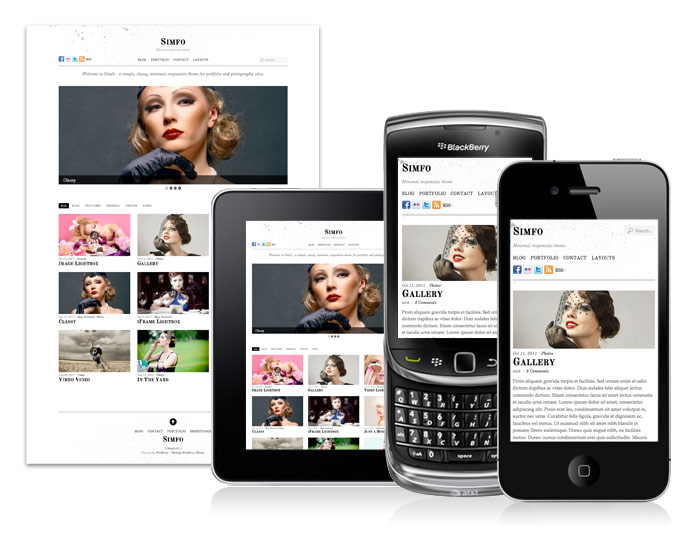
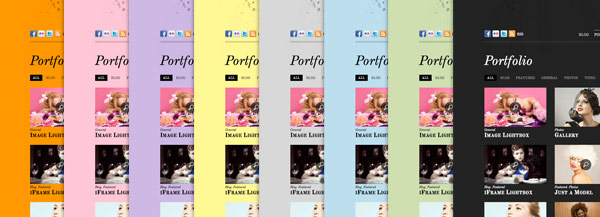
Simfo is a minimal responsive theme with a subtle touch of grungy texture. Design-wise, it has tremendous attention to details — great balance of white space and beautiful typography. Functionality-wise, it works on all screen resolution and most browsers including the mobile devices such as iPad, iPhone, Android, and Blackberry. The template includes optional lightbox and post sorting navigation. Simfo is a perfect theme for portfolio and general blog sites. If you like Simfo, you may also like ThemeMin and Elemin. The following themes also have the responsive layout feature: Grido, Tisa, Suco, Elemin, Funki, Minblr, Wumblr, and iTheme2
We are offering 30% disount code for this new theme. Use the coupon code "simfo" for a 30% discount off this theme until October 20th, 2011.
Responsive Layout
To see the responsive layout and stacking posts in action, view the demo and resize the browser window or view it with a mobile device such as iPhone, iPad, Blackberry, or Android.
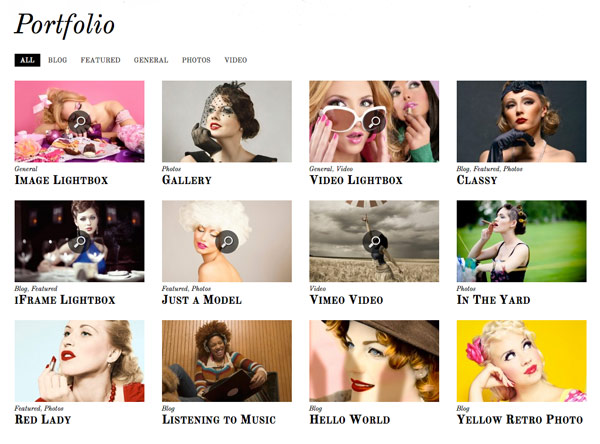
Post Sorting
It includes an optional post sorting navigation to allow user to sort the posts based on the category.
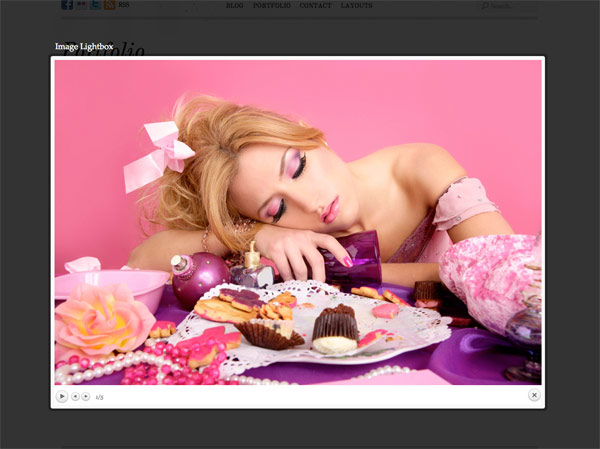
Lightbox Link
You can insert the optional lightbox link to display a zoom-in image, video or iframe window.
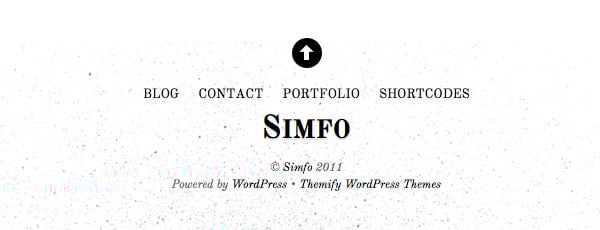
Footer Menu, Logo, and Widgets
The footer includes customizable footer widgets, footer menu, and logo text or image.