26
Feb
2014
General /
We are looking to hire a talented freelance video producer to create top quality, high definition video tutorials for our website and YouTube channel.
As the video producer, you will be producing videos of WordPress tutorials, showing our customers and clients how to use WordPress, configure theme settings and customisation of themes. We prefer the tutorials to be recorded on a Apple Macintosh computer.
You will be working for Themify on a project by project arrangement; this is not a full-time position.
We are looking for candidates who have the following criteria:
- experience in producing top quality videos in high-definition (1080p), preferably in a video podcast capacity or video tutorial work
- has the ability to narrate a video in a clear English speaking voice
- is comfortable in using the Admin area of the WordPress CMS and can teach others how to use it
- has the ability to explain WordPress terminology into plain English.
So, are you the right candidate for the job? If you think you are, send us an email with your service rates and links of your sample work or your video portfolio to jobs at themify dot me.
Read More
13
Feb
2014
/
If you want to have only the image link to a lightbox, and not also the title, follow these steps:
1. in WP Admin, go to Themify > General
2. paste the following in the Header Code text area
<script>
jQuery(document).ready(function($){
	$('.post-title a').each(function(){
		var $self = $(this),
		    $article = $self.closest('article'),
		    post_id = $article.attr('id');
		$self.removeClass('themify_lightbox');
		$self.attr( 'href', 'http://'+document.domain + '/?p=' + post_id.replace('post-', '') );
	});
});
</script>
3. save the change and check the site.
Note that this will only work for top level domains.
Read More
11
Feb
2014
Development /
Here at Themify, we are proud to announce that we have added some cool new and enhanced features to our existing Framework.
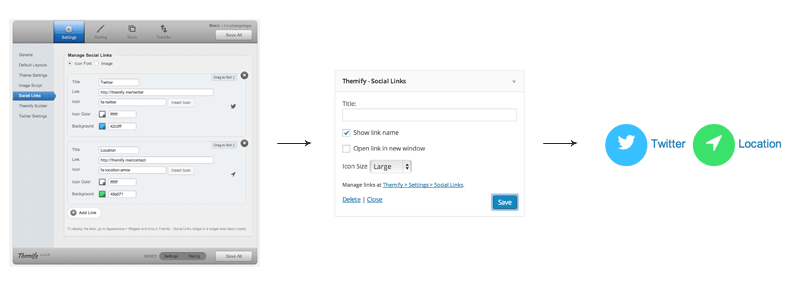
360+ Social & Web Icons
Our first new feature is the addition of Icon Fonts to our Social Links widget. We have added:
- 360+ FontAwesome icons
- the ability to custom color each individual icon and their background
- icons can appear in three sizes: small, medium or large
Menu Icons
For our second new feature, we have also added Icon Fonts to WordPress Menus. So, if you always wanted to add a little house icon next to Home on your menu bar, now you can! To access this new feature, go into your WordPress Admin > Appearance > Menus and in each menu panel you should see a Icon field.

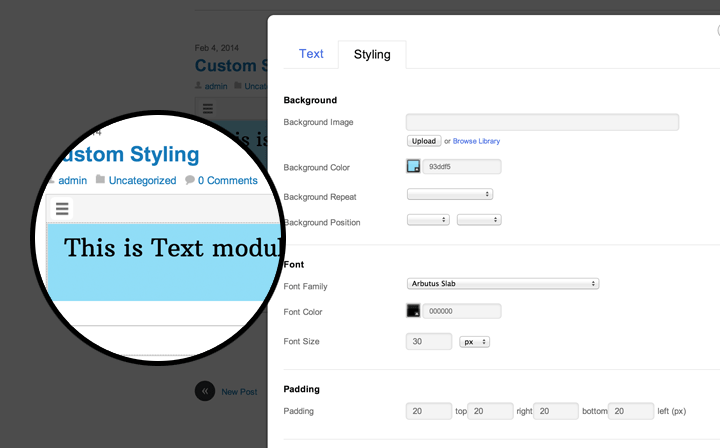
Builder Custom Styling
For our Builder lovers, we have a new feature for you too! You can now custom style the row and module individually (font, padding, margin, background, and border), giving more control over the structural design of your webpage.
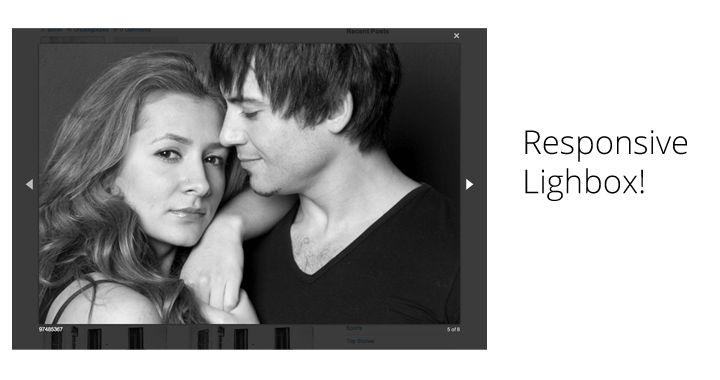
Responsive Lightbox
And finally, we have replaced the old lightbox with a new one that not only is fully responsive but also offers better performance on desktops, tablets and mobiles than the previous version.
We hope your enjoy the new features!
Read More
15
Jan
2014
/
Here you'll find certain snippets to do some general common stuffs in Themify themes. Note that some snippets might not work in all themes.
General procedure to use a snippet
1. Create a child theme and create a functions.php in your child theme folder
2. Edit it, and paste this inserting the snippet you've chosen
<?php

// Snippet code goes here

?>
If you already have a child theme and the functions.php file, you only need to add the PHP code inside the <?php and ?> tags.
Add audio player to home page header
<?php

/**
 * Place an audio player in the header of the front page
 */
function custom_themify_home_audio_player() {
	if( is_front_page() )
		echo do_shortcode( '[audio mp3="http://www.roxyg/wp-content/uploads/YOUR-AUDIO-FILE.mp3" autoplay="true"]' );
}
add_action('themify_header_before', 'custom_themify_home_audio_player');

?>
Display the default Featured Image meta box again
<?php

/**
 * Display WordPress default Featured Image meta box
 */
remove_action('do_meta_boxes', 'themify_cpt_image_box');

?>
Add author capabilities to the "tile" custom post type
This code is generic: if you want to add author capabitilities to portfolio or team, just replace "tile" with the desired custom post type key.
<?php

/**
 * Add author capabilities to Tile post type
 */
function custom_themify_cpt_add_author() {
	add_post_type_support( 'tile', 'author' );
}
add_action('init', 'custom_themify_cpt_add_author');

?>
Read More
31
Oct
2013
/
Install WooCommerce Plugin
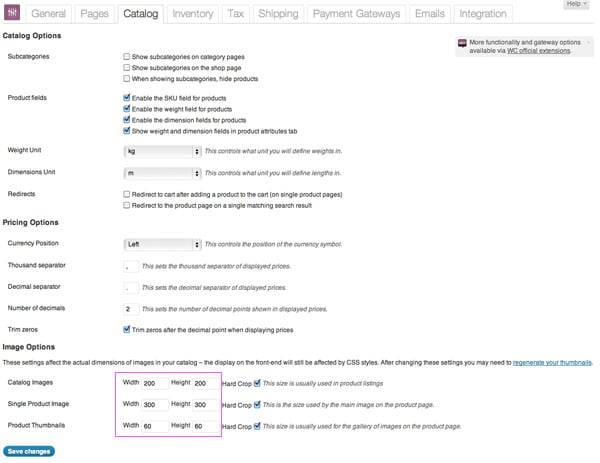
This theme requires WooCommerce plugin. Once you installed the WooCommerce plugin, you may customize the plugin settings as you like. If you want to follow our theme design, please set the product image sizes at WooCommerce > Settings > Catalog as follow:
- Catalog Images: 200 x 160px
- Single Product Image: 600 x 380px (used as product image in archive and single)
- Product Thumbnails: 58 x 58px (product gallery thumbnails)
Note: for proper functioning of the dynamic add to cart feature, please go to WooCommerce > Settings, and in the Product tab, make sure the checkbox labeled "Redirect to the basket page after successful addition" is unchecked.
For more details on how to use WooCommerce, please refer to WooCommerce documentation.
Installing the Theme
To install themes with the WordPress theme uploader:
- Download the "theme.zip" file from the Member Area
- Note: some browsers (eg. Safari) auto extract zip files automatically. Right-click on the download link and select "Save Linked File As". This will allow you to download the theme as a zip file.
- Login to your site's WP Admin.
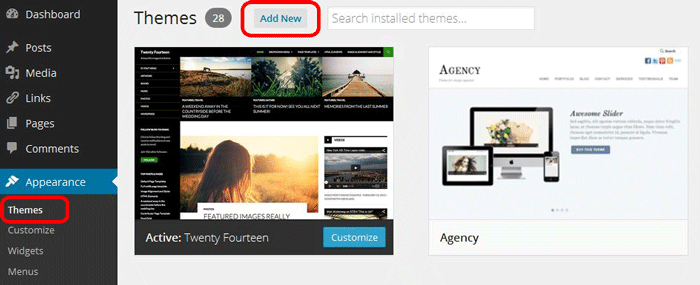
- Go to Appearance > Themes.
- Click on the "Add New" button, then click on the "Upload Theme" button
- Upload the theme.zip file (note: it is the theme.zip, not the theme-psd.zip that you just downloaded from the Member Area).
- Activate the theme
FYI: You can also install themes with FTP method. Read the Installing Themes tutorial for more info.
Demo Import
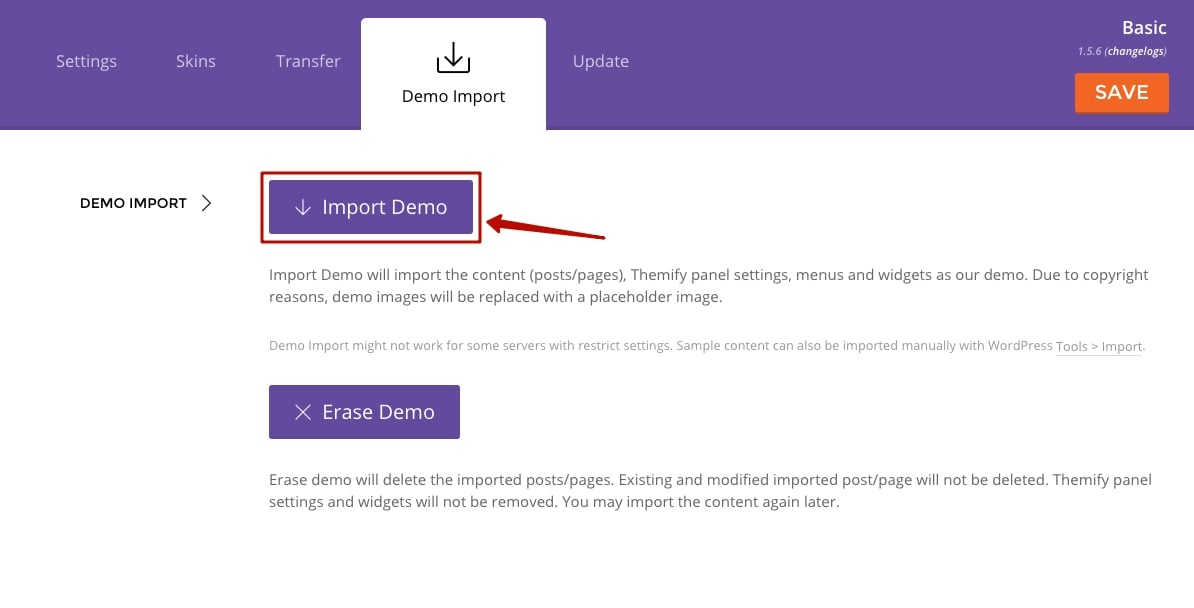
If you are starting a fresh site, importing the demo content will help you understand how the theme demo is built. The Demo Import feature will import the contents (posts, pages, comments, etc.), Themify panel settings, menus, and widgets setup from our demo to your site. You can erase the demo content afterward.
To import the demo setup:
- Go to WP Admin > Themify > Settings > Demo Import and click "Import Demo" button.
- Note that the featured images will be replaced with an image placeholder for copyright reasons.
To erase the demo setup:
- On the Demo Import tab, click on the "Erase Demo" button which will then remove the demo content.
FYI: If the Demo Import does not work on your site, you can use the WP Admin > Tools > Import tool to import the demo content manually.
Site Logo & Tagline
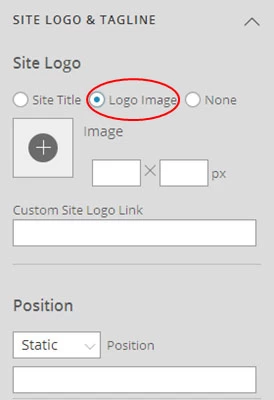
To display a logo image instead of the site name text:
- Go to WP Admin > Appearance > Customize > Site Logo and Tagline.
- Under "Site Logo", select "Logo Image" radio button.
- Upload a logo image.
- Specify the logo image width and height.
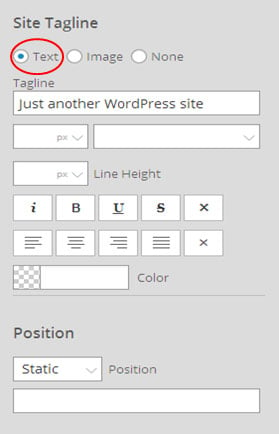
You can also change website Tagline from here:
- Go to WP Admin > Appearance > Customize > Site Logo and Tagline.
- Scroll down and under "Site Tagline" select "Text" radio button.
- Enter your site Tagline.
- Click "Save & Publish".
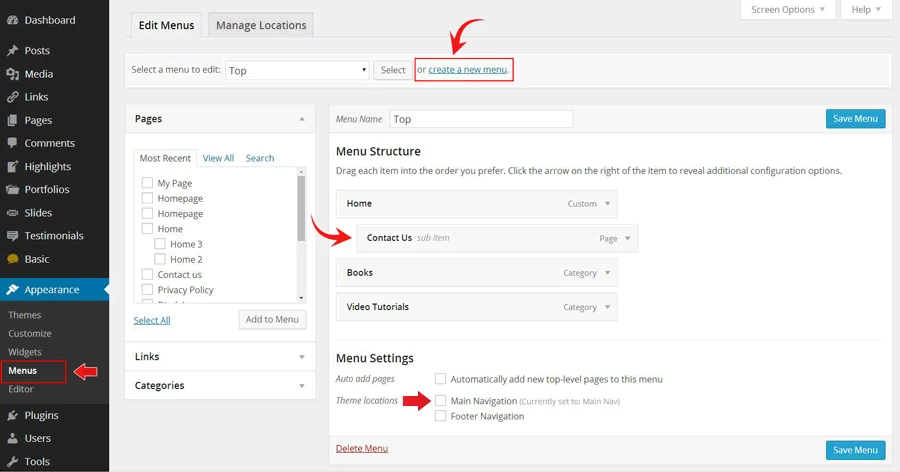
To create a custom navigation menu:
- Go to WP Admin > Appearance > Menus.
- Click on "create a new menu" to create a new menu (eg. Main Menu).
- Add the menu items from the left panels.
- To create a dropdown menu: drag the menu item towards the right (the item(s) will be indented).
- When you are done adding the menu items, click "Save Menu".
- To assign menu locations:
- Scroll down to the bottom where it says "Theme locations" and tick the menu location checkbox.
- Main Navigation = main menu on the header
- Footer Navigation = footer menu on the footer (Note: some themes might not have Footer Navigation).
TIPS: You can display menus on sidebar widgets, remove the main menu, create empty links, and lightbox links. Read Custom Menus for more detailed tutorial.
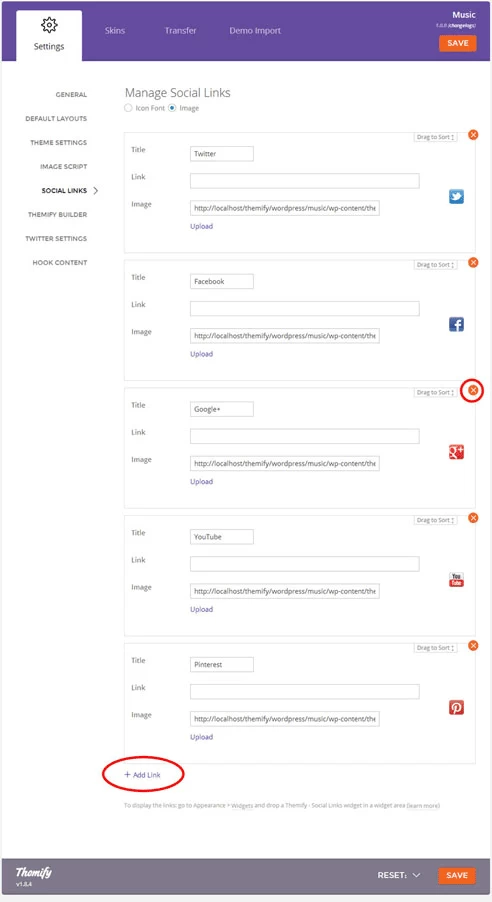
Setting Up the Social Links
Step 1) To set up the social media links:
- Go to WP Admin > Themify > Settings > Social Links tab.
- The theme comes with some pre-filled social links. Simply enter your social profile URL in the Link input field. For example, enter 'https://twitter.com/themify' for the Twitter link.
- You can choose to display either "Icon Font" or "Image".
- If "Icon Font" is selected, click on "Insert Icon" to select an icon (over 320+ icons available).
- If "Image" is selected, you can upload your own graphic icon by clicking on the Upload button.
- To add more links, click on the Add Link button at the bottom.
- To remove a link, click on the delete icon.
- To arrange the display order, drag and drop the link container.
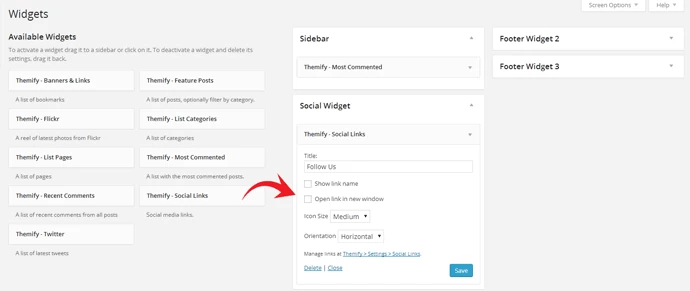
Step 2) Displaying the Social Links:
- Once you have the Social Links setup, go to WP Admin > Appearance > Widgets. Drag and drop the Themify - Social Links from the Available Widgets panel to the Social Widget panel.
- Optional: Customize Widget Title - such as "Follow Us". You can also "Show link name" and adjust icon size.
To hide the default RSS icon in the header:
- Go to WP Admin > Themify > Settings > Theme Settings.
- Under the "Exclude RSS Link", tick the checkbox that says "Check here to exclude RSS icon/button in the header".
To hide the default search form in the header:
- Go to WP Admin > Themify > Settings > Theme Settings.
- Under the "Exclude Search Form", tick the checkbox that says "Check here to exclude search form in the header".
To add the Horizontal Menu:
- Go to WP > Appearance > Menus
- Create a new menu and assign it "Horizontal Menu" by checking the checkbox under "Theme locations" (refer to Custom Menus for more info on how to create menus)
WooCommerce Products
Flatshop includes a number of options specifically for customizing the look and feel of WooCommerce products.
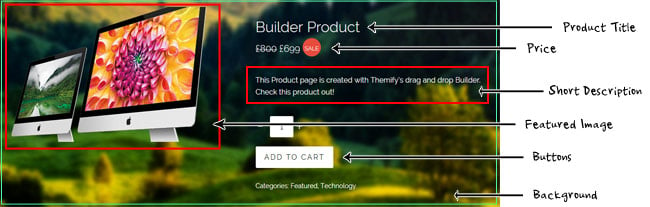
These options can be found in the Themify Custom Panel when creating or editing a product.
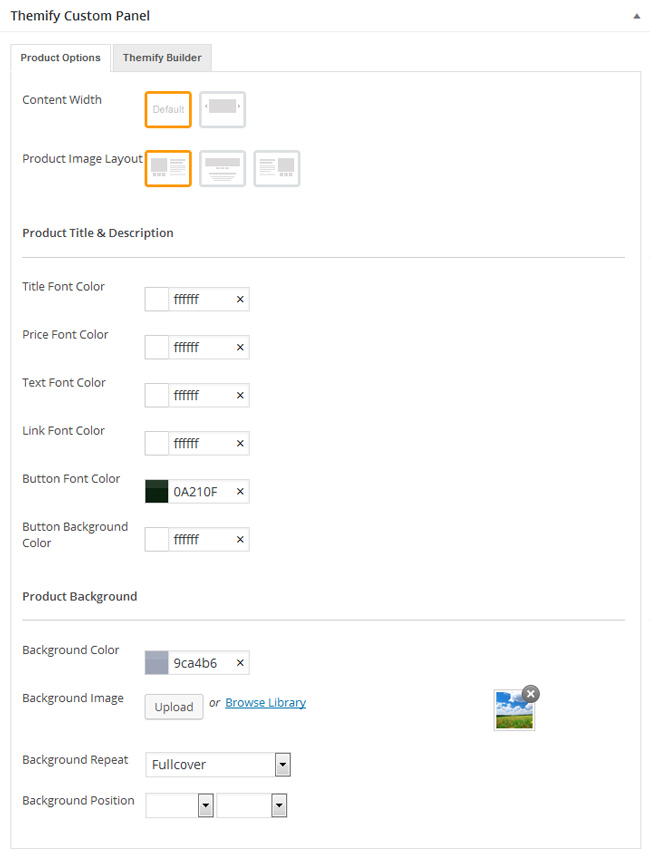
Options include:
- Product Image Layout - This option can be used to determine the layout of the product featured image, along with the product description and buttons on the product page.
- Title Font Color - Used to determine the color of the product title.
- Price Font Color - Sets the color used for the product price output.
- Text Font Color - Sets the color used for the main text of the product, such as short description, etc.
- Link Font Color - Sets the color for links in the main text of the product.
- Button Font Color - Used to determine the color of the text inside the buttons on a product page, such as add to cart button, etc.
- Button Background Color - Sets the background color of buttons.
- Background Color - Sets a background colour for the product listing.
- Background Image - Sets a background image to be used for the product listing.
- Background Repeat - Determines whether or not the background image will tile.
- Background Position - Used to set the positioning of the background iamge in the product listing.
Querying Products (Shop Pages)
In Flatshop you can now query products much like other post types using the Themify Custom Panel when adding or editing a page.
First create a page under WP > Pages > Add New and then check the "Query Products" tab of the Themify Custom Panel.
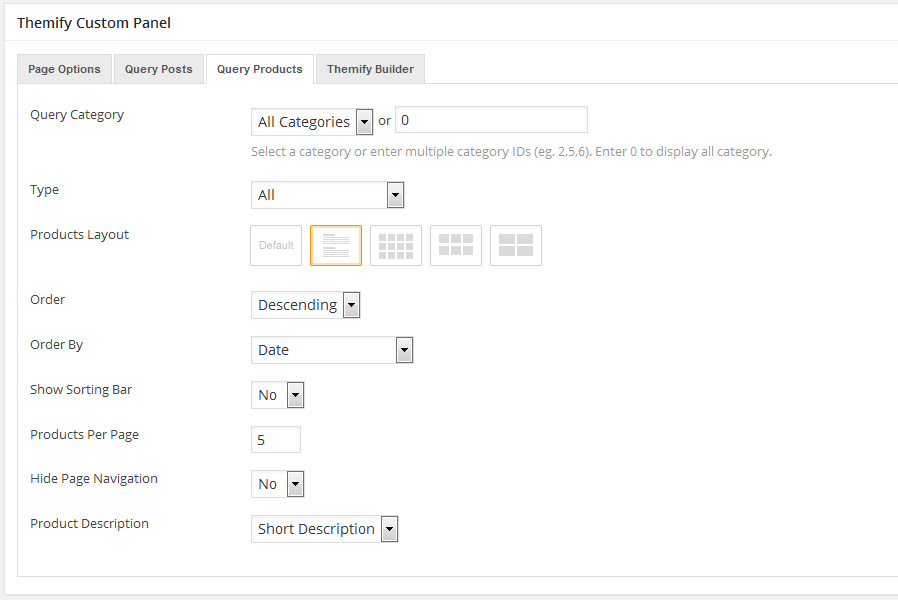
Options include:
- Query Category - Sets the category of products to display on the page.
- Products Layout - Determines how products will be displayed on the page, such as number of columns, etc.
- Order - Used to set whether to order products in ascending or descending order.
- Order By: - Determines what the products will be ordered by, such as publish date/time, title, etc.
- Products Per Page: - Sets the number of products displayed per page, i.e. the amount of products on the page before user has to use navigation links.
- Hide Page Navigation: - Used to hide the page navigation links for loading further products when the above limit is reached.
- Product Description: - Determines if a description will be shown for the products on the page, and if so which type of description to use.
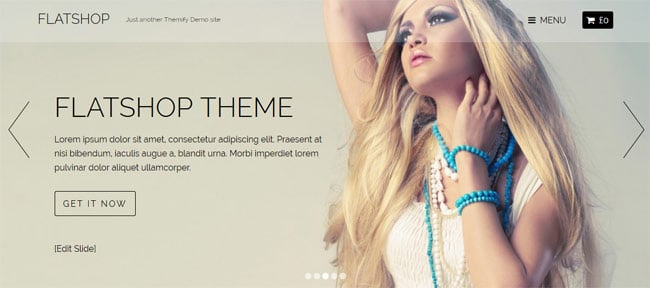
Full-width Slider
Flatshop includes a full-width slider which can be included at the top of any page, including the home page, and will display custom slider post types based on the selected category.
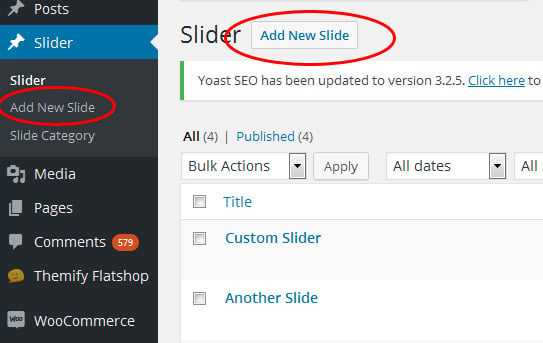
Adding Slider Posts
You can add new slider posts in the same way as any other post type in WordPress, by first navigating to the post type menu (in this case WP > Slider) and selecting "Add New"
Once you have added a new slide, you will be presented with the WordPress post editor. Here you can enter a title for the slide, and use the WordPress WYSIWYG editor to set up any slide content, such as text or buttons, etc. You can also set a category for the slide which will then be used to group slides together when output on pages.
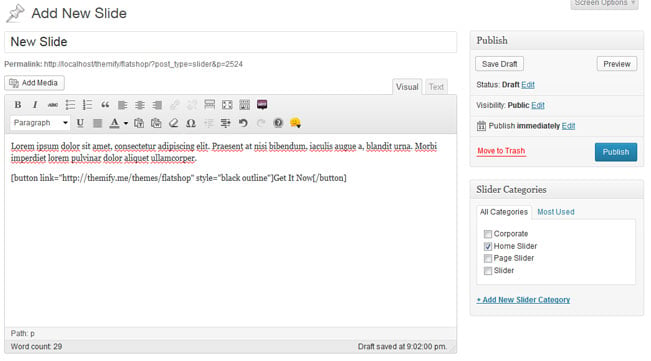
Button Shortcodes
You can use the [button] shortcode in the slider content to create action buttons. Below are some sample buttons (read the button documentation for more options):
[button link="https://themify.me/" style="red flat"]Themify[/button]
[button link="https://themify.me/themes/flatshop" style="black outline"]Get It Now[/button]
Slider Custom Panel
You will also see the Themify Custom Panel which has a number of options available for editing the look and content of slides.
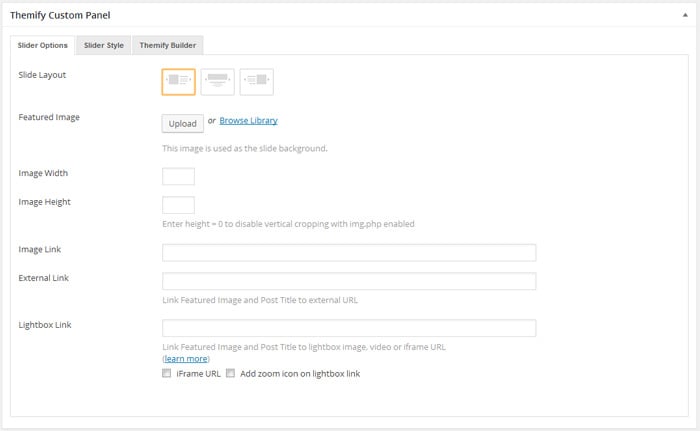
Options include:
- Slide Layout - This option determines the layout for the slide, such as placement of the slide content and featured image, etc.
- Featured Image - Use the options to set the image used for the slide.
- Image Width - Sets the width of the image used by the slide.
- Image Height - Sets the height of the image used by the slide.
- Image Link -
- External Link - Sets the link used by the slide title.
- Lightbox Link - Sets a link to be used by the slide which will be opened in a lightbox.
- iFrame URL - Sets the lightbox script to use an iFrame, for example if wanting to show another site or page in the lightbox.
- Add zoom icon - Adds a magnifying glass icon to the image.
Displaying the Slider on a Page
When creating or editing a page in WordPress you can use the Themify Custom Panel to set a slider category to be shown at the top of the page.
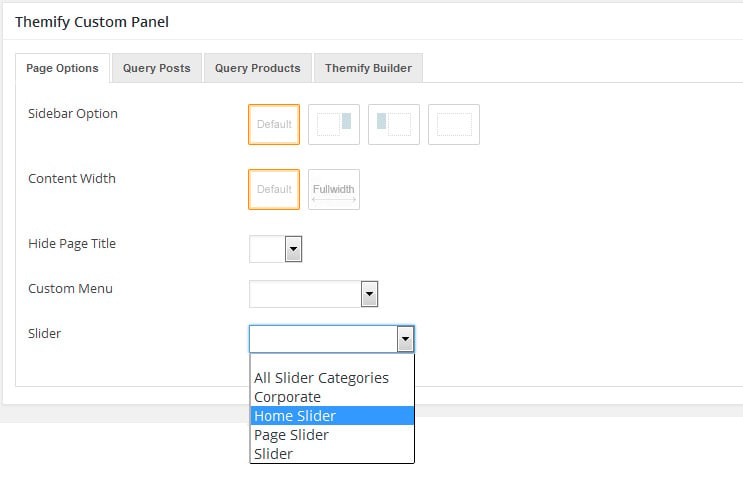
This option will allow you to select a category - or pull from all slider categories - and will then output that category's slides on the top of the page.
Slider Options
There are a number of options which can be set for all sliders under Themify > Settings > Theme Settings
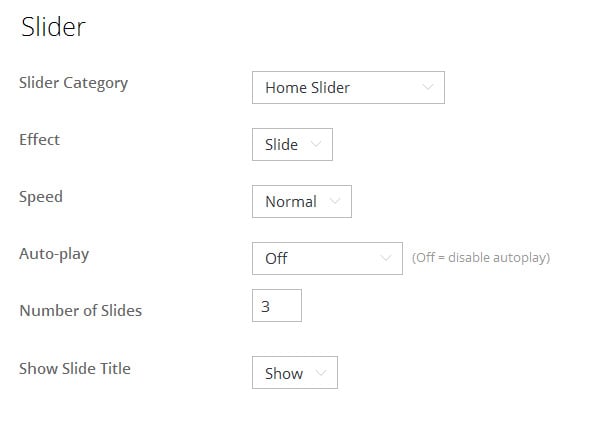
Options include:
- Slider Category - Sets the default category to be used for the slider, this will be used on the standard home page layout.
- Effect - Sets the transition effect used by the slider when switching slides.
- Speed - Sets the speed of transition when switching slides.
- Auto-play - Sets the time the slider will pause on each slide before switching slides automatically.
- Number of Slides - Sets the number of slides that will be shown.
Shop Settings
The shop settings option panel under Themify > Settings > Shop Settings is used to determine the standard layout of WooCommerce product archive pages and the single product pages.
Shop Page Settings
This section refers to the default product category/archive pages.
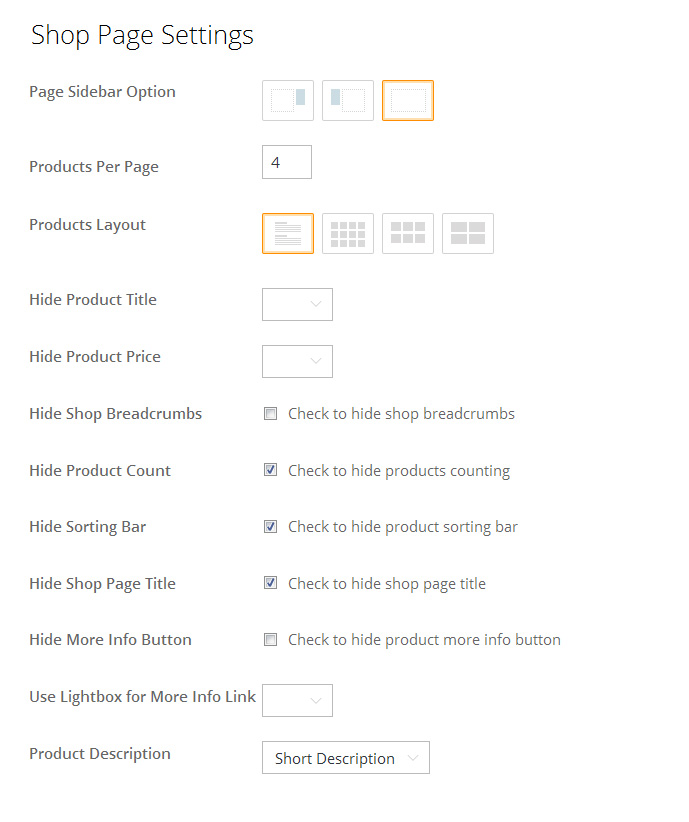
Options include:
- Page Sidebar Option - This will set whether the sidebar is displayed on the shop page and which side of the layout it will appear on.
- Products Per Page - Sets the number of products shown per page.
- Products Layout - Determines the way product listings will be shown on the page, such as number of columns, etc.
- Hide Product Title - Sets whether the product title should be shown or not.
- Hide Product Price - Sets whether the product price will be shown or not.
- Hide Shop Breadcrumbs - Determines whether the breadcrumbs will be shown, these show the user their current location within the store.
- Hide Product Count - Determines whether the product stock count will be shown.
- Hide Sorting Bar - Determines whether the list of sorting options is shown on the page.
- Hide Shop Page Title - Determines whether the shop page title will be shown on the page.
- Product Description - Sets whether a description will be shown, and which description to use, for the products.
Single Product Page
This section refers to the single product pages, which you will see when you select to view a single product from the listings.
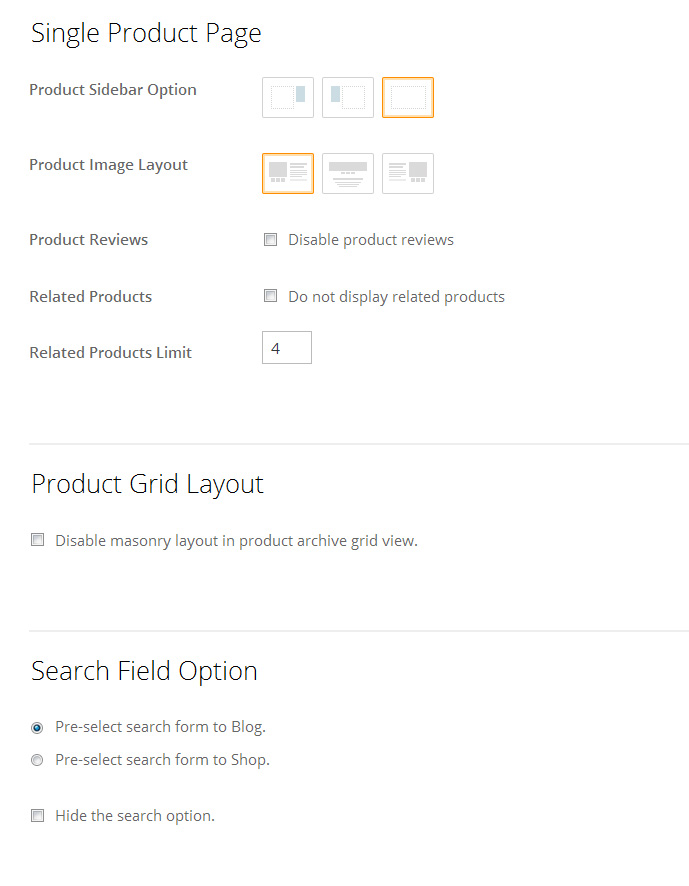
Options include:
- Product Sidebar Option - This will set whether the sidebar is displayed on the product page and which side of the layout it will appear on.
- Product Reviews - Sets whether the product reviews will be listed on the product page.
- Related Products - Sets whether the related products list will be shown on the product page.
- Related Products Limit - Sets how many related products will be shown at maximum.
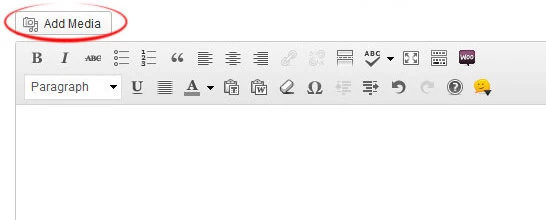
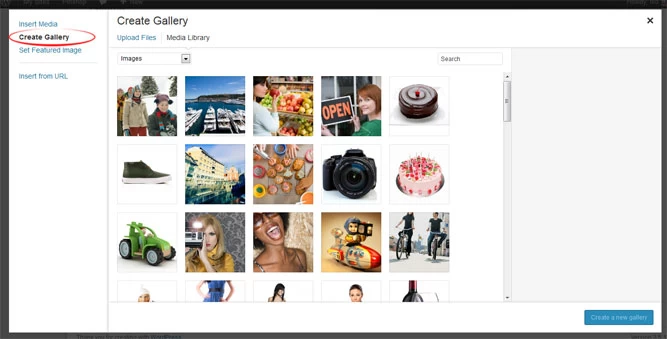
Inserting Gallery to Posts or Pages
The gallery can be inserted in any post or page. To insert a gallery, click on "Add Media" button
It will open a lightbox for you to create and insert gallery. Read this tutorial for more details on how to use WordPress Gallery.
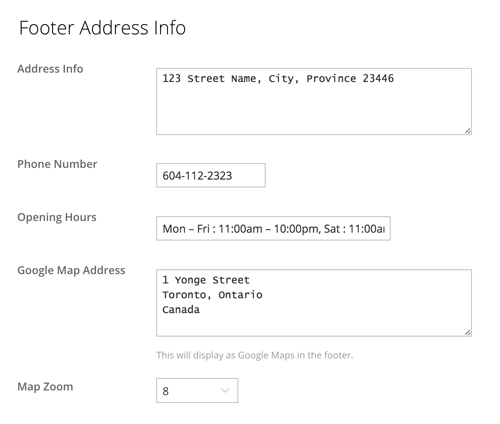
To enter the footer address & map:
- Go to Themify > Settings > Theme Settings
- Enter the Address Info as you like (note that Address Info will display on the frontend, it is not a map)
- Enter the Phone Number (optional)
- Enter Opening Hours (optional)
- Enter Google Map Address (the address will be used as Google Map location)
- Select the Map Zoom level (optional)
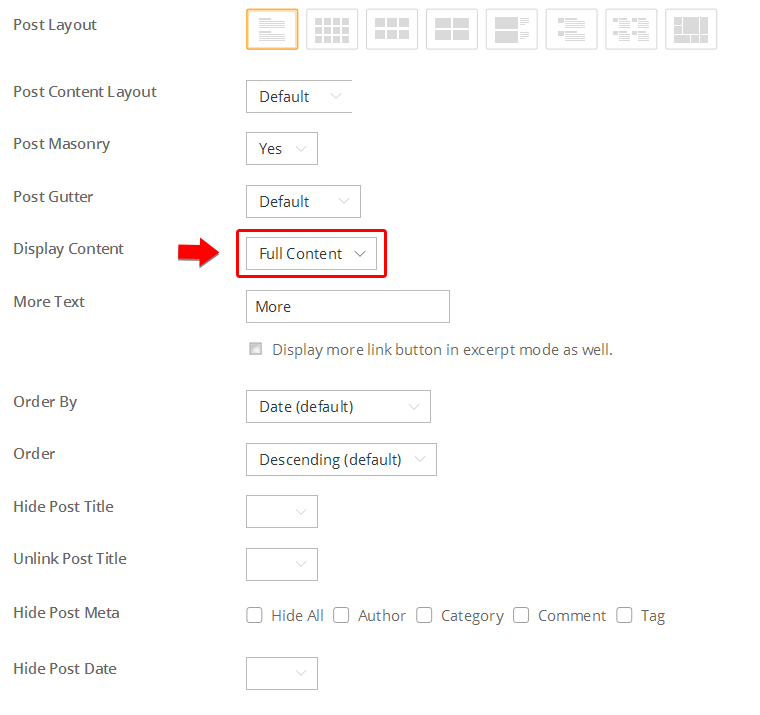
Setting Default Post and Page Layouts
Generally, the theme works out of the box. All the sidebar options and image dimensions are pre-defined in the theme. If you need to change the default sidebar options, featured image dimensions, content/except display, post meta, etc., it can be done in the WP Admin > Themify > Settings > Default Layouts.
There are three default layout options under Themify > Settings > Default Layouts:
- Archive Sidebar Option: refers to the default home page, category, search, archive, tag pages, etc.
- Default Post Layout: is the post page direct URL (also known as "Single Post").
- Note: Some themes may only have 4 layouts.
- Default Static Page Layout: is the static page.
FYI: Read Default Layouts documentation for more info.
Creating a Blog Page
To create a blog page:
- First, create a new Page (go to WP Admin > Pages > Add New), name it "Blog" or any page title as you want.
- View the page on the frontend, click "Turn On Builder".
- Drop in a Post module and configure the options as you like.
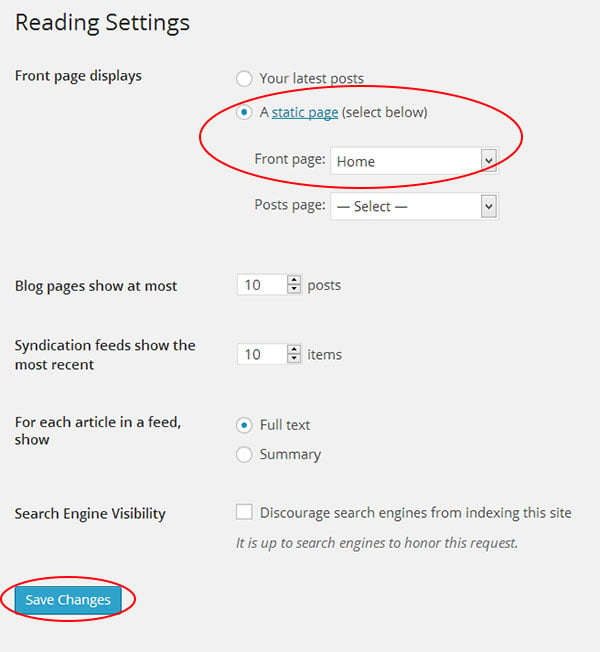
Setting a Custom Front Page
You can set any page as the front (home) page. This means you can use the Builder to design the page and assign it as the front page. To set the Front Page:
- Go to WP Admin > Settings > Reading.
- On the Front page displays, select the "A static page (select below)" option and then select a "Front page".
- Leave the "Posts page" default. If you want to create a custom Blog page, read this tutorial instead of setting the "Posts page".
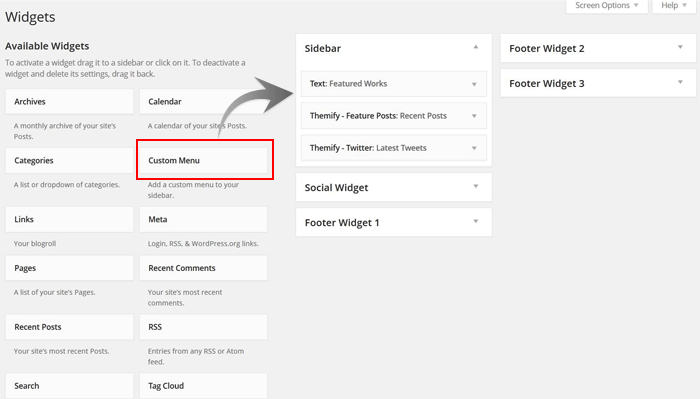
To add widgets to widgetized areas (eg. sidebar and footer widgets):
- Go to WP Admin > Appearance > Widgets.
- The big panel on the left side shows all available widgets. The small panels on the right are the widgetized areas.
- To add a widget: drag and drop the widget from the left panel to the right panel.
- To remove the widget: drag the widget back to the left panel (Available Widgets panel). If you want to keep the widget setting for future use, drag it to the Inactive Widgets instead of the Available Widgets panel. It will save your widget settings. To retrieve the widget, drag the widget from Inactive Widgets panel instead of the Available Widgets panel.
TIPS: You can also add widgets in Appearance > Customize panel.
Theme Skins
To apply pre-designed color skins:
- Go to WP Admin > Themify > Skins, select a skin by clicking on the thumbnail and click Save.
Styling The Theme
To style the theme frontend appearance:
- Go to WP Admin > Appearance > Customize.
- It will take you to the Customize panel with live preview where you can style the appearance of the theme design (ie. color, background, font, spacing, border, etc.).
FYI: Refer to Customize documentation for more info.
- To set the Footer Widget column layout, go to WP Admin > Themify > Settings > Theme Settings.

- To drop the widgets in the Footer Widgets, go to WP Admin > Appearance > Widgets.
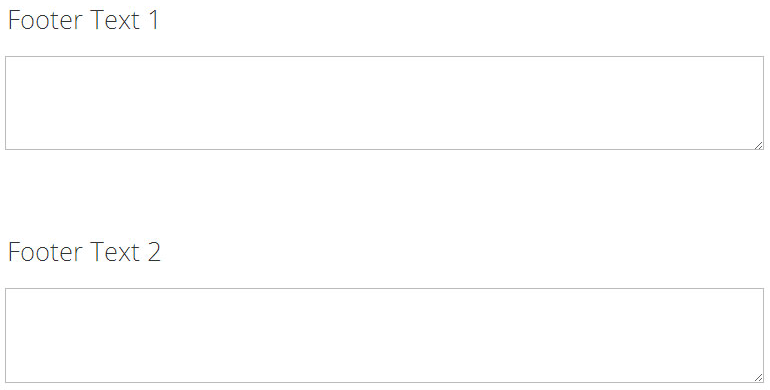
To replace the footer credit links:
- Go to WP Admin > Themify > Settings > Theme Settings and enter the footer text.
- HTML tags are allowed in the Footer Text.
- To have empty footer text, tick the hide footer text checkbox.
Read More
03
Oct
2013
/
This documentation will guide you through the steps needed to install and use the Themify Builder plugin.
NOTE: Themify Builder plugin is the standalone plugin version of the Builder included in the Themify framework. If you are using a Themify theme, this plugin is not required. The purpose of this plugin is to use Themify Builder with third party themes.
Installing Builder
You can install the plugin using the following steps:
- First, download the plugin zip file from the link provided in your Themify member area.
- NOTE: some browsers (eg. Safari) auto extract zip files automatically. Right click on the download link and select "Save Linked File As" will allow you to download as a zip file.
- Log in to your site's admin area.
- Navigate to WP Admin > Plugins > Add New
- Now, select the "Upload" option on this page.
- Select "Browse" and navigate to the plugin ZIP file which you downloaded in the first step, and then select the "Install Now" button.
- This will initiate the plugin installation process, and once finished you can then activate the plugin.
Updating Builder
You will receive notifications of updates to the plugin whenever you are on the settings page for the plugin, these notifications will provide a link to automatically install the update.
You can find a list of updates and the changes made in each in the Builder changelogs which are also linked in the notification.

You can also manually update by downloading the latest ZIP file from your Themify member area and either deleting the plugin on your site and following the installation instructions above again, or by uploading the contents of the new ZIP via FTP and overwriting the existing plugin folder.
Reinstall Builder
If the auto plugin update does not, you may reinstall the Themify Builder plugin by following the steps below. Reinstalling the plugin shouldn't affect the content/data because they are saved separately in the database. To be safe: you should backup your WordPress content (posts, pages, menus, etc.) before reinstalling it. To backup your WordPress content, go to wp-admin > Tools > Export and export all content to a zip file. You may use wp-admin > Tools > Import to import these content in the future if necessary.
- Login to Member Area to download the latest themify-builder.zip (keep it as .zip file, do not extract it)
- Login to your site wp-admin
- Go to Plugins (where WordPress lists all the plugins on your site)
- Deactivate the Themify Builder plugin (plugin can not be deleted if it is active)
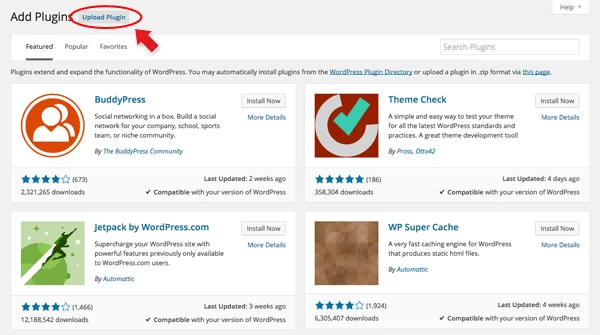
- Now click on the "Delete" button to remove the Themify Builder plugin (the "Delete" link is located under the Themify Builder name)
- Remain on the Plugins page, click on the "Add new" button (located at the top of the page), click on the "Upload Plugin" link, upload the latest themify-builder.zip and activate it (basically the same procedure as you would install a new plugin)
Builder Settings
There are a number of settings on the Themify Builder plugin page, these are broken into two sections and are as follows:
- Builder Settings
- Themify Builder - This option is used to enable/disable the Builder functionality.
- Module Exclude - This option can be used to exclude specific modules from being loaded and usable by Builder, it will also disable the custom post types associated with a module for those which include them.
- Image Script
- img.php - The image script is used in the Builder content to crop images dynamically to any dimension. This can be used to disable the Image Script used by Builder globally, so that Builder will instead use the images generated by WordPress rather than dynamically creating them.
- Image Quality - This option will set the quality of images output by the Image Script on a scale from 0 - 100, with 100 being highest quality.
- Cropping Alignment - This option can be used to set where the origin point will be when images are cropped by the Image Script.
- Vertical Cropping - This option can be used to enable/disable vertical cropping of images to fit a set height. If disabled, images will not be cropped, and height will be based on aspect ratio of the image.
- Default Featured Image Size - This is an option available when the Image Script is disabled, and will determine the size of the WordPress generated image used when outputting images for scaling.
Using Builder
For an in-depth explanation of the various features of Builder, and how to make use of the functionality of the plugin, you can refer to the Themify Builder documentation.
Read More