This quick tutorial will show you how to install and use Themify's WordPress themes. NOTE: Some screenshots and features may vary from different themes as they might have different features.
1. Installing The Theme
Note: you need to have a self-hosted WordPress site in order to install themes (works on wordpress.com with Business Plan only).
To install the theme:
Download the theme zip from the Member Area. The theme zips in the Member Area are always the latest version.
Login to your WordPress site's admin
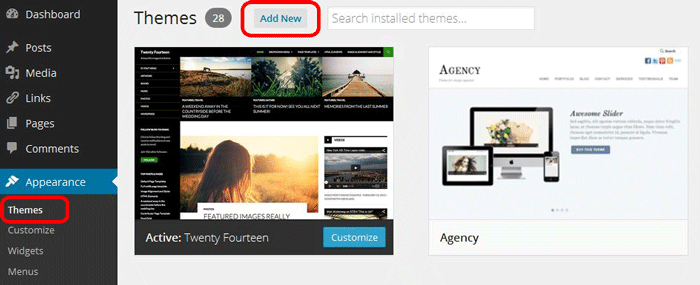
Go to Appearance > Themes
Click on the "Add New" button, then click on the "Upload Theme" button
Upload the theme zip that you've downloaded from our server and click "Install Now"
Click "Activate"
Common issues:
If you get "upload_max_filesize" error, this means your host/server has limited file upload size. You can either request your host provider to increase file upload size or install the theme with FTP, read Installing Themes for details.
If you get "missing the style.css stylesheet" error, make sure the zip file you selected is 'theme_name.zip', not 'theme_name-psd.zip' (the psd.zip file is the Photoshop file).
2. Theme Option Panel
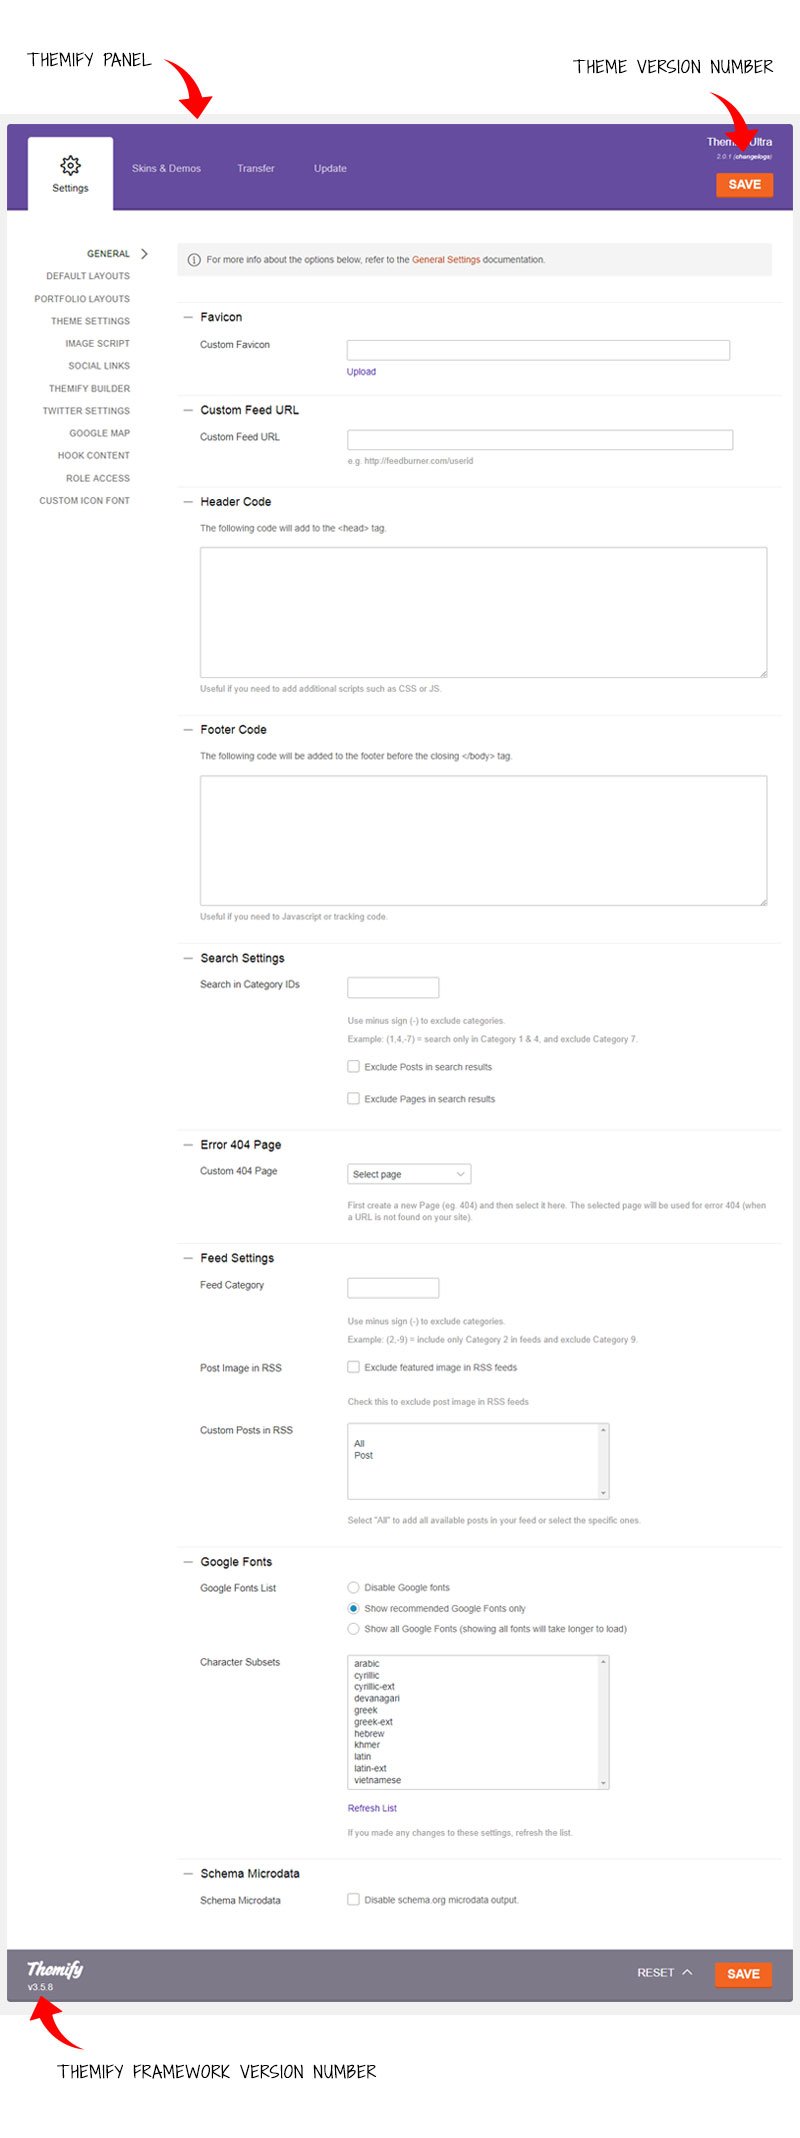
After the theme is activated, it should redirect you to the Themify panel (theme option page). Under the Theme Option panel, there are four main tabs: Settings, Skins, Transfer, and Demo Import. The theme update notification can also be found on the Themify panel page as well.
Theme Auto Update
All Themify themes have auto update feature. When a theme update is available, you will see a notice above the Themify panel. On the Themify panel, you can find the theme version number on the top right corner and the framework version number is located at the bottom left corner.
Settings
General Settings - Under the General Settings tab, you can customize the favicon, feed URL, insert header code, footer code, set search categories, RSS feed, and Google Fonts options.
Default Layouts - Under the Default Layouts tab, you can choose the global layout options for: archive/index pages, single post page, and static page.
Theme Settings - Under the Theme Settings tab, you can customize the theme specific features such as WordPress gallery lightbox, exclude RSS icon, exclude search box, footer text, footer widgets, etc.
Image Script - Under the Image Script tab, you can disable the img.php script that we use to dynamically generate the featured image sizing.
Social Links - Under the Social Links tab, you can manage social media links such as Twitter, Facebook and more.
Themify Builder - Under the Themify Builder tab, you can enable/disable the Themify Builder and to exclude certain Builder modules.
Twitter Settings - Under the Twitter Settings tab, you can insert the Twitter API access token (Note: required for Themify Twitter widget and Twitter shortcode).
Hook Content - Under the Hook Content tab, you can add dynamic content to the theme without the need to edit any theme template file.
Role Access - Under the Role Access tab, you can set which user role you'd like to give access to the Themify Custom panel, customizer, Builder front/backend. (Default is set to the default WordPress roles)
Skins
Under the Skins tab, you may apply one of the pre-built skins.
Transfer
Under the Transfer tab, you may backup or restore the setting data in the Themify panel. Click on Export to download the setting data for backup. You may restore the data by clicking on the Import button. The data in the option panel is stored in the database. Updating or reinstalling the theme does not affect the setting data.
Reset
At any time, you may clear the Settings by clicking on the RESET setting button located at the bottom of the Themify panel.
3. Importing Demo Content (Optional)
If you are starting a new site and would like to import the sample content as seen on the demo site:
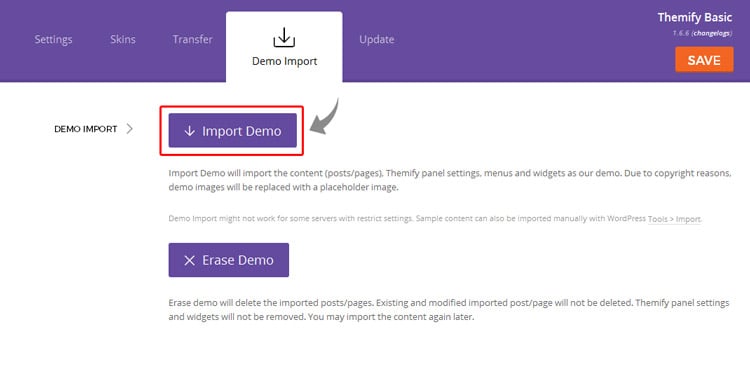
Go to Themify panel > Demo Import.
Click on the "Import Demo" button.
A popup box will appear with the message "This will import demo and Override current Themify panel settings," just choose "Ok" and the importing process will start.
Now sit back and let the importing process finish.
As soon as the importing process finishes, you will see a "Done" message and your demo content.
Now you may edit or delete the contents as you like.
Note: The Demo Import feature will import the content including (posts/pages), Themify panel settings, menus, and widgets. Due to copyright reasons, demo images will be replaced with a placeholder image. Simply upload the "Featured Image" in the Themify Custom Panel to replace the placeholder image.
Common issue: The Demo Import might not work on some servers with restrictive settings or low performance resources (i.e. it blocks files from importing to the server). If the Demo Import fails, you may also import manually using WP Admin > Tools > Import.
4. Adding Posts
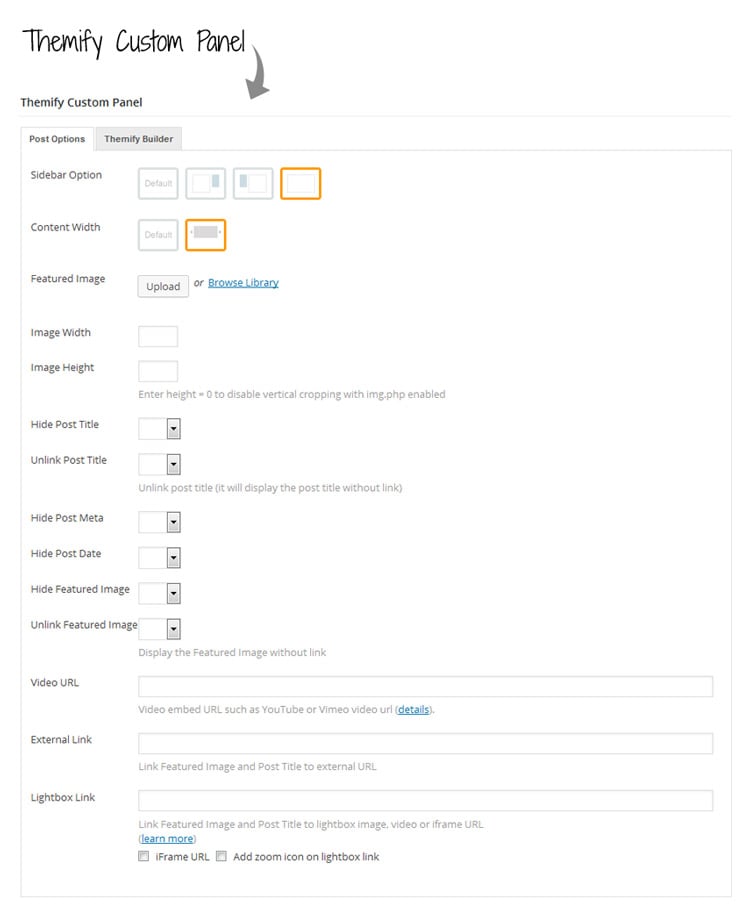
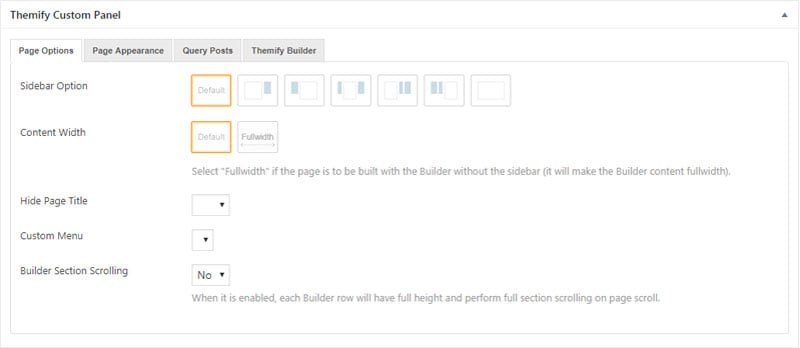
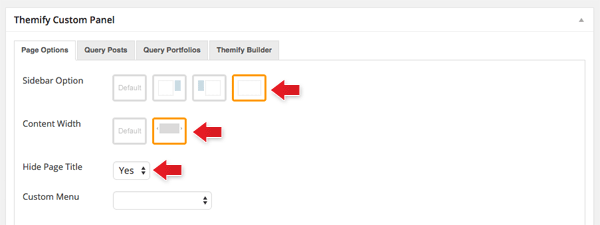
When adding or editing a post, there is a Themify Custom Panel under the content editor which allows you to override the "Default Single Post Layout" set in Themify > Settings > Default Layouts. You can override the sidebar option, content width, feature image, image dimension, and toggle the visibility of the post elements such as post title, date, image, etc.
5. Adding Pages
When
adding or editing a Page, there is also a Themify Custom Panel under the content editor which allows you to override the "Default Page Layout" set in Themify > Settings > Default Layouts.
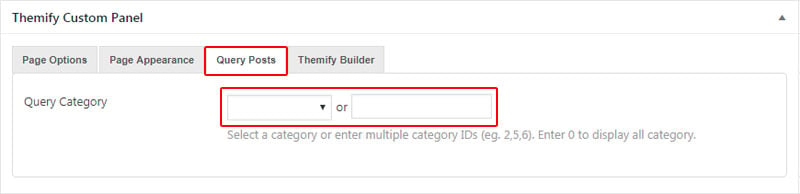
Query Posts (Blog Page)
All Themify themes allow you to query blog posts on any static page (e.g. you can create a custom blog page). To query posts, on the Page's Themify Custom Panel, click on "Query Posts" tab then select "All Categories" or any category as you like.
Static Front Page
The default WordPress homepage is actually a blog archive page showing the latest blog posts. You may change it to a custom static Page in WP Admin > Settings > Reading (read Custom Front Page for details).
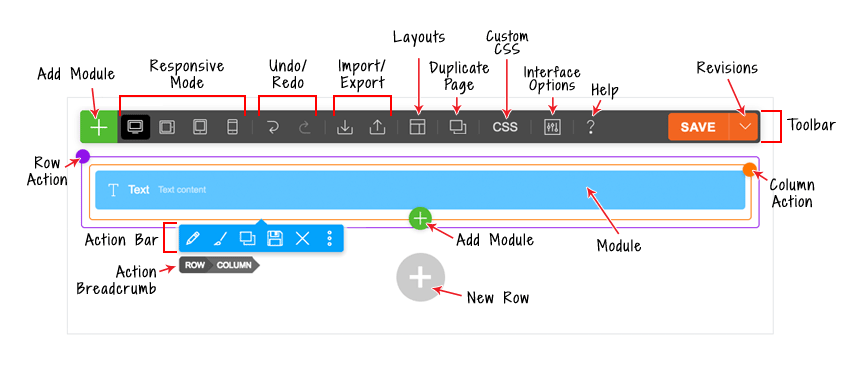
6. Using The Builder
You can build the post/page layout using the drag and drop Builder in either the backend or frontend mode. Read the Builder documentation for more details on how to use it. Below is a quick guide:
A) To use the Themify Builder in backend:
First, add or edit a post/page.
If you are using WordPress 5+ with Gutenberg enabled (default), you should see a Builder Block like the screenshot below.
If Gutenberg is disabled, you will find the "Themify Builder" tab below the WordPress classic editor.
Drag and drop the module to the column/grid to add modules.
B) To use the Themify Builder on frontend:
View any post or page on the frontend (Note: WordPress default homepage is actually a blog archive page, you will need to create a static front page to use the Builder on homepage).
On the frontend, from the top admin bar (make sure your Toolbar is enabled), select Themify Builder > Turn On Builder.
You will see the module panel slide up and a grid on the page.
Drag and drop the module to the grid to add modules.
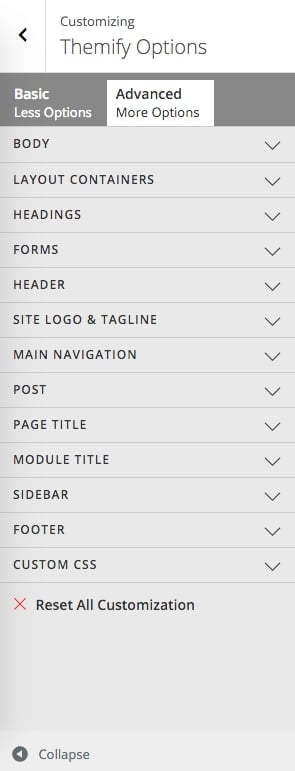
7. Customize Panel, Site Logo, and Tagline
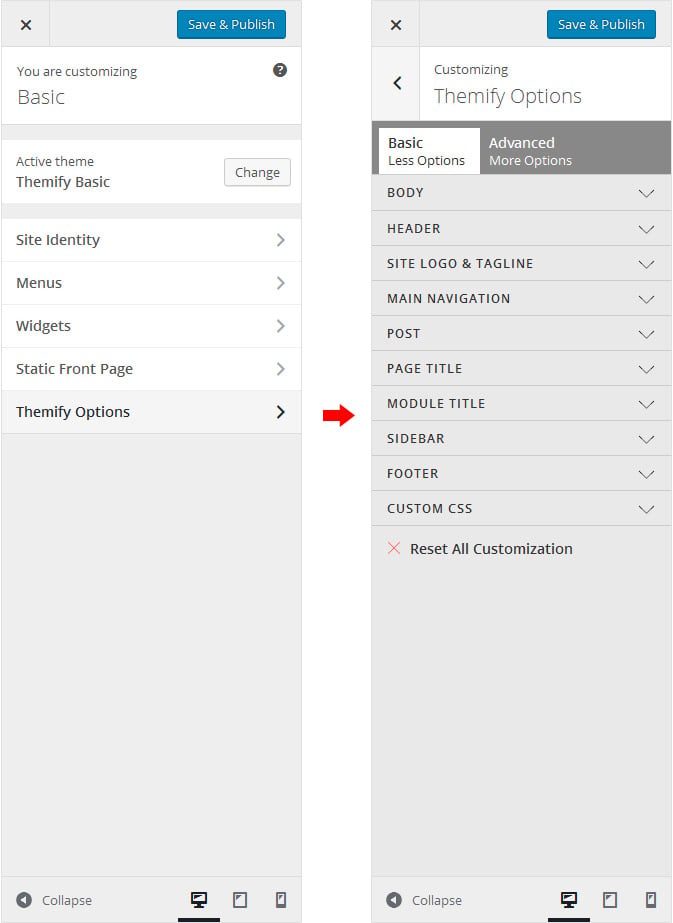
Customize Panel
The Customize panel allows you to customize the appearances of the theme (e.g. font, background, color, border, position, spacing, custom CSS, etc.).
To access the Customize Panel:
Go to WP Admin > Appearance > Customize.
On the Customize, there are "Basic" and "Advanced" tabs:
Basic = shows only the basic options which is good for beginners
Advanced = shows all styling options which is good for experienced users
Read Styling for more details on how to use the Customize Panel.
Common confusion in the Customize Panel:
If you try to style something, but it is not reflecting on the preview window, it could be something else overriding the styling. Note that if you are using the Builder to style the module layout, the Builder styling will have higher priority. You may contact our Support team if you find the Customize panel is not working.
Site Logo Image
To display a logo image instead of text:
Go to WP Admin > Appearance > Customize > Themify Options > Site Logo & Tagline.
Under "Site Logo", select "Logo Image" radio button.
Click on the plus (+) sign button, and upload a logo image.
You can also use custom site logo link (optional).
Specify the image width and height.
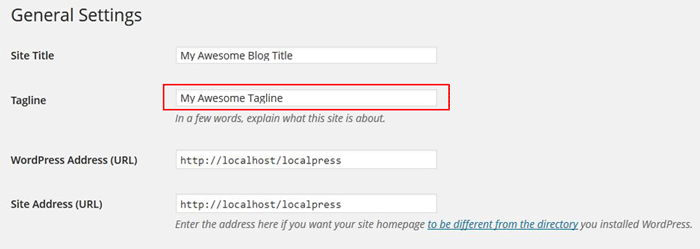
Site Description (Tagline)
A) To edit the Site Tagline using the WordPress settings:
Go to WP Admin > Settings.
Edit or remove the text in the Tagline field.
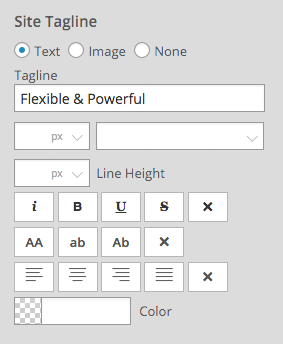
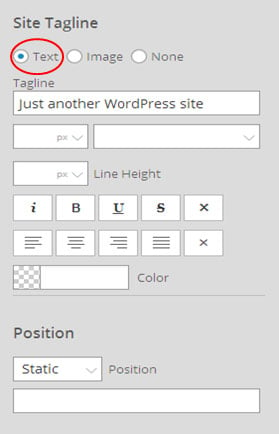
B) To edit the Site Tagline using the Customize panel:
Go to Appearance > Customize > Themify Options > Site Logo & Tagline.
Scroll down to the "Site Tagline" section and you will see option to display Tagline as "Text, Image, or None".
Enter the text in the Tagline field (alternatively you can choose to display an "Image" or "None" by selecting the radio button options).
Under the Tagline field, you can customize the font styling, color, and text formatting.
8. Custom Navigation Menus
To customize the main menu navigation:
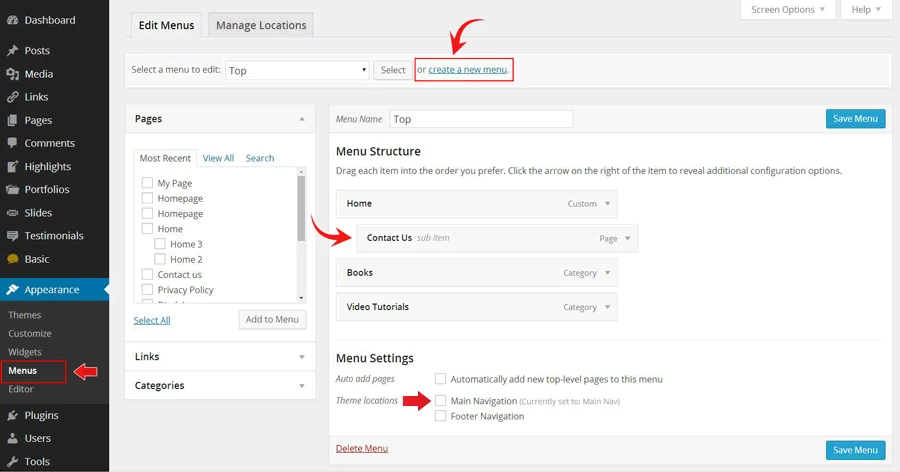
Go to WP Admin > Appearance > Menus.
Select a menu to edit or click on the "create a new menu" link to create a new menu (e.g. Main Menu).
Add the menu items from the left panels (Pages, Links or Categories, etc).
To create sub-level (dropdown) menu links, drag the menu item slightly toward the right (the item(s) will be indented).
When you are done adding the menu items, on the "Theme locations" > check "Main Navigation" checkbox to assign this menu as the main site menu.
Click "Save Menu" when you are done.
Tips: the custom menu can also be used with the widget (go to Appearance > Widgets and drop in the Custom Menu widget).
Conditional Menus
If you need to show a different menu on different pages, we have the Conditional Menus plugin. As the name suggests, this plugin allows you to have different menus in different posts, pages, categories, archive pages, etc.
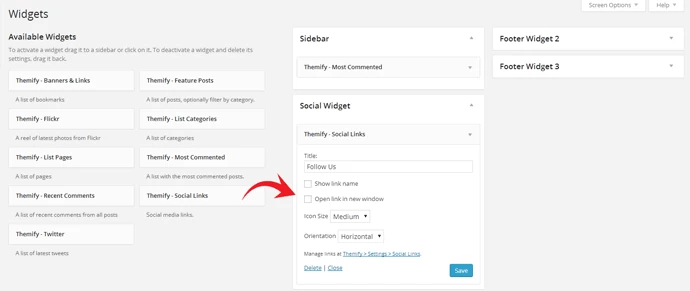
9. Widgets
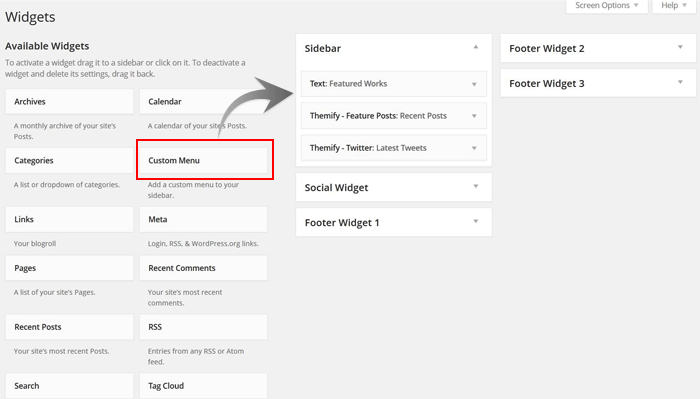
A) To add/remove widgets:
Go to Appearance > Widgets.
Drag the widgets from the Available Widgets panel located on the left side to the widget area panel on the right (e.g. Sidebar, Social Widget, Footer Widget, etc).
To remove the widgets, drag the widget from the widget area panel back to the Available Widgets panel. If you want to keep the widget setting for future use, drag it to the Inactive Widgets instead of the Available Widgets panel - this will save your widget settings. To retrieve the widget, drag the widget from the Inactive Widgets panel instead of the Available Widgets panel.
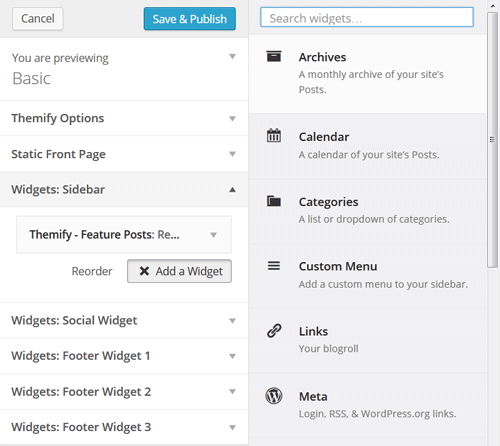
B) To add widgets using Customize with live preview:
Go to Appearance > Customize.
Choose the widget area where you want to add/remove the widget.
Now click on "Add a Widget" button.
A list of all the available widgets will appear, now select the desired widget.
The selected widget will be added to the widget area.
Give the title to your widget and your widget will go live on your site (Note: it might take a few seconds for the widget to populate in the preview window).
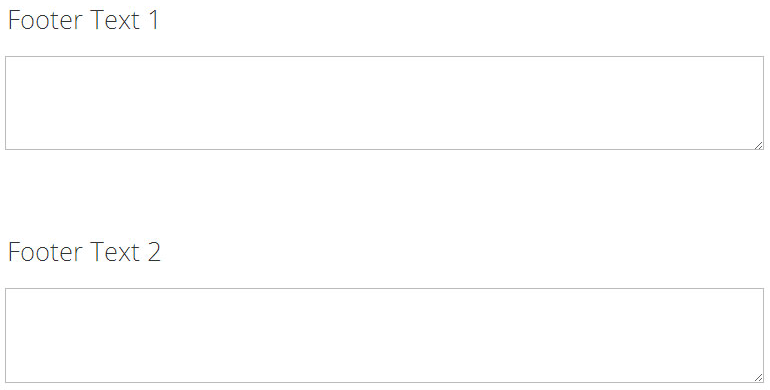
10. Footer Credit Text
To replace the footer credit links:
Go to WP Admin > Themify panel > Settings > Theme Settings and enter any text in "Footer Text 1" and "Footer Text 2" box.
HTML tags are allowed in the Footer Text.
To have empty footer text, enter a blank space in Footer Text.
11. Updating the Theme
To update the theme, you would need to install the Themify Updater plugin. A valid license key is required to update the theme.
To install themes with the WordPress theme uploader:
Download the "theme.zip" file from the Member Area
Note: some browsers (eg. Safari) auto extract zip files automatically. Right-click on the download link and select "Save Linked File As". This will allow you to download the theme as a zip file.
Login to your site's WP Admin.
Go to Appearance > Themes.
Click on the "Add New" button, then click on the "Upload Theme" button
Upload the theme.zip file (note: it is the theme.zip, not the theme-psd.zip that you just downloaded from the Member Area).
Activate the theme
FYI: You can also install themes with FTP method. Read the Installing Themes tutorial for more info.
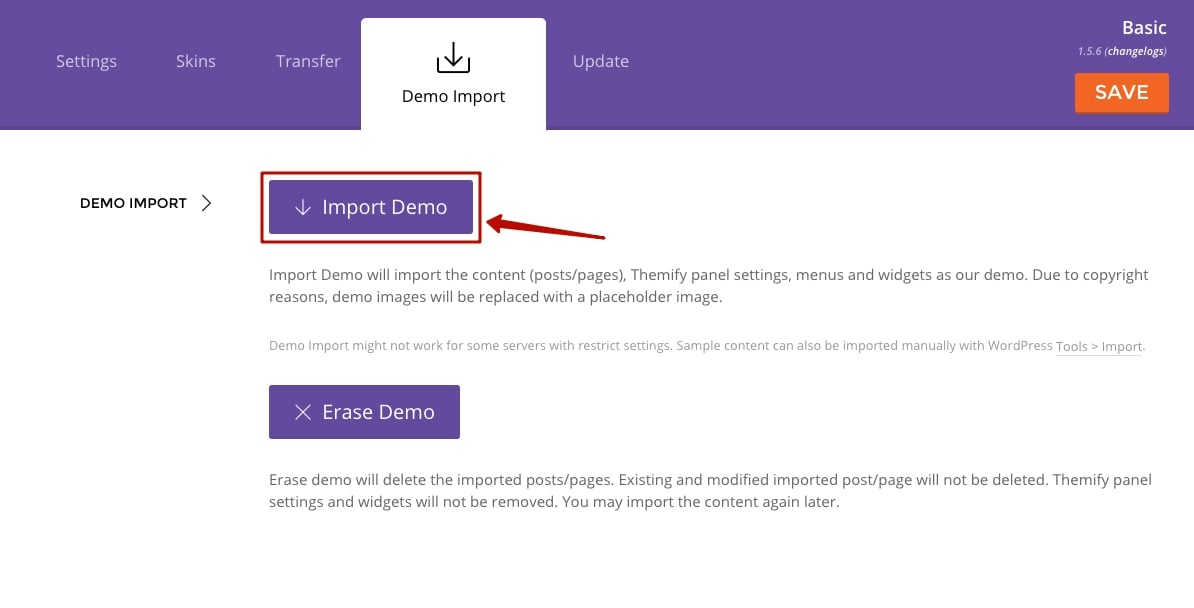
Demo Import
If you are starting a fresh site, importing the demo content will help you understand how the theme demo is built. The Demo Import feature will import the contents (posts, pages, comments, etc.), Themify panel settings, menus, and widgets setup from our demo to your site. You can erase the demo content afterward.
To import the demo setup:
Go to WP Admin > Themify > Settings > Demo Import and click "Import Demo" button.
Note that the featured images will be replaced with an image placeholder for copyright reasons.
To erase the demo setup:
On the Demo Import tab, click on the "Erase Demo" button which will then remove the demo content.
FYI: If the Demo Import does not work on your site, you can use the WP Admin > Tools > Import tool to import the demo content manually.
Site Logo & Tagline
To display a logo image instead of the site name text:
Go to WP Admin > Appearance > Customize > Site Logo and Tagline.
Under "Site Logo", select "Logo Image" radio button.
Upload a logo image.
Specify the logo image width and height.
You can also change website Tagline from here:
Go to WP Admin > Appearance > Customize > Site Logo and Tagline.
Scroll down and under "Site Tagline" select "Text" radio button.
Enter your site Tagline.
Click "Save & Publish".
Main Navigation Menu
To create a custom navigation menu:
Go to WP Admin > Appearance > Menus.
Click on "create a new menu" to create a new menu (eg. Main Menu).
Add the menu items from the left panels.
To create a dropdown menu: drag the menu item towards the right (the item(s) will be indented).
When you are done adding the menu items, click "Save Menu".
To assign menu locations:
Scroll down to the bottom where it says "Theme locations" and tick the menu location checkbox.
Main Navigation = main menu on the header
Footer Navigation = footer menu on the footer (Note: some themes might not have Footer Navigation).
TIPS: You can display menus on sidebar widgets, remove the main menu, create empty links, and lightbox links. Read Custom Menus for more detailed tutorial.
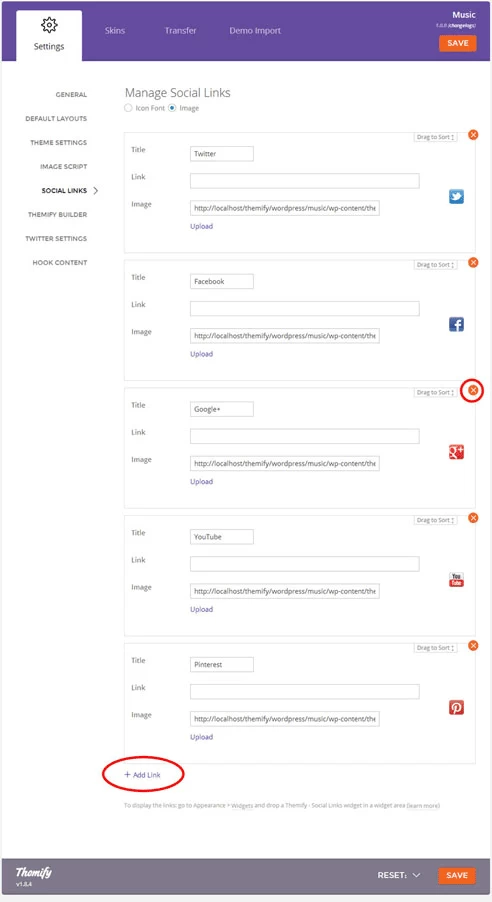
Setting Up the Social Links
Step 1) To set up the social media links:
Go to WP Admin > Themify > Settings > Social Links tab.
The theme comes with some pre-filled social links. Simply enter your social profile URL in the Link input field. For example, enter 'https://twitter.com/themify' for the Twitter link.
You can choose to display either "Icon Font" or "Image".
If "Icon Font" is selected, click on "Insert Icon" to select an icon (over 320+ icons available).
If "Image" is selected, you can upload your own graphic icon by clicking on the Upload button.
To add more links, click on the Add Link button at the bottom.
To remove a link, click on the delete icon.
To arrange the display order, drag and drop the link container.
Step 2) Displaying the Social Links:
Once you have the Social Links setup, go to WP Admin > Appearance > Widgets. Drag and drop the Themify - Social Links from the Available Widgets panel to the Social Widget panel.
Optional: Customize Widget Title - such as "Follow Us". You can also "Show link name" and adjust icon size.
Hiding the RSS Icon
To hide the default RSS icon in the header:
Go to WP Admin > Themify > Settings > Theme Settings.
Under the "Exclude RSS Link", tick the checkbox that says "Check here to exclude RSS icon/button in the header".
Hiding the Search Form
To hide the default search form in the header:
Go to WP Admin > Themify > Settings > Theme Settings.
Under the "Exclude Search Form", tick the checkbox that says "Check here to exclude search form in the header".
How to Import Builder layouts
To import a pre-designed Builder layout:
Add a new Page.
On the page's Themify Custom Panel > Page Options,
select the options as you like
We recommend setting to fullwidth, no sidebar, and hide page title
Optional: on the Themify Custom Panel, click on "Page Appearance" tab to set the design appearance of this particular page.
On the Discussion panel, uncheck "Allow discussion" checkbox (this will disable the comments on the page).
Publish and view the page frontend.
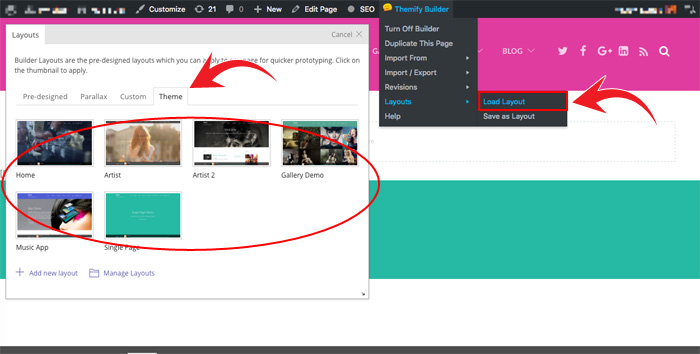
Turn on the Builder on frontend, on the top admin bar, select Themify Builder > Layouts > Load Layouts.
A lightbox window will appear where you'll be able to toggle between Pre-designed, Parallax, Custom Builder, or Theme layouts. Click on "Theme" tab and click on a thumbnail image to import.
Pre-design tab consists of all Layouts in the Builder.
Parallax tab consists of all Layouts that have parallax scrolling effect.
Custom tab is where you find your own custom Layouts.
Theme tab consists of the layouts built specifically for this theme.
When it asks to replace or append the layout, click "Replace Existing Layout".
Now you may replace the images and text as you like.
Designing Pages with the Builder
Step 1) To create the demo pages using our Builder as shown on our demo:
In admin, go to Pages > Add New
Enter page title
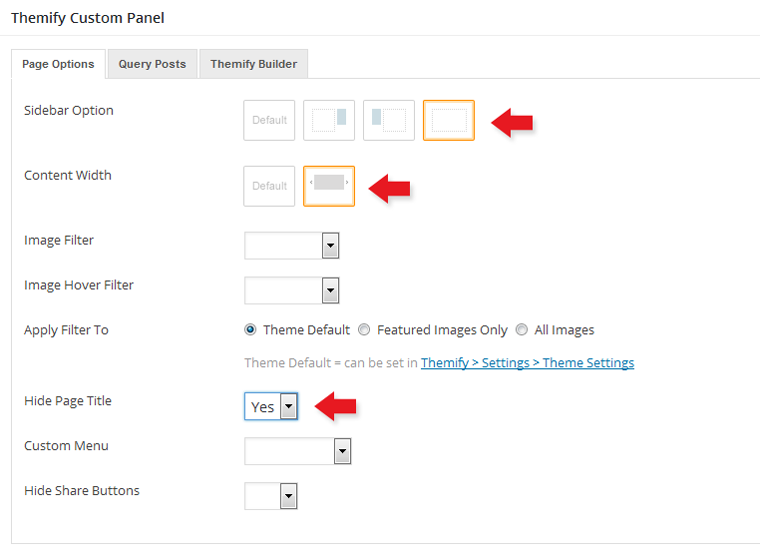
On Themify Custom Panel:
Sidebar Option = No Sidebar
Content Width = Fullwidth
Hide Page Title = Yes
By default, the Header Wrap is set to "Transparent Background"
On Discussion panel, uncheck "Allow comments" to disable comments on this page
Publish the page and click "View Page" to view the page on frontend
Step 2) Using the Builder to construct the page content and layout:
From top admin bar: select Themify Builder > Turn On Builder
First row:
To start: drop in a Text module on the first row and enter your text. In our demo, we have two line of text - first line is heading 2 and second line is heading 3
To customize the row: hover the menu icon located on top-left of the row > select Options
In the row options: upload a background image, background video (.mp4 format), specify the background color and font color
Second row:
Now drop another Text module on the second row, enter the headings (h2 and h3 text) as you like and insert a [themify_album_posts] shortcode to display the Album posts
Again, in row > options: specify the background color and font color as you like
Third row:
On the third row: drop in another Text module, enter the headings (h2 and h3 text) as you like and insert a [themify_event_posts] shortcode to display the Event posts
In the row > options: select Row Width = fullwidth and then specify the background color and font color as you like
Fifth row:
Similar to the above step: drop in another Text module, enter the headings (h2 and h3 text) as you like and insert a [themify_video_posts] shortcode to display the Video posts
In the row > options: specify the background color and font color as you like
Save: don't forget to save the Builder when you are done with each step
FYI: There are more features available in the Builder. Please refer to the Builder documentation for more info.
ScrollTo Row Anchor Menu (Single-Page Menu)
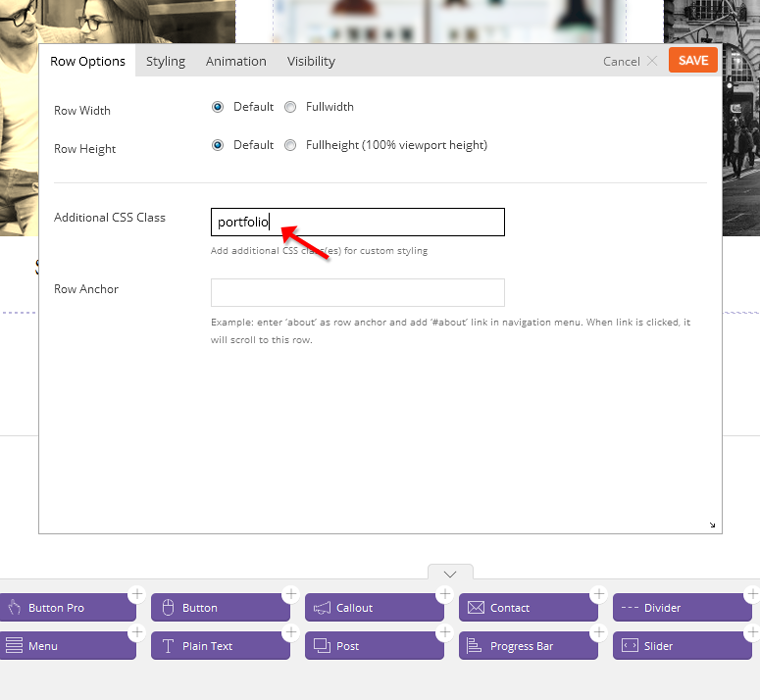
To achieve scrollTo row anchor:
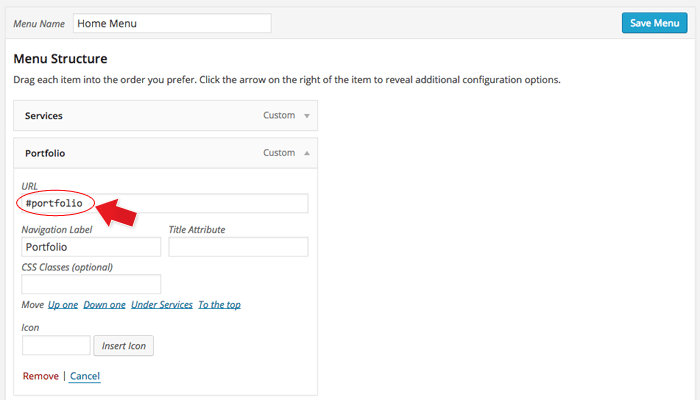
Step 1) First enter the Row Anchor name in Builder > Row > Options (e.g. "portfolio").
Step 2) Then in the WordPress menu link (WP Admin > Appearance > Menu), insert the anchor name as link URL = "#portfolio" (basically add # in front of the anchor name).
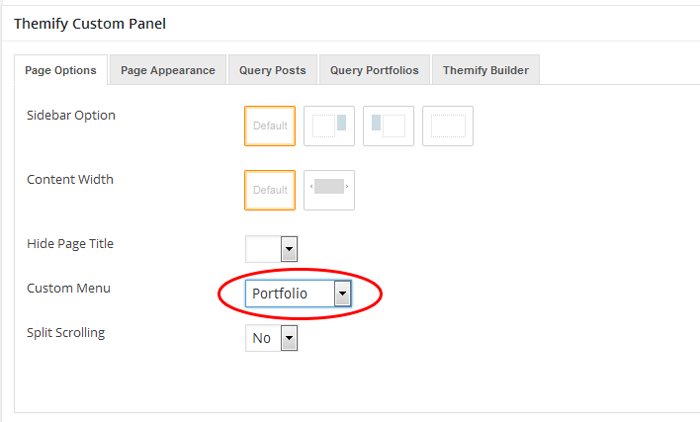
Step 3) On the page where you want to have the single page menu, select the menu in Themify Custom Panel (the Themify Custom Panel is located below the content editor when you add/edit the page).
Result: When the #portfolio link is clicked or when users go the URL with the #portfolio anchor (eg. http://yoursite.com#portfolio), it will scroll to the row where it specified Row Anchor = "portfolio".
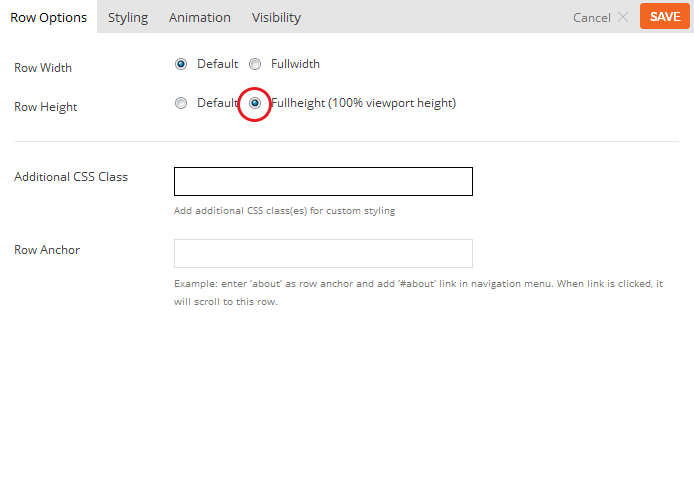
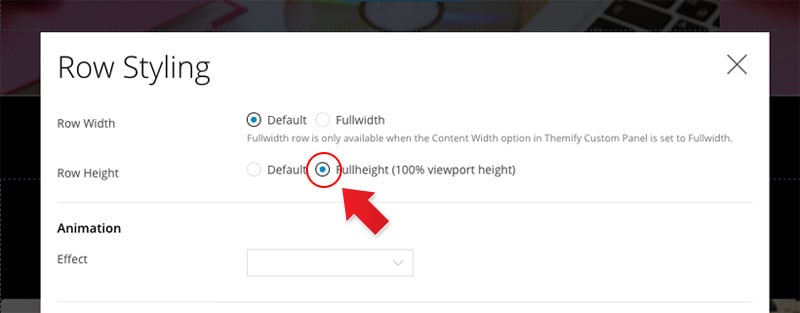
Full Height Builder Row
Full height row will set the height of the row in 100% viewport height and the row content will automatically align in the middle vertically.
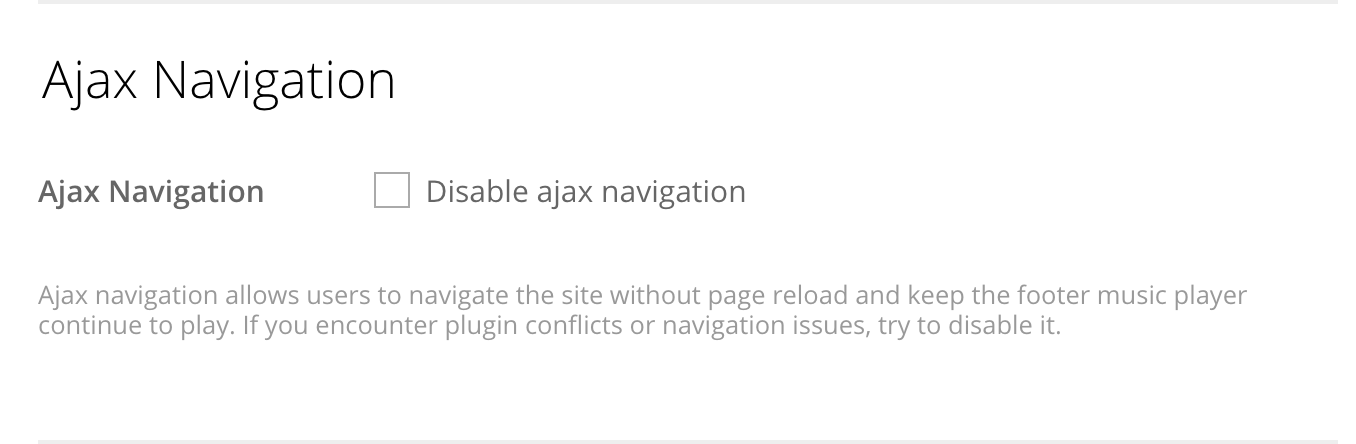
This feature allows users to browse your site while having the Audio dock on continuous play. This means that no matter where users navigate on your site, they'll be able to keep listening to a track without having the Audio Dock refreshed. By default this feature is active. To disable it refer to the steps below:
Go to Themify Settings > Theme Settings
Scroll down to the "Ajax Navigation" option and select to disable it.
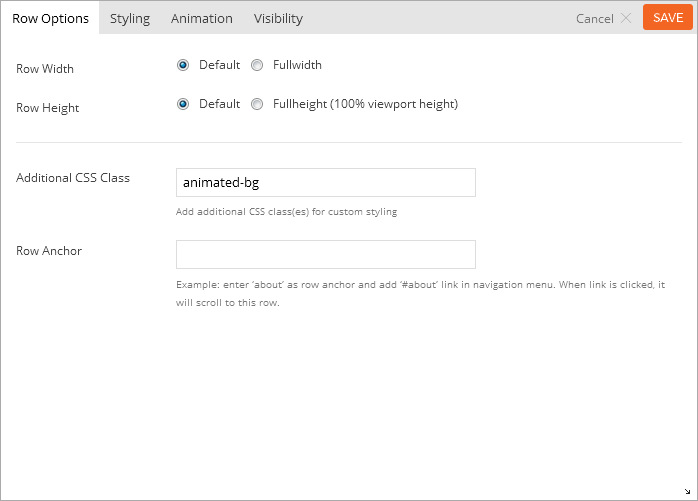
Animated Background Colors
The animated background colors can be inserted in any Builder row. To define the colors, go to Themify > Settings > Theme Settings (you can leave this as default). To set animated background colors in Builder rows:
With the Builder turned on > Row > Options
Insert "animated-bg" in the row "Additional CSS Class"
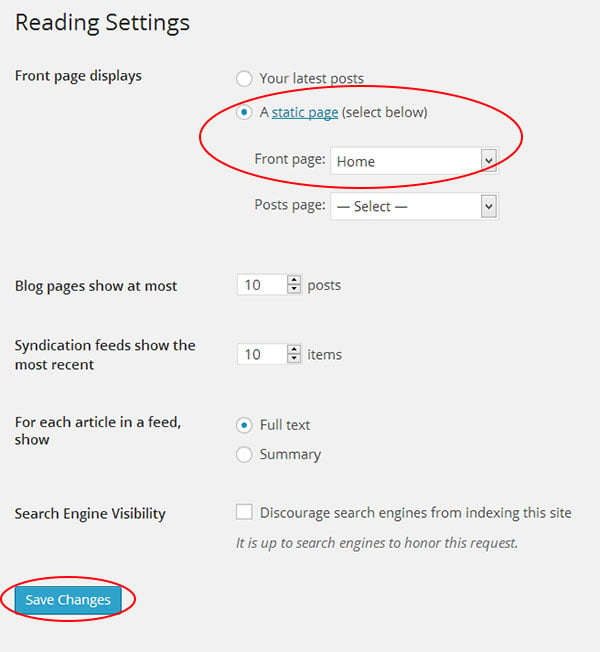
Setting Custom Front Page
You can set any page as the front (home) page. This means you can use the Builder to design the page and assign it as the front page. To set the Front Page:
Go to WP Admin > Settings > Reading
Select the "A static page (select below)" option and then select a "Front page"
Leave the "Posts page" default. If you want to create a custom Blog page, read this tutorial instead of setting the "Posts page"
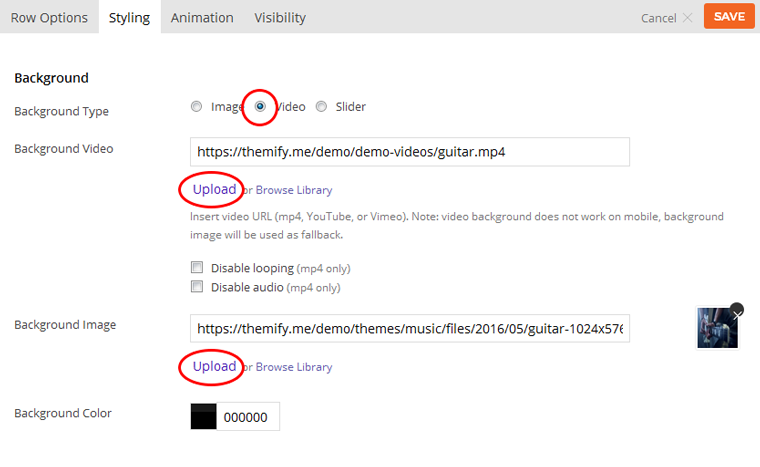
Background Video
To display a fullcover background video in Builder rows:
With the Builder turned on, select the row where you want to show the video background > select Options
In the row options: select "Background Video", upload a mp4 video and a fallback background image because, when viewed through a mobile device, the background video will not work
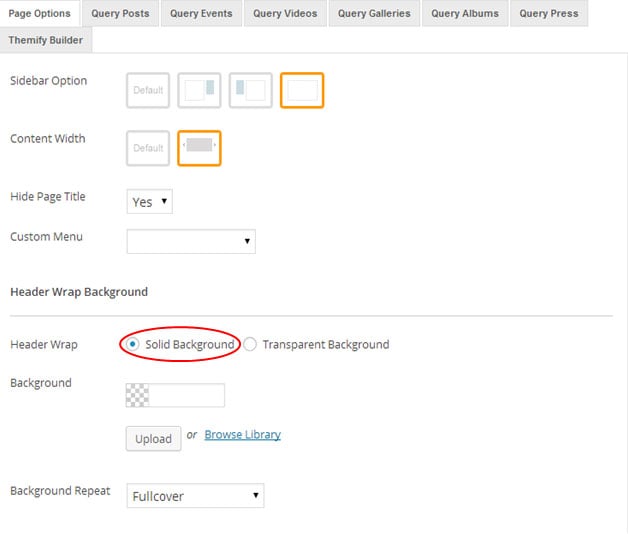
Custom Header Background
To customize header background:
Edit the page/post where you want to change the header background
In Themify Custom Panel, under the Header Wrap Background, select "Solid Background" and then upload a background image or pick a color
To have transparent header, select "Transparent Background"
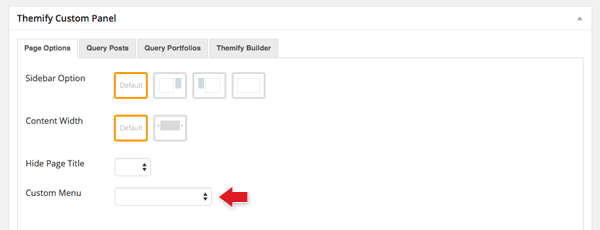
Custom Page Menu
This theme allows you to assign a custom menu in the Main Navigation Menu of each individual page. Remember that this custom menu option is only available in Pages (not Posts).
To set custom Page menu:
First, make sure you have created the menu in Appearance > Menus
Then add or edit any page where you want to have a custom menu
In the Themify Custom Panel, under the "Custom Menu", select a menu from the dropdown
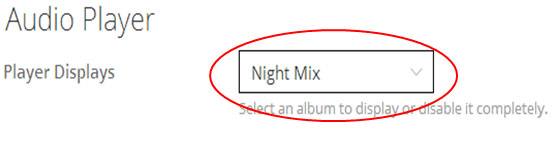
Footer Music Player
To set the music player in the footer:
First, make sure you have created an Album post (the player will use the audio tracks from the Album post)
Go to Themify > Settings > Theme Settings
Under the "Audio Player", select an Album post from the dropdown
Album Post Type
Music theme offers an easy way to create new albums in your website with Album post type.
To create a new Album:
Go to WordPress dashboard > Albums > Add New
Enter the album title and content
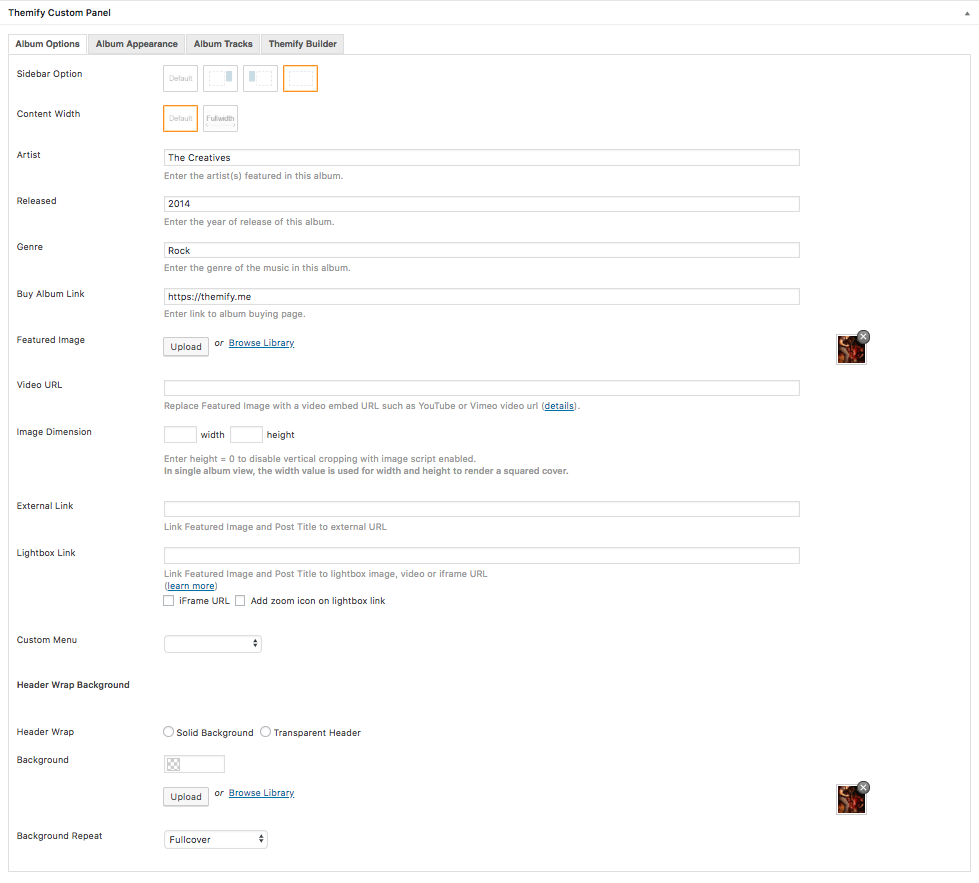
Album Options Tab:
Sidebar Option = This option is used to set the display of the sidebar or disable it entirely.
Content Width = This option is used to set the width of the content displayed on the page.
Artists = This option is used to feature artists of the album being created.
Released = This option is used to set the year of release of this album.
Genre = This option is used to set the genre of the music in this album.
Buy Album Link = This option is used to set link to buying album page.
Featured Image = This option is used to set the featured image for the Album. You can upload or use an image from the media library.
Video URL = This option is used to set Featured Video. Featured image will be automatically replaced by video if this option is set.
Image Dimension = This option is used to set the dimensions the album images will be displayed at.
External Link = This option is used to link featured image to external URL .
Lightbox Link = This option is used to link the album featured image and title to open a URL in a lightbox. This defaults is to expecting an image URL.
iFrame URL If checked, this will open the URL as an iFrame within the lightbox and can be used to open external URLs such as other pages or sites.
Add zoom icon on lightbox link This option sets whether a zoom icon will be shown on the featured image when set to a lightbox link.
Custom Menu = This option sets the menu to be shown when accessing the post/album.
Header Wrap Background = This options sets the header background for the album page.
Header Wrap = This option sets the background type to choose between solid or transparent background for header wrap.
Background = This option sets the background of the featured area at the top of the album's single view.
Background Repeat = This option sets the repeat option for the background of the featured area.
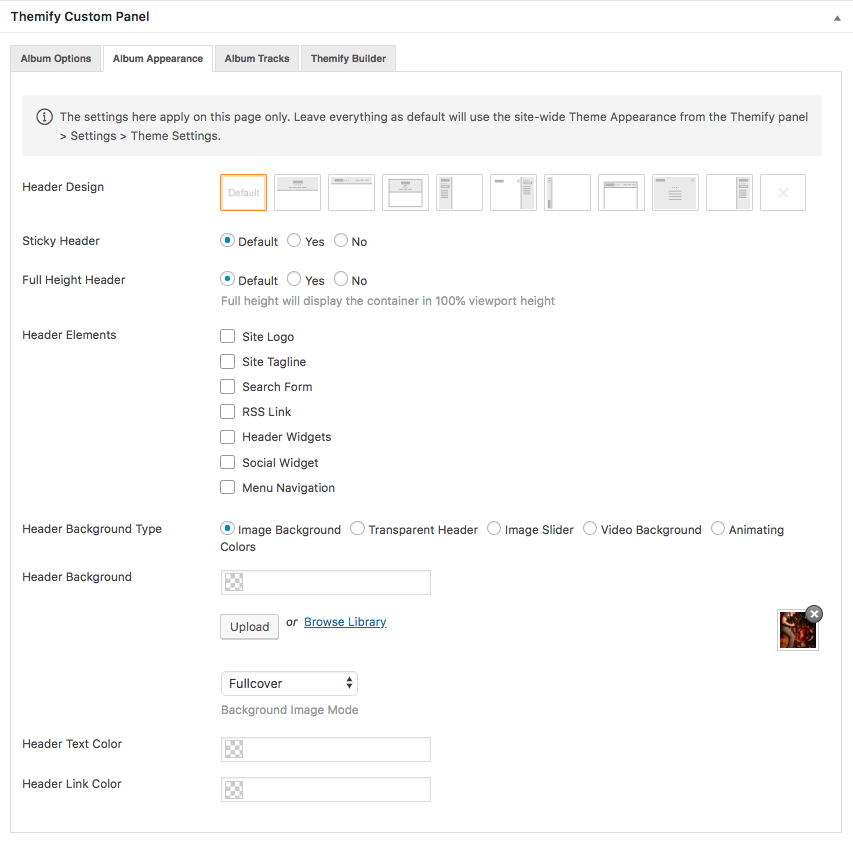
Album Appearance:
Header Design = Choose from 10 header and page layouts
Sticky Header = header will be stuck at the top when scrolling down
Full Height Header = header will display in 100% viewport height
Header Elements = select show/hide the header elements.
Header Background Type = Select the type of header background that you'd like to use. (1) Image, (2) Transparent, (3) Image Slider, (4) Video, and (5) Animating Colors.
Slider Image Position = add the image position for the slider
Header Background = add an image background or color that you'd like to use.
Header Text Color = color for the text in the header
Header Link Color = color for the links in the header
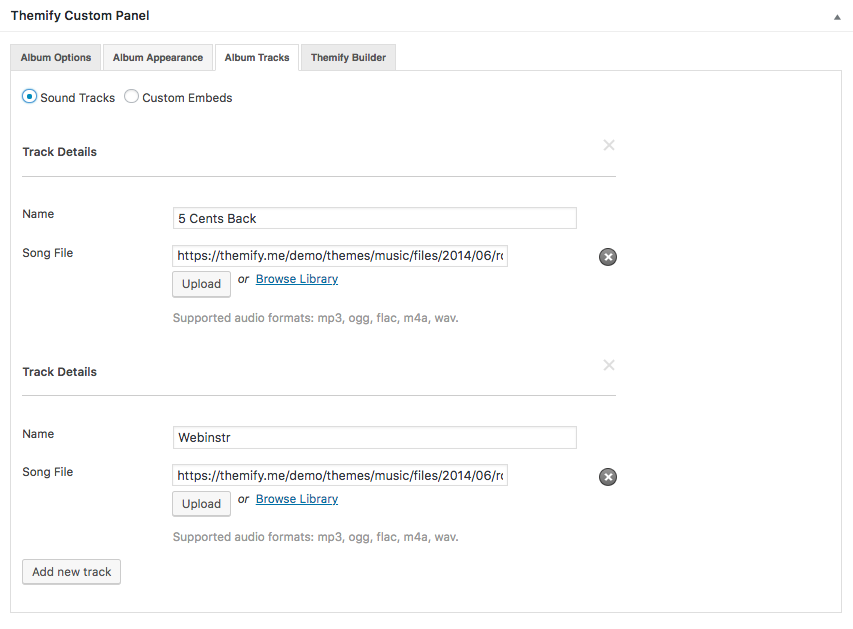
Album Tracks:
Sound Tracks = allow you to upload audio/song tracks (the Footer Music Player, which can be set in Themify > Settings > Theme Settings, uses the album tracks to generate the playlist)
Custom Embeds = allow you to add custom audio embeds from third sites such as Spotify, Soundcloud, etc.
Displaying Album Posts via Query Page:
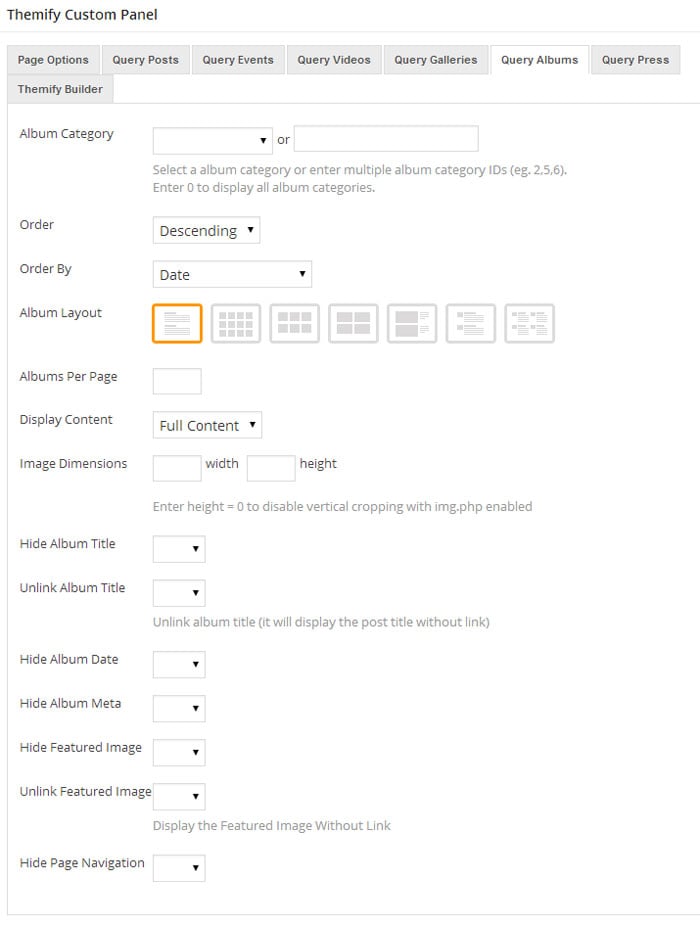
The Album posts can be displayed on pages by using the "Query Albums" tab provided in the Themify Custom Panel when adding/editing pages under WP Admin > Pages. The options in this tab will determine the Album posts which will be queried and displayed on the page.
Album Category = This option is used to set which category to show Album posts from.
Order = This option is used to set the order of the posts between ascending or descending order.
Order By = This option is used to set the attribute that the order of the post will be based on.
Album Layout = This option sets the layout of how album posts will be organized on the page.
Albums Per Page = This option sets how many posts will be displayed per page.
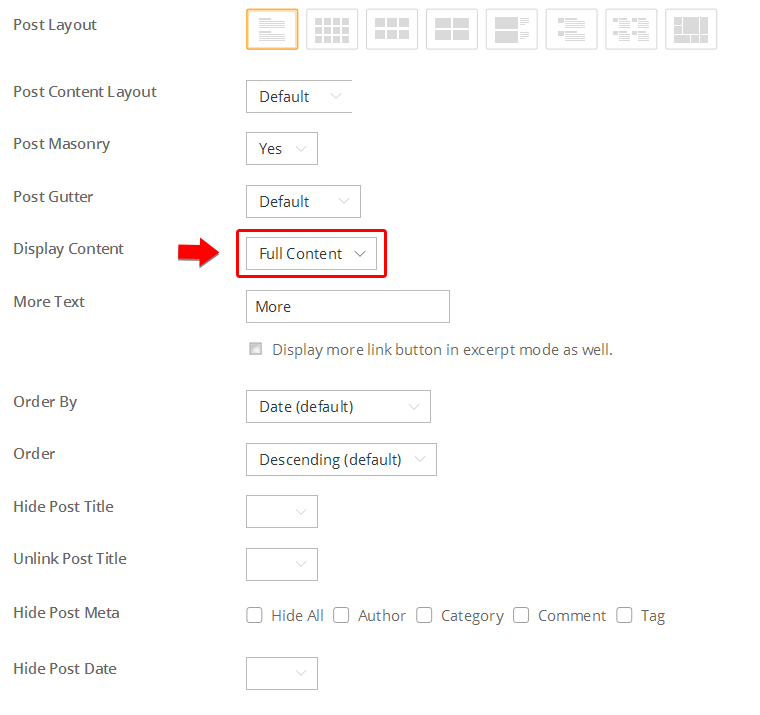
Display Content = This option sets how much of a post's content will be displayed (None, Excerpt, or Full content).
Image Dimensions = This option is used to set the dimensions the featured images will be displayed at.
Hide Album Title = This option will set whether to hide the Album titles.
Unlink Album Title = This option will set whether to remove the link from the Album titles.
Hide Album Date = This option will set whether to hide the Album dates.
Hide Album Meta = This option will set whether to hide the Album meta information.
Hide Featured Image = This option will set whether to hide the featured images.
Unlink Featured Image = This option will set whether to remove the link from the featured images.
Hide Page Navigation = This option will remove the navigation controls for switching between pages of posts.
Displaying Album Posts via Shortcode:
The Album posts can be displayed using the [themify_album_posts] shortcode provided by the theme, which will output the albums based on the options passed in the shortcode.
= display only 4 album posts that are in category ID 41 & 37, in grid 4 layout with fade-in animation
Available parameters:
style = sets the layout style for the post output (grid4, grid2, list-post, list-large-image, list-thumb-image, grid2-thumb, slider, default = grid3). You may also add custom css classes in here by simply adding their name (e.g. style="grid4 custom-class")
post_date = sets whether to display the album date (yes, no, default = yes)
limit = sets the number of posts to be shown (default = 3). Set to -1 to show all posts (e.g. limit=-1)
category = sets the category of posts to be shown based on ID or text slug (default = all categories). You can exclude categories using the minus sign and ID (e.g. category=-1 will exclude the category with ID 1). To find category ID number or text slug, click on "Album Categories" link located under the "Albums" admin menu
image = sets whether to display the featured image (yes, no, default = yes)
image_w = sets the featured image width (default)
image_h = sets the featured image height (default)
title = sets whether to display the post title (yes, no, default = yes)
display = sets whether to show full contents of post, an excerpt or no content (content, excerpt, none, default = none)
post_meta = sets whether to display post meta and post stat icons, such as view, comment, and share counts (yes, no, default = yes)
more_text = sets the text that will appear in the read more link for the post
more_link = sets the whether to display post type archives and custom links (false, true, default = false)
order = sets whether the output will use ascending or descending order (ASC, DESC, default = DESC)
orderby = criteria used to order posts (date, rand, title, default = date)
visible = sets number of visible items (default = 3)
scroll = sets number of items to scroll (default = 1)
wrap = sets whether to start from the first slide when the last slide is reached or not (yes, no, default = yes)
slider_nav = sets whether to display navigation arrows (yes, no, default = yes)
pager = sets whether to display slider pager (yes, no, default = yes)
Event Post Type
To create a new event:
Go to WordPress dashboard > Events > Add New.
You can provide a title and description content using the standard WordPress edit page,
and further customization options are available in the Themify Custom Panel.
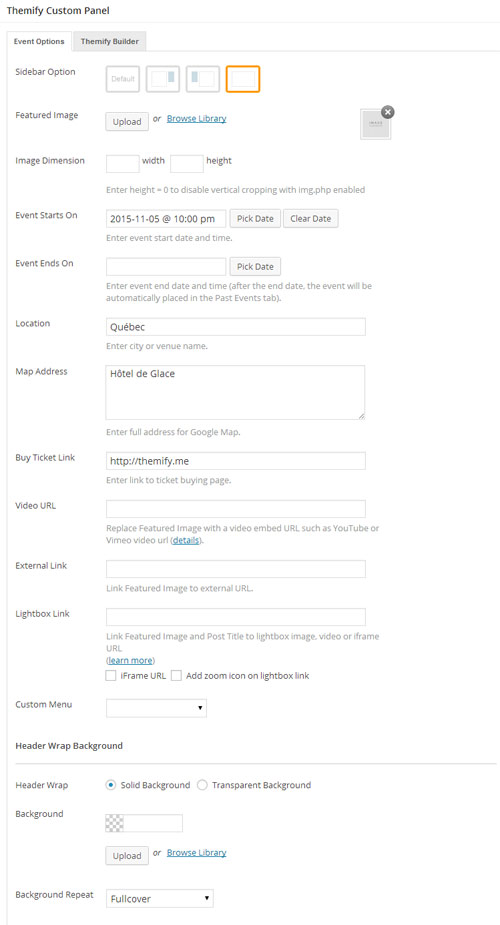
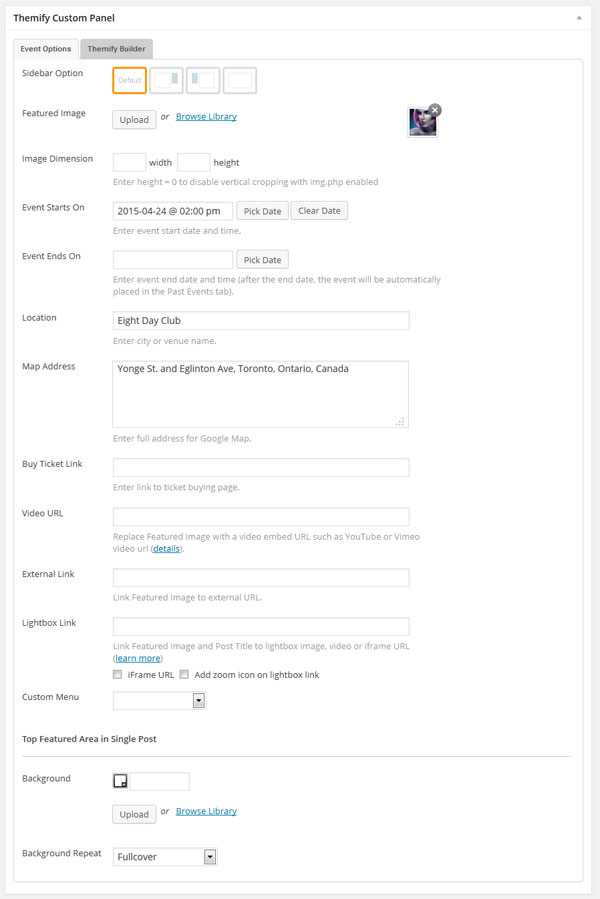
Sidebar Option = This option is used to set the display of the sidebar or disable it entirely.
Featured Image = This option is used to set the featured image for the event post. You can upload or use an image from the media library.
Image Dimensions = This option is used to set the dimensions the event images will be displayed at.
Event Starts On = This option sets the start date/time for the event.
NOTE: the event post on the frontend will use this as the event date. The post publish date will be used to query/sort the event posts.
Event Ends On = This option sets the end date/time for the event.
NOTE: When the current date/time passes the "Event Ends On" date/time, this event will consider "Past Event".
Location = This option sets the name for the location of the event.
Map Address = This option sets the map location to be used on the event page.
Buy Ticket Link = This option sets the link to be used to buy tickets for the event.
Video URL = This option is used to set a video to be used in place of the featured image and can use links from services such as YouTube, Vimeo, etc.
External Link = This option is used to link the post featured image and title to a custom URL.
Lightbox Link = This option is used to link the post featured image and title to open a URL in a lightbox. This defaults to expecting an image URL.
iFrame URL If checked, this will open the URL as an iFrame within the lightbox and can be used to open external URLs such as other pages or sites.
Add zoom icon on lightbox link This option sets whether a zoom icon will be shown on the featured image when set to a lightbox link.
Custom Menu = This option sets the menu to be shown when accessing the album.
Header Wrap Background = This options sets the header background for the Event page.
Header Wrap = This option sets the background type to choose between solid or transparent background for header wrap.
Background = This option sets the background of the featured area at the top of the event's page single view.
Background Repeat = This option sets the repeat option for the background of the featured area.
Displaying Event Posts via Widget:
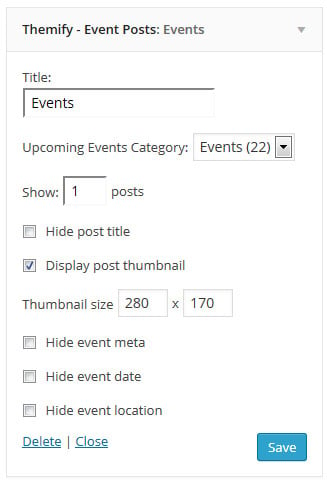
The Event posts can be displayed in sidebars, footer, or other widget areas using the "Themify - Event Posts" widget provided by the theme, which will output the events based on the options selected in the widget panel.
Title = This option is used to set the title of the widget.
Category = This option is used to set which category to show upcoming event posts from. Defaults to all categories.
Show [X] posts = This option is used to set the number of posts to be shown in the widget.
Hide post title = This option determines whether to hide the post titles.
Display post thumbnail = This option sets whether to show the featured image thumbnails.
Thumbnail size = This option sets the dimensions for the featured image thumbnails.
Hide event meta = This option will hide the post meta from the widget.
Hide event date = This option will hide the event date from the widget.
Hide event location = This option will hide the event location from the widget.
Displaying Event Posts via Query Page:
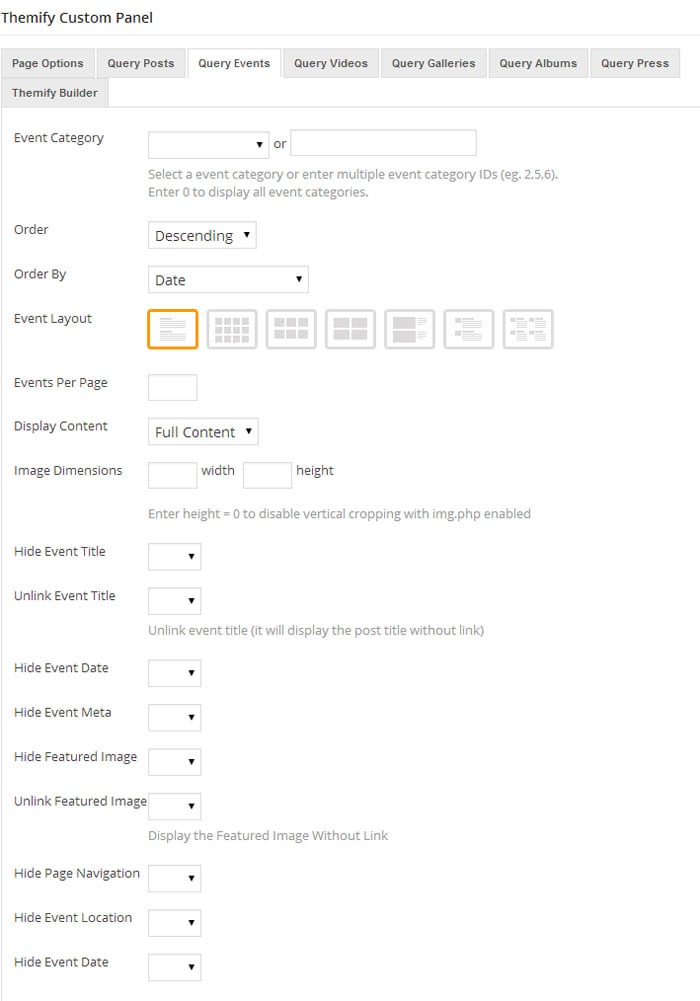
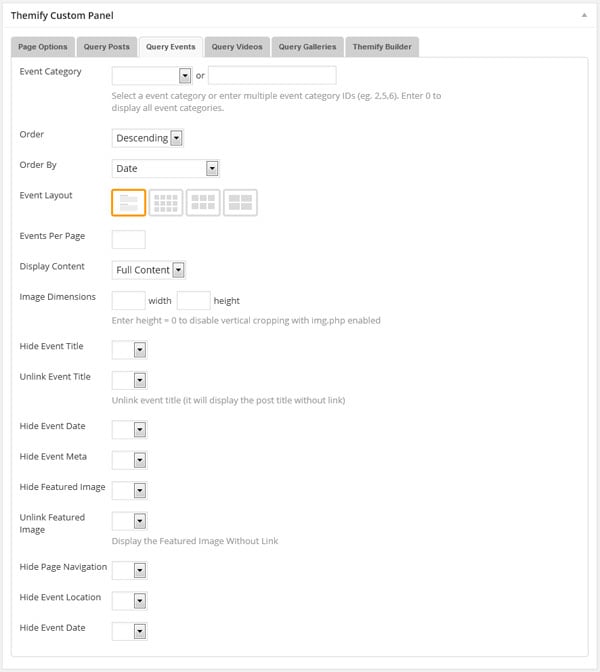
The Event posts can be displayed on pages by using the "Query Events" tab provided in the Themify Custom Panel when adding/editing pages under WP Admin > Pages. The options in this tab will determine the event posts which will be queried and displayed on the page.
Event Category = This option is used to set which category to show event posts from.
Display Events = Choose to display all events, past events or upcoming events.
Order = This option is used to set the order of the posts between ascending or descending order.
Order By = This option is used to set the attribute that the order of the post will be based on.
Event Layout = This option sets the layout of how event posts will be organized on the page.
Events Per Page = This option sets how many posts will be displayed per page.
Display Content = This option sets how much of a post's content will be displayed (None, Excerpt, or Full content).
Image Dimensions = This option is used to set the dimensions the featured images will be displayed at.
Hide Event Title = This option will set whether to hide the event titles.
Unlink Event Title = This option will set whether to remove the link from the event titles.
Hide Event Date = This option will set whether to hide the event dates.
Hide Event Meta = This option will set whether to hide the event meta information.
Hide Featured Image = This option will set whether to hide the featured images.
Unlink Featured Image = This option will set whether to remove the link from the featured images.
Hide Page Navigation = This option will remove the navigation controls for switching between pages of posts.
Hide Event Location = This option will set whether to hide the event location.
Displaying Event Posts via Shortcode:
The Event posts can be displayed using the [themify_event_posts] shortcode provided by the theme, which will output the events along with the option of displaying tabs to categorize them into upcoming and past events based on date/time.
The shortcode by default shows both past and upcoming events and can be controlled using "past_events" parameter.
= display 4 event posts in a slider without meta data
Available parameters:
style = sets the layout style for the post output (list-post, grid4, grid3, grid2, and slider, default = grid4). You may also add custom css classes in here by simply adding their name (e.g. style="grid4 custom-class")
past_events = if set to "yes" will only show past events, if set to "no" will only show upcoming events. Default is it shows both.
event_date = sets whether to display the event date (yes, no, default = yes)
event_location = sets whether to display the event's location (yes, no, default = yes)
limit = sets the number of posts to be shown (default = 5). Set to -1 to show all posts (e.g. limit=-1)
category = sets the category of posts to be shown based on ID or text slug (default = all categories). You can exclude categories using the minus sign and ID (e.g. category=-1 will exclude the category with ID 1). To find category ID number or text slug, click on "Event Categories" link located under the "Events" admin menu
image = sets whether to display the featured image (yes, no, default = yes)
image_w = sets the featured image width (default 240px)
image_h = sets the featured image height (default 180px)
title = sets whether to display the post title (yes, no, default = yes)
display = sets whether to show full contents of post, an excerpt or no content (content, excerpt, none, default = none)
post_meta = sets whether to display post meta and post stat icons such as view, comment, and share counts (yes, no, default = no)
more_text = sets the text that will appear in the read more link for the post
order = sets whether the output will use ascending or descending order (ASC, DESC, default = DESC)
orderby = criteria used to order posts (event_date, author, comment_count, date, menu_order, rand, title, default = date)
unlink_image = sets whether to remove the link on the post featured image (yes, no, default = no)
unlink_title = sets whether to remove the link on the post title (yes, no, default = no)
Managing "Buy Event Ticket"
You can use event management services like Ticketmaster or Eventbrite to manage the commercial events (i.e. create an event with them and then insert the event URL in the "Buy Ticket Link" of the Themify Custom Panel in the Event post type backend).
If you prefer to use a WordPress plugin, you may use Easy Digital Downloads with the Event Tickets extension. First, create a product (the plugin refers as "Downloads") with the Easy Digital Downloads plugin, then insert the product direct buy URL in the "Buy Ticket Link" field.
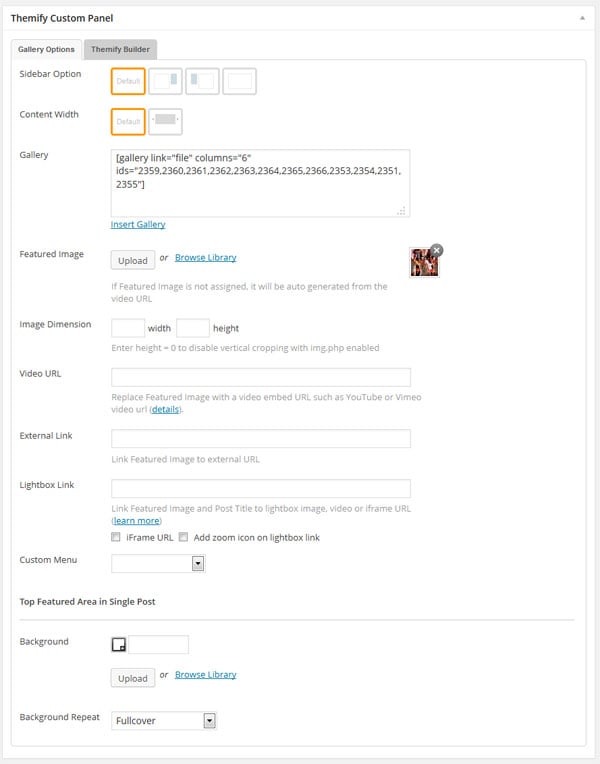
Gallery Post Type
Gallery posts are designed to show galleries on your site and can be used by being output via shortcode from within post/page content or Builder modules, or queried from pages.
Adding Gallery Posts:
To create a Gallery post, select "Add New" under the "Galleries" admin menu.
You can provide a title and description content using the standard WordPress edit page, and further customization options are available in the Themify Custom Panel.
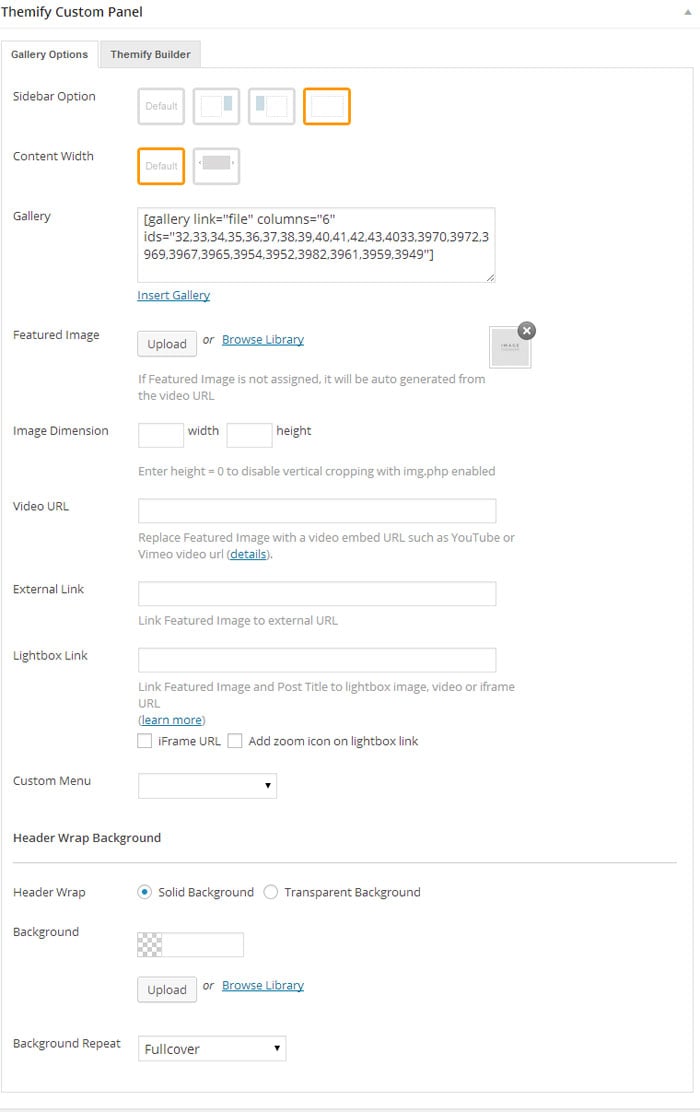
Sidebar Option = This option is used to set the display of the sidebar or disable it entirely.
Content Width = This option sets the maximum width of the post content.
Gallery = This option is used to create the image gallery that will be displayed. You can manually enter a gallery shortcode or use the "Insert Gallery" link to use WordPress' media panel.
Featured Image = This option is used to set the featured image for the portfolio post. You can upload or use an image from the media library.
Image Dimensions = This option is used to set the dimensions the portfolio images will be displayed at.
Video URL = This option is used to set a video to be used in place of the featured image, and can use links from services such as YouTube, Vimeo, etc.
External Link = This option is used to link the post featured image and title to a custom URL.
Lightbox Link = This option is used to link the post featured image and title to open a URL in a lightbox. This defaults to expecting an image URL.
iFrame URL If checked, this will open the URL as an iFrame within the lightbox and can be used to open external URLs such as other pages or sites.
Add zoom icon on lightbox link This option sets whether a zoom icon will be shown on the featured image when set to a lightbox link.
Custom Menu = This option sets the menu to be shown when accessing the post.
Header Wrap Background = This options sets the header background for the album page.
Header Wrap = This option sets the background type to choose between solid or transparent background for header wrap.
Background = This option sets the background of the header of the Gallery's single view.
Background Repeat = This option sets the repeat option for the background of the header.
Displaying Gallery Posts via Query Page:
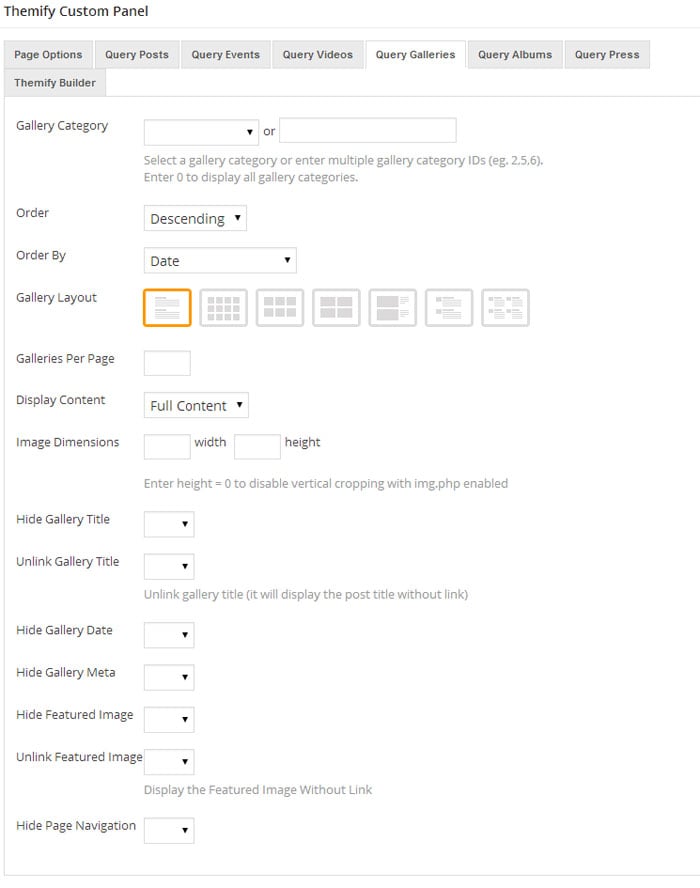
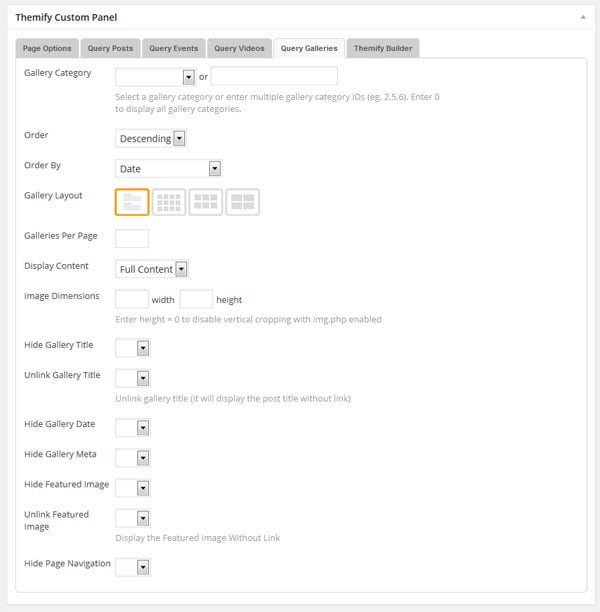
The Gallery posts can be displayed on pages by using the "Query Galleries" tab provided in the Themify Custom Panel when adding/editing pages under WP Admin > Pages. The options in this tab will determine the gallery posts which will be queried and displayed on the page.
Gallery Category = This option is used to set which category to show gallery posts from.
Order = This option is used to set the order of the posts between ascending or descending order.
Order By = This option is used to set the attribute that the order of the post will be based on.
Gallery Layout = This option sets the layout of how gallery posts will be organised on the page.
Galleries Per Page = This option sets how many posts will be displayed per page.
Display Content = This option sets how much of a post's content will be displayed (None, Excerpt, or Full content).
Image Dimensions = This option is used to set the dimensions the featured images will be displayed at.
Hide Gallery Title = This option will set whether to hide the post titles.
Unlink Gallery Title = This option will set whether to remove the link from the post titles.
Hide Gallery Date = This option will set whether to hide the post dates.
Hide Gallery Meta = This option will set whether to hide the post meta information.
Hide Featured Image = This option will set whether to hide the featured images.
Unlink Featured Image = This option will set whether to remove the link from the featured images.
Hide Page Navigation = This option will remove the navigation controls for switching between pages of posts.
Displaying Gallery Posts via Shortcode:
The Gallery posts can be displayed using the [themify_gallery_posts] shortcode provided by the theme, which will output the galleries based on the options set in the shortcode.
= display 4 gallery posts in a slider without meta data and date
Available parameters:
style = sets the layout style for the post output (list-post, grid4, grid3, grid2, and slider, default = grid4). You may also add custom css classes in here by simply adding their name (e.g. style="grid4 custom-class")
limit = sets the number of posts to be shown (default = 5). Set to -1 to show all posts (e.g. limit=-1)
category = sets the category of posts to be shown based on ID or text slug (default = all categories). You can exclude categories using the minus sign and ID (e.g. category=-1 will exclude the category with ID 1). To find category ID number or text slug, click on "Gallery Categories" link located under the "Galleries" admin menu
image = sets whether to display the featured image (yes, no, default = yes)
image_w = sets the featured image width (default 240px)
image_h = sets the featured image height (default 180px)
title = sets whether to display the post title (yes, no, default = yes)
display = sets whether to show full contents of post, an excerpt or no content (content, excerpt, none, default = none)
post_meta = sets whether to display post meta and post stat icons such as view, comment, and share counts (yes, no, default = no)
more_text = sets the text that will appear in the read more link for the post
order = sets whether the output will use ascending or descending order (ASC, DESC, default = DESC)
orderby = criteria used to order posts (author, comment_count, date, menu_order, rand, title, default = date)
unlink_image = sets whether to remove the link on the post featured image (yes, no, default = no)
unlink_title = sets whether to remove the link on the post title (yes, no, default = no)
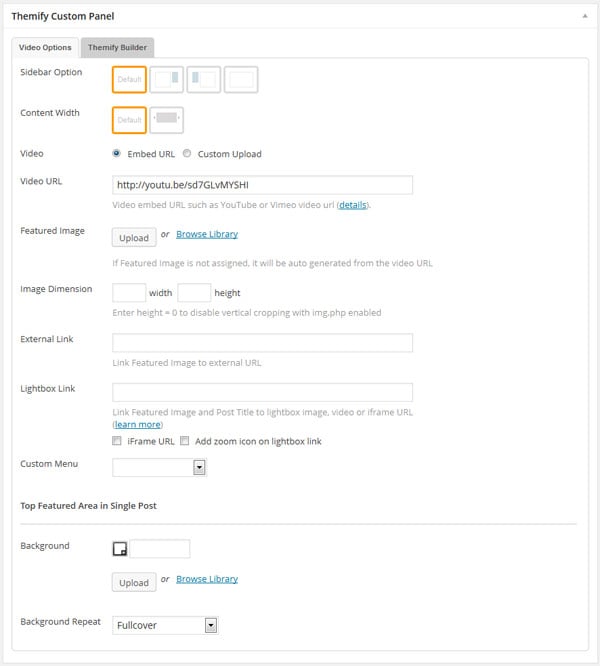
Video Post Type
Video posts are designed to show video content on your site, supporting both embedded videos or self-hosted, and can be used by being output via shortcode from within post/page content or Builder modules, or queried from pages.
Adding Video Posts:
To create a Video post, select "Add New" under the "Videos" admin menu.
You can provide a title and description content using the standard WordPress edit page, and further customization options are available in the Themify Custom Panel.
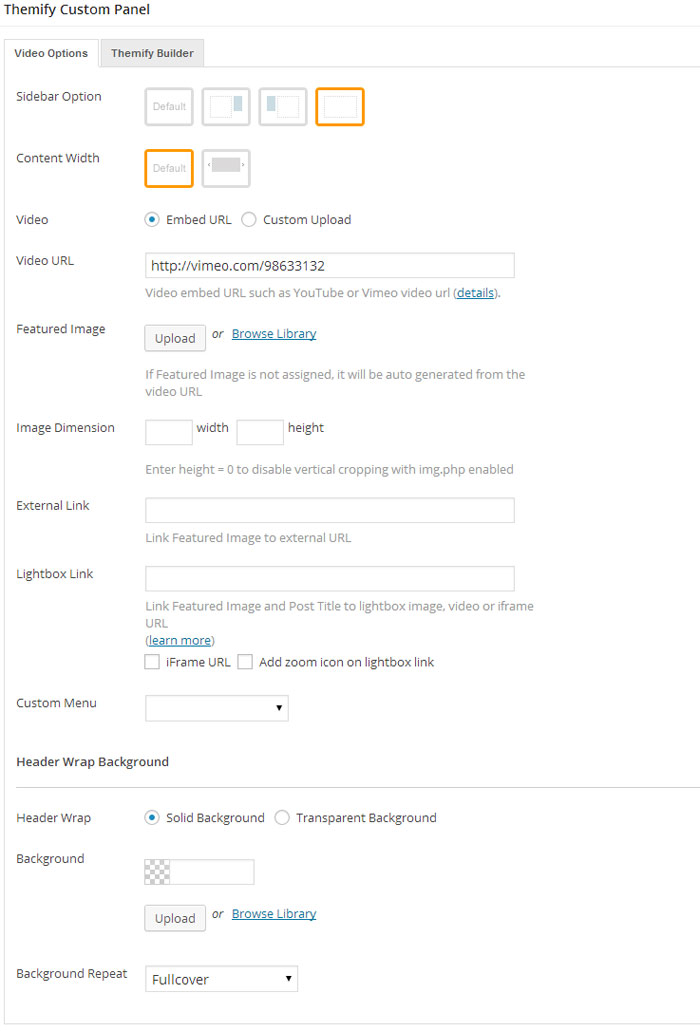
Sidebar Option = This option is used to set the display of the sidebar or disable it entirely.
Content Width = This option sets the maximum width of the post content.
Video = This option sets the type of video you will be using, whether an embedded service such as YouTube, or self-hosted video files.
Video URL = This option sets the URL of the video file to use.
Featured Image = This option is used to set the featured image for the portfolio post. You can upload or use an image from the media library.
Image Dimensions = This option is used to set the dimensions the portfolio images will be displayed at.
External Link This option is used to link the post featured image and title to a custom URL.
Lightbox Link This option is used to link the post featured image and title to open a URL in a lightbox. This defaults to expecting an image URL.
iFrame URL If checked, this will open the URL as an iFrame within the lightbox and can be used to open external URLs such as other pages or sites.
Add zoom icon on lightbox link This option sets whether a zoom icon will be shown on the featured image when set to a lightbox link.
Custom Menu = This option sets the menu to be shown when accessing the post.
Header Wrap Background = This options sets the header background for the album page.
Header Wrap = This option sets the background type to choose between solid or transparent background for header wrap.
Background = This option sets the background of the header of the Video's single view.
Background Repeat = This option sets the repeat option for the background of the header.
Displaying Video Posts via Query Page:
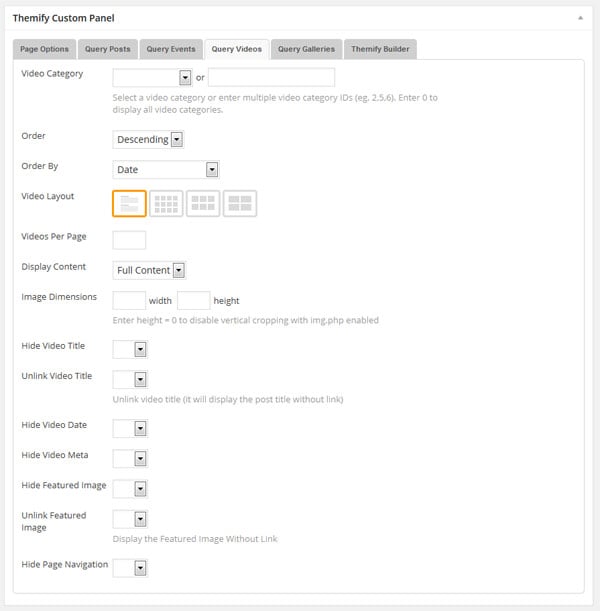
The Video posts can be displayed on pages by using the "Query Videos" tab provided in the Themify Custom Panel when adding/editing pages under WP Admin > Pages, the options in this tab will determine the video posts which will be queried and displayed on the page.
Video Category = This option is used to set which category to show video posts from.
Order = This option is used to set the order of the posts between ascendent or descendent order.
Order By = This option is used to set the attribute that posts will be ordered based on.
Video Layout = This option sets the layout of how gallery posts will be organised on the page.
Videos Per Page = This option sets how many posts will be displayed per page.
Display Content = This option sets how much of a post's content will be displayed (None, Excerpt, or Full content).
Image Dimensions = This option is used to set the dimensions the featured images will be displayed at.
Hide Video Title = This option will set whether to hide the post titles.
Unlink Video Title = This option will set whether to remove the link from the post titles.
Hide Video Date = This option will set whether to hide the post dates.
Hide Video Meta = This option will set whether to hide the post meta information.
Hide Featured Image = This option will set whether to hide the featured images.
Unlink Featured Image = This option will set whether to remove the link from the featured images.
Hide Page Navigation = This option will remove the navigation controls for switching between pages of posts.
Displaying Video Posts via Shortcode:
The Video posts can be displayed using the [themify_video_posts] shortcode provided by the theme, which will output the videos based on the options set in the shortcode.
= display 6 video posts in a slider without meta data or date
Available parameters:
style = sets the layout style for the post output (list-post, grid4, grid3, grid2, and slider, default = grid4). You may also add custom css classes in here by simply adding their name (eg. style="grid4 custom-class")
limit = sets the number of posts to be shown (default = 5) Set to -1 to show all posts (eg. limit=-1)
category = sets the category of posts to be shown based on ID or text slug (default = all categories) You can exclude categories using the minus sign and ID (eg. category=-1 will exclude the category with ID 1) To find category ID number or text slug: click on "Video Categories" link located under the "Videos" admin menu
image = sets whether to display the featured image (yes, no, default = yes)
image_w = sets the featured image width (default 240px)
image_h = sets the featured image height (default 180px)
title = sets whether to display the post title (yes, no, default = yes)
display = sets whether to show full contents of post, an excerpt or no content (content, excerpt, none, default = none)
post_meta = sets whether to display post meta and post stat icons, such as view, comment, and share counts (yes, no, default = no)
more_text = sets the text that will appear in the read more link for the post
order = sets whether the output will use ascendent or descendent order (ASC, DESC, default = DESC)
orderby = criteria used to order posts (author, comment_count, date, menu_order, rand, title, default = date)
unlink_image = sets whether to remove the link on the post featured image (yes, no, default = no)
unlink_title = sets whether to remove the link on the post title (yes, no, default = no)
Press Post Type
Press post type in Music theme helps you to easily put your press news and interviews.
Adding Press Posts:
To create a Press post, select "Add New" under the "Press" admin menu.
You can provide a title and description content using the standard WordPress edit page, and further customization options are available in the Themify Custom Panel.
Sidebar Option = This option is used to set the display of the sidebar or disable it entirely.
Content Width = This option sets the maximum width of the post content.
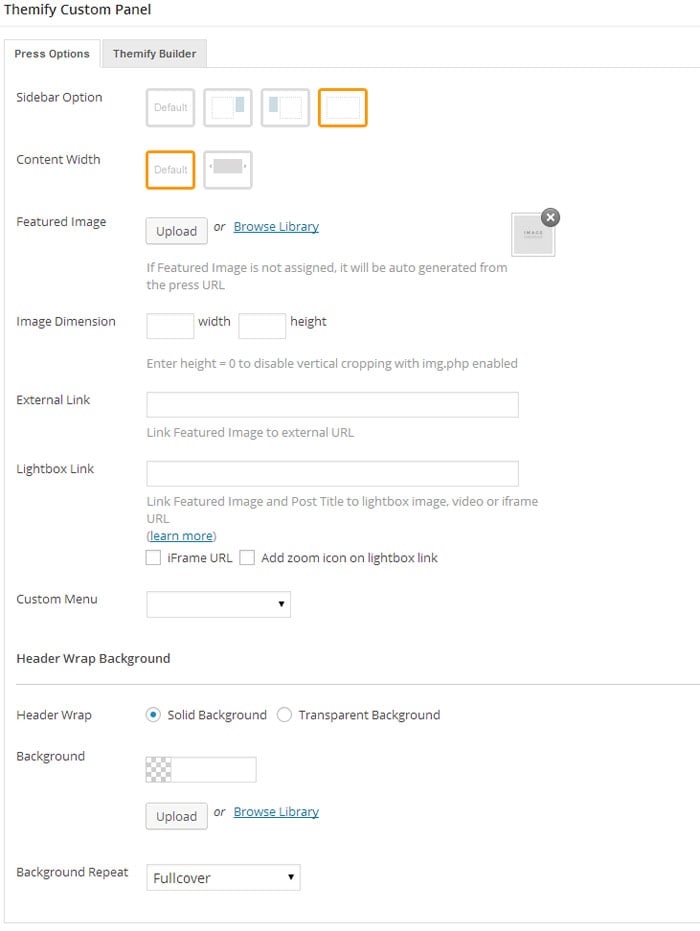
Featured Image = This option is used to set the featured image for the press post. You can upload or use an image from the media library.
Image Dimensions = This option is used to set the dimensions the press images will be displayed at.
External Link This option is used to link the post featured image and title to a custom URL.
Lightbox Link This option is used to link the post featured image and title to open a URL in a lightbox. This defaults to expecting an image URL.
iFrame URL If checked, this will open the URL as an iFrame within the lightbox and can be used to open external URLs such as other pages or sites.
Add zoom icon on lightbox link This option sets whether a zoom icon will be shown on the featured image when set to a lightbox link.
Custom Menu = This option sets the menu to be shown when accessing the post.
HeaderWrap Background This option offers various properties for HeaderWrap background:
Header Wrap = This option allows to choose between a solid background or a transparent background.
Background = This option sets the background of the header of the post's single view.
Background Repeat = This option sets the repeat option for the background of the header
Displaying Press Posts via Query Page:
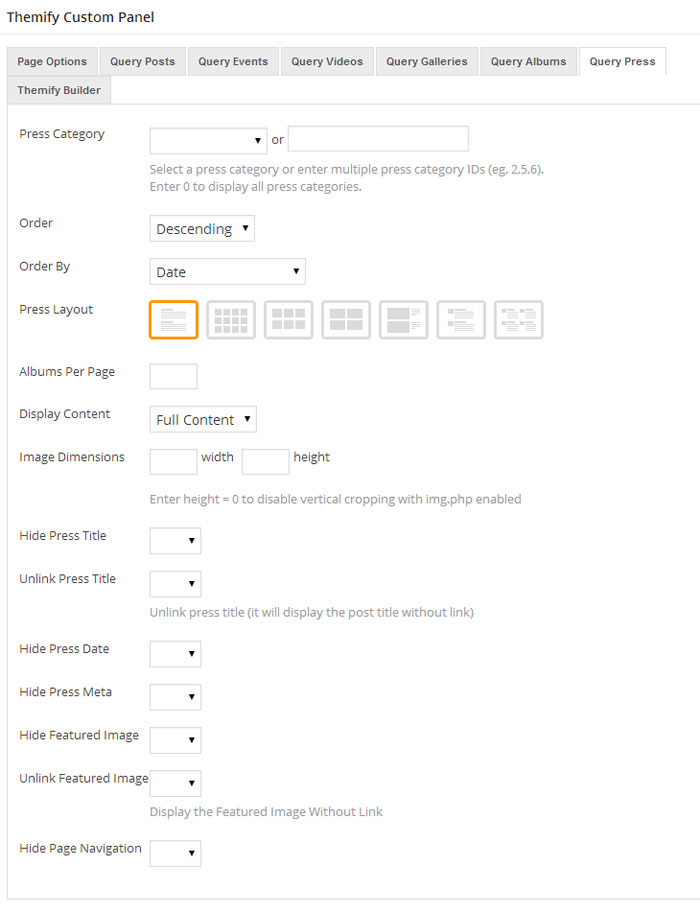
The Press posts can be displayed on pages by using the "Query Press" tab provided in the Themify Custom Panel when adding/editing pages under WP Admin > Pages, the options in this tab will determine the gallery posts which will be queried and displayed on the page.
Press Category = This option is used to set which category to show Press posts from.
Order = This option is used to set the order of the posts between ascendant or descendent order.
Order By = This option is used to set the attribute that posts will be ordered based on.
Press Layout = This option sets the layout of how Press posts will be organised on the page.
Press Per Page = This option sets how many posts will be displayed per page.
Display Content = This option sets how much of a post's content will be displayed (None, Excerpt, or Full content).
Image Dimensions = This option is used to set the dimensions the featured images will be displayed at.
Hide Press Title = This option will set whether to hide the post titles.
Unlink Press Title = This option will set whether to remove the link from the post titles.
Hide Press Date = This option will set whether to hide the post dates.
Hide Press Meta = This option will set whether to hide the post meta information.
Hide Featured Image = This option will set whether to hide the featured images.
Unlink Featured Image = This option will set whether to remove the link from the featured images.
Hide Page Navigation = This option will remove the navigation controls for switching between pages of posts.
Displaying Press Posts via Shortcode:
The Press posts can be displayed using the [themify_press_posts] shortcode provided by the theme, which will output the Press based on the options set in the shortcode.
= display 6 press posts in a slider without meta data or date
Available parameters:
style = sets the layout style for the post output (grid4, grid3, grid2, list-post, list-large-image, list-thumb-image, grid2-thumb, slider, default = grid3). You may also add custom css classes in here by simply adding their name (e.g. style="grid4 custom-class")
auto = sets the slider autoplay pause length (number, off)
effect = sets the transition effect for Press to appear (fade, scroll, default = scroll)
speed = sets the transition speed (number)
wrap = sets whether to start from the first slide when the last slide is reached or not (yes, no, default = yes)
slider_nav = sets whether to show slider navigation arrows (yes, no, default = yes)
pager = sets whether to display slider pagination or not (yes, no, default = yes)
limit = sets the number of posts to be shown (default = 3). Set to -1 to show all posts (eg. limit=-1)
category = sets the category of posts to be shown based on ID or text slug (default = all categories). You can exclude categories using the minus sign and ID (e.g. category=-1 will exclude the category with ID 1). To find category ID number or text slug, click on "Press Categories" link located under the "Press" admin menu
image = sets whether to display the featured image (yes, no, default = yes)
image_w = sets the featured image width (default 240px)
image_h = sets the featured image height (default 180px)
title = sets whether to display the post title (yes, no, default = yes)
display = sets whether to show full contents of post, an excerpt or no content (content, excerpt, none, default = none)
post_meta = sets whether to display post meta and post stat icons such as view, comment, and share counts (yes, no, default = yes)
post_date = sets whether to display post entry date (yes, no, default = yes)
more_link = sets whether to display custom link below the posts (true, false, default = false)
more_text = sets the text that will appear in the read more link for the post
order = sets whether the output will use ascending or descending order (ASC, DESC, default = DESC)
orderby = criteria used to sort posts (date, rand, title, default = date)
offset = number of posts to skip in the query (default = 0)
Setting Default Post and Page Layouts
Generally, the theme works out of the box. All the sidebar options and image dimensions are pre-defined in the theme. If you need to change the default sidebar options, featured image dimensions, content/except display, post meta, etc., it can be done in the WP Admin > Themify > Settings > Default Layouts.
There are three default layout options under Themify > Settings > Default Layouts:
Archive Sidebar Option: refers to the default home page, category, search, archive, tag pages, etc.
Default Post Layout: is the post page direct URL (also known as "Single Post").
First, create a new Page (go to WP Admin > Pages > Add New), name it "Blog" or any page title as you want.
View the page on the frontend, click "Turn On Builder".
Drop in a Post module and configure the options as you like.
Setting a Custom Front Page
You can set any page as the front (home) page. This means you can use the Builder to design the page and assign it as the front page. To set the Front Page:
Go to WP Admin > Settings > Reading.
On the Front page displays, select the "A static page (select below)" option and then select a "Front page".
Leave the "Posts page" default. If you want to create a custom Blog page, read this tutorial instead of setting the "Posts page".
Adding Widgets
To add widgets to widgetized areas (eg. sidebar and footer widgets):
Go to WP Admin > Appearance > Widgets.
The big panel on the left side shows all available widgets. The small panels on the right are the widgetized areas.
To add a widget: drag and drop the widget from the left panel to the right panel.
To remove the widget: drag the widget back to the left panel (Available Widgets panel). If you want to keep the widget setting for future use, drag it to the Inactive Widgets instead of the Available Widgets panel. It will save your widget settings. To retrieve the widget, drag the widget from Inactive Widgets panel instead of the Available Widgets panel.
Go to WP Admin > Themify > Skins, select a skin by clicking on the thumbnail and click Save.
Styling The Theme
To style the theme frontend appearance:
Go to WP Admin > Appearance > Customize.
It will take you to the Customize panel with live preview where you can style the appearance of the theme design (ie. color, background, font, spacing, border, etc.).
FYI: Refer to Customize documentation for more info.
Footer Widgets
To set the Footer Widget column layout, go to WP Admin > Themify > Settings > Theme Settings.
To drop the widgets in the Footer Widgets, go to WP Admin > Appearance > Widgets.
Footer Text
To replace the footer credit links:
Go to WP Admin > Themify > Settings > Theme Settings and enter the footer text.
HTML tags are allowed in the Footer Text.
To have empty footer text, tick the hide footer text checkbox.
FAQs
How to rename the Event post type slug
As an example, to reaname the 'event' slug to 'myevent', you would:
First create a child theme by following this tutorial.
Then add the following code snippet in the child theme functions.php file.
After activating the child theme, then go to WP-admin > Settings > Permalinks and click save button (this will refresh the event slug setting).
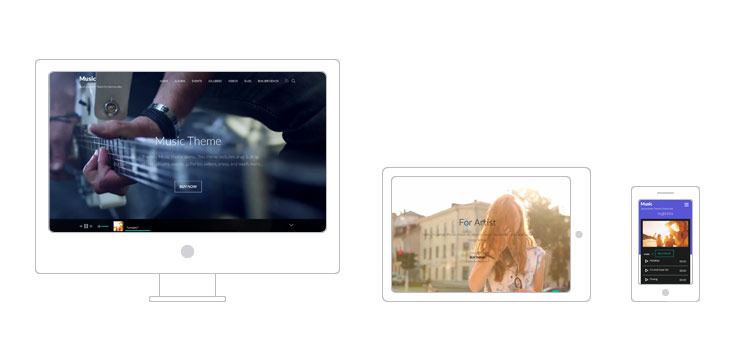
Exciting news from the Themify camp: we'd like to introduce Music, a theme with artists, musicians, managers, and app developers in mind. Responsive and retina ready, Music introduces fullwidth video backgrounds, embedded music players, and a slick design right out of the box.
In addition, we've been working on some behind-the-scenes projects in tandem with the Music theme: Builder and Themify panels have been completely redesigned, now including a Customize panel which allows for customization of the theme with a live preview from the frontend! Builder is also coming with new features like the aforementioned fullwidth video background, pre-designed Layouts, and a new feature called Layout Parts.
Music Theme
Music is a theme that brings art to life. Built for artists, musicians, and anything related to music, Music is responsive and retina ready out of the box. We've jam-packed it full of much-requested features (like fullwidth video backgrounds) and made the Builder more powerful to make it even easier to create truly unique and beautiful websites.
To install the plugin, you can use the standard plugin upload function provided by WordPress by following these steps:
First, you will need to download the plugin files from the member area on the Themify site.
Note: Some browsers (e.g. Safari) may auto-extract ZIP files. Right-clicking on the download link and selecting "Save Linked File As" will allow you to download the ZIP version.
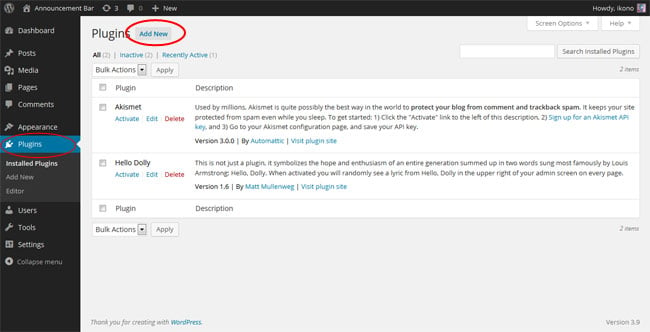
Once you have the ZIP file correctly saved, login to your site's admin dashboard and go to Plugins.
On this screen, you will want to select the "Add New" button, which will then take you to the plugin installation page.
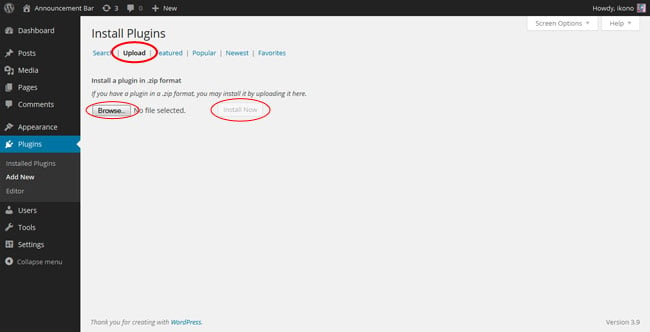
On this page, you will need to select the "Upload" tab.
Now, select the "Browse" button and use the file window to navigate to where you saved the plugin ZIP file and select it.
Following this, select the "Install Now" button.
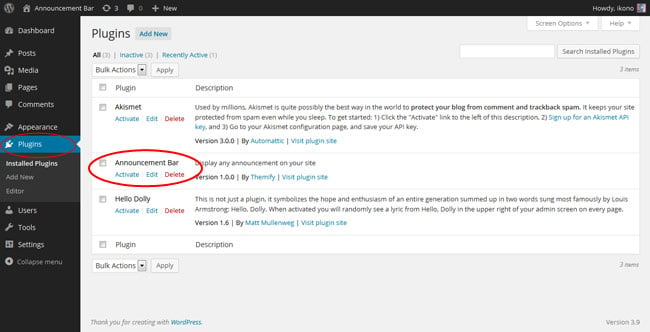
Activating the Plugin
Once the plugin is installed, you will then need to activate it before you have access to the features of the plugin.
To do this, please follow these steps:
First, go back to the main Plugins page.
Here you should see the Announcement Bar plugin in the list of installed plugins.
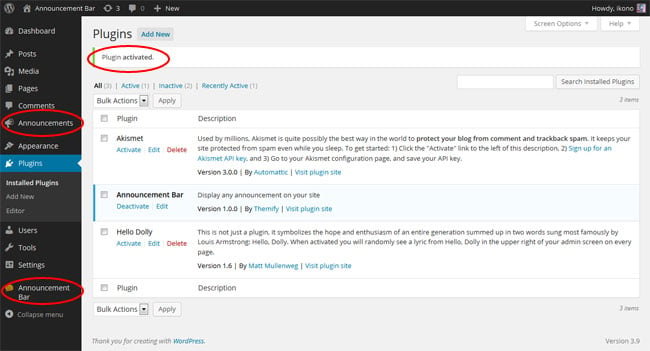
Select "Activate" underneath the plugin's name.
The plugin will now activate and you should see a message stating the successful activation, along with the new menu options for the Announcement Bar plugin in your dashboard.
Announcement Posts
The heart of the Announcement Bar plugin's backend functionality is built around a new custom post type named "Announcement Posts," and these posts are used by the plugin to create the output that will be seen by your users in the announcement bar itself.
Announcement posts can be given a title, content, and categorized, as with any other post type within WordPress, and the plugin also offers a wide range of options to customize the appearance of each individual announcement post.
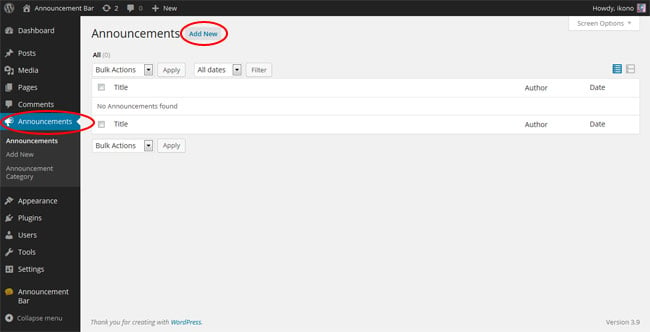
Creating an Announcement Post
To create an announcement post, please follow these steps:
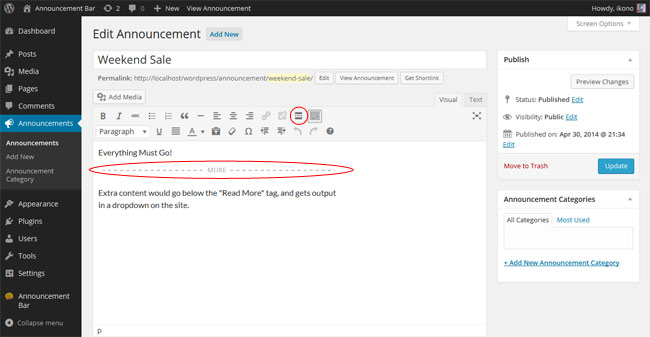
First, navigate to the Announcements section of your WordPress dashboard and then select "Add New"
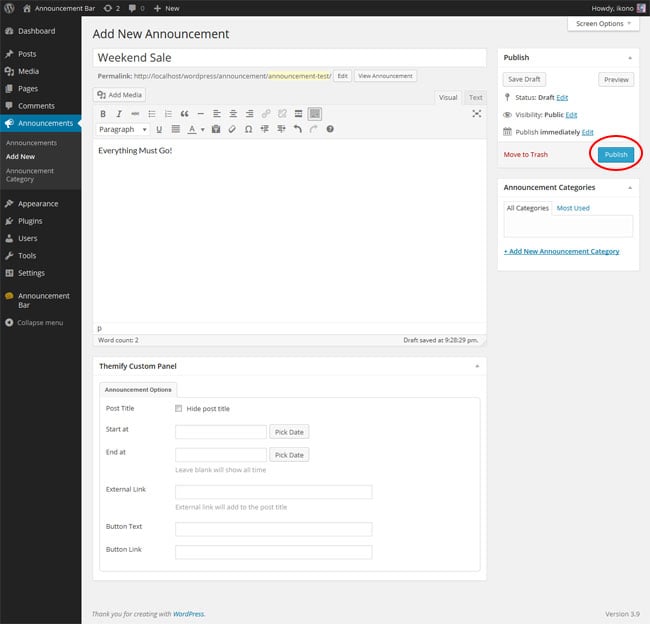
Once this is done, you will be presented with the new post page, and here you can give the announcement post a title and content as required.
When you are done creating the content of the post, you can hit "Publish" and the announcement post will be published on the site, and depending on your settings the announcement bar will then be shown on the page.
You can also make use of the "Read More" tag in your announcement posts to create a "read more" link within the announcement bar, this will then allow you to add extra content which will be shown in a dropdown when this link is clicked, and allows support for content created with the Themify Builder.
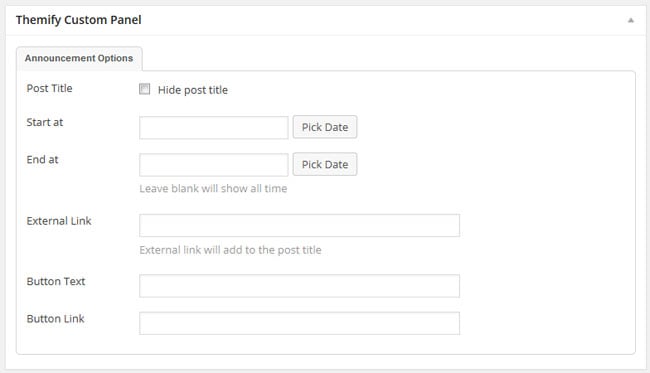
Customizing an Announcement Post
The Announcement Bar plugin offers a number of options for announcement posts which allow you to customise how those posts will be displayed in the announcement bar.
Options are as follows:
Post Title = This options allows you to set whether the post title will be displayed in the announcement bar or not.
Start at = This option sets a date/time when the announcement post will begin being displayed in the announcement bar on the site.
End at = This option sets a date/time for the announcement post to stop being displayed in the announcement bar.
External Link = This option can be used to set a link for the title of the announcement post to point to.
Button Text = This option sets the text for a call to action button which will be displayed along with the announcement post in the announcement bar.
Button Link = This options sets the link to be used for the call to action button.
Announcement Bar Settings
The announcement bar forms the core of what the user will see on the frontend when using the Announcement Bar plugin, it is set up to allow you to display any of the announcement posts you have created and customize how they are displayed, which posts are displayed, etc.
The announcement bar itself can also then be customized to cater its appearance and behaviour to your needs.
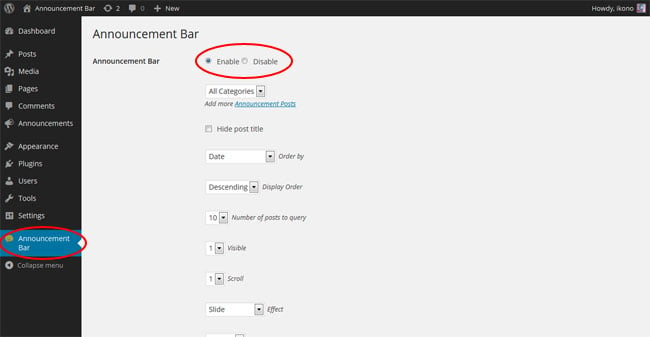
Displaying the Announcement Bar
The announcement bar is automatically displayed on the site whenever there are active announcement posts published, unless it is disabled from the Announcement Bar options panel.
To switch the announcement bar between being enabled or disabled, please follow these steps:
Firstly, navigate to the Announcement Bar section in the WordPress admin dashboard.
The Announcement Bar Enable/Disable toggle option here will determine whether or not the announcement bar is displayed on your site.
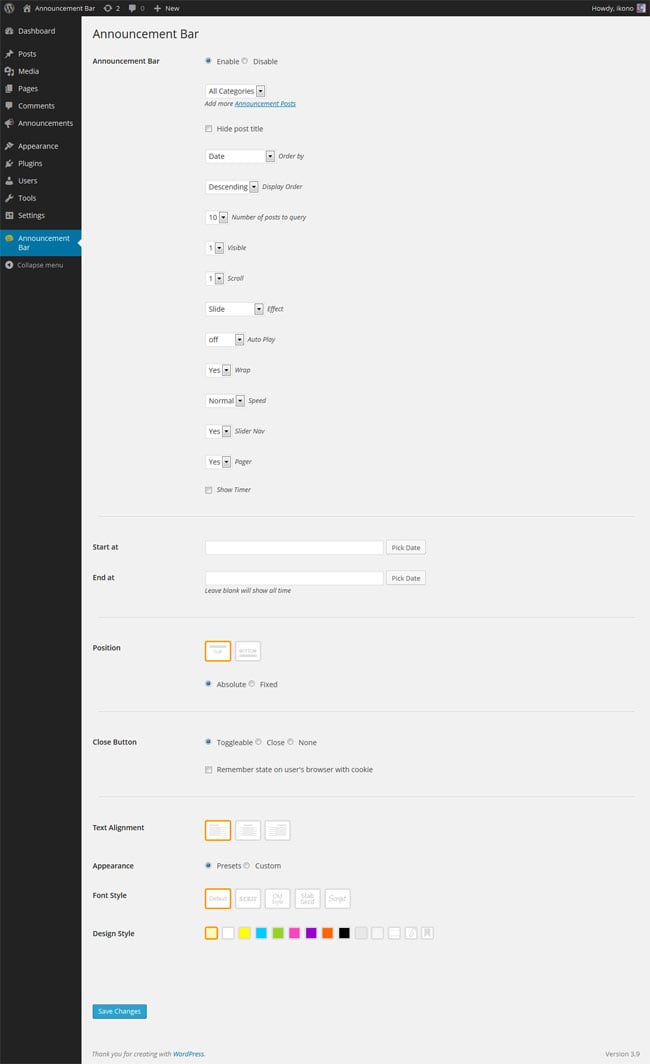
Customizing the Announcement Bar
To customize the display of the announcement bar please follow these steps:
Navigate to the Announcement Bar section in the WordPress admin dashboard.
Here you will find a number of options to customize your announcement bar in terms of both appearance and behaviour.
Options are as follows:
Enable/Disable = Allows you to toggle whether the announcement bar is shown by default on the site when announcement posts are present.
Category = This sets the category of announcement posts that the announcement will display by default.
Hide post title = This sets whether the titles for announcement posts are shown by default or not.
Order by = This option is used to set what data the announcement posts are ordered by (e.g. date, title, random, etc.)
Display Order = This sets the ordering for the announcement posts between ascending or descending order.
Number of posts to query = This sets the maximum number of announcement posts to be displayed in the announcement bar by default.
Visible = This option sets the number of announcement posts that will be displayed at once in the announcement bar.
Scroll = This sets how many announcement posts will be scrolled through when the announcement bar switches which posts are displayed.
Effect = This sets the effect used when scrolling to new announcement posts in the announcement bar.
Speed = This option will set the speed at which the scrolling takes place in the announcement bar.
Slider Nav = This sets whether navigation arrows will be displayed for the announcement bar.
Pager = This sets whether dots will be shown for the pages of the announcement bar.
Show Timer = This option enables the timer display on the announcement bar, which indicates visually when the announcement bar will scroll to new posts.
Start at = This option sets a date/time when the announcement post will begin being displayed in the announcement bar on the site.
End at = This option sets a date/time for the announcement post to stop being displayed in the announcement bar.
Position = Position of the Announcement Bar. Select whether top or bottom.
Absolute = The bar will scroll along the page.
Fixed = The bar will be fixed/sticky (always on top of the page).
Close Button = Close button of the Announcement Bar.
Toggleable = Bar can toggle (collapse/expand)
Close = Close the completely.
None = No close button.
Text Alignment = Text alignment of the announcement posts (left, center, or right alignment).
Appearance = Appearance of the Announcement Bar
Presets = Builtin design presets
Custom = Allows you to customize the font, color, and background (refer to Custom Styling for more details)
Font Style = Choose either: Default, Serif, Old Style, Slab Serif, or Script.
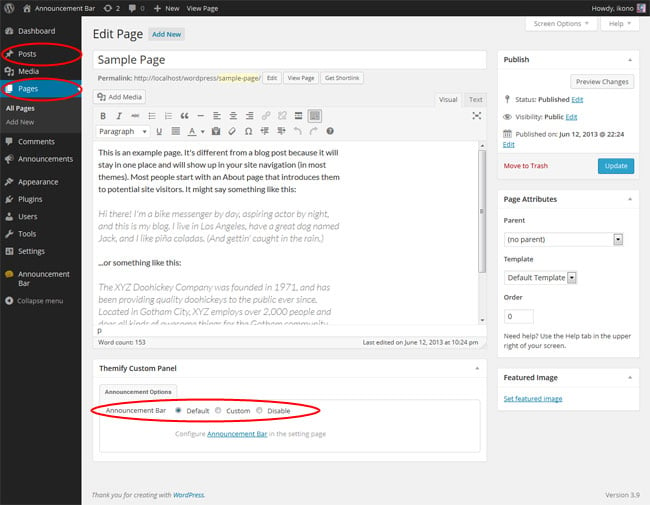
Setting Announcement Bars for Specific Pages/Posts
You can also customize the announcement bar based on individual page or post, changing how they appear and behave, which announcements they show, etc. for each page or post on your site.
To do this, follow these steps:
Navigate to the edit screen for the post or page you intend to set up a custom announcement bar for in the WordPress dashboard, for example under Posts or Pages
Here you can find the Themify Custom Panel which will include an "Announcement Options" tab that allows you to switch between using the default announcement bar, which will use the global options set under the Announcement Bar section, a custom announcement bar with options set specifically for this post/page, or disable it on this post/page entirely.
If you opt to use a custom announcement bar on a post/page, it will allow you to modify the same settings as available in the Announcement Bar section of the WordPress admin dashboard.
Announcement Widget
The Announcement Bar plugin also comes with a widget, which you can use to display announcement posts in other areas, such as your sidebar, or other widgitized areas.
To add the Announcement Bar widget:
Go to wp-admin > Appearance > Widgets
Drop the Announcement Bar widget to any widgetized area as you like
Announcement Shortcode
The Announcement Bar plugin includes a shortcode, which can be used within posts/pages to output announcement posts by simply including the shortcode as needed.
To insert the shortcode, simply type or paste in the shortcode from below to your post/page content. It will show the Announcement Bar with the default settings.
[announcement_bar]
The settings can be changed by adding parameters. The example below will show 3 announcement posts without the title from "promotions" category.
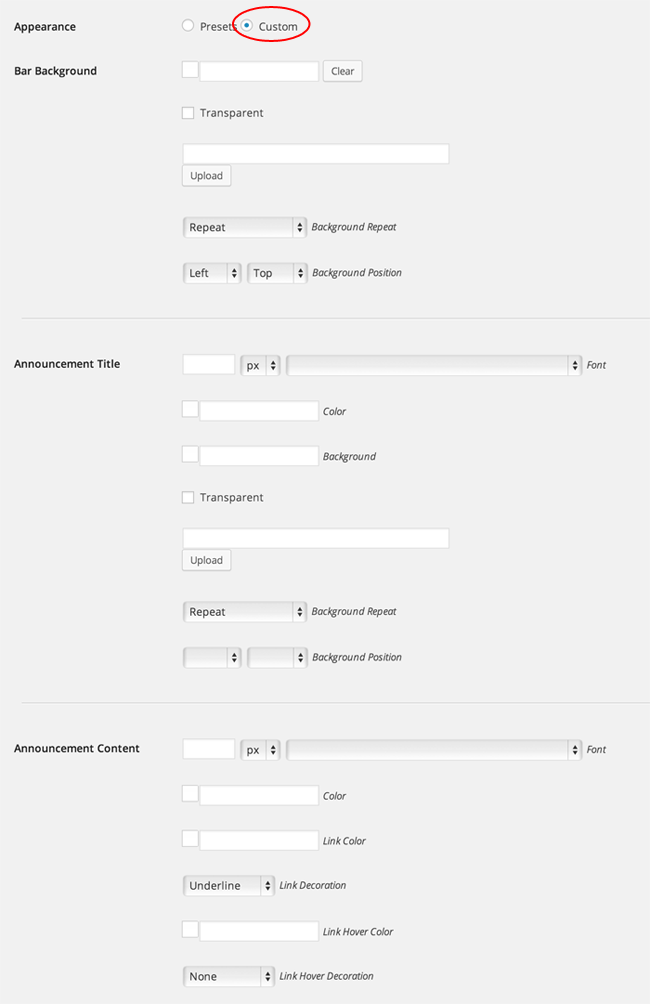
The Annoucement Bar plugin allows you to customize the styling of the announcement bar display both globally and on a per-page/post basis by offering custom styling options.
To apply custom styling: click on "Custom" radio button from the Appearance option. Then you will be able the background, font, color, etc. of the Announcement Bar.
Bar Background = Background of the Announcement Bar.
Announcement Title = The announcement post title on the bar.
Announcement Content = Refers to text/content of the announcement posts.
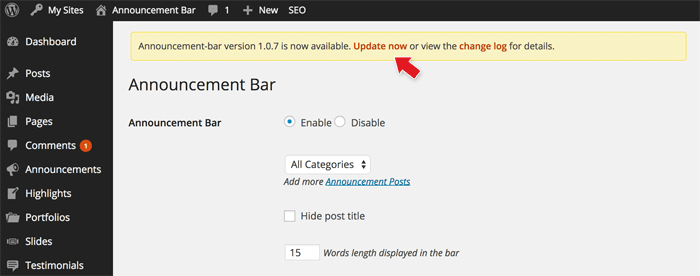
Updating the Plugin
To update the plugin:
Go to the Announcement Bar settings page
If there is a newer version, it will display the update notice at the top. To update, click on "Update now" (note that an active membership is required to update the plugin)
Customize the display of announcements
Sometimes you want better control over on which pages of the website the announcements are displayed, more control that the plugin already provides. For example display announcements in posts with specific categories, or to users with specific user roles, perhaps during special hours in the day. For this you can use the hooks provided by the plugin and control where the announcement shows up:
The above snippet uses Conditional Tags (codex: http://codex.wordpress.org/Conditional_Tags) to check if we're on a single post page where the post is assigned to the "news"category and if so enables the display of the announcements. The condition can be customized for various purposes.
Firefox has strict requirements where the font resides in relation to the website, sometimes this causes issues where the custom fonts on your site are not loaded. To fix that, you need to add the following code in the .htaccess file located in the root of your WordPress installation.
<FilesMatch "\.(ttf|otf|woff)$">
<IfModule mod_headers.c>
        Header set Access-Control-Allow-Origin "*"
</IfModule>
</FilesMatch>
Issue with audio playback
If you're having trouble rewinding or forwarding the audio files on your site, it could mean that the Range headers for the audio file are not setup properly. Click here for more information. You can ask your web hosting provider to fix this issue for you.
Hide header and footer inside lightbox window
In various modules in Builder (eg. Button module), you have the option to open an URL in a lightbox window. If the source URL is using a Themify theme, it will add a class lightboxed to the body tag (in the iframe tag). You can add custom CSS to target the page in the lightbox. For an example, you can hide the header and footer with this custom CSS:
The Themify themes cache all the theme settings in a file, which is, by default located in <theme>/themify/.data directory. This reduces the number of database queries thereby increasing the performance of your website. If your server is setup to sync files for backup, this feature may cause your settings to not be saved as expected. In such a case the caching can be easily turned off by adding this snippet into the wp-config.php file:
<?php

define( 'THEMIFY_SKIP_DATA_CACHE', true );
The location where the theme stores the settings cache can also be changed the same say, to do that:
<?php

define( 'THEMIFY_SETTING_CACHE_DIR', __DIR__ . '/wp-content/uploads/tf_datacache/' ); /* Note that the trailing slash at the end is required. */
This changes the path to the "tf_datacache" folder inside wp-content/uploads. You can then assign permissions or change the rules for file sync for that folder depending on your needs and your setup.
Builder
Change module title tags
Builder by default uses h3 tags for module titles, to change that you can use:
If you want to disable the frontend Builder (without disabling the Builder entirely) you can use the following code in the child theme functions.php file:
By default when screen size gets smaller than 600px, the split scrolling effect is disabled. To change this, you would add this code in a child theme functions.php:
To change the settings of the map displayed on the event post, the "themify_event_map_args" filter can be used. For example, to disable the mouse wheel zoom on the map, you can use:
By default when you click the video post title, it goes to the video single view. You can change the post title link to open video in lightbox by adding the following code in Themify > Settings > General > Footer Code:
<script>
jQuery(function($) {
	$( '.video-multiple .post-title a, .loops-wrapper.video .post-title a' ).click( function(){
		$( this ).closest( '.post' ).find( '.lightbox' ).trigger( 'click' );
		return false;
	} );
} );
</script>
Open album posts in lightbox
Similar as above, to change album post title to open album in lightbox, add the following code in Themify > Settings > General > Footer Code:
<script>
jQuery(function($) {
	$( '.album-multiple .post-title a, .loops-wrapper.album .post-title a' ).click( function(){
		$( this ).closest( '.post' ).find( '.themify-lightbox' ).trigger( 'click' );
		return false;
	} );
} );
</script>
Show past events in event category taxonomy archive
By default only the upcoming events are displayed in the Event category taxonomy pages. To disable this behavior and show all events, you can use:
Switch map and featured image in single event pages
In single event pages, the map is displayed on the right side while the map goes in the background. To switch the position of the map and the featured image, you can use:
The theme by default displays the post meta info (author, comment counts, etc.) on the side of the post. This snippet will them to the bottom of the post:
To install themes with the WordPress theme uploader:
Download the "theme.zip" file from the Member Area
Note: some browsers (eg. Safari) auto extract zip files automatically. Right-click on the download link and select "Save Linked File As". This will allow you to download the theme as a zip file.
Login to your site's WP Admin.
Go to Appearance > Themes.
Click on the "Add New" button, then click on the "Upload Theme" button
Upload the theme.zip file (note: it is the theme.zip, not the theme-psd.zip that you just downloaded from the Member Area).
Activate the theme
FYI: You can also install themes with FTP method. Read the Installing Themes tutorial for more info.
Demo Import
If you are starting a fresh site, importing the demo content will help you understand how the theme demo is built. The Demo Import feature will import the contents (posts, pages, comments, etc.), Themify panel settings, menus, and widgets setup from our demo to your site. You can erase the demo content afterward.
To import the demo setup:
Go to WP Admin > Themify > Settings > Demo Import and click "Import Demo" button.
Note that the featured images will be replaced with an image placeholder for copyright reasons.
To erase the demo setup:
On the Demo Import tab, click on the "Erase Demo" button which will then remove the demo content.
FYI: If the Demo Import does not work on your site, you can use the WP Admin > Tools > Import tool to import the demo content manually.
Site Logo & Tagline
To display a logo image instead of the site name text:
Go to WP Admin > Appearance > Customize > Site Logo and Tagline.
Under "Site Logo", select "Logo Image" radio button.
Upload a logo image.
Specify the logo image width and height.
You can also change website Tagline from here:
Go to WP Admin > Appearance > Customize > Site Logo and Tagline.
Scroll down and under "Site Tagline" select "Text" radio button.
Enter your site Tagline.
Click "Save & Publish".
Main Navigation Menu
To create a custom navigation menu:
Go to WP Admin > Appearance > Menus.
Click on "create a new menu" to create a new menu (eg. Main Menu).
Add the menu items from the left panels.
To create a dropdown menu: drag the menu item towards the right (the item(s) will be indented).
When you are done adding the menu items, click "Save Menu".
To assign menu locations:
Scroll down to the bottom where it says "Theme locations" and tick the menu location checkbox.
Main Navigation = main menu on the header
Footer Navigation = footer menu on the footer (Note: some themes might not have Footer Navigation).
TIPS: You can display menus on sidebar widgets, remove the main menu, create empty links, and lightbox links. Read Custom Menus for more detailed tutorial.
Setting Up the Social Links
Step 1) To set up the social media links:
Go to WP Admin > Themify > Settings > Social Links tab.
The theme comes with some pre-filled social links. Simply enter your social profile URL in the Link input field. For example, enter 'https://twitter.com/themify' for the Twitter link.
You can choose to display either "Icon Font" or "Image".
If "Icon Font" is selected, click on "Insert Icon" to select an icon (over 320+ icons available).
If "Image" is selected, you can upload your own graphic icon by clicking on the Upload button.
To add more links, click on the Add Link button at the bottom.
To remove a link, click on the delete icon.
To arrange the display order, drag and drop the link container.
Step 2) Displaying the Social Links:
Once you have the Social Links setup, go to WP Admin > Appearance > Widgets. Drag and drop the Themify - Social Links from the Available Widgets panel to the Social Widget panel.
Optional: Customize Widget Title - such as "Follow Us". You can also "Show link name" and adjust icon size.
Hiding the RSS Icon
To hide the default RSS icon in the header:
Go to WP Admin > Themify > Settings > Theme Settings.
Under the "Exclude RSS Link", tick the checkbox that says "Check here to exclude RSS icon/button in the header".
Hiding the Search Form
To hide the default search form in the header:
Go to WP Admin > Themify > Settings > Theme Settings.
Under the "Exclude Search Form", tick the checkbox that says "Check here to exclude search form in the header".
Designing Pages with the Builder
Watch the video tutorial below to see how to create the demo homepage with the Builder.
Step 1) To create the demo pages using our Builder as shown on our demo:
In admin, go to Pages > Add New
Enter page title
On Themify Custom Panel:
Sidebar Option = No Sidebar
Content Width = Fullwidth
Hide Page Title = Yes
On Discussion panel, uncheck "Allow comments" to disable comments on this page
Publish the page and click "View Page" to view the page on frontend
Step 2) Using the Builder to construct the page content and layout:
From top admin bar: select Themify Builder > Turn On Builder
First row:
To start: drop in a Text module on the first row and enter [themify_event_posts] to show the Event posts
To customize the row: hover the menu icon located on top-left of the row > select Options
In the row options: specify the background color, font color and link color as you like
Second row:
Now drop another Text module on the second row, enter a heading text (h2) as you like and insert a [themify_video_posts] shortcode to display the Video posts
Again, in row > options: specify the background color and font color as you like
Third row:
On the third row: drop in another Text module, enter a [themify_gallery_posts] shortcode to display the Gallery posts
In the row > options: specify the background color and font color as you like
Fourth row:
On the fourth row: drop in a Text module, enter a heading text (h2) as you like and insert a[themify_event_posts] shortcode to display the Event posts
In the row > options: select Row Width = fullwidth and then specify the background color and font color as you like
Fifth row:
Similar to the above step: drop in another Text module, enter the headings (h2 and h3 text) as you like and insert a [themify_video_posts] shortcode to display the Video posts
In the row > options: select Row Width = fullwidth and then specify the background color and font color as you like
Sixth row:
Drop in a Text module, enter the headings (h2 and h3 text) as you like and insert a few [button] shortcodes
In the row > options: specify the background color and font color as you like
Save: don't forget to save the Builder when you are done with each step.
Tips: in the row options, you can upload a parallax scrolling background image, video background, or insert a gallery slider.
FYI: There are more features available in the Builder. Please refer to the Builder documentation for more info.
ScrollTo Row Anchor Menu (Single-Page Menu)
To achieve scrollTo row anchor:
Step 1) First enter the Row Anchor name in Builder > Row > Options (e.g. "portfolio").
Step 2) Then in the WordPress menu link (WP Admin > Appearance > Menu), insert the anchor name as link URL = "#portfolio" (basically add # in front of the anchor name).
Step 3) On the page where you want to have the single page menu, select the menu in Themify Custom Panel (the Themify Custom Panel is located below the content editor when you add/edit the page).
Result: When the #portfolio link is clicked or when users go the URL with the #portfolio anchor (eg. http://yoursite.com#portfolio), it will scroll to the row where it specified Row Anchor = "portfolio".
Full Height Builder Row
Full height row will set the height of the row in 100% viewport height and the row content will automatically align in the middle vertically.
You can set any page as the front (home) page. This means you can use the Builder to design the page and assign it as the front page. To set the Front Page:
Go to WP Admin > Settings > Reading
Select the "A static page (select below)" option and then select a "Front page"
Leave the "Posts page" default. If you want to create a custom Blog page, read this tutorial instead of setting the "Posts page".
Custom Page Menu
This theme allows you to assign a custom menu in the Main Navigation Menu of each individual page. Remember that this custom menu option is only available in Pages (not Posts).
To set custom Page menu:
First, make sure you have created the menu in Appearance > Menus
Then add or edit any page where you want to have a custom menu
In the Themify Custom Panel, under the "Custom Menu", select a menu from the dropdown
Event Post Type
Event posts are designed to handle the events you intend to display on your site and can be used by being output via shortcode from within post/page content or Builder modules, queried from pages, or by using the "Themify - Event Posts" widget.
Event posts will automatically be flagged as upcoming or past events based on their start and end date/time when output with the shortcode.
Adding Event Posts:
To create an Event post, select "Add New" under the "Events" admin menu.
You can provide a title and description content using the standard WordPress edit page, and further customization options are available in the Themify Custom Panel.
Sidebar Option = This option is used to set the display of the sidebar or disable it entirely.
Featured Image = This option is used to set the featured image for the portfolio post. You can upload or use an image from the media library.
Image Dimensions = This option is used to set the dimensions the portfolio images will be displayed at.
Event Starts On = This option sets the start date/time for the event.
Event Ends On = This option sets the end date/time for the event.
Location = This option sets the name for the location of the event.
Map Address = This option sets the map location to be used on the event page.
Buy Ticket Link = This option sets the link to be used to buy tickets for the event.
Video URL = This option is used to set a video to be used in place of the featured image, and can use links from services such as YouTube, Vimeo, etc.
External Link This option is used to link the post featured image and title to a custom URL.
Lightbox Link This option is used to link the post featured image and title to open a URL in a lightbox. This defaults to expecting an image URL.
iFrame URL If checked this will open the URL as an iFrame within the lightbox, this can be used to open external URLs such as other pages or sites.
Add zoom icon on lightbox link This option sets whether a zoom icon will be shown on the featured image when set to a lightbox link.
Custom Menu = This option sets the menu to be shown when accessing the post.
Background = This option sets the background of the featured area at the top of the post's single view.
Background Repeat = This option sets the repeat option for the background of the featured area.
Displaying Event Posts via Widget:
The Event posts can be displayed in sidebars, footer, or other widget areas using the "Themify - Event Posts" widget provided by the theme, which will output the events based on the options selected in the widget panel.
Title = This option is used to set the title of the widget.
Category = This option is used to set which category to show upcoming event posts from. Defaults to all categories.
Show [X] posts = This option is used to set the number of posts to be shown in the widget.
Hide post title = This option determines whether to hide the post titles.
Display post thumbnail = This option sets whether to show the featured image thumbnails.
Thumbnail size = This option sets the dimensions for the featured image thumbnails.
Hide event meta = This option will hide the post meta from the widget.
Hide event date = This option will hide the event date from the widget.
Hide event location = This option will hide the event location from the widget.
Displaying Event Posts via Query Page:
The Event posts can be displayed on pages by using the "Query Events" tab provided in the Themify Custom Panel when adding/editing pages under WP Admin > Pages, the options in this tab will determine the event posts which will be queried and displayed on the page.
Event Category = This option is used to set which category to show event posts from.
Order = This option is used to set the order of the posts between ascendent or descendent order.
Order By = This option is used to set the attribute that posts will be ordered based on.
Event Layout = This option sets the layout of how event posts will be organised on the page.
Events Per Page = This option sets how many posts will be displayed per page.
Display Content = This option sets how much of a post's content will be displayed from full content, excerpt, to none.
Image Dimensions = This option is used to set the dimensions the featured images will be displayed at.
Hide Event Title = This option will set whether to hide the event title.
Unlink Event Title = This option will set whether to remove the link from the event titles.
Hide Event Date = This option will set whether to hide the event dates.
Hide Event Meta = This option will set whether to hide the event meta information.
Hide Featured Image = This option will set whether to hide the featured images.
Unlink Featured Image = This option will set whether to remove the link from the featured images.
Hide Page Navigation = This option will remove the navigation controls for switching between pages of posts.
Hide Event Location = This option will set whether to hide the event location.
Displaying Event Posts via Shortcode:
The Event posts can be displayed using the [themify_event_posts] shortcode provided by the theme, which will output the events along with the option of displaying tabs to categorize them into upcoming and past events based on date/time.
= display 4 event posts in a slider without meta data
Available parameters:
style = sets the layout style for the post output (list-post, grid4, grid3, grid2, and slider, default = grid4). You may also add custom css classes in here by simply adding their name (eg. style="grid4 custom-class")
event_date = sets whether to display the event date (yes, no, default = yes)
event_location = sets whether to display the event's location (yes, no, default = yes)
event_tab = sets whether to output the tabs for upcoming and past event categorization (yes, no, default = yes). When tabs are disabled, by default only upcoming events will be displayed, to show the past events you can use the past_events="yes" parameter.
past_events = whether to show past events, if you only want to show past events you can set this to "yes", and set the "event_tab" parameter to "no". (yes, no, default = yes)
past_event_order = post order of the past events in either ascending (ASC) or descending (DESC) order (ASC or DESC, default is ASC)
limit = sets the number of posts to be shown (default = 5) Set to -1 to show all posts (eg. limit=-1)
category = sets the category of posts to be shown based on ID or text slug (default = all categories) You can exclude categories using the minus sign and ID (eg. category=-1 will exclude the category with ID 1) To find category ID number or text slug: click on "Event Categories" link located under the "Events" admin menu
image = sets whether to display the featured image (yes, no, default = yes)
image_w = sets the featured image width (default 240px)
image_h = sets the featured image height (default 180px)
title = sets whether to display the post title (yes, no, default = yes)
display = sets whether to show full contents of post, an excerpt or no content (content, excerpt, none, default = none)
post_meta = sets whether to display post meta and post stat icons, such as view, comment, and share counts (yes, no, default = no)
more_text = sets the text that will appear in the read more link for the post
order = sets whether the output will use ascendent or descendent order (ASC, DESC, default = DESC)
orderby = criteria used to order posts (event_date, author, comment_count, date, menu_order, rand, title, default = date)
unlink_image = sets whether to remove the link on the post featured image (yes, no, default = no)
unlink_title = sets whether to remove the link on the post title (yes, no, default = no)
Managing "Buy Event Ticket"
You can use event management services like Ticketmaster or Evenbrite to manage the commercial events (ie. create an event with them and then insert the event URL in the "Buy Ticket Link" of the Themify Custom Panel in the Event post type backend).
If you prefer to use a WordPress plugin, you may use Easy Digital Downloads with the Event Tickets extension. First create a product (the plugin refers as "Downloads") with the Easy Digital Downloads plugin, then insert the product direct buy URL in the "Buy Ticket Link" field.
Gallery Post Type
Gallery posts are designed to show galleries on your site and can be used by being output via shortcode from within post/page content or Builder modules, or queried from pages.
Adding Gallery Posts:
To create a Gallery post, select "Add New" under the "Galleries" admin menu.
You can provide a title and description content using the standard WordPress edit page, and further customization options are available in the Themify Custom Panel.
Sidebar Option = This option is used to set the display of the sidebar or disable it entirely.
Content Width = This option sets the maximum width of the post content.
Gallery = This option is used to create the image gallery that will be displayed. You can manually enter a gallery shortcode or use the "Insert Gallery" link to use WordPress' media panel.
Featured Image = This option is used to set the featured image for the portfolio post. You can upload or use an image from the media library.
Image Dimensions = This option is used to set the dimensions the portfolio images will be displayed at.
Video URL = This option is used to set a video to be used in place of the featured image, and can use links from services such as YouTube, Vimeo, etc.
External Link This option is used to link the post featured image and title to a custom URL.
Lightbox Link This option is used to link the post featured image and title to open a URL in a lightbox. This defaults to expecting an image URL.
iFrame URL If checked this will open the URL as an iFrame within the lightbox, this can be used to open external URLs such as other pages or sites.
Add zoom icon on lightbox link This option sets whether a zoom icon will be shown on the featured image when set to a lightbox link.
Custom Menu = This option sets the menu to be shown when accessing the post.
Background = This option sets the background of the featured area at the top of the post's single view.
Background Repeat = This option sets the repeat option for the background of the featured area.
Displaying Gallery Posts via Query Page:
The Gallery posts can be displayed on pages by using the "Query Galleries" tab provided in the Themify Custom Panel when adding/editing pages under WP Admin > Pages, the options in this tab will determine the gallery posts which will be queried and displayed on the page.
Gallery Category = This option is used to set which category to show gallery posts from.
Order = This option is used to set the order of the posts between ascendent or descendent order.
Order By = This option is used to set the attribute that posts will be ordered based on.
Gallery Layout = This option sets the layout of how gallery posts will be organised on the page.
Galleries Per Page = This option sets how many posts will be displayed per page.
Display Content = This option sets how much of a post's content will be displayed from full content, excerpt, to none.
Image Dimensions = This option is used to set the dimensions the featured images will be displayed at.
Hide Gallery Title = This option will set whether to hide the post titles.
Unlink Gallery Title = This option will set whether to remove the link from the post titles.
Hide Gallery Date = This option will set whether to hide the post dates.
Hide Gallery Meta = This option will set whether to hide the post meta information.
Hide Featured Image = This option will set whether to hide the featured images.
Unlink Featured Image = This option will set whether to remove the link from the featured images.
Hide Page Navigation = This option will remove the navigation controls for switching between pages of posts.
Displaying Gallery Posts via Shortcode:
The Gallery posts can be displayed using the [themify_gallery_posts] shortcode provided by the theme, which will output the galleries based on the options set in the shortcode.
= display 4 gallery posts in a slider without meta data and date
Available parameters:
style = sets the layout style for the post output (list-post, grid4, grid3, grid2, and slider, default = grid4). You may also add custom css classes in here by simply adding their name (eg. style="grid4 custom-class")
limit = sets the number of posts to be shown (default = 5) Set to -1 to show all posts (eg. limit=-1)
category = sets the category of posts to be shown based on ID or text slug (default = all categories) You can exclude categories using the minus sign and ID (eg. category=-1 will exclude the category with ID 1) To find category ID number or text slug: click on "Gallery Categories" link located under the "Galleries" admin menu
image = sets whether to display the featured image (yes, no, default = yes)
image_w = sets the featured image width (default 240px)
image_h = sets the featured image height (default 180px)
title = sets whether to display the post title (yes, no, default = yes)
display = sets whether to show full contents of post, an excerpt or no content (content, excerpt, none, default = none)
post_meta = sets whether to display post meta and post stat icons, such as view, comment, and share counts (yes, no, default = no)
more_text = sets the text that will appear in the read more link for the post
order = sets whether the output will use ascendent or descendent order (ASC, DESC, default = DESC)
orderby = criteria used to order posts (author, comment_count, date, menu_order, rand, title, default = date)
unlink_image = sets whether to remove the link on the post featured image (yes, no, default = no)
unlink_title = sets whether to remove the link on the post title (yes, no, default = no)
Video Post Type
Video posts are designed to show video content on your site, supporting both embedded videos or self-hosted, and can be used by being output via shortcode from within post/page content or Builder modules, or queried from pages.
Adding Video Posts:
To create a Video post, select "Add New" under the "Videos" admin menu.
You can provide a title and description content using the standard WordPress edit page, and further customization options are available in the Themify Custom Panel.
Sidebar Option = This option is used to set the display of the sidebar or disable it entirely.
Content Width = This option sets the maximum width of the post content.
Video = This option sets the type of video you will be using, whether an embedded service such as YouTube, or self-hosted video files.
Video URL = This option sets the URL of the video file to use.
Featured Image = This option is used to set the featured image for the portfolio post. You can upload or use an image from the media library.
Image Dimensions = This option is used to set the dimensions the portfolio images will be displayed at.
External Link This option is used to link the post featured image and title to a custom URL.
Lightbox Link This option is used to link the post featured image and title to open a URL in a lightbox. This defaults to expecting an image URL.
iFrame URL If checked this will open the URL as an iFrame within the lightbox, this can be used to open external URLs such as other pages or sites.
Add zoom icon on lightbox link This option sets whether a zoom icon will be shown on the featured image when set to a lightbox link.
Custom Menu = This option sets the menu to be shown when accessing the post.
Background = This option sets the background of the featured area at the top of the post's single view.
Background Repeat = This option sets the repeat option for the background of the featured area.
Displaying Video Posts via Query Page:
The Video posts can be displayed on pages by using the "Query Videos" tab provided in the Themify Custom Panel when adding/editing pages under WP Admin > Pages, the options in this tab will determine the video posts which will be queried and displayed on the page.
Video Category = This option is used to set which category to show video posts from.
Order = This option is used to set the order of the posts between ascendent or descendent order.
Order By = This option is used to set the attribute that posts will be ordered based on.
Video Layout = This option sets the layout of how gallery posts will be organised on the page.
Videos Per Page = This option sets how many posts will be displayed per page.
Display Content = This option sets how much of a post's content will be displayed from full content, excerpt, to none.
Image Dimensions = This option is used to set the dimensions the featured images will be displayed at.
Hide Video Title = This option will set whether to hide the post titles.
Unlink Video Title = This option will set whether to remove the link from the post titles.
Hide Video Date = This option will set whether to hide the post dates.
Hide Video Meta = This option will set whether to hide the post meta information.
Hide Featured Image = This option will set whether to hide the featured images.
Unlink Featured Image = This option will set whether to remove the link from the featured images.
Hide Page Navigation = This option will remove the navigation controls for switching between pages of posts.
Displaying Video Posts via Shortcode:
The Video posts can be displayed using the [themify_video_posts] shortcode provided by the theme, which will output the videos based on the options set in the shortcode.
= display 6 video posts in a slider without meta data or date
Available parameters:
style = sets the layout style for the post output (list-post, grid4, grid3, grid2, and slider, default = grid4). You may also add custom css classes in here by simply adding their name (eg. style="grid4 custom-class")
limit = sets the number of posts to be shown (default = 5) Set to -1 to show all posts (eg. limit=-1)
category = sets the category of posts to be shown based on ID or text slug (default = all categories) You can exclude categories using the minus sign and ID (eg. category=-1 will exclude the category with ID 1) To find category ID number or text slug: click on "Video Categories" link located under the "Videos" admin menu
image = sets whether to display the featured image (yes, no, default = yes)
image_w = sets the featured image width (default 240px)
image_h = sets the featured image height (default 180px)
title = sets whether to display the post title (yes, no, default = yes)
display = sets whether to show full contents of post, an excerpt or no content (content, excerpt, none, default = none)
post_meta = sets whether to display post meta and post stat icons, such as view, comment, and share counts (yes, no, default = no)
more_text = sets the text that will appear in the read more link for the post
order = sets whether the output will use ascendent or descendent order (ASC, DESC, default = DESC)
orderby = criteria used to order posts (author, comment_count, date, menu_order, rand, title, default = date)
unlink_image = sets whether to remove the link on the post featured image (yes, no, default = no)
unlink_title = sets whether to remove the link on the post title (yes, no, default = no)
auto = sets slider auto play in seconds (number of seconds or off, default = 4)
speed = sets animation speed in milliseconds (default = 500)
wrap = wrap the slides so it will loop back to the first item (yes, no, default = yes)
slider_nav = show slider navigation (yes, no, default = yes)
Setting Default Post and Page Layouts
Generally, the theme works out of the box. All the sidebar options and image dimensions are pre-defined in the theme. If you need to change the default sidebar options, featured image dimensions, content/except display, post meta, etc., it can be done in the WP Admin > Themify > Settings > Default Layouts.
There are three default layout options under Themify > Settings > Default Layouts:
Archive Sidebar Option: refers to the default home page, category, search, archive, tag pages, etc.
Default Post Layout: is the post page direct URL (also known as "Single Post").
First, create a new Page (go to WP Admin > Pages > Add New), name it "Blog" or any page title as you want.
View the page on the frontend, click "Turn On Builder".
Drop in a Post module and configure the options as you like.
Setting a Custom Front Page
You can set any page as the front (home) page. This means you can use the Builder to design the page and assign it as the front page. To set the Front Page:
Go to WP Admin > Settings > Reading.
On the Front page displays, select the "A static page (select below)" option and then select a "Front page".
Leave the "Posts page" default. If you want to create a custom Blog page, read this tutorial instead of setting the "Posts page".
Adding Widgets
To add widgets to widgetized areas (eg. sidebar and footer widgets):
Go to WP Admin > Appearance > Widgets.
The big panel on the left side shows all available widgets. The small panels on the right are the widgetized areas.
To add a widget: drag and drop the widget from the left panel to the right panel.
To remove the widget: drag the widget back to the left panel (Available Widgets panel). If you want to keep the widget setting for future use, drag it to the Inactive Widgets instead of the Available Widgets panel. It will save your widget settings. To retrieve the widget, drag the widget from Inactive Widgets panel instead of the Available Widgets panel.
Go to WP Admin > Themify > Skins, select a skin by clicking on the thumbnail and click Save.
Styling The Theme
To style the theme frontend appearance:
Go to WP Admin > Appearance > Customize.
It will take you to the Customize panel with live preview where you can style the appearance of the theme design (ie. color, background, font, spacing, border, etc.).
FYI: Refer to Customize documentation for more info.
Footer Widgets
To set the Footer Widget column layout, go to WP Admin > Themify > Settings > Theme Settings.
To drop the widgets in the Footer Widgets, go to WP Admin > Appearance > Widgets.
Footer Text
To replace the footer credit links:
Go to WP Admin > Themify > Settings > Theme Settings and enter the footer text.
HTML tags are allowed in the Footer Text.
To have empty footer text, tick the hide footer text checkbox.
FAQ
Disabling the Event post type
If you wish to use a third party plugin to manage the events on your website you may need to disable the Event post type that is included in the theme. To achieve this first create a child theme, then add this to the child theme's functions.php file: